关于训练深度学习模型deepNN时,训练精度维持固定值,模型不收敛的解决办法(tensorflow实现)
一、背景
最近一直在做人脸表情的识别,用到的程序是之间的一篇文章中的程序:深度学习(一)——deepNN模型实现摄像头实时识别人脸表情(C++和python3.6混合编程)。这里我只进行了简单的程序修改。
由于该程序是利用fer2013数据集做的,效果不是很好,人脸表情的识别精度仅有70%左右,因此我想自己制作数据集,自己训练模型,关于如何制作数据集,可参考文章:从零开始制作人脸表情的数据集。
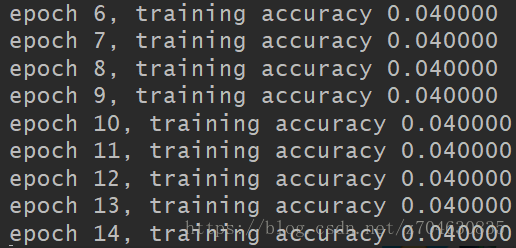
本文主要介绍在训练模型的过程中出现的问题:即无论训练多少次,其训练精度一直维持在0.23。下面会具体介绍问题及解决办法。
二、问题出现
这里先给出我的代码。首先是关于数据读取的代码,这里给出关键部分代码:
def load_data(txt_dir):

    # 省略内容:根据txt的路径读取图像数据和标签

    data_set = np.empty((count, 128, 128, 1), dtype="float32")    # 定义data_set
    label = np.empty((count,10), dtype="uint8")        # 定义label

    # 省略内容:读取data和标签

    return data_set, label
然后是deepNN模型的代码,这个完全参考之前的程序,只不过我的图像大小改成了128*128,表情种类为10类:
def deepnn(x):
    x_image = tf.reshape(x, [-1, 128, 128, 1])

    # conv1
    w_conv1 = weight_variables([5, 5, 1, 64])
    b_conv1 = bias_variable([64])
    h_conv1 = tf.nn.relu(conv2d(x_image, w_conv1) + b_conv1)
    h_pool1 = maxpool(h_conv1)
    norm1 = tf.nn.lrn(h_pool1, 4, bias=1.0, alpha=0.001 / 9.0, beta=0.75)

    # conv2
    w_conv2 = weight_variables([3, 3, 64, 64])
    b_conv2 = bias_variable([64])
    h_conv2 = tf.nn.relu(conv2d(norm1, w_conv2) + b_conv2)
    norm2 = tf.nn.lrn(h_conv2, 4, bias=1.0, alpha=0.001 / 9.0, beta=0.75)
    h_pool2 = maxpool(norm2)

    # Fully connected layer
    w_fc1 = weight_variables([32 * 32 * 64, 384])
    b_fc1 = bias_variable([384])
    h_conv3_flat = tf.reshape(h_pool2, [-1, 32 * 32 * 64])
    h_fc1 = tf.nn.relu(tf.matmul(h_conv3_flat, w_fc1) + b_fc1)

    # Fully connected layer
    w_fc2 = weight_variables([384, 192])
    b_fc2 = bias_variable([192])
    h_fc2 = tf.matmul(h_fc1, w_fc2) + b_fc2

    # linear
    w_fc3 = weight_variables([192, 10])         # 一共10类
    b_fc3 = bias_variable([10])                 # 一共10类
    y_conv = tf.add(tf.matmul(h_fc2, w_fc3), b_fc3)

    return y_conv


def weight_variables(shape):
    initial = tf.truncated_normal(shape, stddev=0.1)
    return tf.Variable(initial)


def bias_variable(shape):
    initial = tf.constant(0.1, shape=shape)
    return tf.Variable(initial)


def conv2d(x, w):
    return tf.nn.conv2d(x, w, strides=[1, 1, 1, 1], padding='SAME')


def maxpool(x):
    return tf.nn.max_pool(x, ksize=[1, 3, 3, 1],
                            strides=[1, 2, 2, 1], padding='SAME')
最后是训练过程的代码,当然这里我根据我的实际情况对原代码进行了修改:
def train_model():

    # 构建模型----------------------------------------------------------
    x = tf.placeholder(tf.float32, [None, 16384])
    y_ = tf.placeholder(tf.float32, [None, 10])

    y_conv = deepnn(x)

    cross_entropy = tf.reduce_mean(
        tf.nn.softmax_cross_entropy_with_logits(labels=y_, logits=y_conv))
    train_step = tf.train.AdamOptimizer(1e-4).minimize(cross_entropy)
    correct_prediction = tf.equal(tf.argmax(y_conv, 1), tf.argmax(y_, 1))
    accuracy = tf.reduce_mean(tf.cast(correct_prediction, tf.float32))

    # 构建完毕----------------------------------------------------------

    # 读取数据
    data_set, label = load_data('./data/list.txt')
    max_train_epochs = 30001
    batch_size = 100

    # 判断是否存在输出模型的路径,如果不存在,则创建
    if not os.path.exists('./models/emotion_model'):
        os.makedirs('./models/emotion_model')

    with tf.Session() as sess:
        saver = tf.train.Saver()
        sess.run(tf.global_variables_initializer())

        batch_num = int(data_set.shape[0] / batch_size)

        for i in range(max_train_epochs):
            for j in range(batch_num):
                # 制作每一个batch的图像和标签
                train_image = data_set[j * batch_size:j * batch_size + batch_size]
                train_image = train_image.reshape(-1, 128*128)
                train_label = label[j * batch_size:j * batch_size + batch_size]
                train_label = np.reshape(train_label, [-1, 10])

                # 逐个batch训练模型
                train_step.run(feed_dict={x: train_image, y_: train_label})

            # 每训练一个epoch保存一次精度
            if i % 1 == 0:
                train_accuracy = accuracy.eval(feed_dict={
                    x: train_image, y_: train_label})
                print('epoch %d, training accuracy %f' % (i, train_accuracy))

            # 每1000个epoch保存一次模型
            if i % 1000 == 0:
                saver.save(sess, './models/emotion_model', global_step=i + 1)
好了,现在准备好数据之后,直接运行train_model():
if __name__ == '__main__':
    train_model()
如果不出意外,其每行的输出应该是:
epoch DD, training accuracy FFFFF
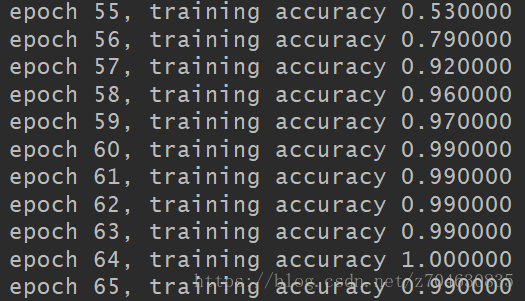
且随着训练次数的增加,training accuracy的值也应该是逐渐接近1的。但是实际上的结果:
training accuracy完全没有任何增加的迹象,训练至1000次仍是这样。
三、问题解决
模型不收敛的话,问题出在哪呢?反复排查后确定了模型没有任何问题。那自然只可能是输入数据的问题了。
原来在数据读取过程中,在load_data(txt_dir)函数中,label语句的定义为:
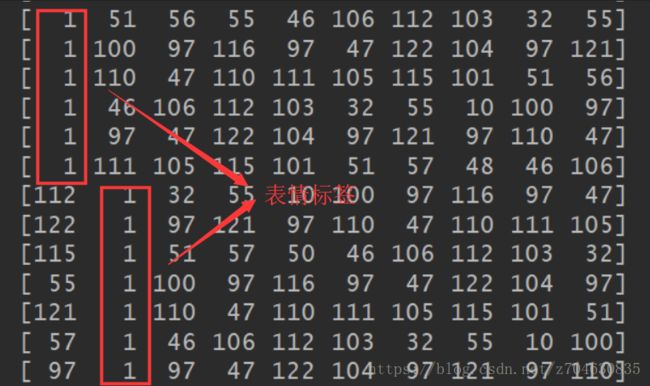
label = np.empty((count,10), dtype="uint8")np.empty()函数导致了label中的很多数据是随机产生的,最终的标签结果也并非是0,1二值数据,而是非常混乱的数据:
既然已经查到问题所在了,那么解决方法也自然就明了了。我们的目的是为了产生二值标签,即图像所属的表情类别标记为1,非所属类别标记为0,如此可这样修改上述代码:
def load_data(txt_dir):

    # 省略内容:根据txt的路径读取图像数据和标签

    # count表示图像的数量
    data_set = np.empty((count, 128, 128, 1), dtype="float32")    # 定义data_set
    label = np.zeros((count,10), dtype="uint8")        # 定义label

    # 省略内容:读取data和标签

    return data_set, label
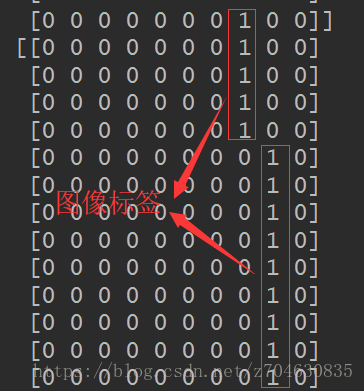
修改之后,先看看我们的标签label是否正确:
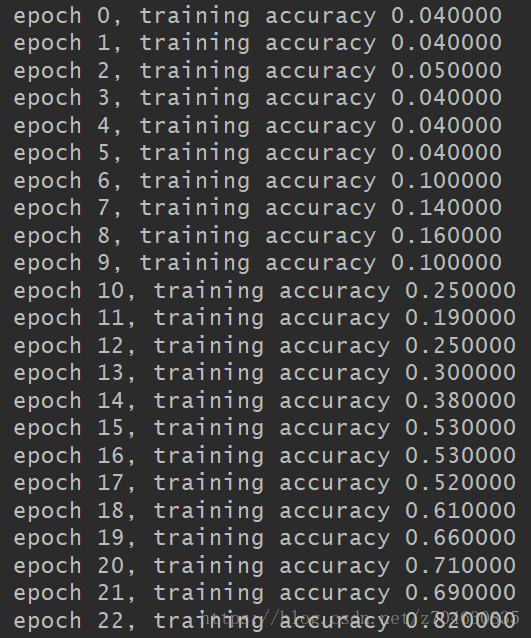
从上图可以看出,label已经完全没有问题,下来我们再看看训练过程中的training accuracy:
好了,可以看到training accuracy在逐步提高,说明这个问题已完美解决。后续大约在训练60个epoch时,训练精度几乎可以接近1:
