ionic2拍照和文件上传
一月之前,我都不知道ionic为何物。突然公司项目主管让我看看ionic,刚开始听到这个消息,非常高兴,终于不用死守一门技术了。结果鼓捣了一段时间,也就是搭建了个环境而已,demo的代码几乎一句都看不懂,在网上东抄抄,西抄抄,也就写了一个界面。这样肯定是不能满足公司的需求的。过了几天,项目主管直接让我用ionic2做一个demo进行演示,下面就是这个小demo。
写这篇博客的目的,一方面相当于自己的笔记,做个小总结,另一方面如果有需要实现该功能的,如果找不到更好的答案,可以看看这个。
1,需要实现的功能
- 简单的界面搭建
- 拍照,并上传到指定服务器
- 从相册选择图片并上传到指定的服务器
- 选择视频并上传
2,搭建界面
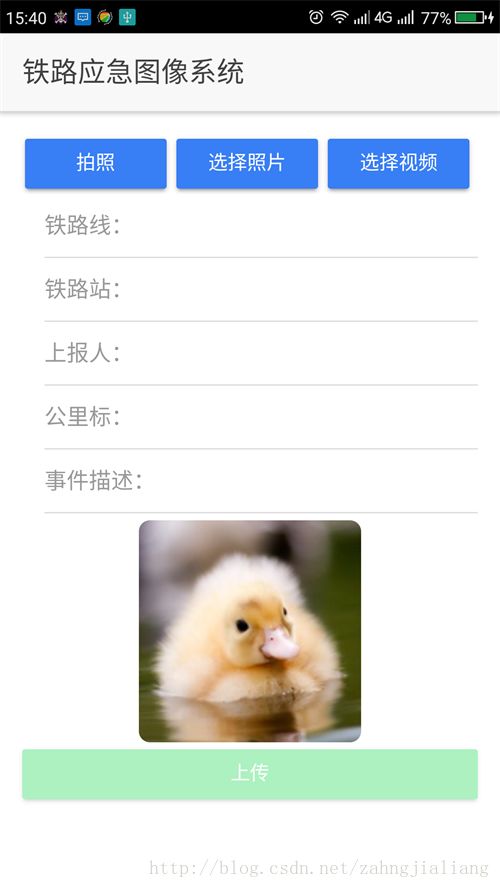
效果图:

界面很简单,三个按钮,几个input表单,一张图片,一个提交的按钮。
因为我连基本得HTML都不怎么懂,所以搭建这个界面也废了一番力气。
下面是界面的代码:
<ion-header class="action-sheets-basic-page">
  <ion-navbar>
    <ion-title>铁路应急图像系统ion-title>
  ion-navbar>

ion-header>

<ion-content padding class="action-sheets-basic-page">
  <button ion-button style=" width: 31%;padding: 0px"  (click)="takePhoto()">
    拍照
  button>
  <button ion-button style="width: 31%;padding: 0px" (click)="choosePhoto()">
    选择照片
  button>
  <button ion-button  style="width: 31%;padding: 0px" (click)="chooseVideo()">
    选择视频
  button>


    <form [formGroup]="loginForm" (ngSubmit)="login(loginForm.value)" novalidate>
        <ion-item [class.error]="!tieluxian.valid && tieluxian.touched">
            <ion-label>铁路线:ion-label>
            <ion-input type="text"  value="" [formControl]="tieluxian" clearInput=true>ion-input>
        ion-item>

        <ion-item>
            <ion-label>铁路站:ion-label>
            <ion-input type="text" value="" [formControl]="tieluzhan" clearInput=true>ion-input>
        ion-item>

        <ion-item>
            <ion-label>上报人:ion-label>
            <ion-input type="text" value="" [formControl]="shangbaoren" clearInput=true>ion-input>
        ion-item>

        <ion-item>
            <ion-label>公里标:ion-label>
            <ion-input type="text" value="" [formControl]="gonglibiao" clearInput=true>ion-input>
        ion-item>

        <ion-item>
            <ion-label>事件描述:ion-label>
            <ion-input  type="text" value="" [formControl]="shijianmiaoshu" clearInput=true>ion-input>
        ion-item>

        <ion-avatar style="text-align: center; " >
            <img [src]="profilePicture" style="margin: 5px auto;border-radius: 5% ;max-width: 70%; max-height: 30%" />
        ion-avatar>

        <button ion-button block color="secondary" type="submit" [disabled]="!loginForm.valid">上传button>
    form>


ion-content>
关于button平分宽度,宽度应该是每个33%,但是因为ionic2中的button貌似内置了margin之类的属性吧,button额外占用一定的宽度。
按钮的点击事件比较简单,一个click一个方法名。
比较复杂的是表单了,但是看看标签和后面的代码,就能知道怎么操作了,具体的属性我也不太懂。
3,导入cordova插件
用到的插件就三个,一个是关于拍照的,另两个是关于文件上传的。
在项目的根目录下,打开cmd指令,输入:
ionic plugin add cordova-plugin-file-transfer这个指令实际会下载两个插件,一个插件是cordova-plugin-file,另一个插件是cordova-plugin-file-transfer。
安装camera插件的指令:
ionic plugin add cordova-plugin-camera其实要是能通过其他方式获得这些文件,直接复制到plugins目录下也是可以的,有的时候下载会非常慢。
官网关于文件传输和照相机的文档:
文档传输,
照相机
ionic2使用typescript作为脚本,和javascript有一定的差别,所以最好多看看官方的文档,只有官方的文档才是最新的。
下载之后,需要用import导入需要用到的类
import { Camera } from 'ionic-native';
import { Transfer } from 'ionic-native';
import { FileUploadOptions } from 'ionic-native';
5,TypeScript代码
import { Component } from '@angular/core';

import { Platform, ActionSheetController } from 'ionic-angular';
import { NavController } from 'ionic-angular';

import { FormBuilder, Validators, FormGroup } from '@angular/forms';
import {NgZone} from 'angular2/core';
import { Camera } from 'ionic-native';
import { Transfer } from 'ionic-native';
import { FileUploadOptions } from 'ionic-native';


@Component({
  templateUrl: 'basic.html'
})
export class BasicPage {
/*  constructor(public platform: Platform, public actionsheetCtrl: ActionSheetController) {

  }*/

  loginForm: FormGroup;
  tieluxian: any;
  tieluzhan: any;
  shangbaoren: any;
  gonglibiao: any;
  shijianmiaoshu:any;
  public path;
  /*profilePicture: any = "https://www.gravatar.com/avatar/";*/
  //给image设置默认的图片
  profilePicture: any="assets/img/live.jpg";


  constructor(public navCtrl: NavController, private formBuilder: FormBuilder) {
    this.loginForm = formBuilder.group({
      /**
       * 表单的操作,方括号里面的参数是对输入的要求
       */
      tieluxian: ['', Validators.compose([Validators.minLength(1),, Validators.required])],
      tieluzhan: ['', Validators.compose([Validators.required, Validators.minLength(1)])],
      shangbaoren: ['', Validators.compose([Validators.required, Validators.minLength(1)])],
      gonglibiao: ['', Validators.compose([Validators.required, Validators.minLength(1)])],
      shijianmiaoshu: ['', Validators.compose([Validators.required, Validators.minLength(1)])],
    })

    this.tieluxian = this.loginForm.controls['tieluxian'];
    this.tieluzhan = this.loginForm.controls['tieluzhan'];
    this.shangbaoren = this.loginForm.controls['shangbaoren'];
    this.gonglibiao = this.loginForm.controls['gonglibiao'];
    this.shijianmiaoshu = this.loginForm.controls['shijianmiaoshu'];

  /*  this.zone = ngzone;
    this.image = null;*/
  }

  /**
   * 表达提交的方法名和html总标签中写得要一样,通过value,可以得表达里面输入的值
   * @param value
   */
  login(value) {
    var tielu=value.tieluxian;
    alert(tielu);
    const fileTransfer = new Transfer();
    /**
     * 上传文件时携带参数,这个是可选项。
     */
    var options: any;
    options = {
      fileKey: 'file',
      fileName: 'name.jpg',
      /*value1: "&reporter=" + "12306" + "&desc="
      + "test" + "&railwaybureau=057"
      + "&spot= " + "&railwaystation= "
      + "&railwayline= " + "&kmdesc= ",*/
      reporter:value.shangbaoren,
      desc:value.shijianmiaoshu,
      railwaybureau:"参数",
      spot:"ok",
      railwaystation:value.tieluzhan,
      railwayline:"railwayline",
      kmdesc:value.gonglibiao,
      headers: {}
  }
    var reqUri = "http://10.28.0.210:8080/uploadCenter.jsp";
    //第一个参数是文件的路径,第二个参数是服务器的url,第二个参数也可以是encodeURI(reqUri)
    fileTransfer.upload(this.path, reqUri, options).then((data) => {
      alert("正在上传");
        }, (err) => {
      alert("出错啦");
        });
  }


  takePhoto() {
    var options = {
      // Some common settings are 20, 50, and 100
      quality: 50,
      destinationType: Camera.DestinationType.FILE_URI,
      // In this app, dynamically set the picture source, Camera or photo gallery

      encodingType: Camera.EncodingType.JPEG,
      mediaType: Camera.MediaType.PICTURE,
      saveToPhotoAlbum:true,
      sourceType:Camera.PictureSourceType.CAMERA,//拍照时,此参数必须有,否则拍照之后报错,照片不能保存

      correctOrientation: true  //Corrects Android orientation quirks
    }
    /**
     * imageData就是照片的路径,关于这个imageData还有一些细微的用法,可以参考官方的文档。
     */
    Camera.getPicture(options).then((imageData) => {
      // imageData is either a base64 encoded string or a file URI
      // If it's base64:
      let base64Image =  imageData;
      this.path = base64Image;//给全局的文件路径赋值。
      this.profilePicture=base64Image;//给image设置source。
      alert(this.path);

    /*  this.zone.run(() => this.image = base64Image);*/
    }, (err) => {
      // Handle error,出错后,在此打印出错的信息。
      alert( err.toString());
    });
  }
  choosePhoto() {


    var options = {
      // Some common settings are 20, 50, and 100
      quality: 50,
      destinationType: Camera.DestinationType.FILE_URI,
      // In this app, dynamically set the picture source, Camera or photo gallery
      sourceType:0,//0对应的值为PHOTOLIBRARY ,即打开相册
      encodingType: Camera.EncodingType.JPEG,
      mediaType: Camera.MediaType.PICTURE,
      allowEdit: true,
      correctOrientation: true  //Corrects Android orientation quirks
    }
    Camera.getPicture(options).then((imageData) => {
      // imageData is either a base64 encoded string or a file URI
      // If it's base64:
      let base64Image =  imageData;
      this.path = base64Image;
      this.profilePicture=base64Image;
      alert(base64Image);
    }, (err) => {
      // Handle error
    });

  }
  chooseVideo() {
    var options = {
      // Some common settings are 20, 50, and 100
      quality: 50,
      destinationType: Camera.DestinationType.FILE_URI,
      // In this app, dynamically set the picture source, Camera or photo gallery
      sourceType:0,
      mediaType: 1,//为1时允许选择视频文件
      allowEdit: true,
      correctOrientation: true  //Corrects Android orientation quirks
    }
    Camera.getPicture(options).then((imageData) => {
      // imageData is either a base64 encoded string or a file URI
      // If it's base64:
      let base64Image =  imageData;
      this.path = base64Image;
      this.profilePicture="assets/img/video.png";//选择视频后,image另外显示一张图片,目前还无法获取视频的第一帧图片。
      alert(this.path);
    }, (err) => {
      // Handle error
    });

  }

  test(){

  }

  logForm() {

  }


}
6,源码
源码