springboot整合redis实例
项目中用户中心登陆,登出,保存用户记录这些session信息,需要用到redis来保存,操作。本demo是用的redisTemplate实现缓存的。下面是具体的配置。只要按照这个来,就能配置好你的springboot整合redis,后面会有一个redis的版本问题需要注意就行。不然数据写不到redis中。
单个springboot项目,本地测试。需要的外在环境:
1.idea
说真的,强忍两天不熟悉带来的低效率开发,后面就是一马平川,idea的强大,特别是对于集成几层工程的大项目来说,eclips只能干瞪眼。还卡的要死。so,建议用idea.
2.安装window10 64位的redis。
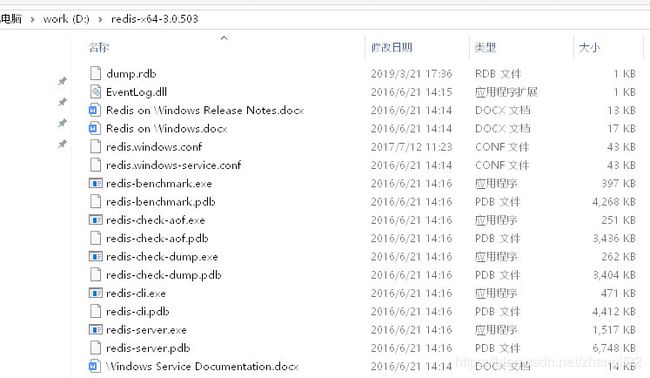
项目启动的redis依赖本机的redis服务呀。SO,这个少不了。百度下一个吧。下面是我本机的redis.可以看到结构和版本信息。

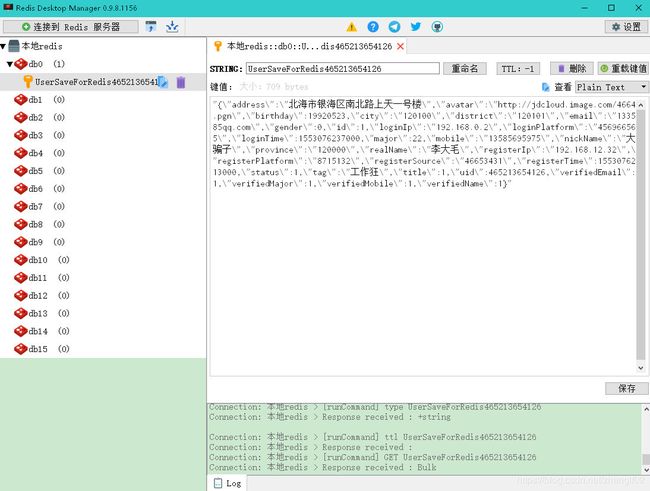
3.下载个redis的客户端:redis.desktop.manager,可以方便后期项目操作redis时对数据新增,移除,修改的查看,验证是否redis有效
 ,打开后默认看 db0这个库,如下图

下面具体到项目来说
1.项目结构
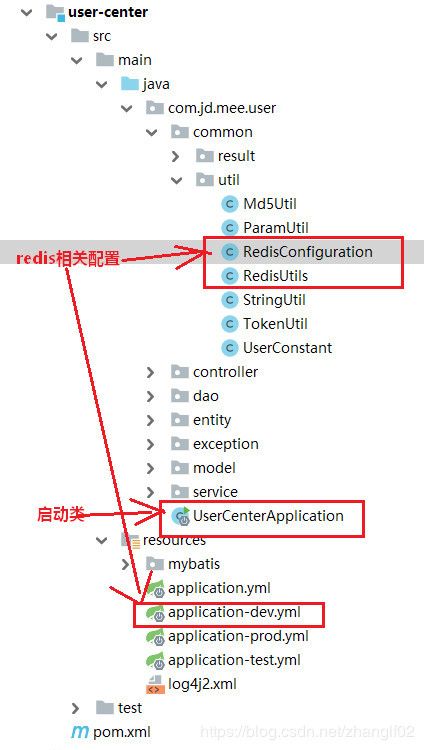
从整体上说。就是需要redis的实例化类RedisConfiguration.java,curd的工具类RedisUtils,redis的配置文件application-dev.yml,redis的启动项UserCenterApplication.java。在图中我都标记了。忘了标记pom.xml文件了,这里要有相关的redis依赖

2.项目中涉及redis的文件介绍
2.1 pom.xml中引入redis依赖
这三个都不可缺少。另外重点注意jedis的版本信息不要有。不然项目执行往redis写数据时会异常。
            org.springframework.boot
            spring-boot-starter-redis
            1.3.8.RELEASE


            redis.clients
            jedis


            org.apache.commons
            commons-pool2
2.2 RedisConfiguration.java
实例化RedisTemplate
import com.fasterxml.jackson.annotation.JsonAutoDetect;
import com.fasterxml.jackson.annotation.PropertyAccessor;
import com.fasterxml.jackson.databind.ObjectMapper;
import org.springframework.context.annotation.Bean;
import org.springframework.context.annotation.Configuration;
import org.springframework.data.redis.connection.RedisConnectionFactory;
import org.springframework.data.redis.core.RedisTemplate;
import org.springframework.data.redis.serializer.Jackson2JsonRedisSerializer;
import org.springframework.data.redis.serializer.StringRedisSerializer;

/**
 *
 * @Date: 2019/3/21 11:11
 * @Description: *
 */
@Configuration
public class RedisConfiguration {

    @Bean
    @SuppressWarnings("all")
    public RedisTemplate redisTemplate(RedisConnectionFactory factory) {
        RedisTemplate template = new RedisTemplate();
        template.setConnectionFactory(factory);
        Jackson2JsonRedisSerializer jackson2JsonRedisSerializer = new Jackson2JsonRedisSerializer(Object.class);
        ObjectMapper om = new ObjectMapper();
        om.setVisibility(PropertyAccessor.ALL, JsonAutoDetect.Visibility.ANY);
        om.enableDefaultTyping(ObjectMapper.DefaultTyping.NON_FINAL);
        jackson2JsonRedisSerializer.setObjectMapper(om);
        StringRedisSerializer stringRedisSerializer = new StringRedisSerializer();
        template.setKeySerializer(stringRedisSerializer);
        template.setHashKeySerializer(stringRedisSerializer);
        template.setValueSerializer(jackson2JsonRedisSerializer);
        template.setHashValueSerializer(jackson2JsonRedisSerializer);
        template.afterPropertiesSet();
        return template;
    }
}
2.3 RedisUtils.java
redis的增删改查工具类,这些操作都是简单的String类型操作工具,不包含set,map,list这些。
import lombok.extern.log4j.Log4j2;
import org.springframework.data.redis.core.RedisTemplate;
import org.springframework.stereotype.Component;

import javax.annotation.Resource;


/**
 * [Redis工具类]
 * @Date: 2019/3/21 11:23
 * @Description: *
 */
@Component
@Log4j2
public class RedisUtils {


    /**
     * [redis]
     */
    @Resource
    private RedisTemplate redisTemplate;


    /**
     * [判断key是否存在]
     * @param key 键
     * @return true 存在 false不存在
     */
    public boolean hasKey(String key) {
        try {
            return redisTemplate.hasKey(key);
        } catch (Exception e) {
            log.info("RedisUtils.hasKey " + e);
            return false;
        }
    }

    /**
     * [普通缓存获取]
     * @param key 键
     * @return 值
     */
    public Object get(String key) {
        return key == null ? null : redisTemplate.opsForValue().get(key);
    }
    /**
     * [普通缓存删除]
     * @param key 键
     * @return 值
     */
    public boolean delete(String key) {
        try {
            Boolean aBoolean = redisTemplate.hasKey(key);
            return aBoolean == false ? true : redisTemplate.delete(key);
        }catch (Exception e){
            log.info("RedisUtils.delete " + e);
           return false;
        }
    }
    /**
     * [普通缓存放入]
     * @param key 键
     * @param value 值
     * @return true成功 false失败
     */
    public boolean set(String key, Object value) {
        try {
            redisTemplate.opsForValue().set(key, value);
            return true;
        } catch (Exception e) {
            log.info("RedisUtils.delete " + e);
            return false;
        }
    }
}
2.4 springboot启动类 中注解开启缓存
/**
 * @date 2019-03-19
 *
 */
@SpringBootApplication
@EnableCaching
public class UserCenterApplication {
    /**
     * 启动main方法
     * @param args
     */
    public static void main(String[] args) {
        SpringApplication.run(UserCenterApplication.class, args);
    }

}
2.5 application-dev.yml中配置redis的相关配置
和jdbc的配置在一块了。
spring:
  datasource:
    url: jdbc:mysql://localhost:3306/catalog?useUnicode=true&characterEncoding=utf-8&useSSL=false
    username: root
    password:
    driver-class-name: com.mysql.jdbc.Driver
  application:
    name: user-center
 redis:
    database: 0
    host: 127.0.0.1
    port: 6379
    password:
    timeout: 500
    pool:
        max-active: 20 # 连接池最大连接数(使用负值表示没有限制
        max-wait: -1   # 连接池最大阻塞等待时间(使用负值表示没有限制
        max-idle: 8      # 连接池中的最大空闲连接
        min-idle: 0       # 连接池中的最小空闲连接
通过以上五步就完成了所有配置。那如何应用,操作redis呢?这里也给出具体的demo!
一般redis的操作放在service层。也有放在controller层的。他们的使用都一样。首先注入实例,然后用就行了。
我们举个清除用户的token的栗子。
import com.jd.mee.user.common.result.CodeMsg;
import com.jd.mee.user.common.util.RedisUtils;
import com.jd.mee.user.common.util.StringUtil;
import com.jd.mee.user.common.util.UserConstant;
import com.jd.mee.user.dao.UserInfoMapper;
import com.jd.mee.user.entity.UserInfo;
import com.jd.mee.user.exception.BizException;
import com.jd.mee.user.service.UserInfoService;
import lombok.extern.slf4j.Slf4j;
import org.apache.commons.lang.StringUtils;
import org.springframework.beans.factory.annotation.Autowired;
import org.springframework.stereotype.Service;

import javax.annotation.Resource;
import java.util.List;

/**
 * @Date: 2019/3/20 9:59
 * @Description:
 */
@Service
@Slf4j
public class UserInfoServiceImpl implements UserInfoService {
    /**
     * [用户持久层实例]
     */
    @Autowired
    private UserInfoMapper userInfoMapper;

    /**
     * [redis]
     */
    @Resource
    RedisUtils redisUtils;

    @Override
    public Boolean removeUserCache(Long uid) throws BizException {
        return   redisUtils.delete(UserConstant.USER_SAVE_REDIS + uid);
    }

}
上面的栗子可以配合前面我说的redis客户端工具查看。在清除前有这个token,清除后token值没了。证明操作redis成功!