Spring Boot 2 系列如何正确地初始化data.sql和schema.sql脚本
How to install google-chrome on centos 7.5
[root@cloud ~]# cat > /etc/yum.repos.d/google-chrome.repo
[google-chrome]
name=google-chrome
baseurl=http://dl.google.com/linux/chrome/rpm/stable/$basearch
enabled=1
gpgcheck=0
gpgkey=https://dl-ssl.google.com/linux/linux_signing_key.pub


[root@cloud ~]# yum -y install google-chrome-stable --nogpgcheck
cat > /usr/bin/google-chrome
#!/bin/bash
#
# Copyright (c) 2011 The Chromium Authors. All rights reserved.
# Use of this source code is governed by a BSD-style license that can be
# found in the LICENSE file.
# Let the wrapped binary know that it has been run through the wrapper.
export CHROME_WRAPPER="`readlink -f "$0"`"
HERE="`dirname "$CHROME_WRAPPER"`"
# We include some xdg utilities next to the binary, and we want to prefer them
# over the system versions when we know the system versions are very old. We
# detect whether the system xdg utilities are sufficiently new to be likely to
# work for us by looking for xdg-settings. If we find it, we leave $PATH alone,
# so that the system xdg utilities (including any distro patches) will be used.
if ! which xdg-settings &> /dev/null; then
# Old xdg utilities. Prepend $HERE to $PATH to use ours instead.
export PATH="$HERE:$PATH"
else
# Use system xdg utilities. But first create mimeapps.list if it doesn't
# exist; some systems have bugs in xdg-mime that make it fail without it.
xdg_app_dir="${XDG_DATA_HOME:-$HOME/.local/share/applications}"
mkdir -p "$xdg_app_dir"
[ -f "$xdg_app_dir/mimeapps.list" ] || touch "$xdg_app_dir/mimeapps.list"
fi
# Always use our versions of ffmpeg libs.
# This also makes RPMs find the compatibly-named library symlinks.
if [[ -n "$LD_LIBRARY_PATH" ]]; then
LD_LIBRARY_PATH="$HERE:$HERE/lib:$LD_LIBRARY_PATH"
else
LD_LIBRARY_PATH="$HERE:$HERE/lib"
fi
export LD_LIBRARY_PATH
export CHROME_VERSION_EXTRA="stable"
# We don't want bug-buddy intercepting our crashes. http://crbug.com/24120
export GNOME_DISABLE_CRASH_DIALOG=SET_BY_GOOGLE_CHROME
# Sanitize std{in,out,err} because they'll be shared with untrusted child
# processes (http://crbug.com/376567).
exec < /dev/null
exec > >(exec cat)
exec 2> >(exec cat >&2)
# Make sure that the profile directory specified in the environment, if any,
# overrides the default.
if [[ -n "$CHROME_USER_DATA_DIR" ]]; then
# Note: exec -a below is a bashism.
exec -a "$0" "$HERE/chrome" \
--user-data-dir="$CHROME_USER_DATA_DIR" "$@"
else
exec -a "$0" "$HERE/chrome" "$@" --no-sandbox --user-data-dir
fi安装完Google的浏览器后,如何进一步安装Google浏览器的插件Postman
第1步:在Windows系统上下载Postman-linux-x64-7.11.0.tar.gz软件包(当然你可以直接在虚拟机里面的直接下载此软件包)
第2步:例如在虚拟机里面的CentOS8上面安装lrzsz软件包,使用Windows系统上安装的SecureCRT命令终端图形化工具
将软件包Postman-linux-x64-7.11.0.tar.gz传输到CentOS8系统里
[root@contoso ~]# yum install lrzsz
[root@contoso ~]# ls
anaconda-ks.cfg initial-setup-ks.cfg Postman-linux-x64-7.11.0.tar.gz
[root@contoso ~]# pwd
/root
[root@contoso ~]# tar -xzf Postman-linux-x64-7.11.0.tar.gz -C /opt
[root@contoso ~]# ln -s /opt/Postman/Postman /usr/bin/postman
我们可以直接在/opt/Postman目录下点击快捷方式图标Postman启动postman插件工具
--------------------------------------------------------------------------------------------
[root@cloud ~]# git config --global user.name "zhengzizhi"
[root@cloud ~]# git config --global user.email "[email protected]"
[root@cloud ~]# git config --list
user.name=zhengzizhi
[email protected]
[root@cloud ~]#
[root@cloud ~]# find / -name .git
/opt/coding/microservice-store/.git
[root@cloud ~]# cd /opt/coding/microservice-store/.git
[root@cloud .git]# ls
branches COMMIT_EDITMSG config description HEAD hooks index info logs objects packed-refs refs
[root@cloud .git]# cat > config
[core]
repositoryformatversion = 0
filemode = true
bare = false
logallrefupdates = true
[remote "origin"]
url = https://github.com/zhengzizhi/microservice-store.git
fetch = +refs/heads/*:refs/remotes/origin/*
[branch "master"]
remote = origin
merge = refs/heads/master
[root@cloud .git]#
SET PASSWORD FOR 'root'@'127.0.0.1' = PASSWORD('dbpass');
SET PASSWORD FOR 'root'@'localhost' = PASSWORD('dbpass');
FLUSH PRIVILEGES;
正式进入本篇主题
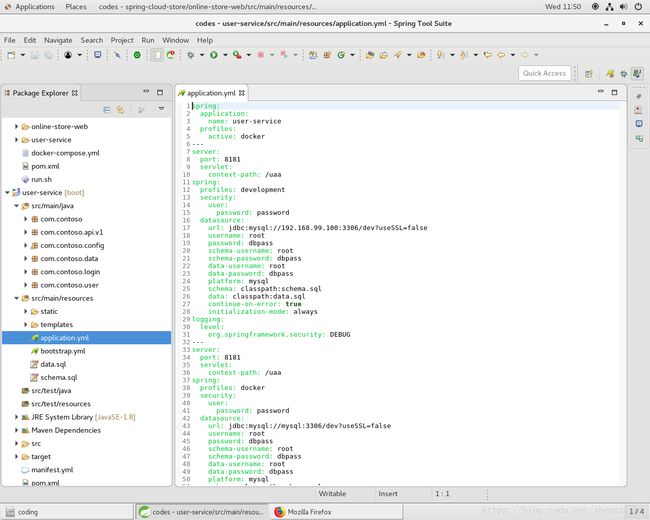
Spring Boot 2 初始化数据库脚本 data.sql & schema.sql 必须提供三组同样的用户名称和用户密码
这在官网和互联网上目前没人提及
application.yml正确的配置格式如下:
spring:
  profiles: development
  datasource:
    url: jdbc:mysql://127.0.0.1:3306/dev?useSSL=false
    username: root
    password: dbpass
    schema-username: root
    schema-password: dbpass
    data-username: root
    data-password: dbpass
    platform: mysql
    schema: classpath:schema.sql
    data: classpath:data.sql
    continue-on-error: true
    initialization-mode: always
再举一范例
创建的表结构由jpa定义的对象实体映射生成,只定义表数据初始化文件data.sql:
application.yml
#security:
#  oauth2:
#    client:
#      client-id: bd1c0a783ccdd1c9b9e4
#      client-secret: 1a9030fbca47a5b2c28e92f19050bb77824b5ad1
#      access-token-uri: https://github.com/login/oauth/access_token
#      user-authorization-uri: https://github.com/login/oauth/authorize
#      client-authentication-scheme: form
#    resource:
#      user-info-uri: https://api.github.com/user
#      prefer-token-info: false
spring:
  datasource:
    driver-class-name: com.mysql.jdbc.Driver
    url: jdbc:mysql://127.0.0.1:3306/db1?useSSL=false
    username: root
    password: 123456
    data-username: root
    data-password: 123456
    initialization-mode: always
  jpa:
    database-platform: org.hibernate.dialect.MySQL5Dialect
    hibernate:
      ddl-auto: create-drop
如果缺少 database-platform: org.hibernate.dialect.MySQL5Dialect 配置项,那么编译时会报告如下错误并退出编译:
Unable to create requested service [org.hibernate.engine.jdbc.env.spi.JdbcEnvironment]: Access to DialectResolutionInfo cannot be null when 'hibernate.dialect' not set
data.sql
INSERT INTO employee(id,name,birth,address)VALUES(1823,'Jack Chen','1993-05-29','Beijing');
INSERT INTO employee(id,name,birth,address)VALUES(1202,'Tim He','1986-12-26','Shanghai');
INSERT INTO employee(id,name,birth,address)VALUES(1304,'John Hu','1980-01-08','Shanxi');
Employee.java
package com.contoso.employee;

import java.util.Date;
import javax.persistence.Entity;
import javax.persistence.GeneratedValue;
import javax.persistence.GenerationType;
import javax.persistence.Id;

@Entity
public class Employee {

	@Id
	@GeneratedValue(strategy = GenerationType.AUTO)
	private Long id;
	private String name;
	private Date birth;
	private String address;

	public Long getId() {
		return id;
	}

	public void setId(Long id) {
		this.id = id;
	}

	public String getName() {
		return name;
	}

	public void setName(String name) {
		this.name = name;
	}

	public Date getBirth() {

		return birth;
	}

	public void setBirth(Date birth) {
		this.birth = birth;
	}

	public String getAddress() {
		return address;
	}

	public void setAddress(String address) {
		this.address = address;
	}

}
EmployeeRepository.java 允许有同名同姓的雇员
package com.contoso.employee;

import java.util.List;

import org.springframework.data.repository.PagingAndSortingRepository;
import org.springframework.data.repository.query.Param;
import org.springframework.data.rest.core.annotation.RepositoryRestResource;

@RepositoryRestResource(collectionResourceRel = "employee", path = "employee")
public interface EmployeeRepository extends PagingAndSortingRepository {
	List findEmployeeByName(@Param("name") String name);
}
pom.xml
	4.0.0

	com.contoso
	spring-cloud-security
	0.0.1-SNAPSHOT
	jar

	spring-cloud-security
	Demo project for Spring Boot


		org.springframework.boot
		spring-boot-starter-parent
		2.0.4.RELEASE


		UTF-8
		UTF-8
		1.8
		Finchley.SR1


			org.springframework.boot
			spring-boot-starter-web


			org.springframework.cloud
			spring-cloud-starter-oauth2


			org.springframework.cloud
			spring-cloud-starter-security


			org.springframework.boot
			spring-boot-starter-data-jpa


			org.springframework.boot
			spring-boot-starter-data-rest


			org.springframework.boot
			spring-boot-starter-jdbc


			org.springframework.data
			spring-data-rest-hal-browser


			mysql
			mysql-connector-java
			runtime


			org.springframework.boot
			spring-boot-starter-test
			test


				org.springframework.cloud
				spring-cloud-dependencies
				${spring-cloud.version}
				pom
				import


				org.springframework.boot
				spring-boot-maven-plugin
https://www.boraji.com/spring-security-5-jdbc-based-authentication-example

