Android Studio使用AIDL技术进行SDK开发
前面我们有介绍AIDL的基本用法:
Android进程间通信——AIDL
Android进程间通信——AIDL Binder连接池
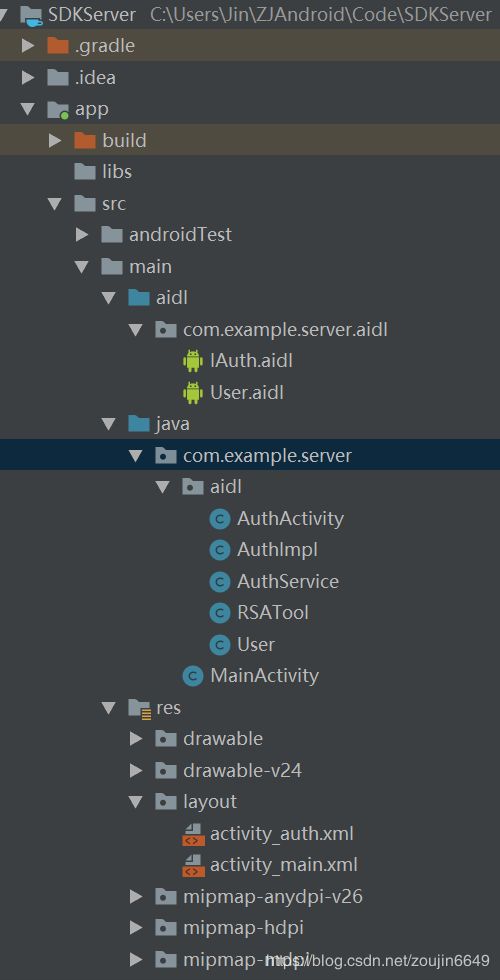
现在我们来介绍利用AIDL来实现一个简陋的SDK,将获取用户信息的方法暴露给客户端,先放工程目录:
SDKServer代码实现
首先作为服务端,我们创建IAuth.aidl文件,声明IAuth接口
// IAuth.aidl
package com.example.server.aidl;
import com.example.server.aidl.User;

// Declare any non-default types here with import statements

interface IAuth {
    /**
     * Demonstrates some basic types that you can use as parameters
     * and return values in AIDL.
     */
     String getAuthCode();
     void checkAuthCode(String code);
     User getCurrentUser();
}
// User.aidl
package com.example.server.aidl;
parcelable User;接下来我们创建一个Service监听客户端的连接
public class AuthService extends Service {

    @Nullable
    @Override
    public IBinder onBind(Intent intent) {
        return new AuthImpl(this);
    }
}
在AndroidManifest中注册,
AuthService能响应action为auth_request_from_sdk的Intent
接口实现如下:
接口实现如下:

public class AuthImpl extends IAuth.Stub {

    private String authCode = null;
    private boolean isAuthed = false;
    private boolean isUserAuth = false;
    private Service mService;
    private Object waitUserAuth = new Object();
    private BroadcastReceiver mReceiver = new BroadcastReceiver() {
        @Override
        public void onReceive(Context context, Intent intent) {
            //notify()方法能够唤醒一个正在等待该对象的锁的线程,当有多个线程都在等待该对象的锁的话,则只能唤醒其中一个线程,具体唤醒哪个线程则不得而知
            //调用某个对象的notify()方法,当前线程也必须拥有这个对象的锁,因此调用notify()方法必须在同步块或者同步方法中进行
            synchronized (waitUserAuth) {
                isUserAuth = intent.getBooleanExtra("isUserAuth", false);
                waitUserAuth.notify();
            }
        }
    };

    public AuthImpl(Service service) {
        mService = service;
    }

    @Override
    public String getAuthCode() throws RemoteException {
        authCode = UUID.randomUUID().toString();
        try {
            return RSATool.encode(authCode);
        } catch (Exception e) {
            e.printStackTrace();
        }
        return "";
    }

    @Override
    public void checkAuthCode(String code) throws RemoteException {
        if (code.equals(authCode)) {
            isAuthed = true;
        }
    }


    @Override
    public User getCurrentUser() throws RemoteException {
        Log.e("SDK_Server", "AuthImpl ___isAuthed--" + isAuthed + "--mService--" + mService + "--isUserAuth--" + isUserAuth);
        if (!isAuthed) {
            throw new RemoteException("Not Authed 1001");
        }
        if (mService == null) {
            throw new RemoteException("Not Authed 1002");
        }
        //获取当前用户信息,跳转到AuthActivity界面
        mService.registerReceiver(mReceiver, new IntentFilter("call_back_from_AuthActivity"));
        Intent intent = new Intent(mService, AuthActivity.class);
        intent.addFlags(Intent.FLAG_ACTIVITY_NEW_TASK);
        mService.startActivity(intent);
        //如果调用某个对象的wait()方法,当前线程必须拥有这个对象的锁,因此调用wait()方法必须在同步块或者同步方法中进行
        //调用某个对象的wait()方法,相当于让当前线程交出此对象的锁,然后进入等待状态,等待后续再次获得此对象的锁
        synchronized (waitUserAuth) {
            try {
                waitUserAuth.wait();
            } catch (Exception e) {
                e.printStackTrace();
            }
        }
        mService.unregisterReceiver(mReceiver);
        if (isUserAuth) {
            User user = new User(1, "ZOUJIN", "ZOUJIN6649", "https://dss2.baidu.com/6ONYsjip0QIZ8tyhnq/it/u=2075772401,2375569036&fm=179&app=42&f=JPEG?w=121&h=140&s=D7F5C46A051445C018C03E68030090F5");
            return user;
        } else {
            return null;
        }

    }
}
用户授权界面:
public class AuthActivity extends AppCompatActivity implements View.OnClickListener {
    TextView tvUserName;
    ImageView ivHeadPic;
    Button btnConfirm;
    ImageView ivBack;

    @Override
    protected void onCreate(Bundle savedInstanceState) {
        super.onCreate(savedInstanceState);
        setContentView(R.layout.activity_auth);
        tvUserName = findViewById(R.id.tv_username);
        ivHeadPic = findViewById(R.id.iv_headPic);
        ivBack = findViewById(R.id.iv_back);
        btnConfirm = findViewById(R.id.btn_confirm);
        btnConfirm.setOnClickListener(this);
        ivBack.setOnClickListener(this);


        showCurrUserInfo();
    }

    private void showCurrUserInfo() {
        //查询当前用户,将当前登录的账户信息显示再界面上
        //前面我们在AuthImpl中实现getUserInfo,我们为了方便,直接new User对象
        //User user = new User(1, "ZOUJIN", "ZOUJIN6649", "https://dss2.baidu.com/6ONYsjip0QIZ8tyhnq/it/u=2075772401,2375569036&fm=179&app=42&f=JPEG?w=121&h=140&s=D7F5C46A051445C018C03E68030090F5");
        //所以这里也直接将前面的User信息和前面保持一致
        tvUserName.setText("ZOUJIN");
        Glide.with(this).load("https://dss2.baidu.com/6ONYsjip0QIZ8tyhnq/it/u=2075772401,2375569036&fm=179&app=42&f=JPEG?w=121&h=140&s=D7F5C46A051445C018C03E68030090F5").into(ivHeadPic);
    }


    @Override
    public void onClick(View view) {
        switch (view.getId()) {
            case R.id.iv_back:
                //取消使用SDK登录
                Intent cancelAction = new Intent("call_back_from_AuthActivity");
                cancelAction.putExtra("isUserAuth", false);
                sendBroadcast(cancelAction);
                finish();
                break;
            case R.id.btn_confirm:
                //使用SDK登录,传递SDKServer当前账户信息给SDKClient
                Intent confirmAction = new Intent("call_back_from_AuthActivity");
                confirmAction.putExtra("isUserAuth", true);
                sendBroadcast(confirmAction);
                finish();
                break;
            default:
                break;
        }
    }
}
服务端我们使用CheckAuthCode()来进行SDK的认证。服务端getAuthCode()暴露给外部调用,内部使用的RSA非对象加密算法的公钥对Code进行加密。SDK供客户端集成,内部使用RSA的私钥对Code进行解密。客户端先通过AIDL调用服务端的getAuthCode获得加密后的Code,再调用SDK的解密方法对Code解密。解密之后的Code,再传递给服务端进行验证。SDK认证成功,isAuth为true,否则为false。如果验证失败,getCurrentUser直接返回并抛异常。验证成功之后,我们会先注册一个广播,监听用户是否授权,再跳转至AuthActivity界面供用户确认授权交互,并利用对象锁将线程阻塞,直到收到广播释放对象锁,线程获得对象锁被唤醒。这里我们为了方便,直接new了一个对象。
在用户授权界面,由于前面我们获取用户信息的时候是直接创建的一个User对象,因此,这里我们与前面保持一致即可。当用户点击确认授权,我们会发送一个广播,并携带确认授权的数据信息。
SDK开发
首先我们创建一个auth_sdk的Library。将SDKServer中的AIDL接口和User类复制过来,注意保持包名一致,然后build一下,我们就可以调用接口文件中的方法了。
首先我们来看一下SDK类和AuthService类
public class SDK {
    public static void initSDK(Application application) {
        AuthService.initApp(application);
    }
}
public class AuthService {
private static final String TAG = "AuthService";
private static Application mApplication;
private IAuth remoteAuth;
private ServiceConnection mConnection = new ServiceConnection() {
@Override
public void onServiceConnected(ComponentName componentName, IBinder iBinder) {
remoteAuth = IAuth.Stub.asInterface(iBinder);
Log.e(TAG, "Service 连接成功");
}
@Override
public void onServiceDisconnected(ComponentName componentName) {
Log.e(TAG, "Service 连接失败");
}
};
private static AuthService sInstance;
private AuthService() {
}
public synchronized static AuthService getInstance() {
if (sInstance == null) {
sInstance = new AuthService();
}
return sInstance;
}
public static void initApp(Application application) {
Intent intent = new Intent("auth_request_from_sdk");
intent.setPackage("com.example.server");
mApplication = application;
mApplication.bindService(intent, getInstance().mConnection, Context.BIND_AUTO_CREATE);
}
public static void removeApp() {
mApplication.unbindService(getInstance().mConnection);
mApplication = null;
sInstance = null;
}
public String getUserInfo() throws Exception {
if (!CheckAppTool.isInstallSDKServer(mApplication)) {
try {
Intent intent = new Intent(Intent.ACTION_VIEW, Uri.parse("market://details?id=com.example.server"));
intent.addFlags(Intent.FLAG_ACTIVITY_NEW_TASK);
mApplication.startActivities(new Intent[]{intent});
} catch (Exception e) {
Intent intent = new Intent(Intent.ACTION_VIEW, Uri.parse("https://play.google.com/store/apps/details?id=com.example.server"));
intent.addFlags(Intent.FLAG_ACTIVITY_NEW_TASK);
mApplication.startActivities(new Intent[]{intent});
}
return null;
}
String code = RSATool.decode(remoteAuth.getAuthCode());
Log.e(TAG, "getUserInfo--code:" + code);
remoteAuth.checkAuthCode(code);
return remoteAuth.getCurrentUser().toString();
}
}
这里的AuthService并不是真正的Service,在初始化的时候会绑定能响应auth_request_from_sdk意图的Service。其实这里才是客户端通过AIDL调用服务端的方法的真正实现,这一步我们封装在了SDK中方便客户端调用。
当客户端调用getUserInfo()时,SDK首先会系统是否安装了SDKServer的应用,如果已经安装了,客户端再调用服务端的getAuthCode,拿到的Code再进行验证,最后再调用getCurrentUser()获取用户信息。
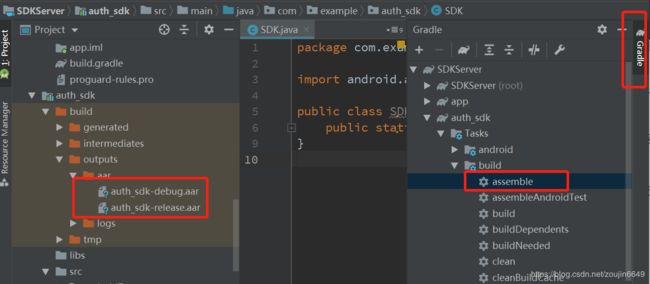
最后是生成aar文件,Android studio最右侧,Gradle-->auth_sdk/Tasks/build/assemble,双击assemble就会在auth_sdk/build/outputs/aar目录下生成两个aar文件
客户端集成SDK
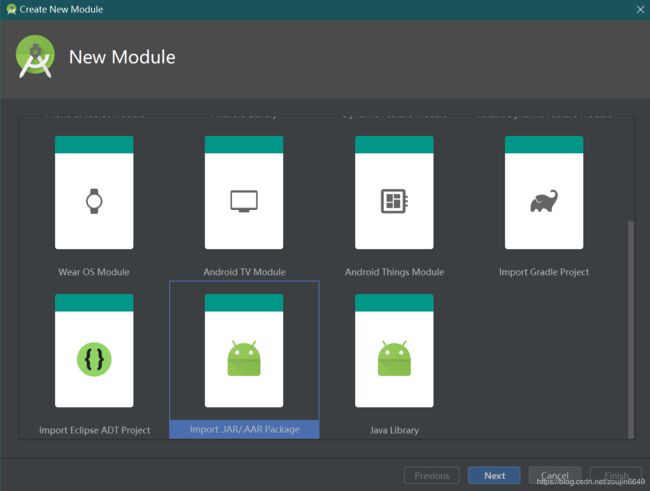
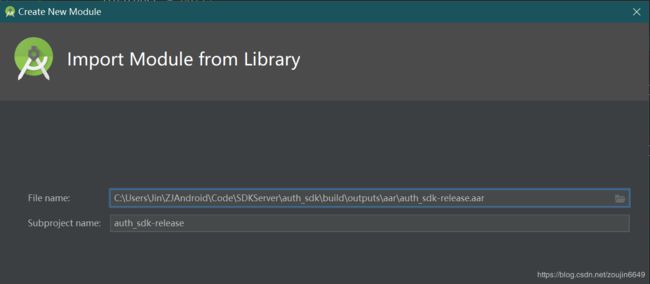
新建一个工程SDKClient,再新建一个module导入aar包,这里我们导入的是SDK的release包
然后我们在SDKClient中依赖auth_sdk-release包
依赖成功之后,我们新建一个Application,并修改AndroidMenifest中application的name值
public class MyApplication extends Application {

    @Override
    public void onCreate() {
        super.onCreate();
        SDK.initSDK(this);
    }
}
我们将SDKClient的Application传递给SDK,SDK的initSDK()方法会调用AuthService的initApp(),initApp()会绑定服务端的Service,这就相当于在SDKClient的Application的onCreate()方法中绑定服务端的Service。
接下来看如何使用
public class MainActivity extends AppCompatActivity implements View.OnClickListener {

    public static final String TAG = "MainActivity";
    private static final int MSG_USER_INFO = 1;
    Button btnJump;
    TextView tvUserInfo;

    @Override
    protected void onCreate(Bundle savedInstanceState) {
        super.onCreate(savedInstanceState);
        setContentView(R.layout.activity_main);
        btnJump = findViewById(R.id.btn_jump);
        tvUserInfo = findViewById(R.id.tv_user_info);
        btnJump.setOnClickListener(this);
    }

    @Override
    public void onClick(View view) {
        switch (view.getId()) {
            case R.id.btn_jump:
                jumpToSDKServer();
                break;
            default:
                break;
        }
    }

    private void jumpToSDKServer() {
        new Thread(new Runnable() {
            @Override
            public void run() {
                try {
                    String userInfo = AuthService.getInstance().getUserInfo();
                    Log.e("SDKClient", "@@@@@@@@" + userInfo);

                    handler.obtainMessage(MSG_USER_INFO, userInfo).sendToTarget();
                } catch (Exception e) {
                    e.printStackTrace();
                }
            }
        }).start();
    }

    private Handler handler = new Handler() {
        @Override
        public void handleMessage(@NonNull Message msg) {

            switch (msg.what) {
                case MSG_USER_INFO:
                    tvUserInfo.setVisibility(View.VISIBLE);
                    tvUserInfo.setText("get user info:" + msg.obj);
                    break;
                default:
                    super.handleMessage(msg);
                    break;
            }
        }
    };
}
SDKClient客户端只需要一句话就可以获取到SDKServer的用户信息:AuthService.getInstance().getUserInfo();
效果图如下:


