SpringCloud实战之路 | 应用篇(八)分布式链路追踪技术Spring Cloud Sleuth + Zipkin
SpringCloud实战之路 | 应用篇(八)分布式链路追踪技术Spring Cloud Sleuth + Zipkin
- 问题场景
- 核心思想
- 解决方案
- 代码实现
- (一)构建Zipkin Server服务
- (二)构建Zipkin Client服务
- 测试
- 追踪数据持久化
文章内容输出来源:拉勾教育Java高薪训练营;
问题场景
在微服务架构下,一次请求少则经过三四次服务调用完成,多则跨越几十个甚至是上百个服务节点。在调用关系如此繁杂的情况下,引出的问题:
- 如何清晰的展示出服务之间的调用关系?
- 如何解决在服务间调用链路过程中出现的错误进行排查?
- 如何对服务调用的耗时进行统计进行优化?
正是基于上述问题才提出了分布式链路追踪技术的解决方案
核心思想
本质: 分布式链路追踪本质就是通过在各个服务的调用链路节点记录日志的方式,并最终聚合集中化展示出来。
分布式链路追踪当中有几个核心概念:
- Trace: 服务追踪的追踪单元是从客户发起请求(request)抵达被追踪系统的边界开始,到被追踪系统
向客户返回响应(response)为止的过程,一个调用链路的过程就是Trace,一个请求对应一个Trace。 - Trace ID: 为了实现请求跟踪,当请求发送到分布式系统的入口端点时,只需要服务跟踪框架为该请求
创建一个唯一的跟踪标识Trace ID,同时在分布式系统内部流转的时候,框架始终保持该唯一标识,直
到返回给请求方 - Span: 跨度,可以认为是一个日志数据结构,在一些特殊的时机点会记录了一些日志信息,比如有时间戳、spanId、TraceId,parentIde等,例如A->B->C,在调用B进入时的节点叫做入口Span,完成调用时出去的节点叫做出口Span,若干个有序的 Span 就组成了一个Trace。
- Span ID: 为了统计各处理单元的时间延迟,当请求到达各个服务组件时,也是通过一个唯一标识Span
ID来标记它的开始,具体过程以及结束。对每一个Span来说,它必须有开始和结束两个节点,通过记录
开始Span和结束Span的时间戳,就能统计出该Span的时间延迟,除了时间戳记录之外,它还可以包含
一些其他元数据,比如时间名称、请求信息等。 - Parent ID: 指向另一个SpanId,用于表明父子的关系,即依赖关系。
Span中也抽象出了另外几个概念,叫做事件,核心事件如下:
- CS : client send/start 客户端/消费者发出一个请求,描述的是一个span开始
- SR: server received/start 服务端/生产者接收请求 SR - CS = 请求发送的网络延迟
- SS: server send/finish 服务端/生产者发送应答 SS - SR = 服务端消耗时间
- CR: client received/finished 客户端/消费者接收应答 CR - SS = 回复需要的时间(响应的网络延迟)
解决方案
Spring Cloud Sleuth (追踪服务框架): 可以追踪服务之间的调用,Sleuth可以记录一个服务请求经过哪些服务、服务处理时间等,根据这些,我们能够理清各微服务间的调用关系及进行问题追踪分析(本质就是通过记录日志的方式来记录踪迹数据的)
- 耗时分析:通过 Sleuth 了解采样请求的耗时,分析服务性能问题(哪些服务调用比较耗时)
- 链路优化:发现频繁调用的服务,针对性优化等
Zikpin: 为分布式链路调用监控系统,可以对链路踪迹的数据进行展示和存储。
我们通常会Spring Cloud Sleuth + Zipkin一起使用,通过Sleuth记录下链路追踪的日志数据,Zipkin Client采集到这些数据信息然后发送给Zipkin Server端进行聚合统计展示。
代码实现
Zipkin 包括Zipkin Server和 Zipkin Client两部分,Zipkin Server是一个单独的服务,Zipkin Client就是
具体的微服务。
(一)构建Zipkin Server服务
引入maven依赖
		<dependency>
            <groupId>io.zipkin.javagroupId>
            <artifactId>zipkin-serverartifactId>
            <version>2.12.3version>
            <exclusions>

                <exclusion>
                    <groupId>org.springframework.bootgroupId>
                    <artifactId>spring-boot-starter-log4j2artifactId>
                exclusion>
            exclusions>
        dependency>

        <dependency>
            <groupId>io.zipkin.javagroupId>
            <artifactId>zipkin-autoconfigure-uiartifactId>
            <version>2.12.3version>
        dependency>
创建入口启动类
package com.cloud;

import org.springframework.boot.SpringApplication;
import org.springframework.boot.autoconfigure.SpringBootApplication;
import zipkin2.server.internal.EnableZipkinServer;

@SpringBootApplication
@EnableZipkinServer // 开启Zipkin Server功能
public class ZipkinServerApplication {

    public static void main(String[] args) {
        SpringApplication.run(ZipkinServerApplication.class,args);
    }

}
创建配置文件yml
server:
  port: 9411
management:
  metrics:
    web:
      server:
        auto-time-requests: false # 关闭⾃动检测请求
访问 http://localhost:9411/zipkin/ 完成Zipkin server端构建

(二)构建Zipkin Client服务
每个微服务引入maven依赖
        <dependency>
            <groupId>org.springframework.cloudgroupId>
            <artifactId>spring-cloud-starter-sleuthartifactId>
        dependency>
        <dependency>
            <groupId>org.springframework.cloudgroupId>
            <artifactId>spring-cloud-starter-zipkinartifactId>
        dependency>
修改微服务application.yml配置文件,添加日志级别
server:
  port: 8080
#注册到Eureka服务中心
eureka:
  client:
    service-url:
      # 注册到集群,就把多个Eurekaserver地址使用逗号连接起来即可;注册到单实例(非集群模式),那就写一个就ok
      defaultZone: http://EurekaServerA:8761/eureka,http://EurekaServerB:8762/eureka
  instance:
    prefer-ip-address: true
    instance-id: ${spring.cloud.client.ip-address}:${spring.application.name}:${server.port}:@project.version@
spring:
  application:
    name: cloud-service-user
  zipkin:
    base-url: http://127.0.0.1:9411 # zipkin server的请求地址
    sender:
      # web 客户端将踪迹日志数据通过网络请求的方式传送到服务端,另外还有配置
      # kafka/rabbit 客户端将踪迹日志数据传递到mq进行中转
      type: web
  sleuth:
    sampler:
      # 采样率 1 代表100%全部采集 ,默认0.1 代表10% 的请求踪迹数据会被采集
      # 生产环境下,请求量非常大,没有必要所有请求的踪迹数据都采集分析,对于网络包括server端压力都是比较大的,可以配置采样率采集一定比例的请求的踪迹数据进行分析即可
      probability: 1
management:
  endpoints:
    web:
      exposure:
        include: "*"
  # 暴露健康接口的细节
  endpoint:
    health:
      show-details: always
#分布式链路追踪
logging:
  level:
    org.springframework.web.servlet.DispatcherServlet: debug
    org.springframework.cloud.sleuth: debug
至此完成Zipkin Client创建
测试
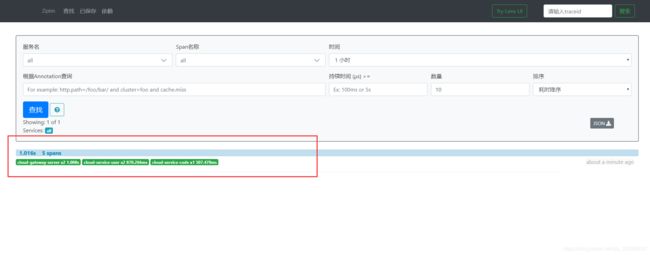
对服务发送一次请求,然后刷新 http://localhost:9411/zipkin/
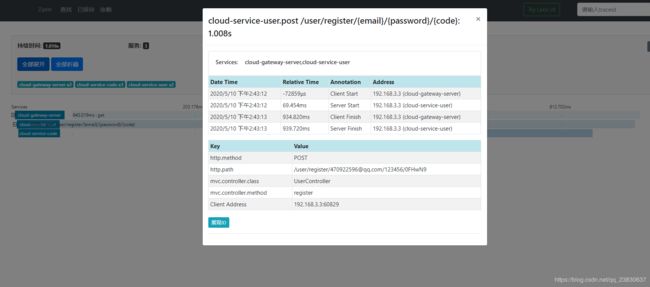
Zipkin server页面方便我们查看服务调用依赖关系及一些性能指标和异常信息

点击进入可以观察到调用情况
追踪数据持久化
通过上面的操作可以完成Sleuth + Zipkin基本搭建,由于链路追踪的信息是存储在内存当中的,所以当对服务端进行重启后会导致之前的链路追踪的数据丢失,为此Zipkin提供了两种持久化方式,持久化到mysql或elasticsearch当中;
以持久化到mysql为例
mysql中创建名称为zipkin的数据库,并执⾏如下sql语句(官⽅提供)
--
-- Copyright 2015-2019 The OpenZipkin Authors
--
-- Licensed under the Apache License, Version 2.0 (the "License"); you
may not use this file except
-- in compliance with the License. You may obtain a copy of the
License at
--
-- http://www.apache.org/licenses/LICENSE-2.0
--
-- Unless required by applicable law or agreed to in writing, software
distributed under the License
-- is distributed on an "AS IS" BASIS, WITHOUT WARRANTIES OR
CONDITIONS OF ANY KIND, either express
-- or implied. See the License for the specific language governing
permissions and limitations under
-- the License.
--
CREATE TABLE IF NOT EXISTS zipkin_spans (
 `trace_id_high` BIGINT NOT NULL DEFAULT 0 COMMENT 'If non zero, this
means the trace uses 128 bit traceIds instead of 64 bit',
 `trace_id` BIGINT NOT NULL,
 `id` BIGINT NOT NULL,
 `name` VARCHAR(255) NOT NULL,
 `remote_service_name` VARCHAR(255),
 `parent_id` BIGINT,
 `debug` BIT(1),
 `start_ts` BIGINT COMMENT 'Span.timestamp(): epoch micros used for
endTs query and to implement TTL',
 `duration` BIGINT COMMENT 'Span.duration(): micros used for
minDuration and maxDuration query',
 PRIMARY KEY (`trace_id_high`, `trace_id`, `id`)
 ) ENGINE=InnoDB ROW_FORMAT=COMPRESSED CHARACTER SET=utf8 COLLATE
utf8_general_ci;
ALTER TABLE zipkin_spans ADD INDEX(`trace_id_high`, `trace_id`)
COMMENT 'for getTracesByIds';
ALTER TABLE zipkin_spans ADD INDEX(`name`) COMMENT 'for getTraces and
getSpanNames';
ALTER TABLE zipkin_spans ADD INDEX(`remote_service_name`) COMMENT 'for
getTraces and getRemoteServiceNames';
ALTER TABLE zipkin_spans ADD INDEX(`start_ts`) COMMENT 'for getTraces
ordering and range';
CREATE TABLE IF NOT EXISTS zipkin_annotations (
 `trace_id_high` BIGINT NOT NULL DEFAULT 0 COMMENT 'If non zero, this
means the trace uses 128 bit traceIds instead of 64 bit',
 `trace_id` BIGINT NOT NULL COMMENT 'coincides with
zipkin_spans.trace_id',
 `span_id` BIGINT NOT NULL COMMENT 'coincides with zipkin_spans.id',
 `a_key` VARCHAR(255) NOT NULL COMMENT 'BinaryAnnotation.key or
Annotation.value if type == -1',
 `a_value` BLOB COMMENT 'BinaryAnnotation.value(), which must be
smaller than 64KB',
 `a_type` INT NOT NULL COMMENT 'BinaryAnnotation.type() or -1 if
Annotation',
 `a_timestamp` BIGINT COMMENT 'Used to implement TTL;
Annotation.timestamp or zipkin_spans.timestamp',
 `endpoint_ipv4` INT COMMENT 'Null when Binary/Annotation.endpoint is
null',
 `endpoint_ipv6` BINARY(16) COMMENT 'Null when
Binary/Annotation.endpoint is null, or no IPv6 address',
 `endpoint_port` SMALLINT COMMENT 'Null when
Binary/Annotation.endpoint is null',
 `endpoint_service_name` VARCHAR(255) COMMENT 'Null when
Binary/Annotation.endpoint is null'
) ENGINE=InnoDB ROW_FORMAT=COMPRESSED CHARACTER SET=utf8 COLLATE
utf8_general_ci;
ALTER TABLE zipkin_annotations ADD UNIQUE KEY(`trace_id_high`,
`trace_id`, `span_id`, `a_key`, `a_timestamp`) COMMENT 'Ignore insert
on duplicate';
ALTER TABLE zipkin_annotations ADD INDEX(`trace_id_high`, `trace_id`,
`span_id`) COMMENT 'for joining with zipkin_spans';
ALTER TABLE zipkin_annotations ADD INDEX(`trace_id_high`, `trace_id`)
COMMENT 'for getTraces/ByIds';
ALTER TABLE zipkin_annotations ADD INDEX(`endpoint_service_name`)
COMMENT 'for getTraces and getServiceNames';
ALTER TABLE zipkin_annotations ADD INDEX(`a_type`) COMMENT 'for
getTraces and autocomplete values';
 ALTER TABLE zipkin_annotations ADD INDEX(`a_key`) COMMENT 'for
getTraces and autocomplete values';
ALTER TABLE zipkin_annotations ADD INDEX(`trace_id`, `span_id`,
`a_key`) COMMENT 'for dependencies job';
CREATE TABLE IF NOT EXISTS zipkin_dependencies (
 `day` DATE NOT NULL,
 `parent` VARCHAR(255) NOT NULL,
 `child` VARCHAR(255) NOT NULL,
 `call_count` BIGINT,
 `error_count` BIGINT,
 PRIMARY KEY (`day`, `parent`, `child`)
) ENGINE=InnoDB ROW_FORMAT=COMPRESSED CHARACTER SET=utf8 COLLATE
utf8_general_ci;
引入maven相关依赖
<dependency>
	 <groupId>io.zipkin.javagroupId>
	 <artifactId>zipkin-autoconfigure-storagemysqlartifactId>
	 <version>2.12.3version>
 dependency>
 <dependency>
	 <groupId>mysqlgroupId>
 	<artifactId>mysql-connector-javaartifactId>
 dependency>
 <dependency>
	 <groupId>com.alibabagroupId>
 	<artifactId>druid-spring-boot-starterartifactId>
 	<version>1.1.10version>
 dependency>
 <dependency>
 	<groupId>org.springframeworkgroupId>
	 <artifactId>spring-txartifactId>
 dependency>
 <dependency>
 	<groupId>org.springframeworkgroupId>
 	<artifactId>spring-jdbcartifactId>
 dependency>
添加配置信息
spring:
 datasource:
   driver-class-name: com.mysql.jdbc.Driver
   url: jdbc:mysql://localhost:3306/zipkin?useUnicode=true&characterEncoding=utf-8&useSSL=false&allowMultiQueries=true
   username: root
   password: 123456
   druid:
     initialSize: 10
     minIdle: 10
     maxActive: 30
     maxWait: 50000
# 指定zipkin持久化介质为mysql
  zipkin:
    storage:
      type: mysql
启动类中注入事务管理器
@Bean
public PlatformTransactionManager txManager(DataSource dataSource) {
 return new DataSourceTransactionManager(dataSource);
}
至此完成对链路追踪信息持久化到mysql的操作

