最新2020 iOS 13 适配汇总(持续更新中)
iOS 13 适配汇总
iOS 13 支持适配的机型
- iPhone X、iPhone XR、iPhone XS、iPhone XS Max
- iPhone 8、iPhone 8 Plus
- iPhone 7、iPhone 7 Plus
- iPhone 6s、iPhone 6s Plus
- iPhone SE
- iPod touch (第七代)
适配要求
根据官网的说法,遵守以下要求的截止日期已延长至2020年6月30日。之后所有提交到 App Store 的 iPhone 和 iPad 应用必须使用 iOS 13 以上的 SDK 进行编译,并支持 iPhone Xs Max 或 12.9 寸 iPad Pro (3代) 及以后版本的全屏幕设计。
适配主要涉及的方面:
- API适配
- 弃用
- DarkMode 深色模式
API适配
本人正在积极地收集更多的iOS13适配的信息,随时更新
一 、在 iOS 13 中部分私有方法 KVC 可能导致崩溃
注意⚠️,iOS 13 通过 KVC 方式修改私有属性,有 Crush 风险,谨慎使用!
崩溃信息
*** Terminating app due to uncaught exception 'NSGenericException', reason: 'Access to UISearchBar's _searchField ivar is prohibited. This is an application bug'
目前整理的会导致崩溃的私有 api 和对应替代方案如下:
1. UITextField 的私有属性 _placeholderLabel 被禁止访问了
收到的错误信息⚠️
崩溃 api。获取 _placeholderLabel 不会崩溃,但是获取 _placeholderLabel 里的属性就会
[_textField setValue:self.placeholderColor
forKeyPath:@"_placeholderLabel.textColor"];
[textField setValue:[UIFont systemFontOfSize:20] forKeyPath:@"_placeholderLabel.font"];
解决方案:
方案1:
UITextField有个attributedPlaceholder的属性,我们可以自定义这个富文本来达到我们需要的结果。
修改如下:
 NSMutableAttributedString *placeholderString =
 [[NSMutableAttributedString alloc] initWithString:placeholder
 attributes:@{NSForegroundColorAttributeName : self.placeholderColor}];
 _textField.attributedPlaceholder = placeholderString;
或者
textField.attributedPlaceholder = [[NSAttributedString alloc] initWithString:@"输入" attributes:@{
    NSForegroundColorAttributeName: [UIColor blueColor],
    NSFontAttributeName: [UIFont systemFontOfSize:20]
}];
方案2:
去掉下划线,访问 placeholderLabel
[textField setValue:[UIColor blueColor] forKeyPath:@"placeholderLabel.textColor"];
[textField setValue:[UIFont systemFontOfSize:20] forKeyPath:@"placeholderLabel.font"];
2. UISearchBar 的私有属性 _searchField 被禁止访问了
崩溃 api
UITextField *textField = [searchBar valueForKey:@"_searchField"];
方案 1,使用 iOS 13 的新属性 searchTextField
searchBar.searchTextField.placeholder = @"search";
方案 2,遍历获取指定类型的属性
- (UIView *)findViewWithClassName:(NSString *)className inView:(UIView *)view{
    Class specificView = NSClassFromString(className);
    if ([view isKindOfClass:specificView]) {
        return view;
    }

    if (view.subviews.count > 0) {
        for (UIView *subView in view.subviews) {
            UIView *targetView = [self findViewWithClassName:className inView:subView];
            if (targetView != nil) {
                return targetView;
            }
        }
    }

    return nil;
}
// 调用方法
UITextField *textField = [self findViewWithClassName:@"UITextField" inView:_searchBar];
3. UISearchBar 的私有属性 _cancelButtonText 被禁止访问了
崩溃 api
[searchBar setValue:@"取消" forKey:@"_cancelButtonText"];
方案,用同上的方法找到子类中 UIButton 类型的属性,然后设置其标题
UIButton *cancelButton = [self findViewWithClassName:NSStringFromClass([UIButton class]) inView:searchBar];
[cancelButton setTitle:@"取消" forState:UIControlStateNormal];
二、 控制器的 modalPresentationStyle 默认值变了
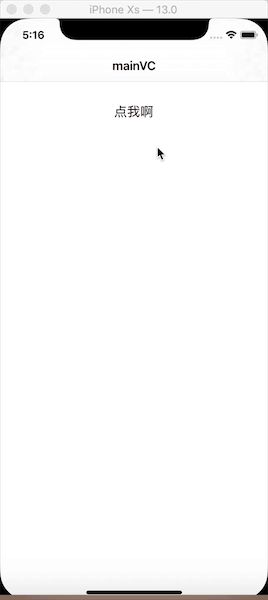
在iOS13中运行代码发现presentViewController和之前弹出的样式不一样。
会出现这种情况是主要是因为我们之前对UIViewController里面的一个属性,即modalPresentationStyle(该属性是控制器在模态视图时将要使用的样式)没有设置需要的类型。在iOS13中modalPresentationStyle的默认改为UIModalPresentationAutomatic,而在之前默认是UIModalPresentationFullScreen。
查阅了下 UIModalPresentationStyle枚举定义,赫然发现iOS 13
新加了一个枚举值:
typedef NS_ENUM(NSInteger, UIModalPresentationStyle) {
     UIModalPresentationFullScreen = 0,
     UIModalPresentationPageSheet API_AVAILABLE(ios(3.2)) API_UNAVAILABLE(tvos),
    UIModalPresentationFormSheet API_AVAILABLE(ios(3.2)) API_UNAVAILABLE(tvos),
     UIModalPresentationCurrentContext API_AVAILABLE(ios(3.2)),
     UIModalPresentationCustom API_AVAILABLE(ios(7.0)),
     UIModalPresentationOverFullScreen API_AVAILABLE(ios(8.0)),
     UIModalPresentationOverCurrentContext API_AVAILABLE(ios(8.0)),
     UIModalPresentationPopover API_AVAILABLE(ios(8.0)) API_UNAVAILABLE(tvos),
     UIModalPresentationBlurOverFullScreen API_AVAILABLE(tvos(11.0)) API_UNAVAILABLE(ios) API_UNAVAILABLE(watchos),
     UIModalPresentationNone API_AVAILABLE(ios(7.0)) = -1,
    UIModalPresentationAutomatic API_AVAILABLE(ios(13.0)) = -2, };
要改会原来模态视图样式,我们只需要把UIModalPresentationStyle设置为UIModalPresentationFullScreen即可。
⚠️注意:UIModalPresentationOverFullScreen最低支持iOS 8,如果你还要支持iOS 8以下版本,那么你可以用UIModalPresentationFullScreen,这个两个值的交互略有些细微差别,具体的可以自己看下效果。
   ViewController *vc = [[ViewController alloc] init];
         vc.title = @"presentVC";
         UINavigationController *nav = [[UINavigationController alloc] initWithRootViewController:vc];
         nav.modalPresentationStyle = UIModalPresentationFullScreen;
         [self.window.rootViewController presentViewController:nav animated:YES completion:nil];
三、DeviceToken有变化
一般现在的第三方推送都是将DeviceToken原始数据丢进去,具体的解析都是第三方内部处理,所以,这些第三方解析DeviceToken的方式正确的话,那就毫无问题。如果你们是通过直接将 NSData 类型的 deviceToken 转换成 NSString 字符串,然后替换掉多余的符号获取DeviceToken,那你需要注意了,如下:
 NSString *dt = [deviceToken description]; dt = [dt
 stringByReplacingOccurrencesOfString: @"<" withString: @""]; dt = [dt
 stringByReplacingOccurrencesOfString: @">" withString: @""]; dt = [dt
 stringByReplacingOccurrencesOfString: @" " withString: @""];
这段代码运行在 iOS 13 上已经无法获取到准确的DeviceToken字符串了,iOS 13 通过[deviceToken description]获取到的内容已经变成了:
{length = 32, bytes = 0xd7f9fe34 69be14d1 fa51be22 329ac80d ... 5ad13017 b8ad0736 }
解决办法一
NSMutableString *deviceTokenString = [NSMutableString string];
 const char *bytes = deviceToken.bytes;
 NSInteger count = deviceToken.length;
 for (int i = 0; i < count; i++) {
     [deviceTokenString appendFormat:@"%02x", bytes[i]&0x000000FF];
 }
解决办法二
或者你也可以使用极光提供的方法(2019年7月24日更新)
- (void)application:(UIApplication *)application didRegisterForRemoteNotificationsWithDeviceToken:(NSData *)deviceToken
 {
     if (![deviceToken isKindOfClass:[NSData class]]) return;
const unsigned *tokenBytes = [deviceToken bytes];
     NSString *hexToken = [NSString stringWithFormat:@"%08x%08x%08x%08x%08x%08x%08x%08x",
                           ntohl(tokenBytes[0]), ntohl(tokenBytes[1]), ntohl(tokenBytes[2]),
                          ntohl(tokenBytes[3]), ntohl(tokenBytes[4]), ntohl(tokenBytes[5]),
                           ntohl(tokenBytes[6]), ntohl(tokenBytes[7])];
     NSLog(@"deviceToken:%@",hexToken); }
四、 Sign in with Apple
(提供第三方登录的注意啦⚠️)
在 iOS 13 中苹果推出一种在 App 和网站上快速、便捷登录的方式: Sign In With Apple。这是 iOS 13 新增的功能,因此需要使用 Xcode 11 进行开发。关于应用是否要求接入此登录方式,苹果在 App Store 应用审核指南 中提到:
Apps that exclusively use a third-party or social login service (such
as Facebook Login, Google Sign-In, Sign in with Twitter, Sign In with
LinkedIn, Login with Amazon, or WeChat Login) to set up or
authenticate the user’s primary account with the app must also offer
Sign in with Apple as an equivalent option.
如果你的应用使用了第三方或社交账号登录服务(如Facebook、Google、Twitter、LinkedIn、Amazon、微信等)来设置或验证用户的主账号,就必须把 Sign In With Apple 作为同等的选项添加到应用上。如果是下面这些类型的应用则不需要添加:
仅仅使用公司内部账号来注册和登录的应用;
-
要求用户使用现有的教育或企业账号进行登录的教育、企业或商务类型的应用;
-
使用政府或业界支持的公民身份识别系统或电子标识对用户进行身份验证的应用;
-
特定第三方服务的应用,用户需要直接登录其邮箱、社交媒体或其他第三方帐户才能访问其内容。
另外需要注意,关于何时要求接入 Sign In With Apple,苹果在 News and Updates 中提到:
New apps must follow these guidelines starting April 30, 2020. App updates must follow these guidelines starting June 30, 2020.
新的应用程序必须从2020年4月30日开始遵循这些指导原则。从2020年6月30日开始,应用程序更新必须遵循这些指导原则.
五、即将废弃的 LaunchImage
从 iOS 8 的时候,苹果就引入了 LaunchScreen,我们可以设置 LaunchScreen来作为启动页。当然,现在你还可以使用LaunchImage来设置启动图。不过使用LaunchImage的话,要求我们必须提供各种屏幕尺寸的启动图,来适配各种设备,随着苹果设备尺寸越来越多,这种方式显然不够 Flexible。而使用 LaunchScreen的话,情况会变的很简单, LaunchScreen是支持AutoLayout+SizeClass的,所以适配各种屏幕都不在话下。
注意啦⚠️. 要求的截止日期已延长至2020年6月30日 . 从2020年6月30日开始,所有使⽤ iOS13 SDK的 App将必须提供 LaunchScreen,LaunchImage即将退出历史舞台。
六、UIActivityIndicatorView加载视图
iOS13对UIActivityIndicatorView的样式也做了修改
之前有三种样式:
- UIActivityIndicatorViewStyleGray 灰色
- UIActivityIndicatorViewStyleWhite 白色
- UIActivityIndicatorViewStyleWhiteLarge 白色(大型)
iOS13废弃了以上三种样式,而用以下两种样式代替:
- UIActivityIndicatorViewStyleLarge (大型)
- UIActivityIndicatorViewStyleMedium (中型)
iOS13通过color属性设置其颜色
- (UIActivityIndicatorView *)loadingView {
    if (_loadingView == nil) {
        _loadingView = [[UIActivityIndicatorView alloc] initWithActivityIndicatorStyle:UIActivityIndicatorViewStyleLarge];
        [_loadingView setColor:[UIColor systemBackgroundColor]];
        [_loadingView setFrame:CGRectMake(0, 0, 200, 200)];
        [_loadingView setCenter:self.view.center];
    }
    return _loadingView;
}
七、 UISearchBar 黑线处理导致崩溃
之前为了处理搜索框的黑线问题,通常会遍历 searchBar 的 subViews,找到并删除 UISearchBarBackground。
for (UIView *view in _searchBar.subviews.lastObject.subviews) {
    if ([view isKindOfClass:NSClassFromString(@"UISearchBarBackground")]) {
        [view removeFromSuperview];
        break;
    }
}
在 iOS13 中这么做会导致 UI 渲染失败,然后直接崩溃,崩溃信息如下:
*** Terminating app due to uncaught exception 'NSInternalInconsistencyException', reason: 'Missing or detached view for search bar layout'
解决方案
设置 UISearchBarBackground 的 layer.contents 为 nil:
for (UIView *view in _searchBar.subviews.lastObject.subviews) {
    if ([view isKindOfClass:NSClassFromString(@"UISearchBarBackground")]) {
        view.layer.contents = nil;
        break;
    }
}
八、UINavigationBar 设置按钮边距导致崩溃
从 iOS 11 开始,UINavigationBar 使用了自动布局,左右两边的按钮到屏幕之间会有 16 或 20 的边距。
image.png
为了避免点击到间距的空白处没有响应,通常做法是:定义一个 UINavigationBar 子类,重写 layoutSubviews 方法,在此方法里遍历 subviews 获取 _UINavigationBarContentView,并将其 layoutMargins 设置为 UIEdgeInsetsZero。
- (void)layoutSubviews {
    [super layoutSubviews];

    for (UIView *subview in self.subviews) {
        if ([NSStringFromClass([subview class]) containsString:@"_UINavigationBarContentView"]) {
            subview.layoutMargins = UIEdgeInsetsZero;
            break;
        }
    }
}
然而,这种做法在 iOS 13 中会导致崩溃,崩溃信息如下:
*** Terminating app due to uncaught exception 'NSInternalInconsistencyException', reason: 'Client error attempting to change layout margins of a private view'
解决方案
使用设置 frame 的方式,让 _UINavigationBarContentView 向两边伸展,从而抵消两边的边距。
- (void)layoutSubviews {
    [super layoutSubviews];

    for (UIView *subview in self.subviews) {
        if ([NSStringFromClass([subview class]) containsString:@"_UINavigationBarContentView"]) {
            if ([UIDevice currentDevice].systemVersion.floatValue >= 13.0) {
                UIEdgeInsets margins = subview.layoutMargins;
                subview.frame = CGRectMake(-margins.left, -margins.top, margins.left + margins.right + subview.frame.size.width, margins.top + margins.bottom + subview.frame.size.height);
            } else {
                subview.layoutMargins = UIEdgeInsetsZero;
            }
            break;
        }
    }
}
九、CNCopyCurrentNetworkInfo 使用要求更严格
从 iOS 12 开始,CNCopyCurrentNetworkInfo 函数需要开启 Access WiFi Information 的功能后才会返回正确的值。在 iOS 13 中,这个函数的使用要求变得更严格,根据 CNCopyCurrentNetworkInfo 文档说明,应用还需要符合下列三项条件中的至少一项才能得到正确的值:
-
使用 Core Location 的应用, 并获得定位服务权限。
-
使用 NEHotspotConfiguration 来配置 WiFi 网络的应用。
-
目前正处于启用状态的 VPN 应用。
苹果作出这项改变主要为了保障用户的安全,因为根据 MAC 地址容易推算出用户当前所处的地理位置。同样,蓝牙设备也具有 MAC 地址,所以苹果也为蓝牙添加了新的权限
解决方案
根据应用需求,添加三项要求其中一项。可以选择第一项获取定位权限,因为添加的成本不会太大,只需要用户允许应用使用定位服务即可。
 - (NSString*) getWifiSsid {   if (@available(iOS 13.0, *)) {
     //用户明确拒绝,可以弹窗提示用户到设置中手动打开权限
     if ([CLLocationManager authorizationStatus] == kCLAuthorizationStatusDenied) {
       NSLog(@"User has explicitly denied authorization for this application, or location services are disabled in Settings.");
       //使用下面接口可以打开当前应用的设置页面
       //[[UIApplication sharedApplication] openURL:[NSURL URLWithString:UIApplicationOpenSettingsURLString]];
       return nil;
     }
     CLLocationManager* cllocation = [[CLLocationManager alloc] init];
     if(![CLLocationManager locationServicesEnabled] || [CLLocationManager authorizationStatus] ==
 kCLAuthorizationStatusNotDetermined){
       //弹框提示用户是否开启位置权限
       [cllocation requestWhenInUseAuthorization];
       usleep(50);
       //递归等待用户选选择
       return [self getWifiSsidWithCallback:callback];
     }   }   NSString *wifiName = nil;   CFArrayRef wifiInterfaces = CNCopySupportedInterfaces();   if (!wifiInterfaces) {
     return nil;   }   NSArray *interfaces = (__bridge NSArray *)wifiInterfaces;   for (NSString *interfaceName in interfaces) {
     CFDictionaryRef dictRef = CNCopyCurrentNetworkInfo((__bridge CFStringRef)(interfaceName));

     if (dictRef) {
       NSDictionary *networkInfo = (__bridge NSDictionary *)dictRef;
       NSLog(@"network info -> %@", networkInfo);
       wifiName = [networkInfo objectForKey:(__bridge NSString *)kCNNetworkInfoKeySSID];
       CFRelease(dictRef);
     }   }   CFRelease(wifiInterfaces);   return wifiName; }
打印:如下
network info -> { BSSID = “44:dd:fb:43:91:ff”; SSID = “Asus_c039”;
SSIDDATA = <41737573 5f633033 39>; } 不同意 network info -> { BSSID =
“00:00:00:00:00:00”; SSID = WLAN; SSIDDATA = <574c414e>; }
十、增加一直使用蓝牙的权限申请
在 iOS 13 中,苹果将原来蓝牙申请权限用的 NSBluetoothPeripheralUsageDescription 字段,替换为 NSBluetoothAlwaysUsageDescription 字段。在info.plist里增加NSBluetoothAlwaysUsageDescription 我们要一直使用您的蓝牙
如果在 iOS 13 中使用旧的权限字段获取蓝牙权限,会导致崩溃,崩溃信息如下:
This app has crashed because it attempted to access privacy-sensitive data without a usage description. The app's Info.plist must contain an NSBluetoothAlwaysUsageDescription key with a string value explaining to the user how the app uses this data.
另外,如果将没有新字段的包提交审核,将会收到包含 ITMS-90683 的邮件,并提示审核不通过。
解决方案
官网文档也有说明,就是在 Info.plist 中把两个字段都加上。
For deployment targets earlier than iOS 13, add both NSBluetoothAlwaysUsageDescription and NSBluetoothPeripheralUsageDescription to your app’s Information Property List file.
十一、 iOS 13 不再支持 UIApplicationExitsOnSuspen
发布到App Store时,出现以下错误:
警告ITMS-90339:“已弃用的Info.plist密钥.Info.plist在bundle ar [ar.app]中包含一个密钥'UIApplicationExitsOnSuspend',很快就会不受支持。删除密钥,重建您的应用并重新提交。”
解决方案
从Info.plist中删除该密钥。
这是一个小技巧。选择Info.plist。然后右键单击任何键或值,并选择“显示原始键/值”。如果UIApplicationExitsOnSuspend这个键是包括在内删除即可。
十二、 获取SearchBar的cancleButton
获取SearchBar的cancleButton,由于searcBar的层级发生变化以及对象的局部变量,因为无法通过kvc的方式来获取
i
f ([[[UIDevice currentDevice]systemVersion] floatValue] >= 13.0) {
for(id cc in [self.searchBar subviews]) {
for (id zz in [cc subviews]) {
for (id gg in [zz subviews]) {
if([gg isKindOfClass:[UIButton class]]){
UIButton *cancelButton = (UIButton )gg;
[cancelButton setTitleColor:[UIColor redColor] forState:UIControlStateNormal];
}
}
} } }else{
UIButtoncancelButton = (UIButton *)[self.searchBar getVarWithName:@"_cancelButton"];
[cancelButton setTitleColor:[UIColor redColor] forState:UIControlStateNormal]; }
十三、 UISegmentedControl 默认样式改变
默认样式变为白底黑字,如果设置修改过颜色的话,页面需要修改。
原本设置选中颜色的 tintColor 已经失效,新增了 selectedSegmentTintColor 属性用以修改选中的颜色。
十四、使用MJExtension 中处理NSNull的不同
这个直接会导致Crash的在将服务端数据字典转换为模型时,如果遇到服务端给的数据为NSNull时,
mj_JSONObject,其中 class_copyPropertyList方法得到的属性里,多了一种EFSQLBinding类型的东西,而且属性数量也不准确,那就没办法了,只能改写这个方法了,这个组件没有更新的情况下,写了一个方法swizzling掉把当遇到 NSNull时,直接转为nil了。
十五、 WKWebView 中测量页面内容高度的方
OS 13以前
document.body.scrollHeight
iOS 13中
document.documentElement.scrollHeight
两者相差55 应该是浏览器定义高度变了
十六、 状态栏(StatusBar)
目前状态栏也增加了一种模式,由之前的两种,变成了三种, 其中default由之前的黑色内容,变成了会根据系统模式,自动选择当前展示lightContent还是darkContent。
我们在使用的时候,就可以重写preferredStatusBarStyle的get方法:
弃用
UIWebView 将被禁止提交审核
在 iOS 13 推出后,苹果在 UIWebView 的说明上将其支持的系统范围定格在了 iOS 2 ~ iOS 12。目前,如果开发者将包含 UIWebView api 的应用更新上传到 App Store 审核后,其将会收到包含 ITMS-90809 信息的回复邮件,提示你在下一次提交时将应用中 UIWebView 的 api 移除。
Dear Developer,
We identified one or more issues with a recent delivery for your app,
“xxx”. Your delivery was successful, but you may wish to correct the
following issues in your next delivery:ITMS-90809: Deprecated API Usage - Apple will stop accepting
submissions of apps that use UIWebView APIs . See
developer.apple.com/documentati… for more information.After you’ve corrected the issues, you can use Xcode or Application
Loader to upload a new binary to App Store Connect.Best regards,
The App Store Team
解决方案
用 WKWebView 替代 UIWebView,确保所有 UIWebView 的 api 都要移除,如果需要适配 iOS 7 的可以通过 openURL 的方式在 Safari 打开。
备注:
问题1: WKWebView 中拨打电话失效
解决办法:遵循 WKNavigationDelegate代理
实现代理方法- (void)webView:(WKWebView *)webView decidePolicyForNavigationAction:(WKNavigationAction *)navigationAction decisionHandler:(void (^)(WKNavigationActionPolicy))decisionHandler
具体代码如下:
- (void)webView:(WKWebView *)webView decidePolicyForNavigationAction:(WKNavigationAction *)navigationAction decisionHandler:(void (^)(WKNavigationActionPolicy))decisionHandler {
    NSURL *URL = navigationAction.request.URL;
    NSString *scheme = [URL scheme];
    if ([scheme isEqualToString:@"tel"]) {
        NSString *resourceSpecifier = [URL resourceSpecifier];
//       也可以使用 NSString *callPhone = [NSString stringWithFormat:@"telprompt://%@", resourceSpecifier];
        NSString *callPhone = [NSString stringWithFormat:@"tel://%@", resourceSpecifier];
        [[UIApplication sharedApplication] openURL:[NSURL URLWithString:callPhone]];

    }
    decisionHandler(WKNavigationActionPolicyAllow);
}
问题2: WKWebView 中和js进行交互
解决办法 使用WebViewJavaScriptBridge完成H5和原生的交互(iOS、安卓)都可用,关于iOS原生和js 的交互我结合在项目中的实际应用写了文在这边,如果觉得不错记得给个赞哦–》iOS原生和js 的交互
使用 UISearchDisplayController 导致崩溃
iOS 8 之前,我们在 UITableView 上添加搜索框需要使用 UISearchBar + UISearchDisplayController 的组合方式,而在 iOS 8 之后,苹果就已经推出了 UISearchController 来代替这个组合方式。在 iOS 13 中,如果还继续使用 UISearchDisplayController 会直接导致崩溃,崩溃信息如下:
*** Terminating app due to uncaught exception 'NSGenericException', reason: 'UISearchDisplayController is no longer supported when linking against this version of iOS. Please migrate your application to UISearchController
解决方案
使用 UISearchController 替换 UISearchBar + UISearchDisplayController 的组合方案。
MPMoviePlayerController 在iOS 13中废弃
*** Terminating app due to uncaught exception 'NSInvalidArgumentException', reason: 'MPMoviePlayerController is no longer available. Use AVPlayerViewController in AVKit.'
解决方案
 'MPMoviePlayerController is no longer available. Use
 AVPlayerViewController in AVKit.'
方案就是AVKit里面的那套播放器。
Xcode 11 创建的工程在低版本设备上运行黑屏
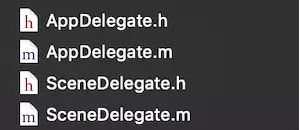
使用 Xcode 11 创建的工程,运行设备选择 iOS 13.0 以下的设备,运行应用时会出现黑屏。这是因为 Xcode 11 默认是会创建通过 UIScene 管理多个 UIWindow 的应用,工程中除了 AppDelegate 外会多一个 SceneDelegate:
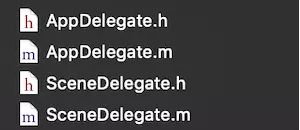
这是为了 iPadOS 的多进程准备的,也就是说 UIWindow 不再是 UIApplication 中管理,但是旧版本根本没有 UIScene。
解决方案
在 AppDelegate 的头文件加上:
@property (strong, nonatomic) UIWindow *window;
使用 @available 导致旧版本 Xcode 编译出错
在 Xcode 11 的 SDK 工程的代码里面使用了 @available 判断当前系统版本,打出来的包放在 Xcode 10 中编译,会出现一下错误:
Undefine symbols for architecture i386:
    "__isPlatformVersionAtLeast", referenced from:
        ...
ld: symbol(s) not found for architecture i386
从错误信息来看,是 __isPlatformVersionAtLeast 方法没有具体的实现,但是工程里根本没有这个方法。实际测试无论在哪里使用@available ,并使用 Xcode 11 打包成动态库或静态库,把打包的库添加到 Xcode 10 中编译都会出现这个错误,因此可以判断是 iOS 13 的 @available 的实现中使用了新的 api
解决方案
如果你的 SDK 需要适配旧版本的 Xcode,那么需要避开此方法,通过获取系统版本来进行判断:
if ([UIDevice currentDevice].systemVersion.floatValue >= 13.0) {
    ...
}
另外,在 Xcode 10 上打开 SDK 工程也应该可以正常编译,这就需要加上编译宏进行处理:
#ifndef __IPHONE_13_0
#define __IPHONE_13_0 130000
#endif

#if __IPHONE_OS_VERSION_MAX_ALLOWED >= __IPHONE_13_0
...
#endif
DarkMode 深色模式
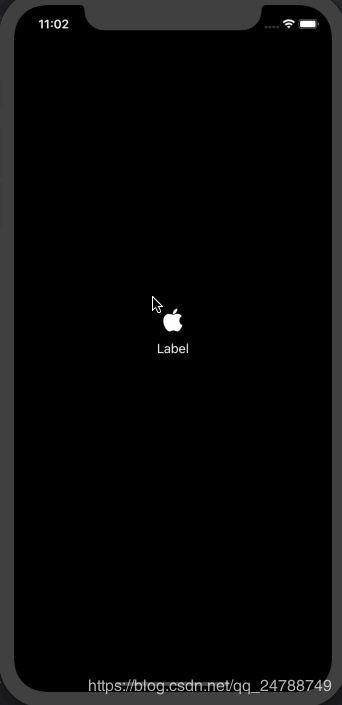
- iOS 13 推出暗黑模式,UIKit 提供新的系统颜色和 api 来适配不同颜色模式,xcassets 对素材适配也做了调整,具体适配可见: Implementing Dark Mode on iOS。
针对黑暗模式的推出,Apple官方推荐所有三方App尽快适配。目前并没有强制App进行黑暗模式适配。因此黑暗模式适配范围现在可采用以下三种策略:
-
全局关闭黑暗模式
-
指定页面关闭黑暗模式
-
全局适配黑暗模式
全局关闭黑暗模式
如果不打算适配 Dark Mode,全局关闭黑暗模式,有两种方案:
方案一:在项目 Info.plist 文件中,添加一条内容,Key为 User Interface Style,值类型设置为String并设置为 Light 即可。
不过也有一点,在系统模式为深色模式的情况下,项目全局关闭黑暗模式,导航栏字体渲染色还是一直会是白色,需要特别设置。
方案二:代码强制关闭黑暗模式,将当前 window 设置为 Light 状态。
if(@available(iOS 13.0,*)){
self.window.overrideUserInterfaceStyle = UIUserInterfaceStyleLight;
}
即可在应用内禁用暗黑模式。
不过即使设置了颜色方案,申请权限的系统弹窗还是会依据系统的颜色进行显示,自己创建的 UIAlertController 就不会。
指定页面关闭黑暗模式
从Xcode 11、iOS 13开始,UIViewController与View新增属性 overrideUserInterfaceStyle,若设置View对象该属性为指定模式,则强制该对象以及子对象以指定模式展示,不会跟随系统模式改变。
-
设置 ViewController 该属性, 将会影响视图控制器的视图以及子视图控制器都采用该模式
-
设置 View 该属性, 将会影响视图及其所有子视图采用该模式
-
设置 Window 该属性, 将会影响窗口中的所有内容都采用该样式,包括根视图控制器和在该窗口中显示内容的所有控制器
全局适配黑暗模式
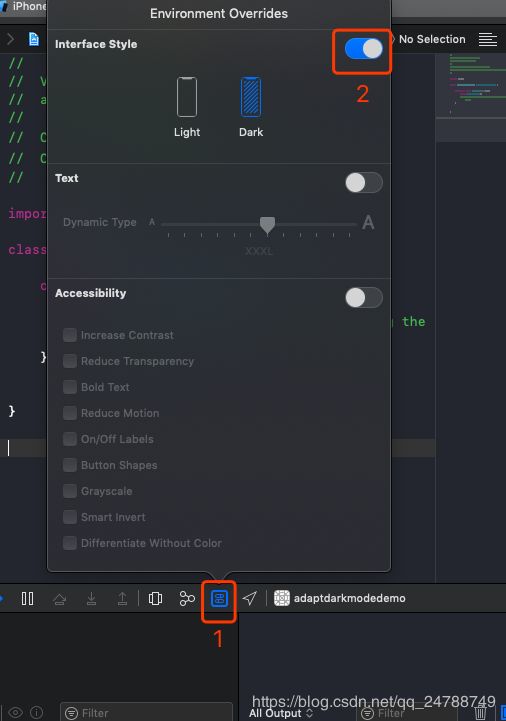
- 模拟器调试(simulator debug)
- 图片(assets)
- 颜色(color)
模拟器调试
图片适配
图片适配,主要是我们本地图片资源适配
**方式1:
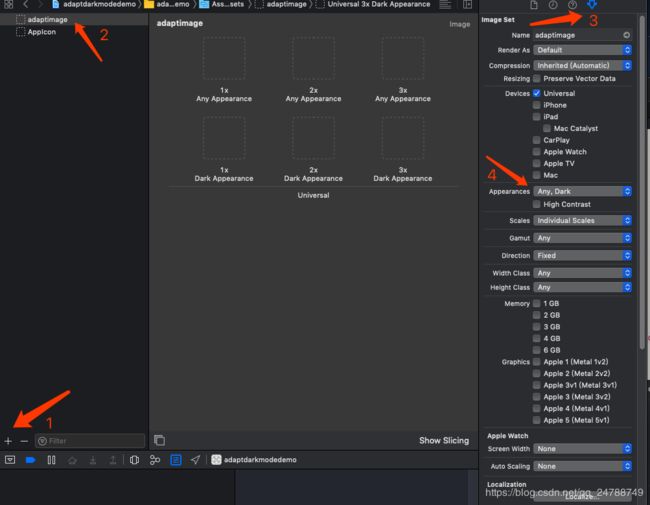
图片适配比较方便的就是通过Assets.xcassets进行图片管理:
- 添加一个
image set,重命名如"adaptimage", - 选中该image set; 选中
Attributes Inspector; - 将
Appearances由"None“改为”Any,Dark"; - 不同模式下设置不同图片即可,mode 改变会自动选择不同的图片
**方式2:
你也可以直接使用判断当前系统mode的方式进行区分:
需要监听系统模式的变化,重写UITraitEnvironment协议方法traitCollectionDidChange(_,我们先看下协议方法:
public protocol UITraitEnvironment : NSObjectProtocol {

     @available(iOS 8.0, *)
     var traitCollection: UITraitCollection { get }

     /** To be overridden as needed to provide custom behavior when the environment's traits change. */
     @available(iOS 8.0, *)
     func traitCollectionDidChange(_ previousTraitCollection: UITraitCollection?) }
所以,我们只需要在改变系统mode的时候,重写代理:
 (void)traitCollectionDidChange:(UITraitCollection
 *)previousTraitCollection {
     [super traitCollectionDidChange:previousTraitCollection];

     // 对比情景改变
     BOOL isChanged = [traitCollection hasDifferentColorAppearanceComparedToTraitCollection:previousTraitCollection];
 }
View 的 layoutSubView, ViewController 的 viewDidLayoutSubviews 均会触发 traitCollectionDidChange:方法
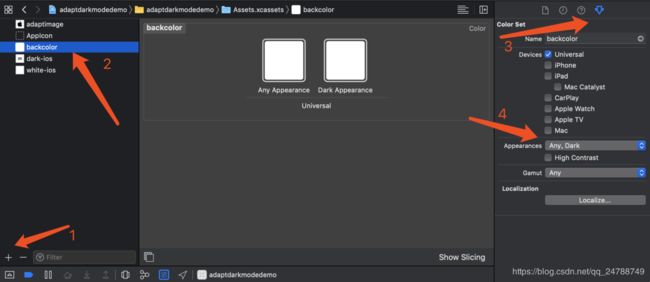
颜色适配
颜色适配有三种方式:
方法一:是通过Assets.xcassets添加一个Color Set,目前系统支持≥iOS11.0
方法二:动态颜色
动态颜色,根据当前情景自动切换颜色,iOS 13 新定义了一批 dynamic color, 大部分以 system 开头,也有以适用类别开头的,例如 labelColor,systemGroupedBackgroundColor,可以直接用
- 自定义 dynamic color
 // iOS 13 UIColor *dynamicColor = [UIColor
 colorWithDynamicProvider:^UIColor * _Nonnull(UITraitCollection *
 _Nonnull traitC) {
         if (traitC.userInterfaceStyle == UIUserInterfaceStyleDark) {
             return UIColor.redColor;
         } else {
             return UIColor.greenColor;
         }
     }];
- 根据当前情景取出 dynamic color 中的色值----用于根据不同情景取色值,设置色值。
UIColor *dynamicColor = [UIColor systemBackgroundColor];
 UITraitCollection *traitCollection = someView.traitCollection; UIColor
 *resolvedColor = [dynamicColor resolvedColorWithTraitCollection:traitCollection];
本人正在积极地收集更多的iOS13适配的信息,随时更新
