Phoenix安装、入门案例
目录
一、Phoenix简介
1、什么是Phoenix
2、Phoenix性能
二、Phoenix的安装部署
三、Phoenix入门案例
四、建立与HBase表映射
五、使用Phoenix构建二级索引加快查询效率
1、配置HBase支持Phoenix二级索引
2、重启HBase集群使配置生效
一、Phoenix简介
1、什么是Phoenix
Phoenix 是一个 HBase 的开源 SQL 引擎,可以使用标准的 JDBC API 代替 HBase 客户端 API 来创建表而不是HBase客户端API来创建表,插入数据,查询你的 HBase 数据 。Phoenix 完全使用 Java 编写,作为 HBase 内嵌的 JDBC 驱动。Phoenix查询引擎会将SQL查询转换为一个或多个HBase扫描,并编排执行以生成标准的JDBC结果集。
2、Phoenix性能
Phoenix是构建在HBase之上的SQL引擎
Phoenix通过以下方式实现高性能操作HBase
-
优化主键的盐值来均匀分布写压力
-
跳过扫描过滤器来优化IN,LIKE,OR查询
-
统计相关数据来提高并行化水平,并帮助选择最佳优化方案
-
实现了二级索引来提升非主键字段查询的性能
-
执行聚合查询通过服务端钩子(称为协同处理器)
-
推送你的WHERE子句的谓词到服务端过滤器处理
-
精心编排你的scan语句让他们并行执行
-
检测scan语句最佳的开始和结束的key
-
编译你的SQL查询为原生HBase的scan语句
官网地址:http://phoenix.apache.org/
二、Phoenix的安装部署
1、准备工作
-
提前安装好ZK集群、hadoop集群、Hbase集群
2、安装包下载地址:http://archive.apache.org/dist/phoenix/
资料\安装\apache-phoenix-4.14.0-HBase-1.1-bin.tar.gz
注意选择和自己HBase版本一致的包
3、上传、解压
-
将对应的安装包上传到对应的Hbase集群其中一个服务器的一个目录下,并解压
tar -xvzf apache-phoenix-4.14.0-HBase-1.1-bin.tar.gz -C ../servers/4、拷贝Phoenix整合HBase所需JAR包
将phoenix目录下的 hoenix-4.14.0-HBase-1.1-server.jar(phoenix-4.14.0-cdh5.14.2-server.jar)、phoenix-core-4.14.0-HBase-1.1.jar(phoenix-core-4.14.0-cdh5.14.2.jar)拷贝到各个 hbase的lib目录下
scp phoenix-4.14.0-HBase-1.1-server.jar phoenix-core-4.14.0-HBase-1.1.jar node01:/export/servers/hbase-1.1.1/lib
scp phoenix-4.14.0-HBase-1.1-server.jar phoenix-core-4.14.0-HBase-1.1.jar node02:/export/servers/hbase-1.1.1/lib
scp phoenix-4.14.0-HBase-1.1-server.jar phoenix-core-4.14.0-HBase-1.1.jar node03:/export/servers/hbase-1.1.1/lib
5、在Phoenix中配置HADOOP、配置HBASE
将hbase的配置文件hbase-site.xml、 hadoop/etc/hadoop下的core-site.xml 、hdfs-site.xml放到phoenix/bin/下,替换phoenix原来的配置文件
# 备份原先的 hbase-site.xml文件
mv hbase-site.xml hbase-site.xml.bak
# 进入到 hbase bin目录
cd /export/servers/apache-phoenix-4.14.0-HBase-1.1-bin/bin
ln -s $HBASE_HOME/conf/hbase-site.xml .
ln -s $HADOOP_HOME/etc/hadoop/core-site.xml .
ln -s $HADOOP_HOME/etc/hadoop/hdfs-site.xml .6、重启hbase集群,使Phoenix的jar包生效
7、验证是否成功
./sqlline.py node01:2181出现如下界面说明启动成功
Setting property: [incremental, false]
Setting property: [isolation, TRANSACTION_READ_COMMITTED]
issuing: !connect jdbc:phoenix:node01:2181 none none org.apache.phoenix.jdbc.PhoenixDriver
Connecting to jdbc:phoenix:node01:2181
SLF4J: Class path contains multiple SLF4J bindings.
SLF4J: Found binding in [jar:file:/export/servers/apache-phoenix-4.14.0-HBase-1.1-bin/phoenix-4.14.0-HBase-1.1-client.jar!/org/slf4j/impl/StaticLoggerBinder.class]
SLF4J: Found binding in [jar:file:/export/servers/hadoop-2.6.0-cdh5.14.0/share/hadoop/common/lib/slf4j-log4j12-1.7.5.jar!/org/slf4j/impl/StaticLoggerBinder.class]
SLF4J: See http://www.slf4j.org/codes.html#multiple_bindings for an explanation.
19/10/18 09:58:06 WARN util.NativeCodeLoader: Unable to load native-hadoop library for your platform... using builtin-java classes where applicable
Connected to: Phoenix (version 4.14)
Driver: PhoenixEmbeddedDriver (version 4.14)
Autocommit status: true
Transaction isolation: TRANSACTION_READ_COMMITTED
Building list of tables and columns for tab-completion (set fastconnect to true to skip)...
133/133 (100%) Done
Done
sqlline version 1.2.0
8、查看当前有哪些表
-
输入
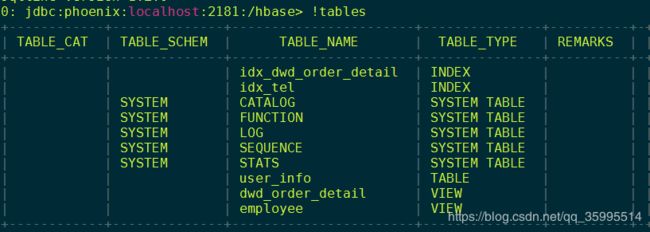
!tables查看都有哪些表
9、退出Phoenix,输入!quit
三、Phoenix入门案例
需求一:
-
使用SQL语句在Phoenix中,创建一个用户表。该用户表有以下列
| ID | 姓名 | 年龄 | 性别 | 地址 |
|---|---|---|---|---|
| 1 | 张三 | 30 | 男 | 北京西城区 |
| 2 | 李四 | 20 | 女 | 上海闵行区 |
-
往表中插入两条数据,查询数据,并查看HBase中的数据
需求分析:
-
直接在 Phoenix 中,使用 create table 语法创建表结构
-
因为数据最终都需要保存在HBase中,故创建表的时候需要指定 HBase 中的列蔟名称
SQL:
-- 创建表
create table if not exists "user_info"(
"id" varchar primary key,
"cf"."name" varchar,
"cf"."age" integer,
"cf"."sex" varchar,
"cf"."address" varchar
);
-- 新增数据
upsert into "user_info" values('1', '张三', 30, '男', '北京市西城区');
upsert into "user_info" values('2', '李四', 20, '女', '上海市闵行区');
-- 查询数据
select * from "user_info";
需求二:
-
修改 id为1 用户的年龄为 45
-- 修改数据
upsert into "user_info"("id", "age") values('1', 45);
需求三:
-
删除 id为2 用户数据
-- 删除数据
delete from "user_info" where "id" = '2';
四、建立与HBase表映射
在HBase已经存在表,需要使用 Phoenix 建立与 HBase的映射,从而以SQL的方式,通过Phoenix 操作HBase。
案例:
1、在HBase中,建立employee的映射表---数据准备
create 'employee','company','family'
put 'employee','row1','company:name','ted'
put 'employee','row1','company:position','worker'
put 'employee','row1','family:tel','13600912345'
put 'employee','row2','company:name','michael'
put 'employee','row2','company:position','manager'
put 'employee','row2','family:tel','1894225698'
scan 'employee'2、建立映射视图
-
在HBase中已有表,在Phoenix中建立映射,必须要使用 create view
-
Phoenix是大小写敏感的
-
所有命令都是大写
-
如果表名不用双引号括起来,无论输入大写或小写,建立的表名都是大写
-
如果要建立同时包含大写和小写的表名和字段名,用双引号把表名或者字段名括起来
在Phoenix中打开命令行
CREATE VIEW IF NOT EXISTS "employee" (
    "rowid" VARCHAR NOT NULL PRIMARY KEY,
    "company"."name" VARCHAR,
    "company"."position" VARCHAR,
    "family"."tel" VARCHAR
);
这个语句有几个注意点
-
IF NOT EXISTS可以保证如果已经有建立过这个表,配置不会被覆盖
-
作为rowkey的字段用 PRIMARY KEY标定
-
列簇用 columnFamily.columnName 来表示
-
建立好后,查询一下数据
3、 查询所有映射表数据
4、查询职位为 'worker' 的所有员工数据
五、使用Phoenix构建二级索引加快查询效率
-
HBase通过rowkey来查询,否则就必须逐行地比较每一列的值,即全表扫瞄
-
数据量较大的表,全表扫描的性能很差
-
如果需要从多个角度查询数据,不可能使用 rowkey 来实现查询。此时可使用secondary index(二级索引)来完成这件事
-
Phoenix提供了对HBase secondary index的支持
1、配置HBase支持Phoenix二级索引
1、在每一个 HRegionServer的 hbase-site.xml 加入以下属性
  hbase.regionserver.wal.codec
  org.apache.hadoop.hbase.regionserver.wal.IndexedWALEditCodec
2、重启HBase集群使配置生效
使用Phoenix创建二级索引
1、创建索引
create local index "idx_tel" on "employee"("family"."tel");
2、查看执行计划,检查是否查询二级索引
explain select * from "employee" where "name" = 'ted';
explain select * from "employee" where "tel" = '13600912345';
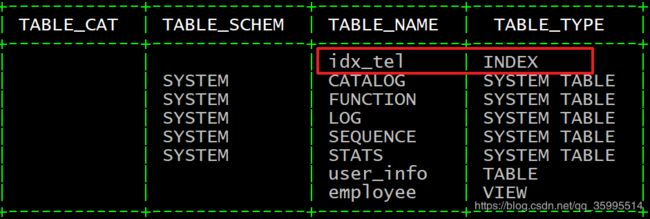
3、查看表上的所有索引
!indexes "employee"4、删除索引
drop index "idx_tel_name" on "employee";


