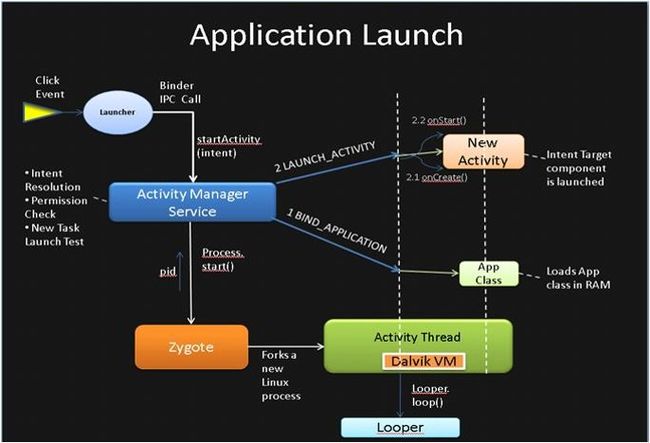
在ActivityManagerService这一篇博客中,我们已经了解AMS在Android系统中是管理系统中Activity的重要类,他通过Binder进程间通信的方式去调度Activity,从而操作Activity的生命周期。那么在这一篇博客中,我们继续通过认识ActivityThread来进一步了解Activity的创建和启动的原理。
简述App启动流程
从图中的流程来看,首先用户在Android桌面中发起针对某个应用程序的点击事件之后:
(1)LauncherActivity通过Binder进程间通信的方式将应用的信息通过Intent的方式传递给AMS,由AMS进行调度。
(2)如果系统中不存在该进程时,AMS将会请求Zygote服务去fork一个子进程,成功后返回一个pid给AMS,并由AndroidRuntime机制调起ActivityThread中的main()方法。
(3)紧接着,应用程序的Main Looper被创建,ActivityThread被实例化成为对象并将Application的信息以进程间通信的方式再次回馈给AMS。
(4)AMS接收到客户端发来的请求数据之后,首先将应用程序绑定,并启动应用程序的Activity,开始执行Activity的生命周期。
1. 应用程序的入口
ActivityThread的Main方法是应用程序进程的入口。先贴上代码:
    public static void main(String[] args) {
        Trace.traceBegin(Trace.TRACE_TAG_ACTIVITY_MANAGER, "ActivityThreadMain");
        SamplingProfilerIntegration.start();

        // CloseGuard defaults to true and can be quite spammy.  We
        // disable it here, but selectively enable it later (via
        // StrictMode) on debug builds, but using DropBox, not logs.
        CloseGuard.setEnabled(false);

        Environment.initForCurrentUser();

        // Set the reporter for event logging in libcore
        EventLogger.setReporter(new EventLoggingReporter());

        // Make sure TrustedCertificateStore looks in the right place for CA certificates
        final File configDir = Environment.getUserConfigDirectory(UserHandle.myUserId());
        TrustedCertificateStore.setDefaultUserDirectory(configDir);

        Process.setArgV0("");

        Looper.prepareMainLooper();

        ActivityThread thread = new ActivityThread();
        thread.attach(false);

        if (sMainThreadHandler == null) {
            sMainThreadHandler = thread.getHandler();
        }

        if (false) {
            Looper.myLooper().setMessageLogging(new
                    LogPrinter(Log.DEBUG, "ActivityThread"));
        }

        // End of event ActivityThreadMain.
        Trace.traceEnd(Trace.TRACE_TAG_ACTIVITY_MANAGER);
        Looper.loop();

        throw new RuntimeException("Main thread loop unexpectedly exited");
    }
在这里需要解释一下,这部分代码都干了哪些事儿:
(1)初始化应用程序中需要使用到的系统路径
Environment.initForCurrentUser();
(2)设置进程名称
Process.setArgV0("");
(3)在这里为应用程序的主线程创建了Looper。
Looper.prepareMainLooper();
thread.getHandler()保存了主线程的Handler
if (sMainThreadHandler == null) {
     sMainThreadHandler = thread.getHandler();
}
通过Looper.loop()的调用进入消息循环
Looper.loop();
(4)实例化ActivityThread对象,并通过attach()方法将APP的信息通过进程间通信的方式传递给AMS进行绑定。在下面我们会详细的讲下attach()方法。
ActivityThread thread = new ActivityThread();
thread.attach(false);
2. ApplicationThread
在attach()方法中,可以找到如下代码:
private void attach(boolean system) {
        sCurrentActivityThread = this;
        mSystemThread = system;
        if (!system) {
            ...// 以上省略
            RuntimeInit.setApplicationObject(mAppThread.asBinder());
            final IActivityManager mgr = ActivityManagerNative.getDefault();
            try {
                mgr.attachApplication(mAppThread);
            } catch (RemoteException ex) {
                throw ex.rethrowFromSystemServer();
            }
            ...// 以下省略
      }
}
// 实例化应用程序进程对象
final ApplicationThread mAppThread = new ApplicationThread();
首先,将mAppThread对象转换成为binder对象并将其作为应用程序先report给VM,该应用程序就能够获得VM反馈的一些异常和错误。然后通过获得Client端的代理对象,将mAppThread对象作为参数传递给AMS进行调度处理。
ApplicationThread继承了ApplicationThreadNative类,而ApplicationThreadNative又继承了Binder,那么它就拥有了进程间通信的特质,于此同时它最终又实现了IApplicationThread接口,该接口实现了操作App生命周期的各种方法回调。
    @Override
    public final void attachApplication(IApplicationThread thread) {
        synchronized (this) {
            int callingPid = Binder.getCallingPid();
            final long origId = Binder.clearCallingIdentity();
            attachApplicationLocked(thread, callingPid);
            Binder.restoreCallingIdentity(origId);
        }
    }
    private final boolean attachApplicationLocked(IApplicationThread thread,
            int pid) {

        // Find the application record that is being attached...  either via
        // the pid if we are running in multiple processes, or just pull the
        // next app record if we are emulating process with anonymous threads.

         ...// 省略以上部分代码
        try {
            ProfilerInfo profilerInfo = profileFile == null ? null
                    : new ProfilerInfo(profileFile, profileFd, samplingInterval, profileAutoStop);
            // 通过AMS调用bindApplication()方法将进程绑定
            thread.bindApplication(processName, appInfo, providers, app.instrumentationClass,
                    profilerInfo, app.instrumentationArguments, app.instrumentationWatcher,
                    app.instrumentationUiAutomationConnection, testMode,
                    mBinderTransactionTrackingEnabled, enableTrackAllocation,
                    isRestrictedBackupMode || !normalMode, app.persistent,
                    new Configuration(mConfiguration), app.compat,
                    getCommonServicesLocked(app.isolated),
                    mCoreSettingsObserver.getCoreSettingsLocked());
            updateLruProcessLocked(app, false, null);
            app.lastRequestedGc = app.lastLowMemory = SystemClock.uptimeMillis();
        } catch (Exception e) {
            // todo: Yikes!  What should we do?  For now we will try to
            // start another process, but that could easily get us in
            // an infinite loop of restarting processes...
            Slog.wtf(TAG, "Exception thrown during bind of " + app, e);

            app.resetPackageList(mProcessStats);
            app.unlinkDeathRecipient();
            startProcessLocked(app, "bind fail", processName);
            return false;
        }
        ... // 省略以下部分代码

        return true;
    }
AMS拿到mAppThread的对象之后,首先调用bindApplication()的方法将应用程序绑定,并通过应用程序发送的Activity生命周期的信号对应实现Activity生命周期的操作。
在这里大家可能会思考一个问题就是:Activity是如何执行自己的生命周期的。这个问题我先给自己埋一个坑,在未来的文章中,我把这个问题作为一个章节继续深入讲解。
如果大家不太了解进程间通信的知识,请参考我写的一篇关于进程间通信的博客Framework源码分析(二):Binder
