实战:SpringBoot集成xxl-sso实现单点登录
前言
单点登录SSO(Single Sign On),凡是有一定的开发经验的童鞋都应该有应用或者了解过,小编还是实习生的时候,看到登录某个应用服务后,再跳转其他应用服务,竟然不用再次登录了,觉得贼拉风,不知道大家第一见这种场景时是不是跟小编一样的感觉。今天小编给大家介绍一款分布式单点登录组件xxl-sso,目的就是让大家能短时间内快速的应用到项目中,并从中了解其中的相关的实现原理。
项目介绍
xxl-sso是一款基于redis轻量级分布式高可用的SSO实现组件,支持web端(Cookie实现)和app端(Token实现)两种方式,两种方式的验证都是用Filter实现的,小编之所以叫组件不叫框架,是因为集成起来超级方便,源码也非常易懂。废话不多说,直接进入实战把。
实战
1.认证中心部署
从https://github.com/xuxueli/xxl-sso/下载项目,将xxl-sso-server单独拷贝到自己的创建的项目中(其实直接用就可以了,小编喜欢拷贝过来以便自定义修改),这个模块只需要修改下application.properties中的redis配置就可以了。
### web
server.port=8880
server.servlet.context-path=/xxl-sso-server

### resources
spring.mvc.static-path-pattern=/static/**
spring.resources.static-locations=classpath:/static/

### freemarker
spring.freemarker.templateLoaderPath=classpath:/templates/
spring.freemarker.suffix=.ftl
spring.freemarker.charset=UTF-8
spring.freemarker.request-context-attribute=request
spring.freemarker.settings.number_format=0.##########

### xxl-sso  "redis://xxl-sso:[email protected]:6379/0"   redis://xxl-sso:123456@localhost:6379/0
xxl.sso.redis.address=redis://127.0.0.1:6379/0
xxl.sso.redis.expire.minite=1440
这里xxl.sso.redis.address是小编自己本地安装的redis单机默认配置信息,还可以通过逗号分隔进行集群,目前这组件只支持分片集群ShardedJedisPool,组件后续会支持JedisCluster,注意redis://{username}:{password}@{ip}:{port}/{db}这种需要密码的配置方式,密码一定不要带#,!,@,$等特殊符号,ShardedJedisPool初始化链接时会报解析错误。
启动项目,效果如下
image-20200605091638566
好了,认证中心OK了,小编项目太多了,端口这里改成了8880,contextPath为/xxl-sso-server,之所以强调端口和contextPath,是因为应用端要用到。
「注意」 : 认证中心的login接口默认是查的内存,具体业务开发中需要改成读数据库的形式。
2.应用端配置
2.1 创建一个新的spring boot module,引入核心jar
            org.springframework.boot
            spring-boot-starter-freemarker
            2.2.6.RELEASE


            com.xuxueli
            xxl-sso-core
            1.1.0
2.2 修改application.properties,如下
### web
server.port=8881
server.servlet.context-path=/xxl-sso-client

### xxl-sso
xxl.sso.server=http://xxlssoserver.com:8880/xxl-sso-server
xxl.sso.logout.path=/logout
xxl-sso.excluded.paths=
xxl.sso.redis.address=redis://127.0.0.1:6379

### freemarker
spring.freemarker.request-context-attribute=request
spring.freemarker.cache=false
spring.freemarker.templateLoaderPath=classpath:/templates/
spring.freemarker.suffix=.ftl
spring.freemarker.charset=UTF-8

### resource (default: /**  + classpath:/static/ )
spring.mvc.static-path-pattern=/static/**
spring.resources.static-locations=classpath:/static/
demo用的是官方的freemarker来演示登录成功的界面,需要需要在classpath:/templates目录下放入一个页面模板,官方的代码freemarker没有配置完整,小编是踩坑后自己补全的
image-20200605093152735
「重点」 : xxl.sso.server改成认证中心的项目地址
xxl.sso.redis.address需要修改与认证中心同一个redis配置
2.3 创建配置类
@Configuration
public class XxlSsoConfig implements DisposableBean {
    @Value("${xxl.sso.server}")
    private String xxlSsoServer;

    @Value("${xxl.sso.logout.path}")
    private String xxlSsoLogoutPath;

    @Value("${xxl.sso.redis.address}")
    private String xxlSsoRedisAddress;

    @Value("${xxl-sso.excluded.paths}")
    private String xxlSsoExcludedPaths;

    @Bean
    public FilterRegistrationBean xxlSsoFilterRegistration() {
        // xxl-sso, redis init
        JedisUtil.init(xxlSsoRedisAddress);
        // xxl-sso, filter init
        FilterRegistrationBean registration = new FilterRegistrationBean();
        registration.setName("XxlSsoWebFilter");
        registration.setOrder(1);
        registration.addUrlPatterns("/*");
        //registration.setFilter(new XxlSsoTokenFilter()); //token验证方式
        registration.setFilter(new XxlSsoWebFilter()); //cookie验证方式
        //xxlSsoServer用来拼接sso server登录/登出接口,进行重定向跳转到认证中心,而且只要到登录界面就要带上回调地址,否则回跳到服务器内部默认页面
        registration.addInitParameter(Conf.SSO_SERVER, xxlSsoServer);
        //xxlSsoLogoutPath用来指定登出的路径,相对当前应用contextPath
        registration.addInitParameter(Conf.SSO_LOGOUT_PATH, xxlSsoLogoutPath);
        //xxlSsoExcludedPaths用来指定不需要校验的路径,相对当前应用contextPath,多个用逗号分隔,支持ANT表达式
        registration.addInitParameter(Conf.SSO_EXCLUDED_PATHS, xxlSsoExcludedPaths);
        return registration;
    }

    @Override
    public void destroy() throws Exception {
        // xxl-sso, redis close
        JedisUtil.close();
    }
}
cookie和token验证方式的实现是可插拔的,校验逻辑实现类为XxlSsoWebFilter(cookie)和XxlSsoTokenFilter(token),里面实现流程是一样的,只是验证的方式不一样。
「校验流程」
-
校验排除的路径,排除不需要校验的访问路径
-
校验contextPath后面路径是否是logout,是logout则清除认证中心放入redis的token(userId+version凭借的唯一标识)凭据
❝
userId是用户对象的唯一标识,version就是UUID
❞ -
校验凭据的合法性以及时效性
「校验方式」
-
WEB cookie验证方式
认证中心登录成功后,会把token存入redis并以重定向的方式传给应用端,应用端将token写入浏览器的cookie中,web端再次请求时,应用端获取HttpServletRequest中cookie中的token与redis中的token进行对比
-
APP token验证方式
认证中心以登录接口的形式提供token并存入redis,再次访问应用端接口时,应用端会取HttpServletRequest里面的header中key为「xxl_sso_sessionid」对应的值(token)与redis中的token进行对比
具体的对比细节,有兴趣的童鞋可以看下源码或者进行留言,大家探讨下。
3.效果演示
为了模拟多个应用端跨域场景,需要修改下hosts文件,添加如下信息
127.0.0.1 xxlssoserver.com
127.0.0.1 xxlssoclient1.com
127.0.0.1 xxlssoclient2.com
「认证中心」 初始化几个用户对象到内存中,也可以改成查数据库的形式,认证中心登录接口会调用findUser方式
@Service
public class UserServiceImpl implements UserService {

    private static List mockUserList = new ArrayList<>();
    static {
        for (int i = 0; i <5; i++) {
            UserInfo userInfo = new UserInfo();
            userInfo.setUserid(1000+i);
            userInfo.setUsername("user" + (i>0?String.valueOf(i):""));
            userInfo.setPassword("123456");
            mockUserList.add(userInfo);
        }
    }

    /**
     * 登录时需要验证用户名称和密码,提供查询,可以改成数据库查询形式
     **/
    @Override
    public ReturnT findUser(String username, String password) {

        if (username==null || username.trim().length()==0) {
            return new ReturnT(ReturnT.FAIL_CODE, "Please input username.");
        }
        if (password==null || password.trim().length()==0) {
            return new ReturnT(ReturnT.FAIL_CODE, "Please input password.");
        }
        // mock user
        for (UserInfo mockUser: mockUserList) {
            if (mockUser.getUsername().equals(username) && mockUser.getPassword().equals(password)) {
                return new ReturnT(mockUser);
            }
        }

        return new ReturnT(ReturnT.FAIL_CODE, "username or password is invalid.");
    }

}
「应用端」 添加一个跳转到登录成功页的接口,页面是上面提到的freemarker的index.flt,然后再添加一个测试接口
    @RequestMapping("/")
    public String index(Model model, HttpServletRequest request) {
        XxlSsoUser xxlUser = (XxlSsoUser) request.getAttribute(Conf.SSO_USER);
        model.addAttribute("xxlUser", xxlUser);
        return "index";
    }
   @RequestMapping("/json")
    @ResponseBody
    public ReturnT json(Model model, HttpServletRequest request) {
        XxlSsoUser xxlUser = (XxlSsoUser) request.getAttribute(Conf.SSO_USER);
        return new ReturnT(xxlUser);
    }
3.1 基于cookie
设置应用端配置FilterRegistrationBean的filter如下
registration.setFilter(new XxlSsoWebFilter()); //cookie验证方式
-
启动应用端后访问地址http://xxlssoclient1.com:8881/xxl-sso-client
image-20200605111722463
细心的童鞋会发现,地址被重定向了到认证中心的登录页,而且参数redirect_url是刚刚应用端的请求地址。
user/123456进行登录
![]()
image-20200605113554851
认证中心重定向到redirect_url的地址并带上token(xxl_sso_sessionid)参数
-
访问预先准备好的例子,地址http://xxlssoclient2.com:8881/xxl-sso-client/json试一下,看是否还需要登录
![]()
image-20200605113400615
直接就返回结果了,跟预期一样免登录了,而且回传到应用端的token(xxl_sso_sessionid)是一样的,而且格式正是userId_UUID
-
登出xxlssoclient1.com后看xxlssoclient2.com是否还能正常访问
image-20200605113701699
token失效了,又重新跳到了认证中心的登录页。
3.2 基于token
设置应用端配置FilterRegistrationBean的filter如下
registration.setFilter(new XxlSsoTokenFilter());//token验证方式
重新启动应用,用postman访问认证中心的登录接口
image-20200605114324037
返回token(xxl_sso_sessionid)为1000_0422bc223a364ec89e0ac67203032e62
-
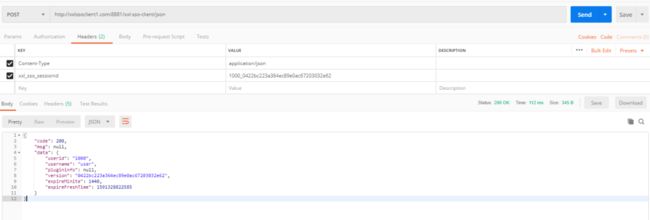
访问应用的测试接口http://xxlssoclient1.com:8881/xxl-sso-client/json
image-20200605114434691
由于header没填入token(xxl_sso_sessionid),报501错误了,加上xxl_sso_sessionid对应的值1000_0422bc223a364ec89e0ac67203032e62,再次请求
image-20200605114718015
接口返回数据成功。
image
-
试试用这个token访问http://xxlssoclient2.com:8881/xxl-sso-client/json
image-20200605114858723
-

正常返回数据。
-
调用http://xxlssoclient1.com:8881/xxl-sso-client/logout后,再看http://xxlssoclient2.com:8881/xxl-sso-client/json还能访问不
image-20200605115114743
跟预期一样,报501错误了,提示没有登录
两种方式都演示完了,是否跟童鞋们预期的一样呢?
代码获取:
https://github.com/pengziliu/GitHub-code-practice/
总结
xxl-sso大大减少了开发与维护成本,非常适用于内部多项目集成场景,耶鲁的CAS/Oauth2.0规范协议应该是目前比较常用的SSO实现,但学习成本以及配置的复杂度比xxl-sso要多很多,有兴趣的童鞋可以进行对比下。
xxl-sso目前还在持续迭代中,小编使用过程中发现登入和登出后认证中心的回调地址暂时没有参数进行配置,童鞋们可以想想怎么实现,欢迎留言,最佳方案的送礼物。


