0490-如何为GPU环境编译CUDA9.2的TensorFlow1.8与1.12
作者:李继武
1 文档编写目的
从CDSW1.1.0开始支持GPU,具体可以参考Fayson之前的文章《如何在CDSW中使用GPU运行深度学习》,从最新的CDSW支持GPU的网站上我们可以查到相应的Nvidia Drive版本,CUDA版本以及TensorFlow版本,如下:
我们注意到CUDA的版本是9.2,但是目前官方发布的编译好的TensorFlow的CUDA版本还是9.0,为了在CDSW环境中让TensorFlow运行在GPU上,必须使用CUDA9.2,我们需要手动编译TensorFlow源码。这里,以编译TensorFlow1.8和TensorFlow1.12的版本为例,指定CUDA的版本为9.2,cudnn的版本为7.2.1。
2 安装编译过程中需要的包及环境
此部分两个版本的操作都相同
1.配置JDK1.8到环境变量中
2.执行如下命令,安装依赖包
yum -y install numpy
yum -y install python-devel
yum -y install python-pip
yum -y install python-wheel
yum -y install epel-release
yum -y install gcc-c++
pip install --upgrade pip enum34
pip install keras --user
pip install mock
如果安装时没有可用的包,可到下面的地址下载,然后制作本地yum源:
https://pkgs.org/
3.下载CUDA9.2并安装
到下面的地址下载CUDA9.2安装包:
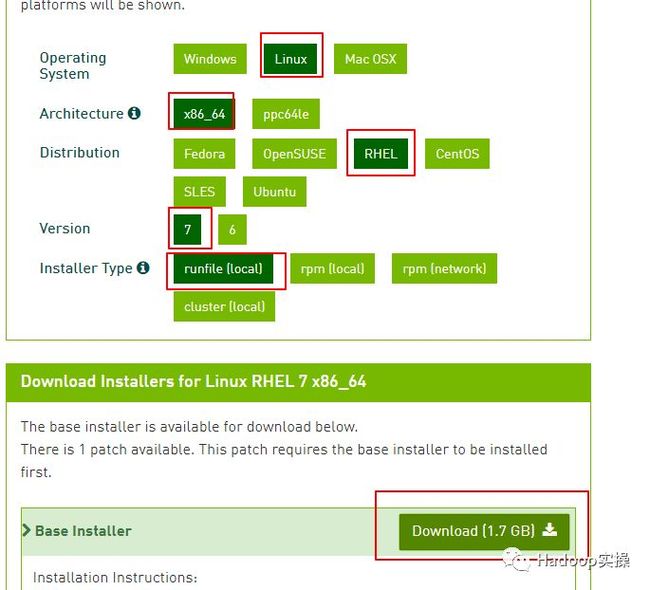
https://developer.nvidia.com/cuda-92-download-archive?target_os=Linux&target_arch=x86_64&target_distro=RHEL&target_version=7&target_type=runfilelocal
选择runfile(local)版本:
上传到服务器:
修改文件权限,并运行该文件:
chmod +x cuda_9.2.148_396.37_linux.run
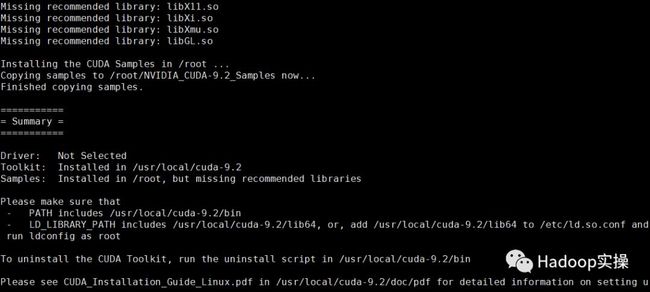
./cuda_9.2.148_396.37_linux.run
将CUDA添加到环境变量:
export PATH=/usr/local/cuda-9.2/bin:$PATH
export LD_LIBRARY_PATH=/usr/local/cuda-9.2/lib64:$LD_LIBRARY_PATH
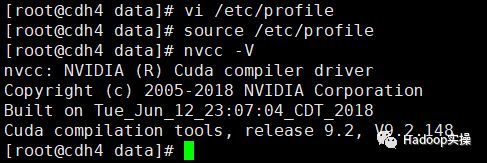
执行如下命令应能看到cuda版本:
source /etc/profile
nvcc -V
4.cuDNN v7.2.1 下载并安装
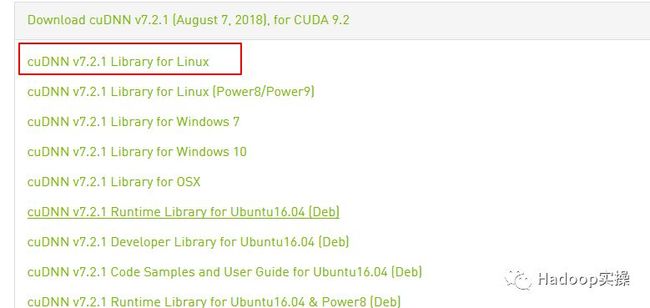
到如下地址下载cudnn v7.2.1,需要注册之后才能下载:
https://developer.nvidia.com/rdp/cudnn-archive
上传到服务器CUDA的安装目录/usr/local/cuda,解压到该目录下
tar -zxvf cudnn-9.2-linux-x64-v7.2.1.38.tgz
在该目录下执行下面命令将cudnn添加到cuda的库中:
sudo cp cuda/include/cudnn.h /usr/local/cuda/include
sudo cp cuda/lib64/libcudnn* /usr/local/cuda/lib64
sudo chmod a+r /usr/local/cuda/include/cudnn.h /usr/local/cuda/lib64/libcudnn*
进入lib64目录,建立一个软连接:
cd /usr/local/cuda/lib64
ln -s stubs/libcuda.so libcuda.so.1
3 安装编译工具bazel
这部分编译不同的tensorflow版本需要安装不同版本的bazel,使用太新的版本有 时会报错。
A.Tensorflow1.12使用的bazel版本为0.19.2:
1.下载bazel-0.19.2:
wget https://github.com/bazelbuild/bazel/releases/download/0.19.2/bazel-0.19.2-installer-linux-x86_64.sh
2.添加可执行权限,并执行:
chmod +x bazel-0.19.2-installer-linux-x86_64.sh
./bazel-0.19.2-installer-linux-x86_64.sh --user
该–user标志将Bazel安装到 H O M E / b i n 系 统 上 的 目 录 并 设 置 . b a z e l r c 路 径 HOME/bin系统上的目录并设置.bazelrc路径 HOME/bin系统上的目录并设置.bazelrc路径HOME/.bazelrc。使用该–help 命令可以查看其他安装选项。
显示下面的提示表示安装成功:
如果使用–user上面的标志运行Bazel安装程序,则Bazel可执行文件将安装在$HOME/bin目录中。将此目录添加到默认路径是个好主意,如下所示:
export PATH=$HOME/bin:$PATH
B.Tensorflow1.8使用的bazel版本为0.13.0:
1.下载bazel-0.13.0
wget https://github.com/bazelbuild/bazel/releases/download/0.13.0/bazel-0.13.0-installer-linux-x86_64.sh
其余的操作与上面安装bazel-0.19.2相同。
4 下载Tensorflow源码
A. 下载最新版的tensorflow:
git clone --recurse-submodules https://github.com/tensorflow/tensorflow
该命令会在当前目录下创建一个tensorflow目录,在其中下载最新版的tensorflow源码:
编写此文档时tensorflow最新的版本为1.12。
B.下载tensorflow1.8:
wget https://github.com/tensorflow/tensorflow/archive/v1.8.0.tar.gz
解压到当前文件夹:
wget https://github.com/tensorflow/tensorflow/archive/v1.8.0.tar.gz
5 配置tensorflow
不同版本的配置略有不同。
A.Tensorflow1.12
进入tensorflow1.12的源码目录,执行./configure并根据提示选择:
[root@cdh4 tensorflow]# ./configure
Extracting Bazel installation...
WARNING: --batch mode is deprecated. Please instead explicitly shut down your Bazel server using the command "bazel shutdown".
INFO: Invocation ID: cc8b0ee2-5e84-4995-ba12-2c922ee3646b
You have bazel 0.19.2 installed.
Please specify the location of python. [Default is /usr/bin/python]:

Found possible Python library paths:
  /usr/lib/python2.7/site-packages
  /usr/lib64/python2.7/site-packages
Please input the desired Python library path to use.  Default is [/usr/lib/python2.7/site-packages]

Do you wish to build TensorFlow with XLA JIT support? [Y/n]: n
No XLA JIT support will be enabled for TensorFlow.

Do you wish to build TensorFlow with OpenCL SYCL support? [y/N]: n
No OpenCL SYCL support will be enabled for TensorFlow.

Do you wish to build TensorFlow with ROCm support? [y/N]: n
No ROCm support will be enabled for TensorFlow.

Do you wish to build TensorFlow with CUDA support? [y/N]: y
CUDA support will be enabled for TensorFlow.

Please specify the CUDA SDK version you want to use. [Leave empty to default to CUDA 9.0]: 9.2

Please specify the location where CUDA 9.2 toolkit is installed. Refer to README.md for more details. [Default is /usr/local/cuda]:

Please specify the cuDNN version you want to use. [Leave empty to default to cuDNN 7]: 7.2.1

Please specify the location where cuDNN 7 library is installed. Refer to README.md for more details. [Default is /usr/local/cuda]:

Do you wish to build TensorFlow with TensorRT support? [y/N]: n
No TensorRT support will be enabled for TensorFlow.

Please specify the locally installed NCCL version you want to use. [Default is to use https://github.com/nvidia/nccl]:

Please specify a list of comma-separated Cuda compute capabilities you want to build with.
You can find the compute capability of your device at: https://developer.nvidia.com/cuda-gpus.
Please note that each additional compute capability significantly increases your build time and binary size. [Default is: 3.5,7.0]:

Do you want to use clang as CUDA compiler? [y/N]: n
nvcc will be used as CUDA compiler.

Please specify which gcc should be used by nvcc as the host compiler. [Default is /usr/bin/gcc]:

Do you wish to build TensorFlow with MPI support? [y/N]: n
No MPI support will be enabled for TensorFlow.

Please specify optimization flags to use during compilation when bazel option "--config=opt" is specified [Default is -march=native -Wno-sign-compare]:

Would you like to interactively configure ./WORKSPACE for Android builds? [y/N]: n
Not configuring the WORKSPACE for Android builds.

Preconfigured Bazel build configs. You can use any of the below by adding "--config=<>" to your build command. See .bazelrc for more details.
    --config=mkl            # Build with MKL support.
    --config=monolithic     # Config for mostly static monolithic build.
    --config=gdr            # Build with GDR support.
    --config=verbs          # Build with libverbs support.
    --config=ngraph         # Build with Intel nGraph support.
    --config=dynamic_kernels    # (Experimental) Build kernels into separate shared objects.
Preconfigured Bazel build configs to DISABLE default on features:
    --config=noaws          # Disable AWS S3 filesystem support.
    --config=nogcp          # Disable GCP support.
    --config=nohdfs         # Disable HDFS support.
    --config=noignite       # Disable Apacha Ignite support.
    --config=nokafka        # Disable Apache Kafka support.
    --config=nonccl         # Disable NVIDIA NCCL support.
Configuration finished
B.Tensorflow1.8
进入tensorflow1.8的源码目录,执行./configure并根据提示选择:
[root@cdh2 tensorflow-1.8.0]# ./configure
WARNING: Running Bazel server needs to be killed, because the startup options are different.
You have bazel 0.13.0 installed.
Please specify the location of python. [Default is /usr/bin/python]:

Found possible Python library paths:
  /usr/lib/python2.7/site-packages
  /usr/lib64/python2.7/site-packages
Please input the desired Python library path to use.  Default is [/usr/lib/python2.7/site-packages]

Do you wish to build TensorFlow with jemalloc as malloc support? [Y/n]: y
jemalloc as malloc support will be enabled for TensorFlow.

Do you wish to build TensorFlow with Google Cloud Platform support? [Y/n]: n
No Google Cloud Platform support will be enabled for TensorFlow.

Do you wish to build TensorFlow with Hadoop File System support? [Y/n]: n
No Hadoop File System support will be enabled for TensorFlow.

Do you wish to build TensorFlow with Amazon S3 File System support? [Y/n]: n
No Amazon S3 File System support will be enabled for TensorFlow.

Do you wish to build TensorFlow with Apache Kafka Platform support? [Y/n]: n
No Apache Kafka Platform support will be enabled for TensorFlow.

Do you wish to build TensorFlow with XLA JIT support? [y/N]: n
No XLA JIT support will be enabled for TensorFlow.

Do you wish to build TensorFlow with GDR support? [y/N]: n
No GDR support will be enabled for TensorFlow.

Do you wish to build TensorFlow with VERBS support? [y/N]: n
No VERBS support will be enabled for TensorFlow.

Do you wish to build TensorFlow with OpenCL SYCL support? [y/N]: n
No OpenCL SYCL support will be enabled for TensorFlow.

Do you wish to build TensorFlow with CUDA support? [y/N]: y
CUDA support will be enabled for TensorFlow.

Please specify the CUDA SDK version you want to use, e.g. 7.0. [Leave empty to default to CUDA 9.0]: 9.2

Please specify the location where CUDA 9.2 toolkit is installed. Refer to README.md for more details. [Default is /usr/local/cuda]:

Please specify the cuDNN version you want to use. [Leave empty to default to cuDNN 7.0]: 7.2.1

Please specify the location where cuDNN 7 library is installed. Refer to README.md for more details. [Default is /usr/local/cuda]:

Do you wish to build TensorFlow with TensorRT support? [y/N]: n
No TensorRT support will be enabled for TensorFlow.

Please specify the NCCL version you want to use. [Leave empty to default to NCCL 1.3]:

Please specify a list of comma-separated Cuda compute capabilities you want to build with.
You can find the compute capability of your device at: https://developer.nvidia.com/cuda-gpus.
Please note that each additional compute capability significantly increases your build time and binary size. [Default is: 3.5,5.2]

Do you want to use clang as CUDA compiler? [y/N]: n
nvcc will be used as CUDA compiler.

Please specify which gcc should be used by nvcc as the host compiler. [Default is /usr/bin/gcc]:

Do you wish to build TensorFlow with MPI support? [y/N]: n
No MPI support will be enabled for TensorFlow.

Please specify optimization flags to use during compilation when bazel option "--config=opt" is specified [Default is -march=native]:

Would you like to interactively configure ./WORKSPACE for Android builds? [y/N]: n
Not configuring the WORKSPACE for Android builds.

Preconfigured Bazel build configs. You can use any of the below by adding "--config=<>" to your build command. See tools/bazel.rc for more details.
    --config=mkl            # Build with MKL support.
    --config=monolithic     # Config for mostly static monolithic build.
Configuration finished
6 编译tensorflow
两个版本都使用下方的命令进行编译
bazel build --config=opt --config=cuda --config=monolithic //tensorflow/tools/pip_package:build_pip_package
注意:执行该命令要在tensorflow的源码目录下
开始编译:
等待编译结束,该过程比较耗时,出现下面提示表示编译成功。
编译结束后,执行下面命令:
bazel-bin/tensorflow/tools/pip_package/build_pip_package /tmp/tensorflow_pkg
执行完毕后可在/tmp/tensorflow_pkg目录中看到编译成功的tensorflow安装包:
注意:在编译过程中,磁盘不足或者内存不足都将导致编译失败,内存不足可能出现下面的错误,可通过设置交换区来解决。
设置缓冲区:
sudo dd if=/dev/zero of=/var/cache/swap/swap0 bs=1M count=1024
sudo chmod 0600 /var/cache/swap/swap0
sudo mkswap /var/cache/swap/swap0
sudo swapon /var/cache/swap/swap0
当编译结束后,删除该交换区:
swapoff /var/cache/swap/swap0
rm -rf /var/cache/swap/swap0
7 验证
此处以验证tensorflow1.8为例:
1.安装编译好的tensorflow安装包:
sudo pip install /tmp/tensorflow_pkg/tensorflow-1.8.0-cp27-none-linux_x86_64.whl
2.安装成功后,打开Python的交互界面,导入tensorflow,查看版本及路径:
注意:测试的时候别在tensorflow目录下import tensorflow,可能直接引用里 面的目录下的包。
提示:代码块部分可以左右滑动查看噢
为天地立心,为生民立命,为往圣继绝学,为万世开太平。
温馨提示:如果使用电脑查看图片不清晰,可以使用手机打开文章单击文中的图片放大查看高清原图。


