Vector 源码解析
一、简介
Vector 也是基于数组实现的,是一个动态数组,其容量能自动增长。Vector 是 JDK 1.0 引入的,它的很多实现方法都加入了同步语句,因此是线程安全的(其实也只是相对安全,有些时候还是要加入同步语句来保证线程的安全),可以用于多线程环境。Vector 实现了 Serializable 接口,因此它支持序列化,实现了 Cloneable 接口,能被克隆,实现了 RandomAccess 接口,支持快速随机访问。
二、继承结构


-
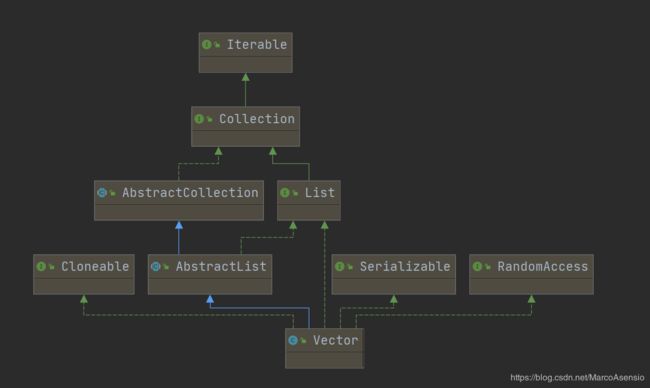
Vector 是矢量队列,它是 JDK 1.0 版本添加的类。继承于 AbstractList,实现了 List,RandomAccess, Cloneable,Serializable 这些接口。
-
Vector 继承了 AbstractList,实现了 List,所以,它是一个队列,支持相关的添加、删除、修改、遍历等功能。
-
Vector 实现了 RandmoAccess 接口,即提供了随机访问功能。RandmoAccess 是 Java 中用来被 List 实现,为 List 提供快速访问功能的。在 Vector 中,我们即可以通过元素的序号快速获取元素对象,这就是快速随机访问。
-
Vector 实现了 Cloneable 接口,即实现 clone() 方法,它能被克隆。
-
和 ArrayList 不同,Vector 中的操作是线程安全的。
三、属性
public class Vector<E>
    extends AbstractList<E>
    implements List<E>, RandomAccess, Cloneable, java.io.Serializable
{

    // 存放元素的数组
    protected Object[] elementData;

    // 元素数量
    protected int elementCount;

    // 容量增长系数
    protected int capacityIncrement;

    private static final long serialVersionUID = -2767605614048989439L;

    // 最大容量
    private static final int MAX_ARRAY_SIZE = Integer.MAX_VALUE - 8;

}
Vector 的属性比其它的集合类简单了许多,有一点需要注意,Vector 的扩容机制和 ArrayList 不同,后者是每次扩容为原来的 1.5 倍,而前者是根据增长系数来扩容,如果增长系数大于 0,就扩容增长系数大小的容量,如果小于 0,就扩容一倍。
四、构造方法

Vector 的构造方法一共有四种形式,我们先看一下它两个参数的构造方法:
public Vector(int initialCapacity, int capacityIncrement) {
    super();
    if (initialCapacity < 0)
        throw new IllegalArgumentException("Illegal Capacity: "+
                                           initialCapacity);
    this.elementData = new Object[initialCapacity];
    this.capacityIncrement = capacityIncrement;
}
先进行安全检查,再对两个实例变量进行初始化,对 elementData 的初始化是直接创建一个 initialCapacity 大小的数组。
再来看看它一个参数的构造方法:
public Vector(int initialCapacity) {
    this(initialCapacity, 0);
}
它一个参数的构造方法的实现就是调用两个参数的构造方法,默认的增长系数为 0。
再来看一下它的无参构造方法:
public Vector() {
    this(10);
}
它的无参构造方法的实现是调用一个参数的构造方法,最终都会调用两个参数的构造方法。
最后看一下以集合类为参数的构造方法:
public Vector(Collection<? extends E> c) {
    elementData = c.toArray();
    elementCount = elementData.length;
    // c.toArray might (incorrectly) not return Object[] (see 6260652)
    if (elementData.getClass() != Object[].class)
        elementData = Arrays.copyOf(elementData, elementCount, Object[].class);
}
最后一种构造方法是将一个集合类转换成 Vector,了解一下就好,开发中用的不多。
五、常用方法
0x01、新增操作

1.add(E e)
public synchronized boolean add(E e) {
    modCount++;
    ensureCapacityHelper(elementCount + 1);
    elementData[elementCount++] = e;
    return true;
}
先调用 ensureCapacityHelper(elementCount + 1) 方法来判断是否需要扩容,如果需要的最小容量大于存储元素的数组的长度就需要进行扩容操作。
private void ensureCapacityHelper(int minCapacity) {
    // overflow-conscious code
    if (minCapacity - elementData.length > 0)
        grow(minCapacity);
}
private void grow(int minCapacity) {
    // overflow-conscious code
    int oldCapacity = elementData.length;
    int newCapacity = oldCapacity + ((capacityIncrement > 0) ?
                                     capacityIncrement : oldCapacity);
    if (newCapacity - minCapacity < 0)
        newCapacity = minCapacity;
    if (newCapacity - MAX_ARRAY_SIZE > 0)
        newCapacity = hugeCapacity(minCapacity);
    elementData = Arrays.copyOf(elementData, newCapacity);
}
扩容策略为如果增长系数大于 0,就扩容增长系数大小的容量,如果小于 0,就扩容一倍。
2.add(int index, E element)
public void add(int index, E element) {
    insertElementAt(element, index);
}
public synchronized void insertElementAt(E obj, int index) {
    modCount++;
    if (index > elementCount) {
        throw new ArrayIndexOutOfBoundsException(index
                                                 + " > " + elementCount);
    }
    ensureCapacityHelper(elementCount + 1);
    System.arraycopy(elementData, index, elementData, index + 1, elementCount - index);
    elementData[index] = obj;
    elementCount++;
}
在指定位置添加元素,底层调用 insertElementAt(element, index) 方法。
3.addElement(E obj)
public synchronized void addElement(E obj) {
    modCount++;
    ensureCapacityHelper(elementCount + 1);
    elementData[elementCount++] = obj;
}
添加一个元素,和 add(E e) 方法类似,只不过这个方法无返回值。
4.addAll(Collection c)
public synchronized boolean addAll(Collection<? extends E> c) {
    modCount++;
    Object[] a = c.toArray();
    int numNew = a.length;
    ensureCapacityHelper(elementCount + numNew);
    System.arraycopy(a, 0, elementData, elementCount, numNew);
    elementCount += numNew;
    return numNew != 0;
}
addAll() 方法,通过将 collection 中的数据转换成 Array[] 然后添加到 elementData 数组,从而完成整个集合数据的添加。
5.addAll(int index, Collection c)
public synchronized boolean addAll(int index, Collection<? extends E> c) {
    modCount++;
    if (index < 0 || index > elementCount)
        throw new ArrayIndexOutOfBoundsException(index);

    Object[] a = c.toArray();
    int numNew = a.length;
    ensureCapacityHelper(elementCount + numNew);

    int numMoved = elementCount - index;
    if (numMoved > 0)
        System.arraycopy(elementData, index, elementData, index + numNew,
                         numMoved);

    System.arraycopy(a, 0, elementData, index, numNew);
    elementCount += numNew;
    return numNew != 0;
}
与上述方法相比,这里主要多了两个步骤,判断添加数据的位置是不是在末尾,如果在中间,则需要先将数据向后移动 collection 长度的位置。
0x02、删除操作
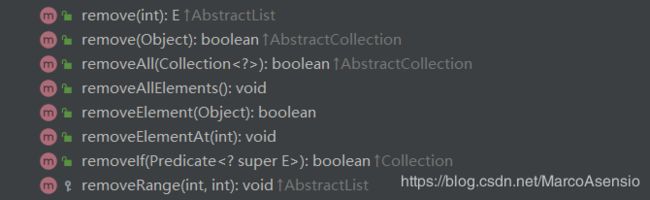
1.remove(int index)
public synchronized E remove(int index) {
    modCount++;
    if (index >= elementCount)
        throw new ArrayIndexOutOfBoundsException(index);
    E oldValue = elementData(index);

    int numMoved = elementCount - index - 1;
    if (numMoved > 0)
        System.arraycopy(elementData, index+1, elementData, index,
                         numMoved);
    elementData[--elementCount] = null; // Let gc do its work

    return oldValue;
}
删除数据并不会更改数组的长度,只会将数据从数组中移除,如果目标没有其他有效引用,则在 GC 时会进行回收。
2.remove(Object o)
public boolean remove(Object o) {
    return removeElement(o);
}
public synchronized boolean removeElement(Object obj) {
    modCount++;
    int i = indexOf(obj);
    if (i >= 0) {
        removeElementAt(i);
        return true;
    }
    return false;
}
public synchronized void removeElementAt(int index) {
    modCount++;
    if (index >= elementCount) {
        throw new ArrayIndexOutOfBoundsException(index + " >= " +
                                                 elementCount);
    }
    else if (index < 0) {
        throw new ArrayIndexOutOfBoundsException(index);
    }
    int j = elementCount - index - 1;
    if (j > 0) {
        System.arraycopy(elementData, index + 1, elementData, index, j);
    }
    elementCount--;
    elementData[elementCount] = null; /* to let gc do its work */
}
先通过 indexOf() 方法获取到元素对应的下标,再调用 removeElementAt() 方法删除对应下标的值。
3.removeRange(int fromIndex, int toIndex)
protected synchronized void removeRange(int fromIndex, int toIndex) {
    modCount++;
    int numMoved = elementCount - toIndex;
    System.arraycopy(elementData, toIndex, elementData, fromIndex,
                     numMoved);

    // Let gc do its work
    int newElementCount = elementCount - (toIndex-fromIndex);
    while (elementCount != newElementCount)
        elementData[--elementCount] = null;
}
该方法主要删除了在范围内的数据,通过 System.arraycopy() 对整部分的数据进行覆盖即可。
4.clear()
public void clear() {
    removeAllElements();
}
public synchronized void removeAllElements() {
    modCount++;
    // Let gc do its work
    for (int i = 0; i < elementCount; i++)
        elementData[i] = null;

    elementCount = 0;
}
该方法通过将所有元素置为 null,等待垃圾回收将这个给回收掉,并且将元素数量设置为 0 来实现对集合的清除。
0x03、查找操作
1.get(int index)
public synchronized E get(int index) {
    if (index >= elementCount)
        throw new ArrayIndexOutOfBoundsException(index);

    return elementData(index);
}
E elementData(int index) {
    return (E) elementData[index];
}
该方法通过数组索引的方式返回下标对应的值。
2.elementAt(int index)
public synchronized E elementAt(int index) {
    if (index >= elementCount) {
        throw new ArrayIndexOutOfBoundsException(index + " >= " + elementCount);
    }

    return elementData(index);
}
该方法通过数组索引的方式返回下标对应的值。
3.firstElement()
public synchronized E firstElement() {
    if (elementCount == 0) {
        throw new NoSuchElementException();
    }
    return elementData(0);
}
该方法返回第一个元素。
4.lastElement()
public synchronized E lastElement() {
    if (elementCount == 0) {
        throw new NoSuchElementException();
    }
    return elementData(elementCount - 1);
}
该方法返回最后一个元素。
0x04、其它常用方法
1.set(int index, E element)
public synchronized E set(int index, E element) {
    if (index >= elementCount)
        throw new ArrayIndexOutOfBoundsException(index);

    E oldValue = elementData(index);
    elementData[index] = element;
    return oldValue;
}
该方法修改下标对应的值。
2.isEmpty()
public synchronized boolean isEmpty() {
    return elementCount == 0;
}
判断集合是否为空。
六、遍历方式
Vector 支持 4 种遍历方式:
0x01、通过迭代器遍历,即通过 Iterator 去遍历
Integer value = null;
for (int i = 0; i < vector.size(); i++) {
    value = (Integer)vec.get(i);
}
0x02、随机访问,通过索引值去遍历
Integer value = null;
for (int i = 0; i < vector.size(); i++) {
    value = (Integer)vec.get(i);
}
0x03、另一种 for 循环
Integer value = null;
for (Integer i : vector) {
    value = i;
}
0x04、Enumeration 遍历
Integer value = null;
Enumeration elements = vector.elements();
while (elements.hasMoreElements()) {
    value = (Integer)elements.nextElement();
}
七、总结
-
Vector 有四个不同的构造方法。无参构造方法的容量为默认值10,仅包含容量的构造方法则将容量增长量(从源码中可以看出容量增长量的作用,第二点也会对容量增长量详细说)设置为0。
-
注意扩充容量的方法 ensureCapacityHelper。与 ArrayList 相同,Vector 在每次增加元素(可能是 1 个,也可能是一组)时,都要调用该方法来确保足够的容量。当容量不足以容纳当前的元素个数时,就先看构造方法中传入的容量增长量参数 CapacityIncrement 是否为 0,如果不为 0,就设置新的容量为旧容量加上容量增长量,如果为 0,就设置新的容量为旧的容量的 2 倍,如果设置后的新容量还不够,则直接新容量设置为传入的参数(也就是所需的容量),而后同样用 Arrays.copyof() 方法将元素拷贝到新的数组。
-
很多方法都加入了 synchronized 同步语句,来保证线程安全。
-
同样在查找给定元素索引值等的方法中,源码都将该元素的值分为 null 和不为 null 两种情况处理,Vector 中也允许元素为 null。
-
其他很多地方都与 ArrayList 实现大同小异,Vector 现在已经基本不再使用。
参考
https://blog.csdn.net/hla199106/article/details/47356165