iOS多线程(NSThread、NSOperation、GCD)
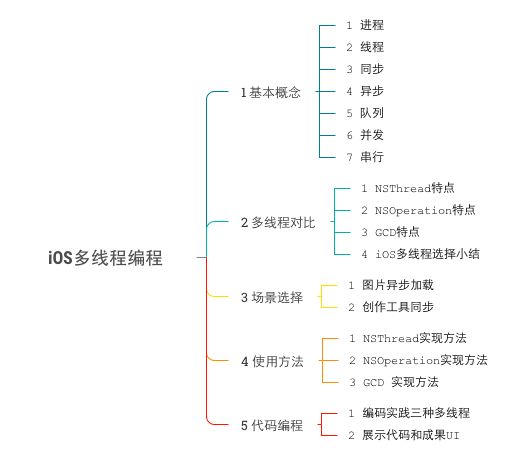
文章大纲
一、基本概念
计算机操作系统都有的基本概念,以下概念简单方式来描述。
-
进程: 一个具有一定独立功能的程序关于某个数据集合的一次运行活动。可以理解成一个运行中的应用程序。
-
线程: 程序执行流的最小单元,线程是进程中的一个实体。
-
同步: 只能在当前线程按先后顺序依次执行,不开启新线程。
-
异步: 可以在当前线程开启多个新线程执行,可不按顺序执行。
-
队列: 装载线程任务的队形结构。
-
并发: 线程执行可以同时一起进行执行。
-
串行: 线程执行只能依次逐一先后有序的执行。
注意:
-
一个进程可有多个线程。
-
一个进程可有多个队列。
-
队列可分并发队列和串行队列。
二、iOS多线程对比
1. NSThread
每个NSThread对象对应一个线程,真正最原始的线程。
1)优点:NSThread 轻量级最低,相对简单。
2)缺点:手动管理所有的线程活动,如生命周期、线程同步、睡眠等。
2. NSOperation
自带线程管理的抽象类。
1)优点:自带线程周期管理,操作上可更注重自己逻辑。
2)缺点:面向对象的抽象类,只能实现它或者使用它定义好的两个子类:NSInvocationOperation 和 NSBlockOperation。
3. GCD
Grand Central Dispatch (GCD)是Apple开发的一个多核编程的解决方法。
1)优点:最高效,避开并发陷阱。
2)缺点:基于C实现。
4. 选择小结
1)简单而安全的选择NSOperation实现多线程即可。
2)处理大量并发数据,又追求性能效率的选择GCD。
3)NSThread本人选择基本上是在做些小测试上使用,当然也可以基于此造个轮子。
三、场景选择
图片异步加载。这种常见的场景是最常见也是必不可少的。异步加载图片有分成两种来说明一下。
第一种,在UI主线程开启新线程按顺序加载图片,加载完成刷新UI。
第二种,依然是在主线程开启新线程,顺序不定地加载图片,加载完成个字刷新UI。
创作工具上的异步。 这个跟上边任务调度道理,只是为了丰富描述,有助于“举一反三”效果。如下描述的是app创作小说。
场景一,app本地创作10个章节内容未成同步服务器,同时发表这10个章节产生的一系列动作,其中上传内容,获取分配章节Id,如何后台没有做处理最好方式做异步按顺序执行。
场景二,app本地创作列表中有3本小说为发表,同时发表创作列表中的3本小说,自然考虑并行队列执行发表。
四、使用方法
第三标题场景选择内容实现先留下一个悬念。具体实现还是先熟知一下各自的API先。
1. NSThread
1.1)三种实现开启线程方式:
①.动态实例化
NSThread *thread = [[NSThread alloc] initWithTarget:self selector:@selector(loadImageSource:) object:imgUrl];
thread.threadPriority = 1;// 设置线程的优先级(0.0 - 1.0,1.0最高级)
[thread start];
②.静态实例化
[NSThread detachNewThreadSelector:@selector(loadImageSource:) toTarget:self withObject:imgUrl];③.隐式实例化
[self performSelectorInBackground:@selector(loadImageSource:) withObject:imgUrl];有了以上的知识点,可以试探了一下编写场景选择中的“图片加载”的基本功能了。
1.2)使用这三种方式编写代码
//动态创建线程
-(void)dynamicCreateThread{
    NSThread *thread = [[NSThread alloc] initWithTarget:self selector:@selector(loadImageSource:) object:imgUrl];
    thread.threadPriority = 1;// 设置线程的优先级(0.0 - 1.0,1.0最高级)
    [thread start];
}

//静态创建线程
-(void)staticCreateThread{
    [NSThread detachNewThreadSelector:@selector(loadImageSource:) toTarget:self withObject:imgUrl];
}

//隐式创建线程
-(void)implicitCreateThread{
    [self performSelectorInBackground:@selector(loadImageSource:) withObject:imgUrl];
}
-(void)loadImageSource:(NSString *)url{
    NSData *imgData = [NSData dataWithContentsOfURL:[NSURL URLWithString:url]];
    UIImage *image = [UIImage imageWithData:imgData];
    if (imgData!=nil) {
        [self performSelectorOnMainThread:@selector(refreshImageView:) withObject:image waitUntilDone:YES];
    }else{
        NSLog(@"there no image data");
    }
}

-(void)refreshImageView:(UIImage *)image{
    [self.imageView setImage:image];
}
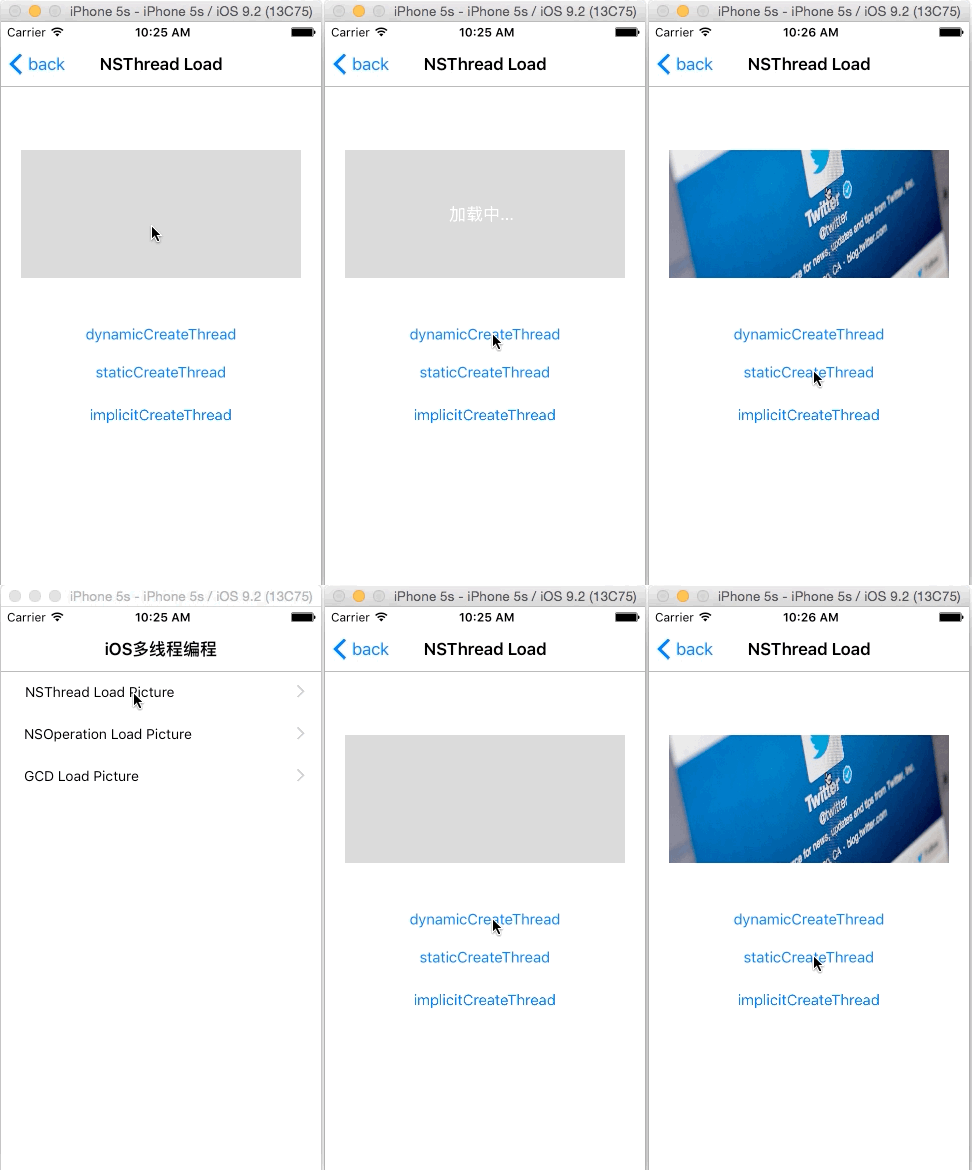
1.3)看先效果图
NSThread多线程加载效果
1.4)NSThread的拓展认识
①获取当前线程
NSThread *current = [NSThread currentThread];
②获取主线程
NSThread *main = [NSThread mainThread];
③暂停当前线程
[NSThread sleepForTimeInterval:2];
④线程之间通信
//在指定线程上执行操作
[self performSelector:@selector(run) onThread:thread withObject:nil waitUntilDone:YES];
//在主线程上执行操作
[self performSelectorOnMainThread:@selector(run) withObject:nil waitUntilDone:YES];
//在当前线程执行操作
[self performSelector:@selector(run) withObject:nil];
显然动态创建线程多了几行代码,其实就是那几行代码,如果重复编写数遍那是一件多么不爽的事情。首次看来静态方法创作线程和隐式创建线程显得比较方便,简洁。从知识结构来说,讲到这里应该讲述一下线程锁,鉴于并不常用和文章过长就不在此详细讲述,有兴趣可以自行查阅。
2. NSOperation
主要的实现方式:结合NSOperation和NSOperationQueue实现多线程编程。
-
实例化NSOperation的子类,绑定执行的操作。
-
创建NSOperationQueue队列,将NSOperation实例添加进来。
-
系统会自动将NSOperationQueue队列中检测取出和执行NSOperation的操作。
2.1)使用NSOperation的子类实现创作线程。
①.NSInvocationOperation创建线程。
NSInvocationOperation *invocationOperation = [[NSInvocationOperation alloc] initWithTarget:self selector:@selector(loadImageSource:) object:imgUrl];
//[invocationOperation start];//直接会在当前线程主线程执行
NSOperationQueue *queue = [[NSOperationQueue alloc]init];
[queue addOperation:invocationOperation];
②.NSBlockOperation创建线程
NSBlockOperation *blockOperation = [NSBlockOperation blockOperationWithBlock:^{
    [self loadImageSource:imgUrl];
}];

NSOperationQueue *queue = [[NSOperationQueue alloc]init];
[queue addOperation:blockOperation];
③.自定义NSOperation子类实现main方法
实现main方法
-(void)main {
    // Do somthing
}
创建线程实例并添加到队列中
LoadImageOperation *imageOperation = [LoadImageOperation new];
imageOperation.loadDelegate = self;
imageOperation.imgUrl = imgUrl;

NSOperationQueue *queue = [[NSOperationQueue alloc]init];
[queue addOperation:imageOperation];
2.2)使用这三种方式编写代码
创建各个实例并添加到队列表当中
//使用子类NSInvocationOperation
-(void)useInvocationOperation{
    NSInvocationOperation *invocationOperation = [[NSInvocationOperation alloc] initWithTarget:self selector:@selector(loadImageSource:) object:imgUrl];
    //[invocationOperation start];//直接会在当前线程主线程执行
    NSOperationQueue *queue = [[NSOperationQueue alloc]init];
    [queue addOperation:invocationOperation];
}

//使用子类NSBlockOperation
-(void)useBlockOperation{
    NSBlockOperation *blockOperation = [NSBlockOperation blockOperationWithBlock:^{
        [self loadImageSource:imgUrl];
    }];

    NSOperationQueue *queue = [[NSOperationQueue alloc]init];
    [queue addOperation:blockOperation];
}

//使用继承NSOperation
-(void)useSubclassOperation{

    LoadImageOperation *imageOperation = [LoadImageOperation new];
    imageOperation.loadDelegate = self;
    imageOperation.imgUrl = imgUrl;

    NSOperationQueue *queue = [[NSOperationQueue alloc]init];
    [queue addOperation:imageOperation];
}

-(void)loadImageSource:(NSString *)url{

    NSData *imgData = [NSData dataWithContentsOfURL:[NSURL URLWithString:url]];
    UIImage *image = [UIImage imageWithData:imgData];
    if (imgData!=nil) {
        [self performSelectorOnMainThread:@selector(refreshImageView1:) withObject:image waitUntilDone:YES];
    }else{
        NSLog(@"there no image data");
    }

}

-(void)refreshImageView1:(UIImage *)image{
    [self.loadingLb setHidden:YES];
    [self.imageView setImage:image];
}

-(void) loadImageFinish:(UIImage *)image{
    [self.loadingLb setHidden:YES];
    [self.imageView setImage:image];
}
附自定义NSOperation子类main主要代码实现
- (void)main {

    if (self.isCancelled) return;

    NSURL *url = [NSURL URLWithString:self.imgUrl];
    NSData *imageData = [NSData dataWithContentsOfURL:url];

    if (self.loadDelegate!=nil&&[self.loadDelegate respondsToSelector:@selector(loadImageFinish:)]) {

        [(NSObject *)self.loadDelegate performSelectorOnMainThread:@selector(loadImageFinish:) withObject:image waitUntilDone:NO];
    }
}
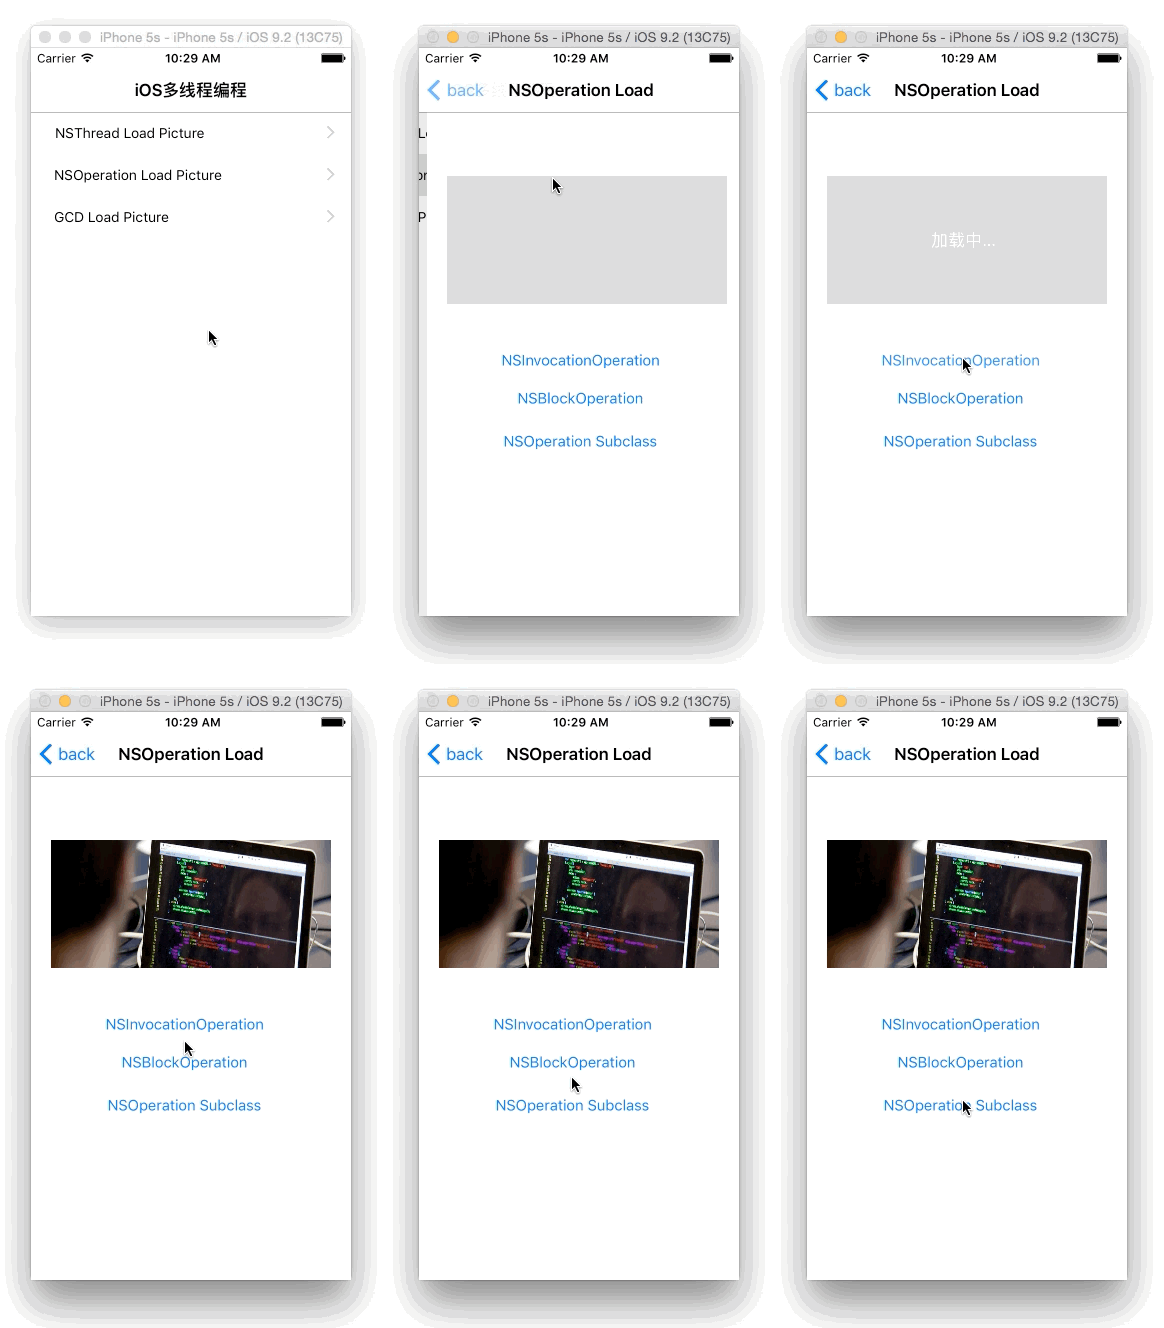
2.3)看先效果图
NSOperation多线程加载效果
3. GCD多线程
GCD是Apple开发,据说高性能的多线程解决方案。既然这样,就细说一下这个解决方案。
进过Nsthread和NSOperation的讲述和上边的基础概念,可以开始组合用起来吧。并发队列、串行队列都用起来。
3.1)分发队列种类(dispatch queue)
①.UI主线程队列 main queue
dispatch_get_main_queue()
②.并行队列global dispatch queue
dispatch_get_global_queue(DISPATCH_QUEUE_PRIORITY_DEFAULT, 0)
这里的两个参数得说明一下:第一个参数用于指定优先级,分别使用DISPATCH_QUEUE_PRIORITY_HIGH和DISPATCH_QUEUE_PRIORITY_LOW两个常量来获取高和低优先级的两个queue;第二个参数目前未使用到,默认0即可
③.串行队列serial queues
dispatch_queue_create("minggo.app.com", NULL);
3.2)6中多线程实现
①后台执行线程创建
dispatch_async(dispatch_get_global_queue(0, 0), ^{
    [self loadImageSource:imgUrl1];
});
②UI线程执行(只是为了测试,长时间加载内容不放在主线程)
dispatch_async(dispatch_get_main_queue(), ^{
    [self loadImageSource:imgUrl1];
});
③一次性执行(常用来写单例)
static dispatch_once_t onceToken;
dispatch_once(&onceToken, ^{
    [self loadImageSource:imgUrl1];
});
④并发地执行循环迭代
dispatch_queue_t queue = dispatch_get_global_queue(DISPATCH_QUEUE_PRIORITY_DEFAULT, 0);
size_t count = 10;
dispatch_apply(count, queue, ^(size_t i) {
    NSLog(@"循环执行第%li次",i);
    [self loadImageSource:imgUrl1];
});
⑤延迟执行
double delayInSeconds = 2.0;
dispatch_time_t popTime = dispatch_time(DISPATCH_TIME_NOW, delayInSeconds * NSEC_PER_SEC);
dispatch_after(popTime, dispatch_get_main_queue(), ^(void){
    [self loadImageSource:imgUrl1];
});
⑥自定义dispatch_queue_t
dispatch_queue_t urls_queue = dispatch_queue_create("minggo.app.com", NULL);
dispatch_async(urls_queue, ^{
    [self loadImageSource:imgUrl1];
});
3.3)对比多任务执行
异步加载图片是大部分app都要问题,那么加载图片是按循序加载完之后才刷新UI呢?还是不安顺序加载UI呢?显然大部分的希望各自加载各自的图片,各自刷新。以下就是模拟这两种场景。
①先后执行,加载两张图片为例
dispatch_async(dispatch_get_global_queue(DISPATCH_QUEUE_PRIORITY_DEFAULT, 0), ^{

    UIImage *image1 = [self loadImage:imgUrl1];
    UIImage *image2 = [self loadImage:imgUrl2];

    dispatch_async(dispatch_get_main_queue(), ^{
        self.imageview1.image = image1;
        self.imageView2.image = image2;
    });
});
②并行队列执行,也是以加载两张图片为例
dispatch_queue_t queue = dispatch_get_global_queue(DISPATCH_QUEUE_PRIORITY_DEFAULT, 0);


dispatch_async(queue, ^{

    dispatch_group_t group = dispatch_group_create();

    __block UIImage *image1 = nil;
    __block UIImage *image2 = nil;

    dispatch_group_async(group, dispatch_get_global_queue(DISPATCH_QUEUE_PRIORITY_DEFAULT, 0), ^{
        image1 = [self loadImage:imgUrl1];
    });

    dispatch_group_async(group, dispatch_get_global_queue(DISPATCH_QUEUE_PRIORITY_DEFAULT, 0), ^{
        image2 = [self loadImage:imgUrl2];
    });

    dispatch_group_notify(group, dispatch_get_main_queue(), ^{
        self.imageview1.image = image1;
        self.imageView2.image = image2;
    });
});
①中等到两张图片加载完成后一起刷新,②就是典型的异步并行的例子,不需要理会各自图片加载的先后问题,完成加载图片刷新UI即可。从加载图片中来说,第①种不太合适使用,但是对于在上边场景选择的时候的创作工具来说有很大的好处,首先得异步进行,然后异步中有得按顺序执行几个任务,比如上传章节内容。因此,我们可以灵活考虑使用这两多线程任务执行方式,实现各种场景。
3.4)编码实现
以上3.3的内容99%代码一样,就不提供一个稍微整体的代码了。看看下边的效果图吧。
3.5)效果图如下
GCD多线程加载效果
五.源码地址
https://github.com/minggo620/iOSMutipleThread.git


