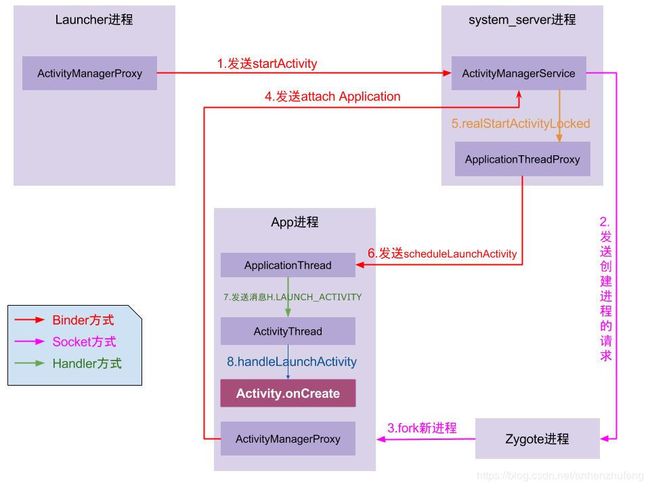
Activity的启动流程,如何判断当前activity所在进程已经启动了
startActivity启动过程分析
https://blog.csdn.net/luoshengyang/article/details/6689748
看完这两篇干货,应该一清二楚了。
是否启动应用进程的分支在ActivityStackSupervisor#startSpecificActivityLocked方法内部
通过判断当前activity对于的进程名的ProcessRecord是否存在来判断进程是否启动(android-cts-7.1_r20 tag)
public final class ActivityStackSupervisor implements DisplayListener {
       ...
       void startSpecificActivityLocked(ActivityRecord r,
            boolean andResume, boolean checkConfig) {
        // Is this activity's application already running?
        ProcessRecord app = mService.getProcessRecordLocked(r.processName,
                r.info.applicationInfo.uid, true);
        r.task.stack.setLaunchTime(r);
        if (app != null && app.thread != null) {
            try {
                if ((r.info.flags&ActivityInfo.FLAG_MULTIPROCESS) == 0
                        || !"android".equals(r.info.packageName)) {
                    // Don't add this if it is a platform component that is marked
                    // to run in multiple processes, because this is actually
                    // part of the framework so doesn't make sense to track as a
                    // separate apk in the process.
                    app.addPackage(r.info.packageName, r.info.applicationInfo.versionCode,
                            mService.mProcessStats);
                }
                realStartActivityLocked(r, app, andResume, checkConfig);
                return;
            } catch (RemoteException e) {
                Slog.w(TAG, "Exception when starting activity "
                        + r.intent.getComponent().flattenToShortString(), e);
            }
            // If a dead object exception was thrown -- fall through to
            // restart the application.
        }
        mService.startProcessLocked(r.processName, r.info.applicationInfo, true, 0,
                "activity", r.intent.getComponent(), false, false, true);
    }
}
具体启动流程:
1. Launcher:Launcher通知AMS要启动activity。
- startActivitySafely->startActivity->Instrumentation.execStartActivity()(AMP.startActivity)->AMS.startActivity
2. AMS:PMS的resoveIntent验证要启动activity是否匹配。如果匹配,通过ApplicationThread发消息给Launcher所在的主线程,暂停当前Activity(即Launcher)。
3. 暂停完,在该activity还不可见时,通知AMS,根据要启动的Activity配置ActivityStack。然后判断要启动的Activity进程是否存在?
- 存在:发送消息LAUNCH_ACTIVITY给需要启动的Activity主线程,执行handleLaunchActivity
- 不存在:通过socket向zygote请求创建进程。进程启动后,ActivityThread.attach
4. 判断Application是否存在,若不存在,通过LoadApk.makeApplication创建一个。在主线程中通过thread.attach方法来关联ApplicationThread。
5. 在通过ActivityStackSupervisor来获取当前需要显示的ActivityStack。
6. 继续通过ApplicationThread来发送消息给主线程的Handler来启动Activity(handleLaunchActivity)。
7. handleLauchActivity:调用了performLauchActivity,里边Instrumentation生成了新的activity对象,继续调用activity生命周期。
IPC过程:
双方都是通过对方的代理对象来进行通信。
1.app和AMS通信:app通过本进程的AMP和AMS进行Binder通信
2.AMS和新app通信:通过ApplicationThreadProxy来通信,并不直接和ActivityThread通信
参考函数流程
Activity启动流程(从Launcher开始):
第一阶段: Launcher通知AMS要启动新的Activity(在Launcher所在的进程执行)
- Launcher.startActivitySafely //首先Launcher发起启动Activity的请求
- Activity.startActivity
- Activity.startActivityForResult
- Instrumentation.execStartActivity //交由Instrumentation代为发起请求
- ActivityManager.getService().startActivity //通过IActivityManagerSingleton.get()得到一个AMP代理对象
- ActivityManagerProxy.startActivity //通过AMP代理通知AMS启动activity
第二阶段:AMS先校验一下Activity的正确性,如果正确的话,会暂存一下Activity的信息。然后,AMS会通知Launcher程序pause Activity(在AMS所在进程执行)
- ActivityManagerService.startActivity
- ActivityManagerService.startActivityAsUser
- ActivityStackSupervisor.startActivityMayWait
- ActivityStackSupervisor.startActivityLocked :检查有没有在AndroidManifest中注册
- ActivityStackSupervisor.startActivityUncheckedLocked
- ActivityStack.startActivityLocked :判断是否需要创建一个新的任务来启动Activity。
- ActivityStack.resumeTopActivityLocked :获取栈顶的activity,并通知Launcher应该pause掉这个Activity以便启动新的activity。
- ActivityStack.startPausingLocked
- ApplicationThreadProxy.schedulePauseActivity
其中ActivityStackSupervisor.startActivityMayWait中会检查当前匹配到的所有activity并启动一个选择框:
final int startActivityMayWait(IApplicationThread caller, int callingUid,
        String callingPackage, Intent intent, String resolvedType,
        IVoiceInteractionSession voiceSession, IVoiceInteractor voiceInteractor,
        IBinder resultTo, String resultWho, int requestCode, int startFlags,
        ProfilerInfo profilerInfo, WaitResult outResult, Configuration config,
        Bundle options, boolean ignoreTargetSecurity, int userId,
        IActivityContainer iContainer, TaskRecord inTask) {
    ...
    boolean componentSpecified = intent.getComponent() != null;
    //创建新的Intent对象,即便intent被修改也不受影响
    intent = new Intent(intent);

    //收集Intent所指向的Activity信息, 当存在多个可供选择的Activity,则直接向用户弹出resolveActivity [见2.7.1]
    ActivityInfo aInfo = resolveActivity(intent, resolvedType, startFlags, profilerInfo, userId);

    ActivityContainer container = (ActivityContainer)iContainer;
    synchronized (mService) {
        if (container != null && container.mParentActivity != null &&
                container.mParentActivity.state != RESUMED) {
            ... //不进入该分支, container == nul
        }

        final int realCallingPid = Binder.getCallingPid();
        final int realCallingUid = Binder.getCallingUid();
        int callingPid;
        if (callingUid >= 0) {
            callingPid = -1;
        } else if (caller == null) {
            callingPid = realCallingPid;
            callingUid = realCallingUid;
        } else {
            callingPid = callingUid = -1;
        }

        final ActivityStack stack;
        if (container == null || container.mStack.isOnHomeDisplay()) {
            stack = mFocusedStack; // 进入该分支
        } else {
            stack = container.mStack;
        }

        //此时mConfigWillChange = false
        stack.mConfigWillChange = config != null && mService.mConfiguration.diff(config) != 0;

        final long origId = Binder.clearCallingIdentity();

        if (aInfo != null &&
                (aInfo.applicationInfo.privateFlags
                        &ApplicationInfo.PRIVATE_FLAG_CANT_SAVE_STATE) != 0) {
            // heavy-weight进程处理流程, 一般情况下不进入该分支
            if (aInfo.processName.equals(aInfo.applicationInfo.packageName)) {
                ...
            }
        }

        //[见流程2.8]
        int res = startActivityLocked(caller, intent, resolvedType, aInfo,
                voiceSession, voiceInteractor, resultTo, resultWho,
                requestCode, callingPid, callingUid, callingPackage,
                realCallingPid, realCallingUid, startFlags, options, ignoreTargetSecurity,
                componentSpecified, null, container, inTask);

        Binder.restoreCallingIdentity(origId);

        if (stack.mConfigWillChange) {
            ... //不进入该分支
        }

        if (outResult != null) {
            ... //不进入该分支
        }

        return res;
    }
}
第三阶段: pause Launcher的Activity,并通知AMS已经paused(在Launcher所在进程执行)
- ApplicationThread.schedulePauseActivity
- ActivityThread.queueOrSendMessage
- H.handleMessage
- ActivityThread.handlePauseActivity
- ActivityManagerProxy.activityPaused
第四阶段:检查activity所在进程是否存在,如果存在,就直接通知这个进程,在该进程中启动Activity;不存在的话,会调用Process.start创建一个新进程(执行在AMS进程)
- ActivityManagerService.activityPaused
- ActivityStack.activityPaused
- ActivityStack.completePauseLocked
- ActivityStack.resumeTopActivityLocked
- ActivityStack.startSpecificActivityLocked
- ActivityManagerService.startProcessLocked
- Process.start //在这里创建了新进程,新的进程会导入ActivityThread类,并执行它的main函数
第五阶段: 创建ActivityThread实例,执行一些初始化操作,并绑定Application。如果Application不存在,会调用LoadedApk.makeApplication创建一个新的Application对象。之后进入Loop循环。(执行在新创建的app进程)
- ActivityThread.main
- ActivityThread.attach(false) //声明不是系统进程
- ActivityManagerProxy.attachApplication
第六阶段:处理新的应用进程发出的创建进程完成的通信请求,并通知新应用程序进程启动目标Activity组件(执行在AMS进程)
- ActivityManagerService.attachApplication //AMS绑定本地ApplicationThread对象,后续通过ApplicationThreadProxy来通信。
- ActivityManagerService.attachApplicationLocked
- ActivityStack.realStartActivityLocked //真正要启动Activity了!
- ApplicationThreadProxy.scheduleLaunchActivity //AMS通过ATP通知app进程启动Activity
第七阶段: 加载MainActivity类,调用onCreate声明周期方法(执行在新启动的app进程)
- ApplicationThread.scheduleLaunchActivity //ApplicationThread发消息给AT
- ActivityThread.queueOrSendMessage
- H.handleMessage //AT的Handler来处理接收到的LAUNCH_ACTIVITY的消息
- ActivityThread.handleLaunchActivity
- ActivityThread.performLaunchActivity
- Instrumentation.newActivity //调用Instrumentation类来新建一个Activity对象
- Instrumentation.callActivityOnCreate
- MainActivity.onCreate
- ActivityThread.handleResumeActivity
- AMP.activityResumed
- AMS.activityResumed(AMS进程)
