概述
Google官方对它的概述如下:
AppBarLayout is a vertical {@link LinearLayout} which implements many of the features of
material designs app bar concept, namely scrolling gestures.

Children should provide their desired scrolling behavior through
{@link LayoutParams#setScrollFlags(int)} and the associated layout xml attribute:
{@code app:layout_scrollFlags}.

This view depends heavily on being used as a direct child within a {@link CoordinatorLayout}.
If you use AppBarLayout within a different {@link ViewGroup}, most of it's functionality will
not work.

AppBarLayout also requires a separate scrolling sibling in order to know when to scroll.
The binding is done through the {@link ScrollingViewBehavior} behavior class, meaning that you
should set your scrolling view's behavior to be an instance of {@link ScrollingViewBehavior}.
A string resource containing the full class name is available.
大概的意思也就是说:
AppBarLayout是一个垂直的{@link LinearLayout},它实现了material designs app bar概念的许多特性,换句话说就是实现了material designs 滚动技术。
AppBarLayout的子View应该通过{@link LayoutParams#setScrollFlags(int)}或者相关的布局xml属性:{@code app:layout_scrollFlags}提供他们想要的滚动行为。
此视图在很大程度上取决于在{@link CoordinatorLayout}中用作直接子级。如果你在不同的{@link ViewGroup}中使用AppBarLayout,它的大部分功能将会不行。
AppBarLayout也需要一个滚动的兄弟View,以便知道什么时候滚动。其与兄弟View的绑定是通过{@link ScrollingViewBehavior}行为类来完成的,这意味着你应该为滚动的兄弟View的行为设置为{@linkScrollingViewBehavior}的实例。
由上面Google对于AppBarLayout的概述可知,AppBarLayout核心就是:
- 实现了material designs 滚动技术
- 最好作为CoordinatorLayou的直接子View使用
- 要拥有一个可滚动的兄弟View并且通过为可滚动的兄弟View设置ScrollingViewBehavior实例来实现绑定。
material designs 滚动技术
滚动技术影响内容相对于应用栏滚动的方式。
以下这些模式描述了内容滚动时的高度(即垂直于手机屏幕方向上的偏移量),如何确定灵活空间的大小,以及何时固定特定元素。
App bar 可滚动的区域
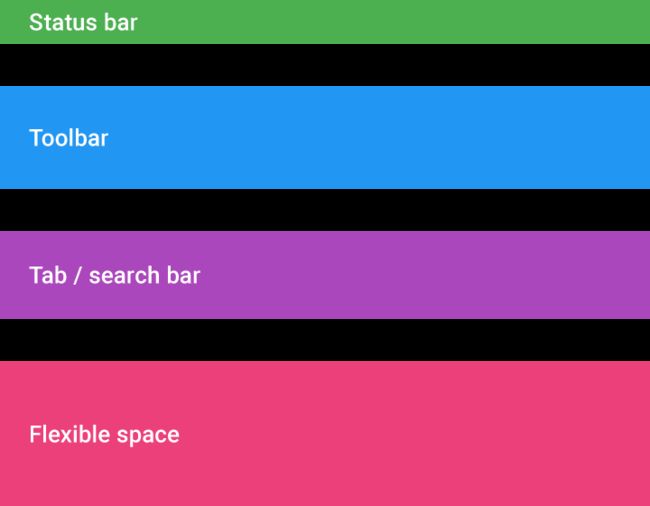
Status bar、Toolbar、Tab bar/search bar 和 Flexible space
App bar 可滚动的区域
当设计滚动行为时,App bar包含构成滚动结构的四个主要区域(称为块):
- Status bar
- Tool bar
- Tab bar/search bar
- Flexible space: 用来容纳图像或者扩展app bar的期望宽高比
Behavior
1. Standard app bar
规格:
The standard app bar在移动设备上的高度为56 dp,在较大屏幕尺寸上为64 dp。
The app bar 有两种滚动选项:
- The app bar可以滚动离开屏幕用来显示内容,并在用户反向滚动时返回。
- The app bar可以保持固定在顶部,内容在它下面滚动。
The standard app bar
Status bar height: 24dp
Toolbar height: 56dp / 64dp
2. App bar with tabs
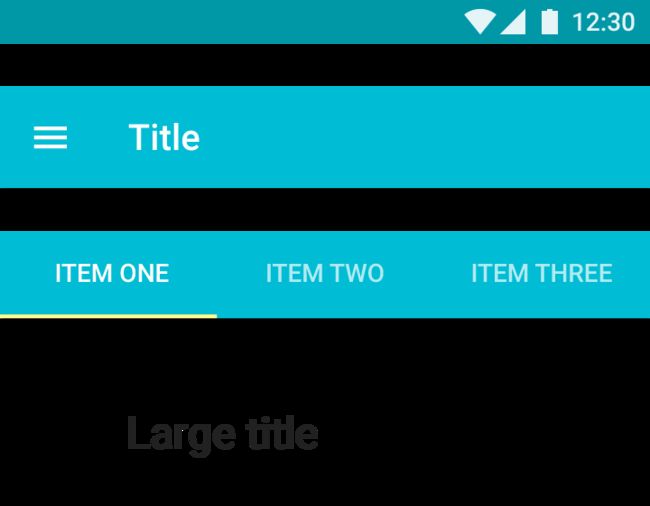
Tabs 可以具有以下行为之一:
- 在 the toolbar滚出过程中The tab bar保持固定在顶部。
- The app bar始终位于顶部,内容在下方滚动。
- the toolbar和 tab bar都会滚出用来显示内容。 tab bar在反向滚动时返回,the toolbar在完全反向滚动时返回。
Status bar, toolbar, and tab bar
Status bar height: 24dp
Toolbar height: 56dp / 64dp
Tab bar height: 48dp
3. Flexible space
因为the app bar是灵活的,它可以扩展以适应更大的排版或图片。 要扩展the app bar,请添加flexible space块。
Flexible space可以被显示为以下两种方式之一:
The flexible space逐渐缩小,直到只剩下the toolbar。 The title在导航栏中缩小到20sp。 当滚动到页面的顶部时,the flexible space和the title再次成长。
整个The app bar滚出后。 当用户反向滚动时,the toolbar返回固定到顶部。 当向后滚动时,the flexible space和the title再次成长。
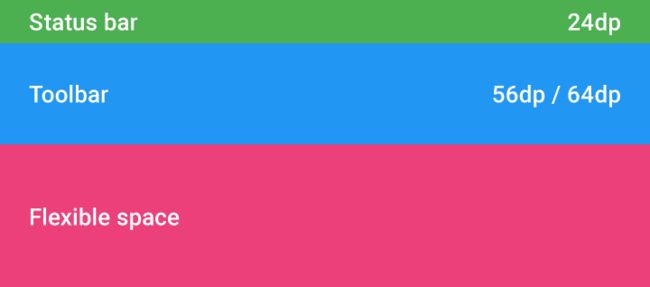
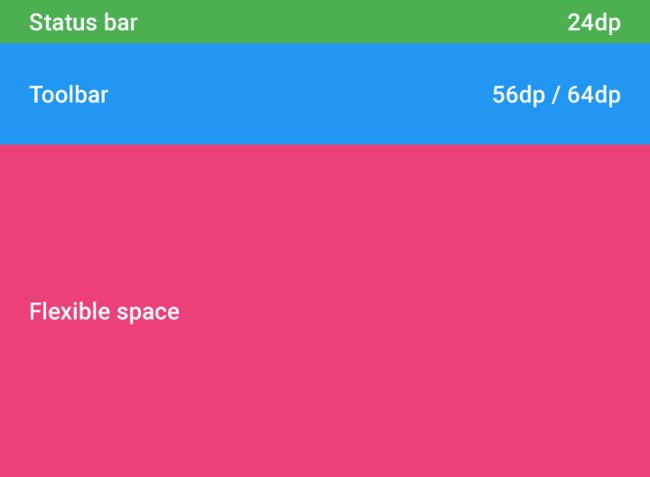
Status bar, toolbar, and flexible space
Status bar height: 24dp
Toolbar height: 56dp / 64dp
4. Flexible space with image
使用flexible space在the app bar中容纳所期望宽高比的图片。
在此示例中,宽高比为4:3。 当滚动时,内容上推图像,这缩减了flexible space。 在转换结束时,图像被着色成the primary color,与滚动无关。
Status bar, toolbar, and flexible space
Status bar height: 24dp
Toolbar height: 56dp / 64dp
5. Flexible space with overlapping content
内容可以与the app bar重叠。
The app bar有两种滚动选项:
- The app bar最初位于内容的后面。 向上滚动时,the app bar应比内容滚动更快,直到内容不再与the app bar重叠。 一旦锚定到位,the app bar就会提升自己以使内容可以在the app bar下方滚动。
- The app bar可以滚动离开屏幕用来显示内容,并在用户反向滚动时返回。
在此互动中,the app bar不能包含tabs。
Flexible space
Status bar: 24dp
Toolbar: 56dp/64dp
通过实例实现material designs 滚动技术中的5种Behavior
1. 实现第一种Behavior(Standard app bar)
布局代码如下:
上面对于AppBarLayout的概述可知,AppBarLayout最好作为CoordinatorLayout直接子View使用并且需要一个滚动的兄弟View,所以我构建了上面的布局结构;可以看到上面的RelativeLayout中设置了app:layout_scrollFlags属性,该属性有5个不同的值可以设置,具体的含义如下:
1. scroll(SCROLL_FLAG_SCROLL)
//Google的解释
The view will be scroll in direct relation to scroll events. This flag needs to be
set for any of the other flags to take effect. If any sibling views
before this one do not have this flag, then this value has no effect.
//我的理解(为了便于描述,就用上面的布局来说明)
1> 如果RelativeLayout想要滚动效果,必须设置app:layout_scrollFlags="scroll";当手指向上
滑动时,RelativeLayout和RecyclerView会整体向上移动,直到RelativeLayout完全移出屏幕,
RecyclerView的内容才会向上滑动;接着手指向下滑动,RecyclerView的内容会向下滑动,
当RecyclerView的第一项内容完全显示时RelativeLayout和RecyclerView会整体向下移动,
直到RelativeLayout完全显示。
2> 如果RelativeLayout没有设置app:layout_scrollFlags="scroll",那么设置其他的flag是不会
起作用的。
3> 布局文件中,假如RelativeLayout前面有兄弟View并且前面的兄弟View没有设置app:layout_scrollFlags="scroll",
那么RelativeLayout设置app:layout_scrollFlags="scroll"是不起作用的。

2. enterAlways(SCROLL_FLAG_ENTER_ALWAYS)
//Google的解释
When entering (scrolling on screen) the view will scroll on any downwards
scroll event, regardless of whether the scrolling view is also scrolling. This
is commonly referred to as the 'quick return' pattern.
//我的理解(为了便于描述,就用上面的布局来说明)
1> enterAlways是用来与scroll联合使用,否者不起作用;
2> enterAlways主要是用来改变scroll向下滑动的效果,当手指向下滑动时,效果与单独使用scroll相同;
接着手指向下滑动,RelativeLayout和RecyclerView会整体向下滑动,当RelativeLayout完全显示时,
RecyclerView的内容接着向下滑动。

3. enterAlwaysCollapsed(SCROLL_FLAG_ENTER_ALWAYS_COLLAPSED)
//Google的解释
An additional flag for 'enterAlways' which modifies the returning view to only
initially scroll back to it's collapsed height. Once the scrolling view has
reached the end of it's scroll range, the remainder of this view will be
scrolled into view. The collapsed height is defined by the view's minimum height.
//我的理解(为了便于描述,就用上面的布局来说明)
1> enterAlwaysCollapsed是作为enterAlways的附加flag的,因此enterAlwaysCollapsed必须与
enterAlways和scroll联合使用,否者不起作用;
2> enterAlwaysCollapsed主要是用来改变scroll|enterAlways向下滑动的效果,当手指向下滑动时,
效果与使用scroll|enterAlways相同;接着手指向下滑动,RelativeLayout和RecyclerView会整体会
向下滑动,当RelativeLayout显示到最小高度时,RecyclerView的内容接着向下滑动,
当RecyclerView的第一项内容完全显示时RelativeLayout和RecyclerView会整体向下移动,
直到RelativeLayout完全显示。

4 exitUntilCollapsed(SCROLL_FLAG_EXIT_UNTIL_COLLAPSED)
//Google的解释
When exiting (scrolling off screen) the view will be scrolled until it is
'collapsed'. The collapsed height is defined by the view's minimum height.
//我的理解(为了便于描述,就用上面的布局来说明)
1> exitUntilCollapsed是用来与scroll联合使用,否者不起作用;
2> exitUntilCollapsed主要是用来改变scroll向上滑动的效果,当手指向上滑动时,
RelativeLayout和RecyclerView会整体向上移动,直到RelativeLayout缩小到最小高度时,
RecyclerView的内容接着向上滑动;接着手指向下滑动,效果与单独使用scroll相同。

5. snap(SCROLL_FLAG_SNAP)
//Google的解释
Upon a scroll ending, if the view is only partially visible then it will be snapped
and scrolled to it's closest edge. For example, if the view only has it's bottom 25%
displayed, it will be scrolled off screen completely. Conversely, if it's bottom 75%
is visible then it will be scrolled fully into view.
//我的理解(为了便于描述,就用上面的布局来说明)
1> snap是用来与scroll联合使用,否者不起作用;
2> 当滚动结束时,如果RelativeLayout只是部分可见,那么RelativeLayout将滚动到它最近的边缘。
例如,如果RelativeLayout只有底部25%显示,RelativeLayout将完全滚动屏幕。 相反,
如果RelativeLayout的底部75%是可见的,那么它将被完全滚动到视图。

6. 注意
1> scroll、enterAlways、和exitUntilCollapsed三个联合使用的时候;
当手指向上滑动时,RelativeLayout和RecyclerView会整体向上移动,直到RelativeLayout缩小
到最小高度时,RecyclerView的内容接着向上滑动;接着手指向下滑动,RelativeLayout和
RecyclerView会整体向下移动,直到RelativeLayout完全显示时,RecyclerView的内容接着
向下滑动。
2>scroll、enterAlways、enterAlwaysCollapsed和exitUntilCollapsed四个联合使用的时候,
效果很奇怪,不是我期望的,有兴趣的同学可以自己研究下。
java代码我就不再展示了,也就是mock一些数据来填充RecyclerView。
运行结果如下所示:
1> 如果RelativeLayout设置app:layout_scrollFlags="scroll|enterAlways"就实现了第一种Behavior中的第一种种滚动方式(也就是上面的例子);
2> 如果RelativeLayout没有设置layout_scrollFlags属性,就实现了第一种Behavior中的第二种滚动方式,有兴趣的同学可以尝试一下。
2. 实现第二种Behavior(App bar with tabs)
布局代码如下:
主Fragment的布局文件


ViewPager中Fragment的布局
上面布局中的TabLayout大家或许有些陌生,但是通过名字就知道是用着tab栏的,下面简单介绍一下TabLayout的几个常用属性:
tabGravity —Tab的重心,有填充和居中两个值,为别为fill和center,默认为fill。
tabMode —Tab的模式,有固定和滚动两个模式,分别为 fixed 和 scrollable,默认为fixed。
tabTextColor —设置默认状态下Tab上字体的颜色。
tabSelectedTextColor —设置选中状态下Tab上字体的颜色。
其他的布局结构我就不多说了,相信大家可以看得懂。
java代码如下所示:
主Fragment的实现代码
public class SecondBehaviorFragment extends BaseFragment {

    private View root;
    private TabLayout tabLayout;
    private ViewPager viewPager;

    @Override
    protected int getLayoutResId() {
        return R.layout.fargment_second_behavior;
    }

    @Nullable
    @Override
    public View onCreateView(LayoutInflater inflater, ViewGroup container, Bundle savedInstanceState) {
        root = super.onCreateView(inflater, container, savedInstanceState);
        initView();
        return root;
    }

    private void initView() {
        tabLayout = (TabLayout) root.findViewById(R.id.tablayout);
        tabLayout.addTab(tabLayout.newTab().setText("TabOne"), true);
        tabLayout.addTab(tabLayout.newTab().setText("TabTwo"));
        tabLayout.addTab(tabLayout.newTab().setText("TabThree"));

        viewPager = (ViewPager) root.findViewById(R.id.viewpager);
        ViewPagerAdapter viewPagerAdapter = new ViewPagerAdapter(getFragmentManager());
        viewPager.setAdapter(viewPagerAdapter);

        tabLayout.setupWithViewPager(viewPager);
    }

    public class ViewPagerAdapter extends FragmentStatePagerAdapter {

        private String[] pageTitles = new String[] {"TabOne", "TabTwo", "TabThree"};

        public ViewPagerAdapter(FragmentManager fm) {
            super(fm);
        }

        @Override
        public Fragment getItem(int position) {
            SecondBehaviorVpFragment fragment = new SecondBehaviorVpFragment();
            return fragment;
        }

        @Override
        public int getCount() {
            return 3;
        }

        @Override
        public CharSequence getPageTitle(int position) {
            return pageTitles[position];
        }
    }
}

ViewPager中Fragment的实现代码:
public class SecondBehaviorVpFragment extends BaseFragment {

    private View root;
    private RecyclerView recyclerView;

    @Override
    protected int getLayoutResId() {
        return R.layout.fragment_second_behavior_vp;
    }

    @Nullable
    @Override
    public View onCreateView(LayoutInflater inflater, ViewGroup container, Bundle savedInstanceState) {
        root = super.onCreateView(inflater, container, savedInstanceState);
        initView();
        return root;
    }

    private void initView() {
        recyclerView = (RecyclerView) root.findViewById(R.id.recyclerview_show_image);
        MyAdapter myAdapter = new MyAdapter();
        final GridLayoutManager gridLayoutManager = new GridLayoutManager(getActivity(), 2);
        recyclerView.setLayoutManager(gridLayoutManager);
        recyclerView.addItemDecoration(new RecycleViewDivider(getActivity(),
                RecycleViewDivider.LayoutManagerType.GRID, RecycleViewDivider.OrientationType.HORIZONTAL));
        recyclerView.setAdapter(myAdapter);
    }

    public class MyAdapter extends RecyclerView.Adapter {

        private int[] imageResIds = new int[] {R.drawable.beauty1, R.drawable.beauty2,
                R.drawable.beauty3, R.drawable.beauty4, R.drawable.beauty5,
                R.drawable.beauty6, R.drawable.beauty7, R.drawable.beauty8};

        @Override
        public RecyclerView.ViewHolder onCreateViewHolder(ViewGroup parent, int viewType) {
            ImageView imageView = new ImageView(getContext());
            RecyclerView.LayoutParams layoutParams = new RecyclerView.LayoutParams(RecyclerView.LayoutParams.WRAP_CONTENT,
                    RecyclerView.LayoutParams.WRAP_CONTENT);
            imageView.setLayoutParams(layoutParams);
            MyViewHolder myViewHolder = new MyViewHolder(imageView);
            return myViewHolder;
        }

        @Override
        public void onBindViewHolder(RecyclerView.ViewHolder holder, int position) {
            ((MyViewHolder)holder).updateView(imageResIds[position]);
        }

        @Override
        public int getItemCount() {
            return imageResIds.length;
        }
    }

    public class MyViewHolder extends RecyclerView.ViewHolder {

        private ImageView imageView;

        public MyViewHolder(View itemView) {
            super(itemView);
            imageView = (ImageView) itemView;
        }

        public void updateView(int resId) {
            imageView.setImageResource(resId);
        }
    }
}
代码很简单,我就不做解释了,下面给出运行结果:
1>如果RelativeLayout设置app:layout_scrollFlags="scroll|enterAlways"和TabLayout不设置layout_scrollFlags属性就实现了第二种Behavior中的第一种种滚动方式(也就是上面的例子);
2> 如果RelativeLayout和TabLayout都没有设置layout_scrollFlags属性,就实现了第二种Behavior中的第二种滚动方式,有兴趣的同学可以尝试一下;
3> 如果RelativeLayout和TabLayout都设置
app:layout_scrollFlags="scroll|enterAlways"就实现了第二种Behavior中的第三种种滚动方式,有兴趣的同学可以尝试一下。
后面的3个效果我会在CollapsingToolbarLayout用法分析中继续研究。


