一个例子入门Vue2.X+vue-router+Vuex+Webpack单页面应用程序
本篇博文讲解如何使用Vue2.X+vue-router+VueX+Webpack实现一个模块化的单页面应用程序,新手向。
1.功能实现
使用Vue2.X的理由是它属于轻量级的JS库,对于流量敏感的移动端来说更友好;容易上手,具有完备的中文文档,学习曲线较平缓;日前新兴起的与传统APP形态不同的快应用,其前端技术栈使用的就是Vue的语法。Vue.js官方文档
vue-router的作用就是将Vue组件(components)映射到路由(routes),然后告诉 vue-router 在哪里渲染它们。结合vue使用,建立单页面应用程序十分简单。Vue-Router官方文档
Vuex是一个专为 Vue.js 应用程序开发的状态管理模式。它采用集中式存储管理应用的所有组件的状态,并以相应的规则保证状态以一种可预测的方式发生变化。VueX官方文档
webpack 是一个现代 JavaScript 应用程序的静态模块打包器(module bundler)。当 webpack 处理应用程序时,它会递归地构建一个依赖关系图(dependency graph),其中包含应用程序需要的每个模块,然后将所有这些模块打包成一个或多个 bundle。webpack中文网
说完技术栈的介绍,我们说下我们的项目的功能,我们要做的是一个有两个页面的购物车项目,一个页面是产品页面,一个页面是购物车页面。产品页面我们可以看到产品的信息,然后可以添加产品到购物车;购物车页面则对产品的总额进行结算,最后点击结账,成功则清空购物车。
demo最后的效果如下:https://lucyzlu.github.io/shopping_demo/index.html#/
很简单的功能,我们来看下具体实现的步骤和细节,关键是如何进行模块化。
项目结构如下:

index.html是最后输出的页面,包含了打包的js,css等文件,而main.js是我们的入口文件(webpack建立依赖图的开始模块):这是在webpack.config.js文件中指定的entry
module.exports = {
  entry: './main.js',
  ...
main.js代码如下:
main.js
import Vue from "vue"
import VueRouter from "vue-router"
import routes from "./router"
import app from "./App.vue"
import store from "./src/store"
Vue.use(VueRouter)
const router = new VueRouter({
routes // (缩写)相当于 routes: routes
})
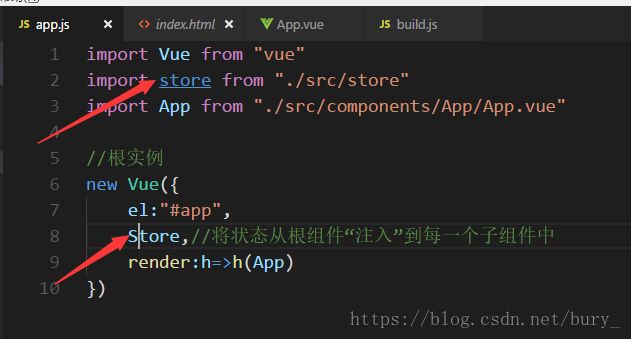
//根实例
new Vue({
el:"#app",
store,//将状态从根组件“注入”到每一个子组件中,
router,//通过 router 配置参数注入路由, 从而让整个应用都有路由功能
render:h=>h(app)//渲染App.vue到index.html中id为app的结点
})建立根实例,挂载实例到DOM上,将状态从组件注入到每一个子组件中,通过 router 配置参数注入路由,从而让整个应用都有路由功能,最后render函数返回了一个编译后的模板。
我们看到main.js依赖了store模块(状态管理),router模块(路由功能),App模块(组件)。下面会一一讲解其内容。
这里h是createElement的简写形式,createElement函数接收的参数如下:
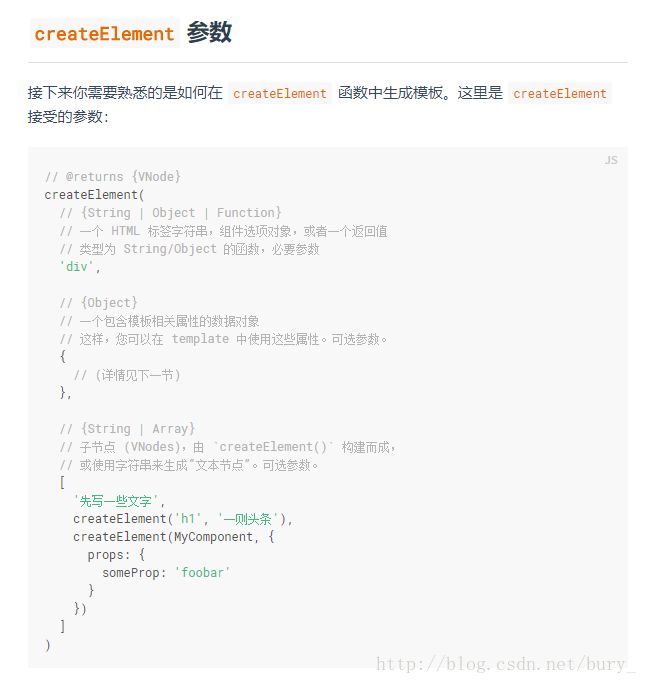
createElement的参数是App.vue组件选项对象,App.vue是我们接触的第一个单文件组件,它由模板(template标签)、逻辑(script)和样式(style)组成。
我们来看一下这个导出的对象是什么,App.vue的代码如下:
App.vue
<template>
    <div id="mainpage">
        <ul>
            <router-link to="/">产品router-link>
            <router-link to="/cart">购物车router-link>
        ul>
        <router-view>router-view>
    div>
template>

<style>
    html,
    body {
        background: burlywood;
        padding: 0;
        margin: 0;
        font: 25px 'Courier New', Courier, monospace;
    }

    ul li {
        display: inline-block;
        width: 45%;
        box-sizing: border-box;
        text-align: center;
        margin: 5px auto;
    }

    button {
        cursor: pointer;
        border-radius: 15%;
    }

    a {
        display:inline-block;
        text-decoration: none;
        width:45%;
        text-align:center;
    }

    .router-link-exact-active {
        background: gold;
    }
style>
App.vue中定义了router-link和router-view标签,这是vue-router中的内容:使用 router-link 组件(最后会被编译为a链接标签)来导航,通过传入 to 属性指定链接,通过router-view指定路由匹配到的组件将渲染在这里。我们来看router.js中怎么定义router-link的指向的:
router.js
import Vue from "vue"
import VueRouter from "vue-router"
import ProductLists from "./src/pages/ProductLists.vue"
import ShoppingCart from "./src/pages/ShoppingCart.vue"

export default [
    {path:"/",component:ProductLists},
    {path:"/cart",component:ShoppingCart}
]
导出一个数组,第一个对象path:”/”指向默认的根路径,指向ProductLists即产品组件,第二个对象path:”/cart”指向ShoppingCart即购物车组件。
我们来看下两个组件的定义:
首先是Products单文件组件,这里面定义了产品的列表,显示每个产品的名字,价格以及一个添加到购物车的按钮,代码:
ProductLists.vue
<template>
    <ul class="product">
        <li v-for="product in products">
            <div class="container">
                <img :src="imagePath+product.src">
            div>
            {{product.title}}-{{product.price}}
            <br>
            <button type="button" @click="addProductToCart(product)">
                添加到购物车
            button>
        li>
    ul>
template>
<script>
    import { mapGetters, mapActions } from "vuex";
    export default {
        data: function () {
            return {
                imagePath: "./src/images/"
            }
        },
        computed: mapGetters({
            products: "allProducts" //将store 中的 getters.allProducts 映射到局部计算属性products
        }),
        methods: mapActions(["addProductToCart"]),
        created() {
            this.$store.dispatch('getAllProducts')//在组件中使用 this.$store.dispatch('xxx') 分发 action
        }
    };
script>

<style scoped>
    button {
        width: 4rem;
        height: 1rem;
        background-color: aquamarine;

    }

    .product li {
        display: block;
        text-align: center;
    }

    .container {
        text-align: center;
        vertical-align: middle;
    }

    img {
        width: 200px;
        height: 200px;
    }
style>
这里我们用到了vuex状态管理中的store实例,我们应该先看看vuex的核心store实例里都有什么,下图是vuex的数据流示意图
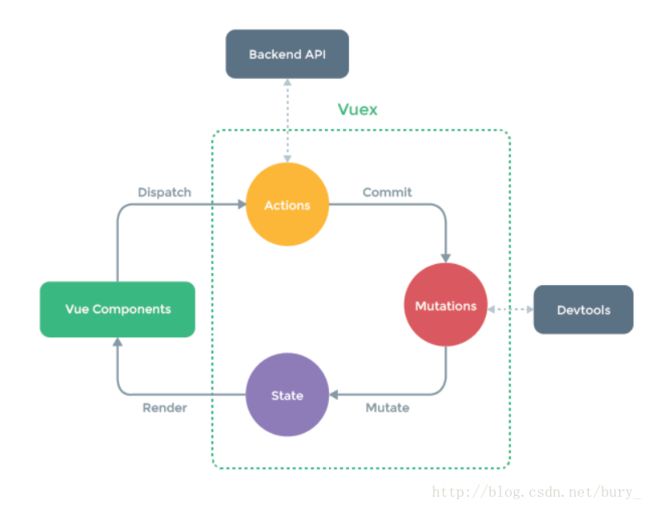
store实例包括了state,mutations,actions,以及getters,modules五个属性。分别对应响应式的应用层级状态,状态更改事件(有一个字符串的事件类型和回调函数,必须是同步函数),类似mutation的action,其并不直接更改state,而是通过提交mutation更改状态,并且回调函数内可以包含异步操作。getters是一系列state的计算属性,modules是store的模块子对象。vuex核心概念由于使用单一状态树,应用的所有状态会集中到一个比较大的对象。当应用变得非常复杂时,store 对象就有可能变得相当臃肿。为了解决以上问题,Vuex 允许我们将 store 分割成模块(module)。每个模块拥有自己的 state、mutation、action、getter、甚至是嵌套子模块——从上至下进行同样方式的分割:
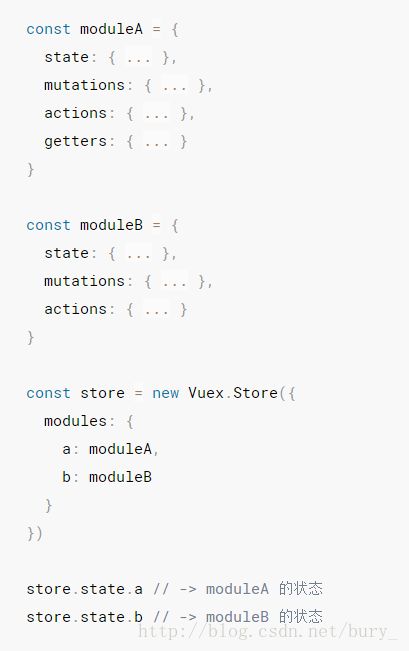
因此在我们的应用中,store的结构可以是这样的:包含一个index.js主体文件进行导入导出,以及cart和products两个模块,分别处理购物车的状态和产品的状态。
我们先看下index.js主体文件
/store/index.js
import Vue from "vue"
import Vuex from "vuex"
import products from "./modules/products"
import cart from "./modules/cart.js"
Vue.use(Vuex);
const debug = process.env.NODE_ENV !== 'production';

export default new Vuex.Store({
    modules: {
        products,
        cart
    },
    strict: debug
});
modules我们知道了,是store的模块,strict属性表示的是在严格模式下,无论何时发生了状态变更且不是由 mutation 函数引起的,将会抛出错误。这能保证所有的状态变更都能被调试工具跟踪到。但是不要在发布环境下启用严格模式!严格模式会深度监测状态树来检测不合规的状态变更——请确保在发布环境下关闭严格模式,以避免性能损失。类似于插件,我们可以让构建工具来处理这种情况,检测当前环境是否是发布环境process.env.NODE_ENV !== 'production',如果不是,才启动严格模式。
下面我们来看下两个store模块的内容。首先是产品的内容product.js,(shop是个api,有一个产品信息列表,以及getProducts和buyProducts方法,分别是获取产品列表和结账操作,模拟了服务器端,我们最后再讲):
/store/modules/product.js
import shop from "../../api/shop"

const state = {
    all: []
}

const getters = {
    allProducts: state => state.all
}

const actions = {
    getAllProducts({ commit }) {
        shop.getProducts(products => {
            commit("setProducts", products);
        });
    }
}

const mutations = {
    setProducts(state, products) {
        state.all = products;
    },

    decrementProductInventory(state, { id }) {
        const product = state.all.find(product => product.id === id)
        product.inventory--
    }
}

export default {
    state,
    getters,
    actions,
    mutations
}
products有一个保存所有产品信息的局部状态all数组,它是通过触发getAllProducts这个action,来从名为shop的api中获取数据的,获取到的数据通过回调函数保存到products参数中,再通过提交setProducts这个mutation来设置状态all为products。
action 函数的参数:action函数接受一个与 store 实例具有相同方法和属性的 context 对象,因此你可以调用 context.commit 提交一个 mutation,或者通过 context.state 和 context.getters 来获取 state 和 getters。
下面看下购物车状态模块,这个模块稍微复杂一点
/store/modules/cart.js
import shop from '../../api/shop'

// initial state
// shape: [{ id, quantity }]
const state = {
  added: [],
  checkoutStatus: null
}

// getters
const getters = {
  checkoutStatus: state => state.checkoutStatus,

  cartProducts: (state, getters, rootState) => {
    return state.added.map(({ id, quantity }) => {
      const product = rootState.products.all.find(product => product.id === id)
      return {
        title: product.title,
        price: product.price,
        quantity
      }
    })
  },

  cartTotalPrice: (state, getters) => {
    return getters.cartProducts.reduce((total, product) =>
      total + product.price * product.quantity,0)//第二个参数必须指定,因为cartProducts最开始是空数组
  }
}

// actions
const actions = {
  checkout ({ commit, state }, products) {
    const savedCartItems = [...state.added]
    commit('setCheckoutStatus', null)
    // empty cart
    commit('setCartItems', { items: [] })
    shop.buyProducts(
      products,
      () => commit('setCheckoutStatus', 'successful'),
      () => {
        commit('setCheckoutStatus', 'failed')
        // rollback to the cart saved before sending the request
        commit('setCartItems', { items: savedCartItems })
      }
    )
  },

  addProductToCart ({ state, commit }, product) {
    commit('setCheckoutStatus', null)
    if (product.inventory > 0) {
      const cartItem = state.added.find(item => item.id === product.id)
      if (!cartItem) {
        commit('pushProductToCart', { id: product.id })
      } else {
        commit('incrementItemQuantity', cartItem)
      }
      // remove 1 item from stock
      commit('decrementProductInventory', { id: product.id })
      alert("成功添加商品到购物车!");
    }
  }
}

// mutations
const mutations = {
  pushProductToCart (state, { id }) {
    state.added.push({
      id,
      quantity: 1
    })
  },

  incrementItemQuantity (state, { id }) {
    const cartItem = state.added.find(item => item.id === id)
    cartItem.quantity++
  },

  setCartItems (state, { items }) {
    state.added = items
  },

  setCheckoutStatus (state, status) {
    state.checkoutStatus = status
  }
}

export default {
  state,
  getters,
  actions,
  mutations
}
cart模块定义了两个局部状态对象,一个是added表示添加到购物车的产品,一个是结账状态checkoutstatus,
三个getters,(因为是在模块内部,getters接收的三个参数,第一个参数state是模块的局部状态对象,第二个参数getters是当前模块的getters,第三个参数rootState是store根实例的状态,是全局状态),第一个getter,checkoutStatus依赖于state中的checkoutStatus,第二个gettere,cartProducts返回购物车中的产品名字,单价和数量,第三个getter,cartTotalPrice遍历cartProducts并根据产品单价和数量返回总价。
定义了两个action(对于模块内部的 action,局部状态通过 context.state 暴露出来,根节点状态则为 context.rootState),一个是checkout进行结账操作,另一个addProductToCart添加产品到购物车,如果购物车(added)没有该物品,提交pushProductToCart添加物品,如果购物车有该物品,则提交incrementItemQuantity增加购物车中该物品的数量;最后提交decrementProductInventory减少物品库存。
定义了四个mutations,pushProductToCart向added数组中添加产品对象,包括产品的id和数量,incrementItemQuantity增加added中对应产品的数量,setCartItems和setCheckoutStatus分别设置added和checkoutStatus(记住更改 Vuex 的 store 中的状态的唯一方法是提交 mutation)
最后导出该store模块。
那么我们来看一下有了store状态管理以后我们怎么定义product组件和cart组件吧!
首先是Products组件,
/pages/ProductLists.vue
<template>
    <ul class="product">
        <li v-for="product in products">
            <div class="container">
                <img :src="imagePath+product.src">
            div>
            {{product.title}}-{{product.price}}
            <br>
            <button type="button" @click="addProductToCart(product)">
                添加到购物车
            button>
        li>
    ul>
template>
<script>
    import { mapGetters, mapActions } from "vuex";
    export default {
        data: function () {
            return {
                imagePath: "./src/images/"
            }
        },
        computed: mapGetters({
            products: "allProducts" //将store 中的 getters.allProducts 映射到局部计算属性products
        }),
        methods: mapActions(["addProductToCart"]),//addProductToCart是store模块cart.js里的action
        created() {
            this.$store.dispatch('getAllProducts')//getAllProducts是store模块product.js里的,在组件中使用 this.$store.dispatch('xxx') 分发 action
        }
    };
script>

<style scoped>
    button {
        width: 4rem;
        height: 1rem;
        background-color: aquamarine;

    }

    .product li {
        display: block;
        text-align: center;
    }

    .container {
        text-align: center;
        vertical-align: middle;
    }

    img {
        width: 200px;
        height: 200px;
    }
style>
这里我们使用了Vuex中的store实例的mapGetters辅助函数和mapActions辅助函数,mapGetters 辅助函数仅仅是将 store 中的 getter 映射到局部计算属性,mapActions 辅助函数将组件的 methods 映射为 store.dispatch 调用(就是提交store中的mutation,更改store的状态)。Vuex 使用单一状态树,因此每个应用仅仅包含一个store实例,但是单状态树和模块化并不冲突,在Products模块中我们就使用了store中的getteres和actions(通过mapGetters和mapActions)。
这里计算属性products也可以不使用mapGetters辅助函数,使用this.$store.getters访问store实例的getters,可以直接写成
computed: {
            products:function(){return this.$store.getters.allProducts}
        },
再来看下另一个组件shoppingcart组件:
/pages/ShoppingCart.vue
<template>
    <div class="cart">
        <ul>
            <li v-for="product in products">
                {{product.title}}-{{product.price}} x <span class="number">{{product.quantity}}span>
            li>
        ul>
        <p>总额:{{total}}p>
        <p>
            <button :disabled="!products.length" @click="checkout(products)">结账button>
        p>
        <p v-show="checkoutStatus">Checkout {{ checkoutStatus }}.p>
    div>
template>
<script>
    import { mapGetters } from "vuex"

    export default {
        computed: {
            ...mapGetters({
                products: 'cartProducts',
                checkoutStatus: 'checkoutStatus',
                total: 'cartTotalPrice'
            })
            //可以加入其他局部computed属性,所以上面mapGetters要使用展开运算符
        },
        methods: {
            checkout(products) {
                this.$store.dispatch('checkout', products)
            }
        }
    }
script>

<style scoped>
    .cart{
        margin:0 auto;
        text-align:center;
    }

    .cart ul li{
        display:block;
        text-align:right;
        background:skyblue;
    }

    span.number{
        color:crimson;
    }

    button{
        background-color:chartreuse;
        width:4rem;
        height:1rem;
    }
style>
shoppingcart组件,显示购买的产品信息,每一条包括产品的名字,单价和数量,最后显示一个计算属性。
最后定义了一个api,定义了产品列表,返回产品信息和进行结账操作:
/api/shop.js
/**
 * Mocking client-server processing
 */
const _products = [
    {"id": 1, "title": "iPad 4 Mini", "price": 500.01, "inventory": 2,"src":"ipad.jpg"},
    {"id": 2, "title": "H&M T-Shirt White", "price": 10.99, "inventory": 10,"src":"t-shirt.jpg"},
    {"id": 3, "title": "Charli XCX - Sucker CD", "price": 19.99, "inventory": 5,"src":"charli.jpg"}
  ]

  export default {
    getProducts (cb) {
      setTimeout(() => cb(_products), 100)
    },

    buyProducts (products, cb, errorCb) {
      setTimeout(() => {
        // simulate random checkout failure.
        (Math.random() > 0.5 || navigator.userAgent.indexOf('PhantomJS') > -1)
          ? cb()
          : errorCb()
      }, 100)
    }
  }
到此所有文件都写完啦,可以运行npm run dev看下效果!
2.问题总结
- 如果界面没有显示,也没有报错,看看是不是变量名写错了
引入的Vuex的store变量名不对是不会有错误提示的,但是这个实例其实是没有挂载到DOM上面的。
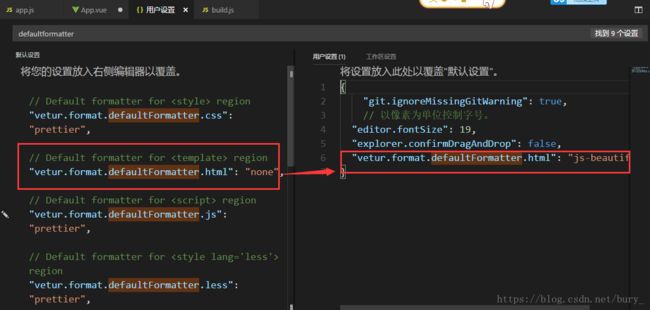
- vscode插件安装
让vscode格式化vue文件中的template:安装vetur插件,文件->首选项->设置,设置用户设置.json文件,添加一条:"vetur.format.defaultFormatter.html": "js-beautify-html",这样右键菜单格式化vue文件就可以格式化template了
让vue中template代码自动补全
文件->首选项->设置,在用户设置里添加如下代码,意思是让vue文件使用html代码补全功能
"files.associations": {"*.vue":"html"}- TypeError: Reduce of empty array with no initial value
reduce函数可选的第二个参数作为total的初始值,如果省略该参数,数组的第一个值将作为total的初始值;如果数组是空数组,一定要添加第二个参数,否则会报上面的参数类型错误,因为它访问了空数组不存在的第一个元素。 - 组件的样式问题
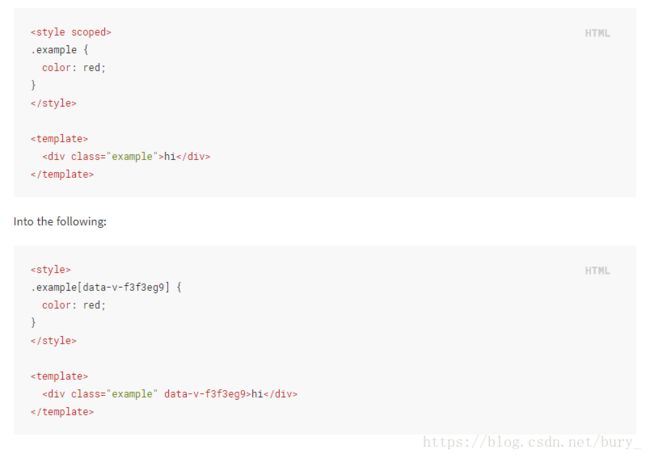
怎么样让在单文件组件内定义的style只作用于当前的template中的元素呢?那就要用到scoped css,为style添加scoped属性
https://vue-loader.vuejs.org/en/features/scoped-css.html
<style scoped>
button {
width: 4rem;
height: 1rem;
background-color: aquamarine;
border-radius: 20%;
cursor: pointer;
}

.product li {
display: block;
}
style>
通过为style标签添加scoped属性,你的Style就只会应用到当前的组件了,不会影响其他组件。
具体怎么做到的呢?就是用PostCSS为组件中的相应CSS选择器选中的元素添加自定义属性(data-v-XX),然后为作用元素的样式添加属性选择器。
- router-link-exact-active的样式
router-link会被编译为a标签,并带有class,
.router-link-exact-active表示当前正处于激活状态的(该链接被点击了以后,且只有一个router-link处于该状态,不同于visited)要修改其状态,可以设置.router-link-exact-active的样式,比如本例中修改了产品,购物车处于激活状态的背景色为金色。