iOS开发之蓝牙使用
本文介绍了蓝牙的概念以及具体的使用步骤.
一.蓝牙概念
- 蓝牙2.0为传统蓝牙,传统蓝牙也称为经典蓝牙.
- 蓝牙4.0因为低耗电,所以也叫做低功耗蓝(BLE).它将三种规格集一体,包括传统蓝牙技术、高速技术和低耗能技术.
二.BLE支持两种部署方式
- 双模式
低功耗蓝牙功能集成在现有的经典蓝牙控制器中,或在现有经典蓝牙技术芯片上增加低功耗堆栈,整体架构基本不变,因此成本增加有限. - 单模式
面向高度集成、紧凑的设备,使用一个轻量级连接层(Link Layer)提供超低功耗的待机模式操作、简单设备恢复和可靠的点对多点数据传输,还能让联网传感器在蓝牙传输中安排好低功耗蓝牙流量的次序,同时还有高级节能和安全加密连接.
三.蓝牙各版本使用选择
- 蓝牙2.0,不上架
使用私有API,手机需要越狱. - 蓝牙2.0,要上架
进行MFI认证,使用ExternalAccessory框架.手机不需要越狱. - 蓝牙4.0,要上架
使用CoreBluetooth框架,手机不需要越狱.(CoreBluetooth是基于BLE来开发的) - 说明
对于小的硬件厂商来说,MFI认证通过几率不大,不仅耗钱还耗时,所以,还是推荐使用蓝牙4.0.
(MFI:Make for ipad ,iphone, itouch 专们为苹果设备制作的设备)
四.问题描述
公司要求iOS端需要和钢琴进行蓝牙连接并进行数据通信,我以为钢琴是蓝牙4.0,然后快速集成CoreBluetooth框架写了一个demo,扫描外设时,没有发现钢琴的蓝牙名称,可是用iphone打开系统设置,可以发现钢琴对应的蓝牙.问了安卓的同事,得知钢琴的蓝牙只有2.0的模块,所以,安卓端是用2.0蓝牙进行交互的.公司决定不做MFI认证,改用蓝牙4.0.在与硬件厂商交涉的过程中,得知钢琴中的蓝牙是4.0的,但是,他们在设计蓝牙板子的时候,没有集成低功耗技术.之后,板子寄回硬件厂商,添加BLE模块.这才踏上蓝牙4.0的正轨.
五.蓝牙4.0使用解析
1.基本知识
central:中心,连接硬件的设备.
peripheral:外设,被连接的硬件.
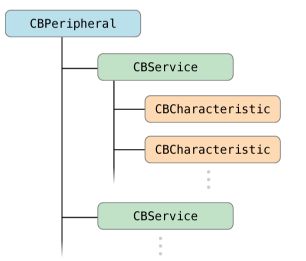
说明:外设在一直广播,当你创建的中心对象在扫描外设时,就能够发现外设.
如图所示:

service:服务.
characteristic:特征.
说明:一个外设包含多个服务,而每一个服务中又包含多个特征,特征包括特征的值和特征的描述.每个服务包含多个字段,字段的权限有read(读)、write(写)、notify(通知).
2.蓝牙4.0分为两种模式
- 中心模式流程
- 建立中心角色
[[CBCentralManager alloc] initWithDelegate:self queue:nil] - 扫描外设
cancelPeripheralConnection - 发现外设
didDiscoverPeripheral - 连接外设
connectPeripheral
4.1 连接失败didFailToConnectPeripheral
4.2 连接断开didDisconnectPeripheral
4.3 连接成功didConnectPeripheral - 扫描外设中的服务
discoverServices
5.1 发现并获取外设中的服务didDiscoverServices - 扫描外设对应服务的特征
discoverCharacteristics
6.1 发现并获取外设对应服务的特征didDiscoverCharacteristicsForService
6.2 给对应特征写数据writeValue:forCharacteristic:type: - 订阅特征的通知
setNotifyValue:forCharacteristic:
7.1 根据特征读取数据didUpdateValueForCharacteristic
- 建立中心角色
外设模式流程
建立外设角色
设置本地外设的服务和特征
发布外设和特征
广播服务
响应中心的读写请求
发送更新的特征值,订阅中心
六.蓝牙4.0开发步骤
1.本文采用中心模式
导入CoreBluetooth框架,#import
2.遵守CBCentralManagerDelegate,CBPeripheralDelegate协议
3.添加属性
// 中心管理者(管理设备的扫描和连接)
@property (nonatomic, strong) CBCentralManager *centralManager;
// 存储的设备
@property (nonatomic, strong) NSMutableArray *peripherals;
// 扫描到的设备
@property (nonatomic, strong) CBPeripheral *cbPeripheral;
// 文本
@property (weak, nonatomic) IBOutlet UITextView *peripheralText;
// 外设状态
@property (nonatomic, assign) CBManagerState peripheralState;
常量,具体服务和特征是读还是写的类型,问公司硬件厂商,或者问同事.
// 蓝牙4.0设备名
static NSString * const kBlePeripheralName = @"公司硬件蓝牙名称";
// 通知服务
static NSString * const kNotifyServerUUID = @"FFE0";
// 写服务
static NSString * const kWriteServerUUID = @"FFE1";
// 通知特征值
static NSString * const kNotifyCharacteristicUUID = @"FFE2";
// 写特征值
static NSString * const kWriteCharacteristicUUID = @"FFE3";
4.创建中心管理者
- (CBCentralManager *)centralManager
{
    if (!_centralManager)
    {
        _centralManager = [[CBCentralManager alloc] initWithDelegate:self queue:nil];
    }
    return _centralManager;
}
创建存储设备数组
- (NSMutableArray *)peripherals
{
    if (!_peripherals) {
        _peripherals = [NSMutableArray array];
    }
    return _peripherals;
}
5.扫描设备之前会调用中心管理者状态改变的方法
// 当状态更新时调用(如果不实现会崩溃)
- (void)centralManagerDidUpdateState:(CBCentralManager *)central
{
    switch (central.state) {
        case CBManagerStateUnknown:{
            NSLog(@"未知状态");
            self.peripheralState = central.state;
        }
            break;
        case CBManagerStateResetting:
        {
            NSLog(@"重置状态");
            self.peripheralState = central.state;
        }
            break;
        case CBManagerStateUnsupported:
        {
            NSLog(@"不支持的状态");
            self.peripheralState = central.state;
        }
            break;
        case CBManagerStateUnauthorized:
        {
            NSLog(@"未授权的状态");
            self.peripheralState = central.state;
        }
            break;
        case CBManagerStatePoweredOff:
        {
            NSLog(@"关闭状态");
            self.peripheralState = central.state;
        }
            break;
        case CBManagerStatePoweredOn:
        {
            NSLog(@"开启状态-可用状态");
            self.peripheralState = central.state;
        }
            break;
        default:
            break;
    }
}
扫描设备
// 扫描设备
- (IBAction)scanForPeripherals
{
    [self.centralManager stopScan];
    NSLog(@"扫描设备");
    [self showMessage:@"扫描设备"];
    if (self.peripheralState ==  CBManagerStatePoweredOn)
    {
        // 扫描所有设备,传入nil,代表所有设备.
        [self.centralManager scanForPeripheralsWithServices:nil options:nil];
    }
}
6.扫描到设备并开始连接
/**
 扫描到设备

 @param central 中心管理者
 @param peripheral 扫描到的设备
 @param advertisementData 广告信息
 @param RSSI 信号强度
 */
- (void)centralManager:(CBCentralManager *)central didDiscoverPeripheral:(CBPeripheral *)peripheral
advertisementData:(NSDictionary<NSString *,id> *)advertisementData RSSI:(NSNumber *)RSSI
{
    [self showMessage:[NSString stringWithFormat:@"发现设备,设备名:%@",peripheral.name]];

    if (![self.peripherals containsObject:peripheral])
    {
        [self.peripherals addObject:peripheral];
        NSLog(@"%@",peripheral);

        if ([peripheral.name isEqualToString:kBlePeripheralName])
        {
            [self showMessage:[NSString stringWithFormat:@"设备名:%@",peripheral.name]];
            self.cbPeripheral = peripheral;

            [self showMessage:@"开始连接"];
            [self.centralManager connectPeripheral:peripheral options:nil];
        }
    }
}
7.连接的三种状态,如果连接成功,则扫描所有服务(也可以扫描指定服务)
连接失败重连
/**
 连接失败

 @param central 中心管理者
 @param peripheral 连接失败的设备
 @param error 错误信息
 */
- (void)centralManager:(CBCentralManager *)central didFailToConnectPeripheral:(CBPeripheral *)peripheral error:(NSError *)error
{
    [self showMessage:@"连接失败"];
    if ([peripheral.name isEqualToString:kBlePeripheralName])
    {
        [self.centralManager connectPeripheral:peripheral options:nil];
    }
}
连接断开重连
/**
 连接断开

 @param central 中心管理者
 @param peripheral 连接断开的设备
 @param error 错误信息
 */
- (void)centralManager:(CBCentralManager *)central didDisconnectPeripheral:(CBPeripheral *)peripheral error:(NSError *)error
{
    [self showMessage:@"断开连接"];
    if ([peripheral.name isEqualToString:kBlePeripheralName])
    {
        [self.centralManager connectPeripheral:peripheral options:nil];
    }
}
连接成功并扫描服务
/**
 连接成功

 @param central 中心管理者
 @param peripheral 连接成功的设备
 */
- (void)centralManager:(CBCentralManager *)central didConnectPeripheral:(CBPeripheral *)peripheral
{
    NSLog(@"连接设备:%@成功",peripheral.name);
    [self showMessage:[NSString stringWithFormat:@"连接设备:%@成功",peripheral.name]];

    // 设置设备的代理
    peripheral.delegate = self;
    // services:传入nil代表扫描所有服务
    [peripheral discoverServices:nil];
}
8.发现服务并扫描服务对应的特征
/**
 扫描到服务

 @param peripheral 服务对应的设备
 @param error 扫描错误信息
 */
- (void)peripheral:(CBPeripheral *)peripheral didDiscoverServices:(NSError *)error
{
    // 遍历所有的服务
    for (CBService *service in peripheral.services)
    {
        NSLog(@"服务:%@",service.UUID.UUIDString);
        // 获取对应的服务
        if ([service.UUID.UUIDString isEqualToString:kWriteServerUUID] || [service.UUID.UUIDString isEqualToString:kNotifyServerUUID])
        {
            // 根据服务去扫描特征
            [peripheral discoverCharacteristics:nil forService:service];
        }
    }
}
9.扫描到对应的特征,写入特征的值,并订阅指定的特征通知.
/**
 扫描到对应的特征

 @param peripheral 设备
 @param service 特征对应的服务
 @param error 错误信息
 */
- (void)peripheral:(CBPeripheral *)peripheral didDiscoverCharacteristicsForService:(CBService *)service error:(NSError *)error
{
    // 遍历所有的特征
    for (CBCharacteristic *characteristic in service.characteristics)
    {
        NSLog(@"特征值:%@",characteristic.UUID.UUIDString);
        // 获取对应的特征
        if ([characteristic.UUID.UUIDString isEqualToString:kWriteCharacteristicUUID])
        {
            // 写入数据
            [self showMessage:@"写入特征值"];
            for (Byte i = 0x0; i < 0x73; i++)
            {
                // 让钢琴的每颗灯都亮一次
                Byte byte[] = {0xf0, 0x3d, 0x3d, i,
                    0x02,0xf7};
                NSData *data = [NSData dataWithBytes:byte length:6];
                [peripheral writeValue:data forCharacteristic:characteristic type:CBCharacteristicWriteWithResponse];
            }
        }
        if ([characteristic.UUID.UUIDString isEqualToString:kNotifyCharacteristicUUID])
        {
            // 订阅特征通知
            [peripheral setNotifyValue:YES forCharacteristic:characteristic];

        }
    }
}
10.根据特征读取到数据
/**
 根据特征读到数据

 @param peripheral 读取到数据对应的设备
 @param characteristic 特征
 @param error 错误信息
 */
- (void)peripheral:(CBPeripheral *)peripheral didUpdateValueForCharacteristic:(nonnull CBCharacteristic *)characteristic error:(nullable NSError *)error
{
    if ([characteristic.UUID.UUIDString isEqualToString:kNotifyCharacteristicUUID])
    {
        NSData *data = characteristic.value;
        NSLog(@"%@",data);
    }
}
读取值打印结果:
2017-04-25 12:34:41.876974+0800 蓝牙4.0Demo[1745:346611] <9f5436>
2017-04-25 12:34:41.983016+0800 蓝牙4.0Demo[1745:346611] <8f5440>
2017-04-25 12:34:42.154821+0800 蓝牙4.0Demo[1745:346611] <9f5649>
2017-04-25 12:34:42.239481+0800 蓝牙4.0Demo[1745:346611] <8f5640>
提示:上Appstore下载LightBlue,进行蓝牙通信测试.
简书
iOS开发之蓝牙使用
个人博客
iOS开发之蓝牙使用
GitHub
蓝牙4.0Demo
