集群+后端存储
一.知识梳理
1.什么是集群?
集群是一组相互独立的、通过高速网络互联的计算机,它们构成了一个组,并以单一系统的模式加以管理。一个客户与集群相互作用时,集群像是一个独立的服务器。集群配置是用于提高可用性和可缩放性。
2.分类
高可用性(High Available Cluster), 例:Linux-HA
负载均衡(Load balancing Cluster), 例:LVS、MOSIX,在企业中经常用于处理网络流量负载。
高性能计算(High Performance Computing), 例:Beowulf
高可用集群:高可用性集群使服务器系统的运行速度和响应速度尽可能快。它们经常利用在多台机器上运行的冗余节点和服务,用来相互跟踪。如果某个节点失败,它的替补者将在几秒钟或更短时间内接管它的职责。因此,对于用户而言,集群永远不会停机。
3.工作模式
HA集群维护节点的高可用,只有一个节点是真正工作,另一个节点处于热备状态,两个集群节点会有一根网络直连,还有心跳线,corosyc(心跳引擎,用于检测主机的可用性), 每个主机都有自己的ip,但是对外使用的是vip,vip、servers、filesystem构成了一个资源组,当一个节点down掉时,整个资源组就会迁移到另一各节点,由于vip不变,在客户对于服务器故障时没有感觉的,这里需要使用ARP协议,mac地址发生了变化。
4.通过fence实现对两个节点的控制管理
在集群中为了防止服务器出现“脑裂”的现象,集群中一般会添加Fence设备,如果两个节点之间的网络断了,或者正在工作的节点由于负载过高down掉了,corosync检测不到心跳信息就会通知另一个节点接管工作,此时如果第一个节点恢复了,而由于网络或者其他原因,对方对没有检测到,这时就会发生资源争抢,两个节点同时对文件系统进行操作,就会导致文件系统出错,因此需要fence进行控制,当一个节点出现问题时,fence就会直接切断电源(不是重启,因为重启还是会将内存的信息写入磁盘,而断电就直接将内存清空),这样就可避免资源争抢。
配置环境:
selinux Enforcing vim /etc/sysconfig/selinux
date 时间同步 ntpdate
iptables 关闭火墙 iptables -F
NetwortManger 关闭
1.建立节点
在test1和test2上配置好yum源,实验中test1即是管理主机,又是集群节点,test2是另外一个集群节点,需要在tets1中做好解析
test1的ip为172.25.66.10 test2的ip为172.25.66.11
[root@test1 ~]# vim /etc/yum.repos.d/rhel-source.repo
[rhel-source]
name=Red Hat Enterprise Linux $releasever - $basearch - Source
baseurl=http://172.25.66.250/rhel6.5
enabled=1
gpgcheck=1
gpgkey=file:///etc/pki/rpm-gpg/RPM-GPG-KEY-redhat-release
[HighAvailability]
name=HighAvailability
baseurl=http://172.25.66.250/rhel6.5/HighAvailability
gpgcheck=0
[LoadBalancer]
name=LoadBalancer
baseurl=http://172.25.66.250/rhel6.5/LoadBalancer
gpgcheck=0
[ResilientStorage]
name=ResilientStorage
baseurl=http://172.25.66.250/rhel6.5/ResilientStorage
gpgcheck=0
[ScalableFileSystem]
name=ScalableFileSystem
baseurl=http://172.25.66.250/rhel6.5/ScalableFileSystem
gpgcheck=0
[root@test2 ~]# vim /etc/yum.repos.d/rhel-source.repo
[rhel-source]
name=Red Hat Enterprise Linux $releasever - $basearch - Source
baseurl=http://172.25.66.250/rhel6.5
enabled=1
gpgcheck=1
gpgkey=file:///etc/pki/rpm-gpg/RPM-GPG-KEY-redhat-release
[HighAvailability]
name=HighAvailability
baseurl=http://172.25.66.250/rhel6.5/HighAvailability
gpgcheck=0
[LoadBalancer]
name=LoadBalancer
baseurl=http://172.25.66.250/rhel6.5/LoadBalancer
gpgcheck=0
[ResilientStorage]
name=ResilientStorage
baseurl=http://172.25.66.250/rhel6.5/ResilientStorage
gpgcheck=0
[ScalableFileSystem]
name=ScalableFileSystem
baseurl=http://172.25.66.250/rhel6.5/ScalableFileSystem
gpgcheck=0
[root@test1 ~]# yum install -y ricci luci ##安装luci,使用web方式配置集群
[root@test1 ~]# passwd ricci ##置ricci密码
[root@test1 ~]# /etc/init.d/ricci start ##启动ricci,监听端口端口为11111
[root@test1 ~]# /etc/init.d/luci start ##启动luci,监听端口端口为8084
[root@test1 ~]# chkconfig luci on ##服务开机自启
[root@test1 ~]# chkconfig ricci on
[root@test2 ~]# yum install -y ricci
[root@test2 ~]# passwd ricci
[root@test2 ~]# /etc/init.d/ricci start
[root@test2 ~]# chkconfig ricci on
[root@test1 ~]# clustat ##测试命令
Cluster Status for test @ Mon Jul 24 05:15:48 2017
Member Status: Quorate
Member Name ID Status
------ ---- ---- ------
test1 1 Online, Local
test2 2 Online
测试:
在网页访问https://172.25.66.10:8084 建立节点
将key文件传到节点的/etc/cluster目录下就可以通过luci给集群添加fence了 点击Fence Devices添加fence,有多种fence设备可供选择这里选的是Fence virt(MulticastMode ),然后点击Nodes里的节点为集群添加fence
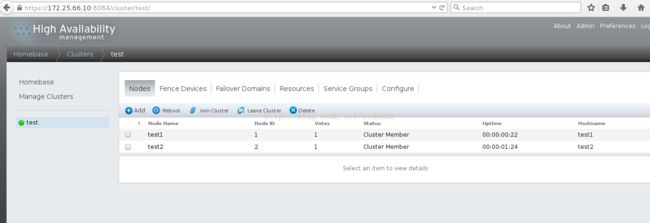
节点建立成功:
三.安装fence_virtd、创建fence设备
1)在真实的物理机上有一个libvirtd服务,是管理虚拟机和其他虚拟化功能,他包含一个API库,一个守护进程(libvirtd)和一个命令行工具(virsh),如果将这个服务关闭了,那么用户就不能通过virsh管理虚拟机。[root@foundation6 iso]# yum installfence-virtd-multicast.x86_64 fence-virtd-libvirt.x86_64 fence-virtd.x86_64 -y
[root@foundation6 Desktop]# fence_virtd -c ##创建fence服务
Module search path [/usr/lib64/fence-virt]:
Available backends:
libvirt 0.1
Available listeners:
multicast 1.2
Listener modules are responsible for accepting requests
from fencing clients.
Listener module [multicast]: ##多播监听
The multicast listener module is designed for use environments
where the guests and hosts may communicate over a network using
multicast.
The multicast address is the address that a client will use to
send fencing requests to fence_virtd.
Multicast IP Address [225.0.0.12]: ##使用默认的多播地址
Using ipv4 as family.
Multicast IP Port [1229]: ##默认端口
Setting a preferred interface causes fence_virtd to listen only
on that interface. Normally, it listens on all interfaces.
In environments where the virtual machines are using the host
machine as a gateway, this *must* be set (typically to virbr0).
Set to 'none' for no interface.
Interface [br0]: ##fence接口
The key file is the shared key information which is used to
authenticate fencing requests. The contents of this file must
be distributed to each physical host and virtual machine within
a cluster.
Key File [/etc/cluster/fence_xvm.key]: ##虚拟机会通过key进行校验
Backend modules are responsible for routing requests to
the appropriate hypervisor or management layer.
Backend module [libvirt]:
Configuration complete. ##配置完成,显示信息
=== Begin Configuration ===
fence_virtd {
listener = "multicast";
backend = "libvirt";
module_path = "/usr/lib64/fence-virt";
}
listeners {
multicast {
key_file = "/etc/cluster/fence_xvm.key";
address = "225.0.0.12";
interface = "br0";
family = "ipv4";
port = "1229";
}
}
backends {
libvirt {
uri = "qemu:///system";
}
}
=== End Configuration ===
Replace /etc/fence_virt.conf with the above [y/N]? y ##生成新的配置文件
[root@foundation6 Desktop]# mkdir /etc/cluster
[root@foundation6 Desktop]#dd if=/dev/urandom of=/etc/cluster/fence_xvm.key bs=128 count=1
[root@foundation6 Desktop]# systemctl restart fence_virtd.service
##/dev/urandom会产生随机数,利用此来产生key
[root@foundation6 Desktop]# scp /etc/cluster/fence_xvm.key [email protected]:/etc/cluster/
[root@foundation6 Desktop]# scp /etc/cluster/fence_xvm.key [email protected]:/etc/cluster/
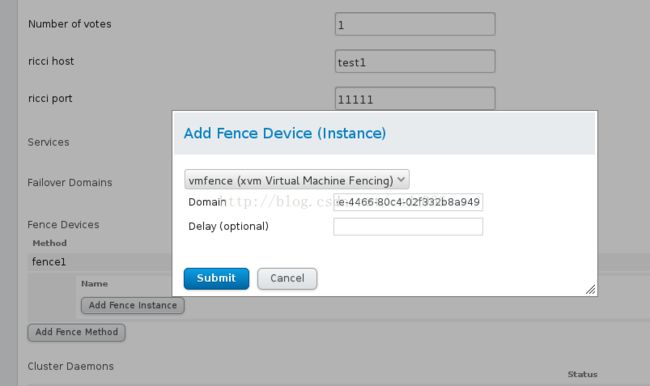
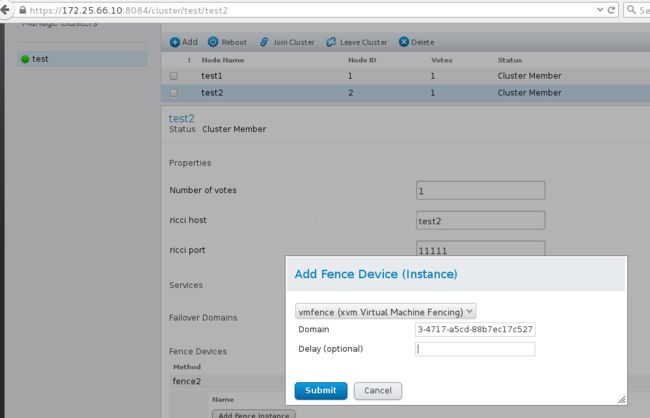
2)在网页访问https://172.25.66.10:8084 建立fence devices ,添加节点,这里选择vmfence(xvm Virtual Machine Fencing)其中Domain填写虚拟机的名字或UUID
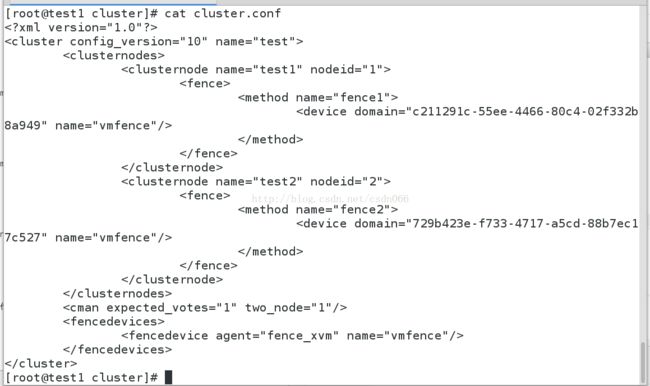
集群内部只知道主机名,而fance所在的物理机知道的是虚拟机的名字,因此要将它们做一个映射,写入UUID
在网页写入的内容会被直接记录在/etc/cluster/cluster.conf文件中
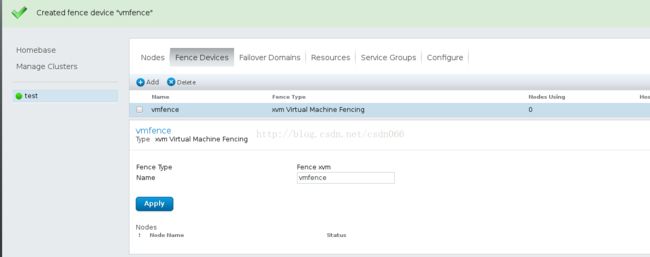
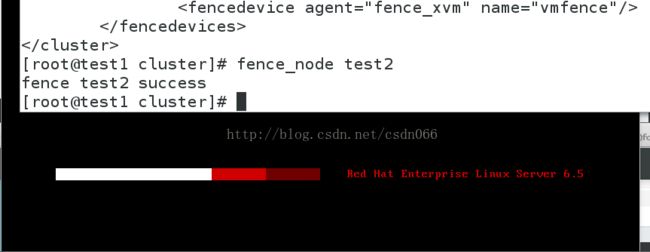
测试节点建立成功:
[root@test1 cluster]# fence_node test2 ##test2重启fence test2 success
[root@test2 ~]# ip link set eth0 down ##将test2的eth0的down掉,会直接断电,test2重启,应用fence的作用
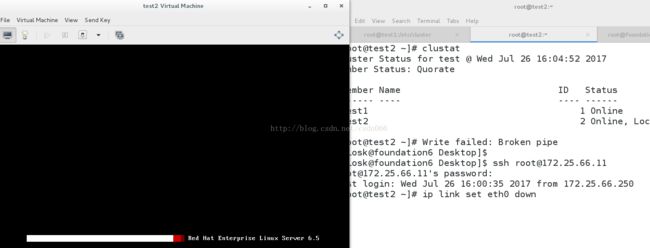
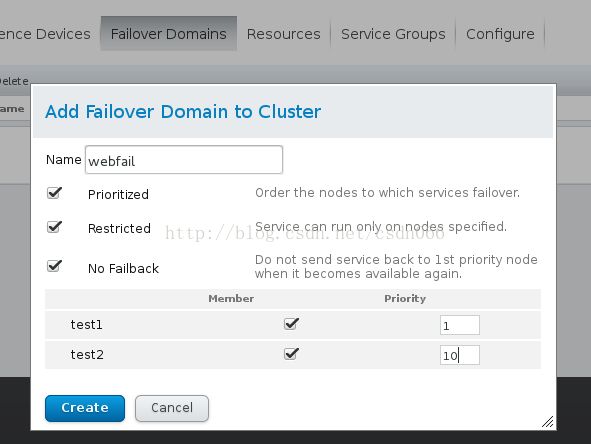
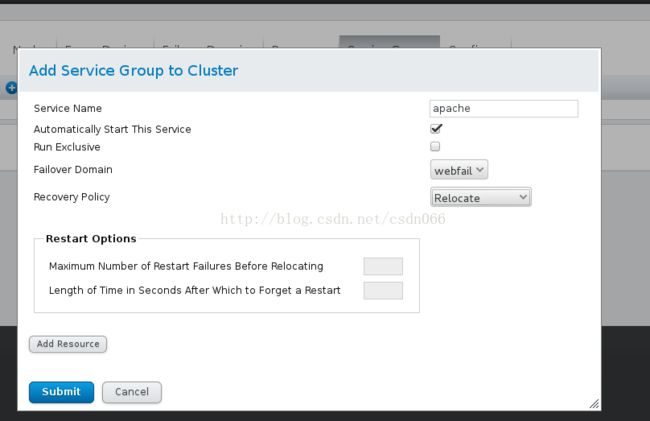
添加资源组:添加Failover Domain ——————> Resource(加入IP Address,Script)————————>Service Groups(apache)
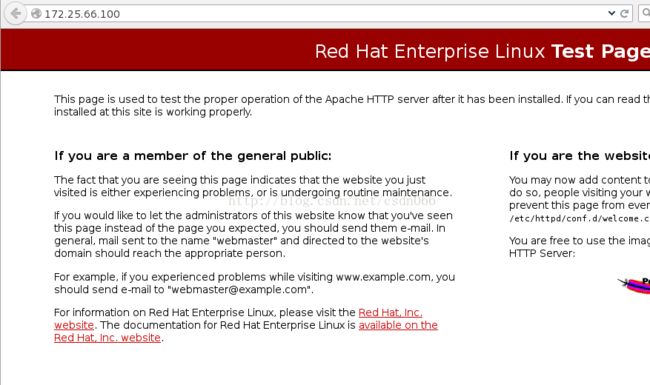
将vip和apache服务加入sources,必须先加ip在加服务,然后在连接节点主机上安装apache服务并开启服务,此时在浏览器就可以访问到172.25.66.100的apache的默认网页
Prioritized设置优先级
Restricted设置只在勾选节点中运行
No Failback设置当优先级高的节点恢复时不会接管正在运行的服务,不回切
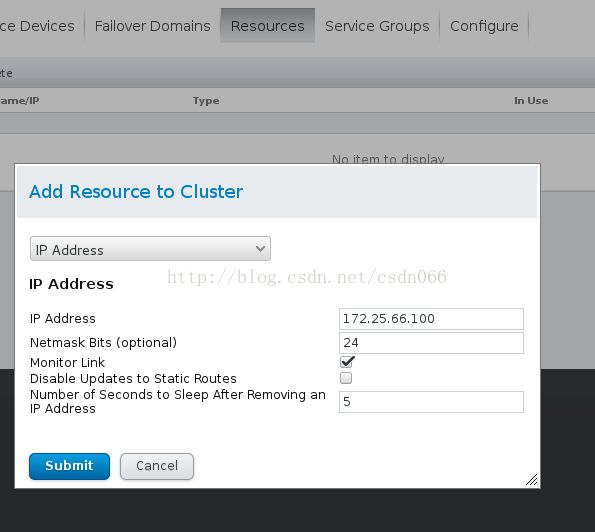
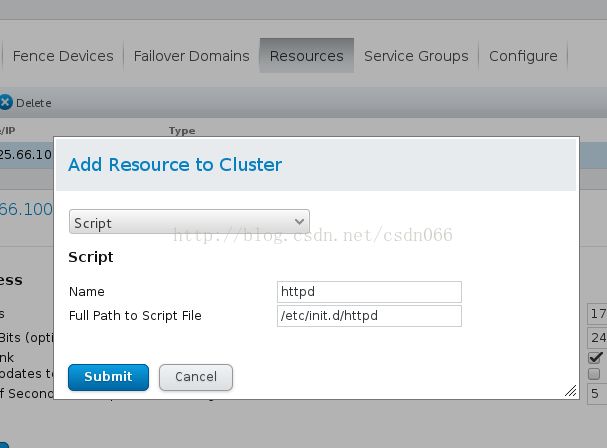
然后在Resource中添加资源这里添加虚拟ip和httpd的脚本(集群要安装httpd):
Automatically Start This Service设置自动开启服务
Run Exclusive 设置当运行此服务时不再运行其他服务,独占
点击 Add Resource 增加Resource中的资源这里添加的是上一步配置的虚拟IP和httpd脚本,先加ip后加脚本
Starting httpd: httpd: Could not reliably determine the server's fully qualified domain name, using 172.25.66.10 for ServerName
[ OK ]
[root@test2 ~]# /etc/init.d/httpd start
Starting httpd: httpd: Could not reliably determine the server's fully qualified domain name, using 172.25.66.11 for ServerName
[ OK ]
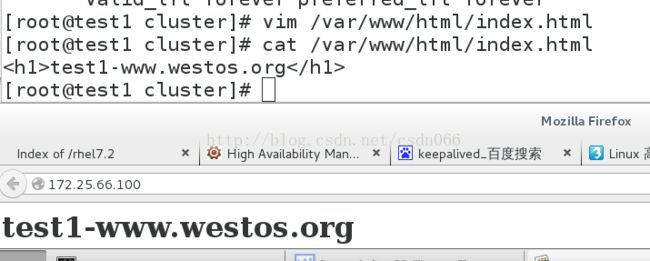
为了实验效果更加明显,这里我们将两个节点apache默认网页改为不同内容[root@test1 cluster]# vim /var/www/html/index.html
[root@test1 cluster]# cat /var/www/html/index.html
test1-www.westos.org
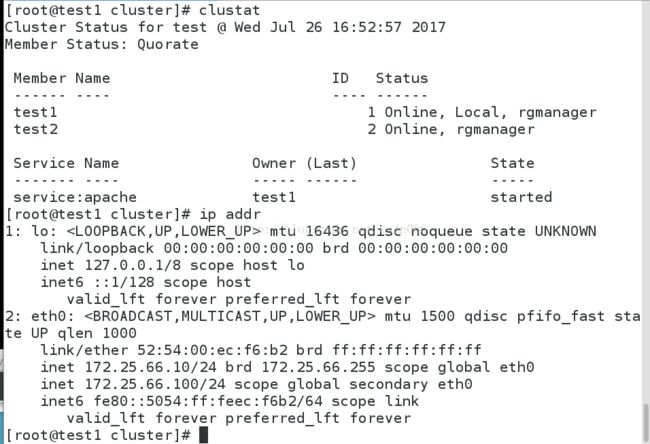
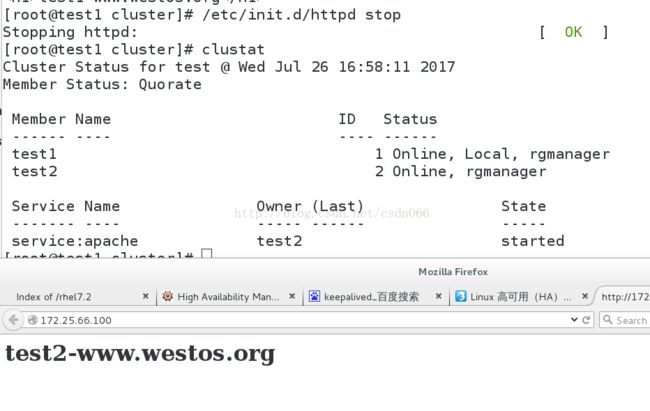
当test1和test2httpd服务正常时,apache在test1时工作,可用clustat查看状态
当test1节点的apache服务关闭时,test2接替工作,同时接管vip
[root@test1 cluster]# /etc/init.d/httpd stop
Stopping httpd: [ OK ][root@test1 cluster]# clustat
Cluster Status for test @ Wed Jul 26 16:58:11 2017
Member Status: Quorate
Member Name ID Status
------ ---- ---- ------
test1 1 Online, Local, rgmanager
test2 2 Online, rgmanager
Service Name Owner (Last) State
------- ---- ----- ------ -----
service:apache test2 started
[root@test2 ~]# echo c > /proc/sysrq-trigger Write failed: Broken pipe
#######################################################################
二.创建共享设备iscsi+节点同步
开启一个虚拟机(server3)作为共享存储,加上8G的硬盘,客户端(test1和test2)安装iscsi,服务端(server3)安装scsi,通过issic和scsi实现网络存储
[root@server3 ~]# yum install -y scsi-*
[root@test1 ~]# yum install -y iscsi-*
[root@test2 ~]# yum install -y iscsi-*
[root@server3 ~]# vim /etc/tgt/targets.conf
38
39 backing-store /dev/vdb
40 initiator-address 172.25.66.10
41 initiator-address 172.25.66.11
42
[root@test1 ~]# iscsiadm -m discovery -t st -p 172.25.66.3 ##发现服务端iscsi共享存储
Starting iscsid: [ OK ]
172.25.66.3:3260,1 iqn.2017-07.com.example:server.target1 ##登入服务端iscsi共享存储
[root@test1 ~]# iscsiadm -m node -l
Logging in to [iface: default, target: iqn.2017-07.com.example:server.target1, portal[root@test1 ~]: 172.25.66.3,3260] (multiple)
Login to [iface: default, target: iqn.2017-07.com.example:server.target1, portal: 172.25.66.3,3260] successful.
[root@test2 ~]# iscsiadm -m discovery -t st -p 172.25.66.3
Starting iscsid: [ OK ]
172.25.66.3:3260,1 iqn.2017-07.com.example:server.target1
[root@test2 ~]# iscsiadm -m node -l ##test2和tset3同时登陆服务端共享存储
Logging in to [iface: default, target: iqn.2017-07.com.example:server.target1, portal: 172.25.66.2,3260] (multiple)
Login to [iface: default, target: iqn.2017-07.com.example:server.target1, portal: 172.25.66.3,3260] successful.
[root@test1 ~]# fdisk -cu /dev/sda ##磁盘分区,在tets1上对共享存储进行操作
Command (m for help): n
Command action
e extended
p primary partition (1-4)
p
Partition number (1-4):
Value out of range.
Partition number (1-4): 1
First sector (2048-16777215, default 2048):
Using default value 2048
Last sector, +sectors or +size{K,M,G} (2048-16777215, default 16777215):
Using default value 16777215
Command (m for help): t
Selected partition 1
Hex code (type L to list codes): 8e
Changed system type of partition 1 to 8e (Linux LVM)
Command (m for help): wq
The partition table has been altered!
Calling ioctl() to re-read partition table.
Syncing disks.
[root@test2 ~]# fdisk -l ##在test2上可以查看到存储设备分区同步
Disk /dev/vda: 9663 MB, 9663676416 bytes
16 heads, 63 sectors/track, 18724 cylinders
Units = cylinders of 1008 * 512 = 516096 bytes
Sector size (logical/physical): 512 bytes / 512 bytes
I/O size (minimum/optimal): 512 bytes / 512 bytes
Disk identifier: 0x000a7cda
Device Boot Start End Blocks Id System
/dev/vda1 * 3 1018 512000 83 Linux
Partition 1 does not end on cylinder boundary.
/dev/vda2 1018 18725 8924160 8e Linux LVM
Partition 2 does not end on cylinder boundary.
Disk /dev/mapper/VolGroup-lv_root: 8170 MB, 8170504192 bytes
255 heads, 63 sectors/track, 993 cylinders
Units = cylinders of 16065 * 512 = 8225280 bytes
Sector size (logical/physical): 512 bytes / 512 bytes
I/O size (minimum/optimal): 512 bytes / 512 bytes
Disk identifier: 0x00000000
Disk /dev/mapper/VolGroup-lv_swap: 964 MB, 964689920 bytes
255 heads, 63 sectors/track, 117 cylinders
Units = cylinders of 16065 * 512 = 8225280 bytes
Sector size (logical/physical): 512 bytes / 512 bytes
I/O size (minimum/optimal): 512 bytes / 512 bytes
Disk identifier: 0x00000000
Disk /dev/sda: 8589 MB, 8589934592 bytes
64 heads, 32 sectors/track, 8192 cylinders
Units = cylinders of 2048 * 512 = 1048576 bytes
Sector size (logical/physical): 512 bytes / 512 bytes
I/O size (minimum/optimal): 512 bytes / 512 bytes
Disk identifier: 0xbab2f040
Device Boot Start End Blocks Id System
/dev/sda1 2 8192 8387584 8e Linux LVM
[root@test1 ~]#pvcreate /dev/sda1
[root@test1 ~]# vgs ##一个节点创建物理分区,逻辑卷组,逻辑卷,另一个节点同步更新
VG #PV #LV #SN Attr VSize VFree
VolGroup 1 2 0 wz--n- 8.51g 0
clustervg 1 0 0 wz--nc 8.00g 8.00g
[root@test1 ~]# lvcreate -L +2G -n demo clustervg
Error locking on node test2: Unable to resume clustervg-demo (253:2)
Failed to activate new LV.
注意查看两个节点的分区信息必须一致,当两个结点的信息不一致时,要及时排错,可能会遇到下面两种情况
[root@test1 ~]# cat /proc/partitions ##分区大小不一致
major minor #blocks name
252 0 9437184 vda
252 1 512000 vda1
252 2 8924160 vda2
253 0 7979008 dm-0
253 1 942080 dm-1
8 0 8388608 sda
8 1 8387584 sda1
[root@test2 ~]# cat /proc/partitions
major minor #blocks name
252 0 9437184 vda
252 1 512000 vda1
252 2 8924160 vda2
253 0 7979008 dm-0
253 1 942080 dm-1
8 0 8388608 sda
8 1 2097152 sda1
[root@test2 ~]# partprobe ##用partprobe命令刷新下
Warning: WARNING: the kernel failed to re-read the partition table on /dev/vda (Device or resource busy). As a result, it may not reflect all of your changes until after reboot.
[root@test2 ~]# cat /proc/partitions
major minor #blocks name
252 0 9437184 vda
252 1 512000 vda1
252 2 8924160 vda2
253 0 7979008 dm-0
253 1 942080 dm-1
8 0 8388608 sda
8 1 8387584 sda1
[root@test1 ~]# lvcreate -L +2G -n demo clustervg ##刷新后信息同步,但还是无法建立逻辑卷
Error locking on node test2: device-mapper: create ioctl on clustervg-demo failed: Device or resource busy
Failed to activate new LV.
[root@test1 ~]# fence_node test2 ##考虑节点信息不同步,直接将test2断电重启
fence test2 success
[root@test1 ~]# lvcreate -L +2G -n demo clustervg ##建立逻辑卷成功
Logical volume "demo" created
[root@test1 ~]# mkfs.ext4 /dev/clustervg/demo ##格式化为ext4格式,ext4只能进行本地共享,无法实现网络共享
mke2fs 1.41.12 (17-May-2010)
Filesystem label=
OS type: Linux
Block size=4096 (log=2)
Fragment size=4096 (log=2)
Stride=0 blocks, Stripe width=0 blocks
131072 inodes, 524288 blocks
26214 blocks (5.00%) reserved for the super user
First data block=0
Maximum filesystem blocks=536870912
16 block groups
32768 blocks per group, 32768 fragments per group
8192 inodes per group
Superblock backups stored on blocks:
32768, 98304, 163840, 229376, 294912
Writing inode tables: done
Creating journal (16384 blocks): done
Writing superblocks and filesystem accounting information: done
This filesystem will be automatically checked every 37 mounts or
180 days, whichever comes first. Use tune2fs -c or -i to override.
磁盘可以格式化为本地系统或者集群文件系统
1.磁盘格式化为本地文件系统
节点执行pvs,vgs,lvs。命令进行同步
最后在网页进行配置:
点击Resource添加资源:选择File System
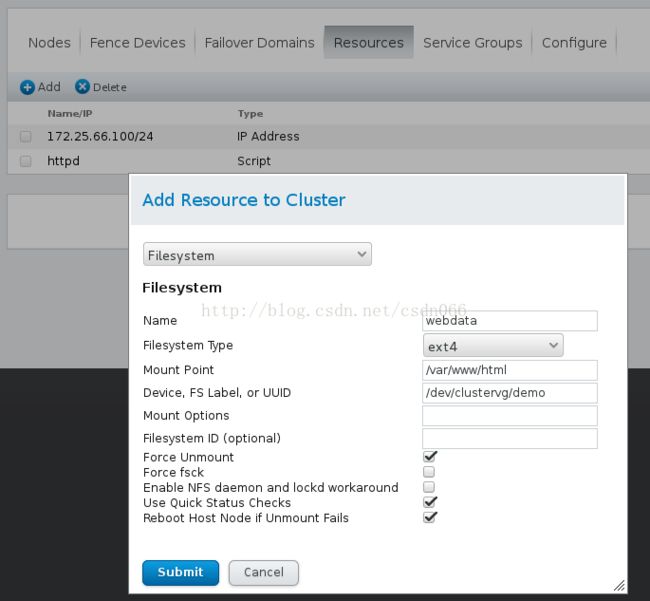
在之前的Resource Group中的apache组添加资源顺序为虚拟IP -> File System ->httpd脚本
因为stest2主机的优先级高所以先挂载在test主机,apache在test1是工作
[root@test1 ~]# lvextend -L +2G /dev/clustervg/demo ##扩展逻辑卷
Extending logical volume demo to 4.00 GiB
Logical volume demo successfully resized
[root@test1 ~]# lvs
LV VG Attr LSize Pool Origin Data% Move Log Cpy%Sync Convert
lv_root VolGroup -wi-ao---- 7.61g
lv_swap VolGroup -wi-ao---- 920.00m
demo clustervg -wi-a----- 4.00g
2.磁盘格式化为集群文件系统
[root@test1 ~]# mkfs.gfs2 -j 3 -p lock_dlm -t test:mygfs2 /dev/clustervg/demo ##格式化为gfs2格式,gfs2格式可以做为网络共享,并且可以实现同时挂在,同时写入
This will destroy any data on /dev/clustervg/demo.
It appears to contain: symbolic link to `../dm-2'
Are you sure you want to proceed? [y/n] y
Device: /dev/clustervg/demo
Blocksize: 4096
Device Size 4.00 GB (1048576 blocks)
Filesystem Size: 4.00 GB (1048575 blocks)
Journals: 3
Resource Groups: 16
Locking Protocol: "lock_dlm"
Lock Table: "test:mygfs2"
UUID: 0085b03e-a622-0aec-f936-f5dca4333740
在/etc/fstab中写入(UUID可以通过blkid查看,所用节点都做)
[root@test1 html]# vim /etc/fstab ##写在配置文件中,开机自启,由于gfs2是网络共享存储。必须先启动网络,在挂载
UUID="0085b03e-a622-0aec-f936-f5dca4333740" /var/www/html gfs2 _netdev,defaults 0 0
[root@test1 html]# gfs2_tool journals /dev/clustervg/demo ##结点日志
journal2 - 128MB
journal1 - 128MB
journal0 - 128MB
3 journal(s) found.
[root@test1 html]# gfs2_jadd -j 3 /dev/clustervg/demo ##增加3个结点
Filesystem: /var/www/html
Old Journals 3
New Journals 6
[root@test1 html]# gfs2_tool journals /dev/clustervg/demo
journal2 - 128MB
journal3 - 128MB
journal1 - 128MB
journal5 - 128MB
journal4 - 128MB
journal0 - 128MB
6 journal(s) found.
[root@test1 html]# df -h
Filesystem Size Used Avail Use% Mounted on
/dev/mapper/VolGroup-lv_root 7.5G 1.1G 6.1G 15% /
tmpfs 246M 32M 215M 13% /dev/shm
/dev/vda1 485M 33M 427M 8% /boot
/dev/mapper/clustervg-demo 4.0G 776M 3.3G 19% /var/www/html
[root@test1 html]# lvextend -L +4G /dev/clustervg/demo
Extending logical volume demo to 8.00 GiB
Insufficient free space: 1024 extents needed, but only 1023 available
[root@test1 html]# lvextend -l +1023 /dev/clustervg/demo
Extending logical volume demo to 8.00 GiB
Logical volume demo successfully resized
[root@test1 html]# lvs
LV VG Attr LSize Pool Origin Data% Move Log Cpy%Sync Convert
lv_root VolGroup -wi-ao---- 7.61g
lv_swap VolGroup -wi-ao---- 920.00m
demo clustervg -wi-ao---- 8.00g
[root@test1 html]# vgs
VG #PV #LV #SN Attr VSize VFree
VolGroup 1 2 0 wz--n- 8.51g 0
clustervg 1 1 0 wz--nc 8.00g 0
[root@test1 html]# gfs2_grow /dev/clustervg/demo ##扩展
FS: Mount Point: /var/www/html
FS: Device: /dev/dm-2
FS: Size: 1048575 (0xfffff)
FS: RG size: 65533 (0xfffd)
DEV: Size: 2096128 (0x1ffc00)
The file system grew by 4092MB.
gfs2_grow complete.
[root@test1 html]# df -h
Filesystem Size Used Avail Use% Mounted on
/dev/mapper/VolGroup-lv_root 7.5G 1.1G 6.1G 15% /
tmpfs 246M 32M 215M 13% /dev/shm
/dev/vda1 485M 33M 427M 8% /boot
/dev/mapper/clustervg-demo 7.8G 776M 7.0G 10% /var/www/html

