基于人脸特征点实现疲劳检测
为了有效监测驾驶员是否疲劳驾驶、避免交通事故的发生,提出了一种利用人脸特征点进行实时疲劳驾驶检测的新方法。对驾驶员驾驶时的面部图像进行实时监控,首先检测人脸,并利用ERT算法定位人脸特征点;然后根据人脸眼睛区域的特征点坐标信息计算眼睛纵横比EAR来描述眼睛张开程度,根据合适的EAR阈值可判断睁眼或闭眼状态;最后基于EAR实测值和EAR阈值对监控视频计算闭眼时间比例(PERCLOS)值度量驾驶员主观疲劳程度,将其与设定的疲劳度阈值进行比较即可判定是否疲劳驾驶。
一、 人脸特征点检测
人脸特征点检测基于该类库实现(https://github.com/610265158/Peppa_Pig_Face_Engine), 我尝试过很多开源框架,包括 dlib, openface,pfld,clnf 等,在闭眼检测方面,表现都不是十分理想,后来发现这个类库,哇,眼前一亮,检测的很牛逼,而且很稳定。在 i7 八代的cpu上,识别一帧大概平均在40ms左右( 因为项目主机上没有gpu ,所以没有测试过gpu的检测速度 ,但应该很快), 详细参考该作者文章:https://blog.csdn.net/qq_35606924/article/details/99711208, 写的真的很牛逼,不牛逼你找我。
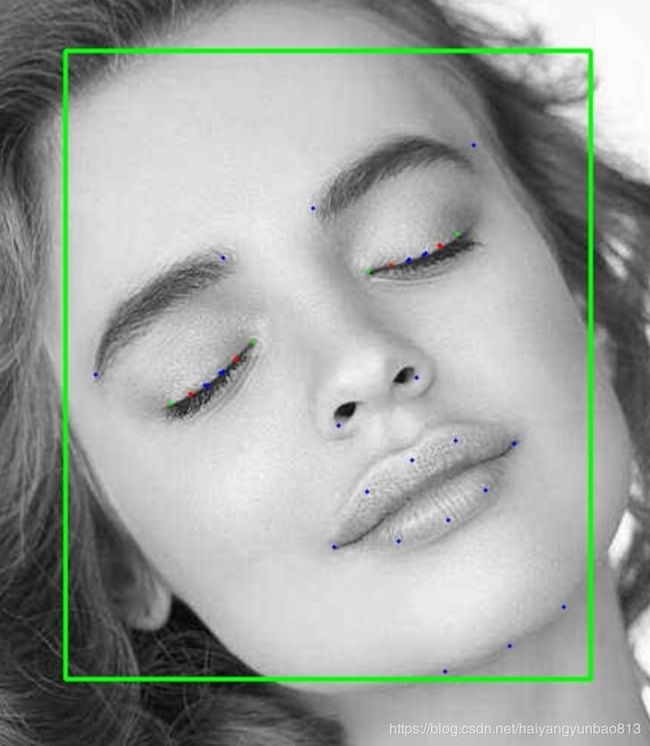
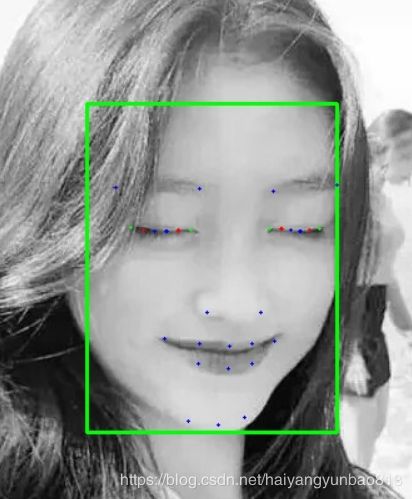
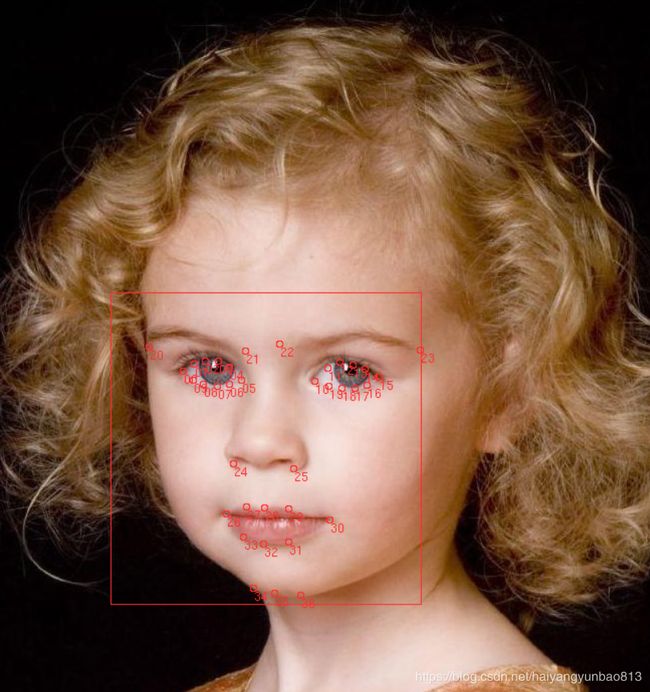
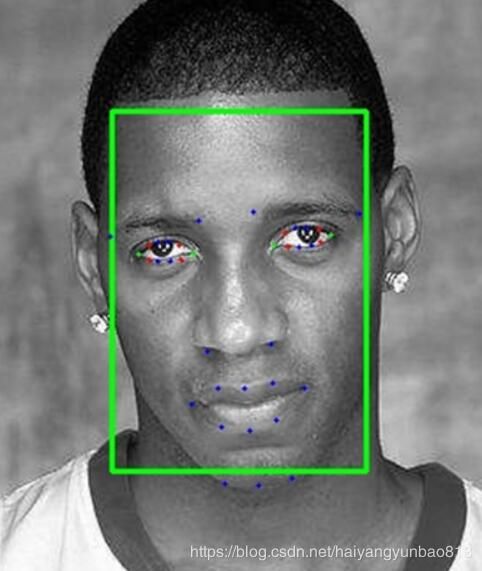
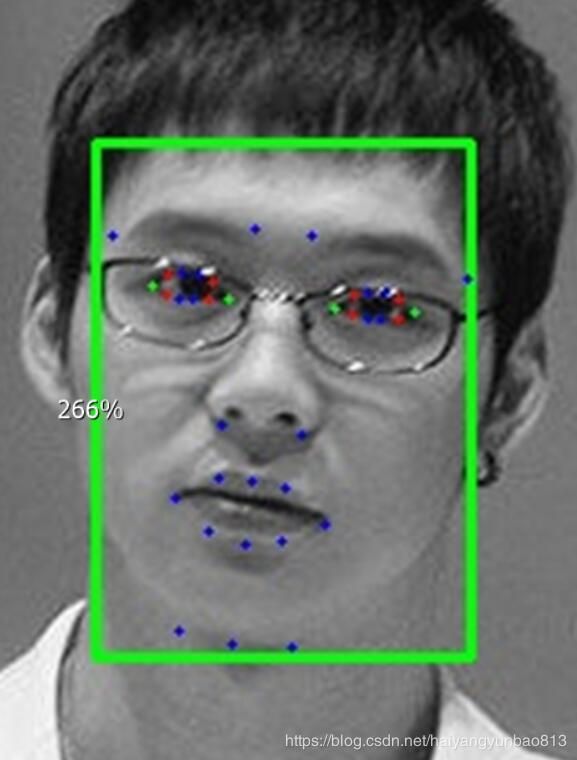
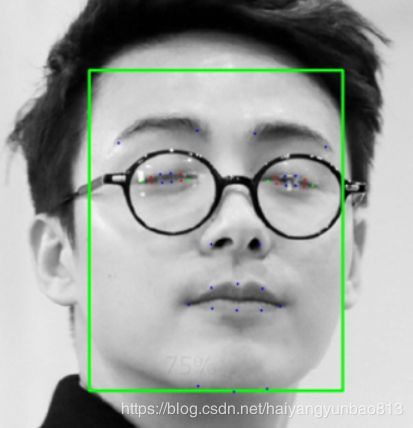
在我的数据集上检测闭眼的效果图:
二、训练自己的数据集( 基于 tf1 )
因为开源数据集中包含闭眼的数据太少了,所以需要我们自己手动增加 ,这里我使用的是 dlib 的标注工具。
1. 标注数据集 , 因为主要检测眼睛和头部姿态,所以我标注了37个点。(大概标注了5000多张)
** 标注工具: (由于标注过程中经常出错,所以增加了撤销等功能)
2. 标注完成后,会生成一个xml文件,里面包含所有的标注信息 (最好检测下,不要标记少点或者多点情况),然后做下面操作
1. 打乱顺序
imglab --shuffle dataset_0402.xml2. 分隔数据集 ( 训练集 和 测试集 )
imglab --split-train-test 0.95 dataset_0402.xml3. 还可以 翻转数据集 、去除相似样本等操作
imglab --rmdupes  xml/mydataset.xml ## 去除相似样本
imglab --flip   xml/mydataset.xml  ## 翻转图片
4. 更多详细操作参考: https://blog.csdn.net/u010168781/article/details/91048497
3. 将训练集和测试集转换成作者提供的格式
import json
from xml.dom.minidom import parse
from tqdm import tqdm


def json_to_txt(json_file, txt_file):
    txt_file = open(txt_file, mode='w')
    with open(json_file, 'r') as f:
        data = json.load(f)
        tmp_str = ""
        for sub_data in data:
            file_name = sub_data['image_path']

            tmp_str += file_name + '|'

            key_points = sub_data['keypoints']

            for points in key_points:
                tmp_str = tmp_str + str(points[0]) + ' ' + str(points[1]) + ' '
            tmp_str = tmp_str + '\n'

        txt_file.write(tmp_str)


def read_xml_to_json(path, out_file_path):
    domTree = parse(path)
    # 文档根元素
    rootNode = domTree.documentElement
    images = rootNode.getElementsByTagName("image")
    with open(out_file_path, 'w') as f:
        train_json_list = []
        for image in tqdm(images):
            one_image_ann = {}
            if image.hasAttribute("file"):
                info = ""
                # 文件路径
                file_path = image.getAttribute("file")
                print("path:" + file_path)

                one_image_ann['image_path'] = file_path

                box = image.getElementsByTagName("box")

                top = box[0].getAttribute("top")
                left = box[0].getAttribute("left")
                width = box[0].getAttribute("width")
                height = box[0].getAttribute("height")

                print("top:" + top + " left:" + left + " width:" + width + " height:" + height)
                bbox = [float(top), float(left), float(width), float(height)]

                parts = box[0].getElementsByTagName("part")

                if len(parts) == 0:
                    continue
                key = []
                for part in parts:
                    key.append([float(part.getAttribute("x")), float(part.getAttribute("y"))])
                    print("x:" + part.getAttribute("x") + " y:" + part.getAttribute("y"))

                one_image_ann['keypoints'] = key
                one_image_ann['bbox'] = bbox
                one_image_ann['attr'] = None

                train_json_list.append(one_image_ann)

        json.dump(train_json_list, f, indent=2)


def read_xml_to_txt(path, out_txt_file_path):
    domTree = parse(path)
    # 文档根元素
    rootNode = domTree.documentElement
    images = rootNode.getElementsByTagName("image")
    with open(out_txt_file_path, 'w') as f:
        txt_str = ""
        for image in tqdm(images):
            if image.hasAttribute("file"):
                # 文件路径
                file_path = image.getAttribute("file")
                txt_str += file_path + '|'
                # print("path:" + file_path)

                box = image.getElementsByTagName("box")
                parts = box[0].getElementsByTagName("part")

                if len(parts) == 0:
                    continue

                key = []
                for part in parts:
                    key.append([float(part.getAttribute("x")), float(part.getAttribute("y"))])
                    txt_str = txt_str + str(float(part.getAttribute("x"))) + ' ' + str(
                        float(part.getAttribute("y"))) + ' '
                    # print("x:" + part.getAttribute("x") + " y:" + part.getAttribute("y"))

                txt_str = txt_str + '\n'

        f.write(txt_str)


if __name__ == '__main__':
    data_path = ["data/test.xml", "data/train.xml"]
    out_path = ["data/test.txt", "data/train.txt"]
    for path, out in zip(data_path, out_path):
        read_xml_to_txt(path, out)
4. 配置训练参数
1. 修改特征点下标,因为作者使用的数据集是基于68点的,所以说下标肯定是不同的,如果你标注点的顺序和作者使用的数据 集一样,则不需要更改。
2. 配置数据集训练和测试路径以及其他的一些参数,参考 train_config.py。
5. 修改数据读取方式
1. 如果直接开始训练,会报这个错: Can't pickle local object 'DataFromGenerator.init..' , 因为作者是在linux下训练的,而我是在windows下训练,可能window不支持这个多线程预加载。如果我们将这个 ds = MultiProcessPrefetchData(ds, self.prefetch_size, self.process_num) 注释掉,重新训练,会发现训练速度很慢,迭代10次,大概需要耗时 1min , gpu 利用率大概在 2% 左右,我猜可能是因为我们没有做预加载处理,导致大部分时间都耗时在读取数据上。
2. 通过 tfrecord 方式来读取数据,这样可以大大加快我们的训练速度,在 mx150的gpu上测试,10迭代耗时大概在5s左右,提高了至少10倍的速度,但唯一难受的是,生成的 record 文件太大了(解决文件太大,看后面)。 下面是实现过程:
1. 生成 tfrecord 文件
# 写这段代码的时候,只有上帝和我知道它是干嘛的
# 现在,只有上帝知道
# @File : generate_tfrecord.py
# @Time : 2020/4/24 14:10
# @Author : J.
# @desc : 生成 tfrecord 文件

import tensorflow as tf
from lib.dataset.dataietr import FaceKeypointDataIter
from train_config import config as cfg
from tqdm import tqdm
import argparse
import sys


def int64_feature(value):
    return tf.train.Feature(int64_list=tf.train.Int64List(value=[value]))


def bytes_feature(value):
    return tf.train.Feature(bytes_list=tf.train.BytesList(value=[value]))


def create_tf_example(image_file, is_train):
    crop_image, label = _train_data._map_func(image_file, is_train)
    tf_example = tf.train.Example(
        features=tf.train.Features(
            feature={
                'image': bytes_feature(crop_image.tobytes()),
                'label': bytes_feature(label.tobytes())
            }
        ))
    return tf_example


def generate_tfrecord(images_files, record_path, is_train=True):
    num_tf_example = 0
    writer = tf.python_io.TFRecordWriter(record_path)
    with tqdm(images_files, ncols=100) as files:
        for image in files:
            tf_example = create_tf_example(image, is_train)
            writer.write(tf_example.SerializeToString())
            num_tf_example += 1
            # if num_tf_example % 100 == 0:
            #     print("Create %d TF_Example" % num_tf_example)
        writer.close()
        print("{} tf_examples has been created successfully, which are saved in {}".format(num_tf_example, record_path))


def main(_):
    global _train_data
    global _val_data
    _train_data = FaceKeypointDataIter(cfg.TRAIN.batch_size, cfg.TRAIN.epoch, cfg.DATA.root_path,
                                       FLAGS.train_data,
                                       True)

    _val_data = FaceKeypointDataIter(cfg.TRAIN.batch_size, cfg.TRAIN.epoch, cfg.DATA.root_path,
                                     FLAGS.val_data,
                                     False)

    print("==================  generate train tf_record start  ===================")
    train_images_files = _train_data.get_parse_file()
    generate_tfrecord(train_images_files, FLAGS.train_save_path, True)
    print("==================  generate train tf_record end  ===================")

    print("==================  generate val tf_record start  ===================")
    val_images_files = _val_data.get_parse_file()
    generate_tfrecord(val_images_files, FLAGS.val_save_path, False)
    print("==================  generate val tf_record end  ===================")


if __name__ == '__main__':
    parser = argparse.ArgumentParser()
    parser.add_argument(
        '--train_data',
        type=str,
        default='data/train.txt',
        help='训练数据.')

    parser.add_argument(
        '--val_data',
        type=str,
        default='data/test.txt',
        help='验证数据.')

    parser.add_argument(
        '--train_save_path',
        type=str,
        default='record/train.record',
        help='生成训练数据路径.')

    parser.add_argument(
        '--val_save_path',
        type=str,
        default='record/val.record',
        help='生成验证数据路径.')

    FLAGS, unparsed = parser.parse_known_args()
    tf.app.run(main=main, argv=[sys.argv[0]] + unparsed)
2. 读取 record 数据
class read_face_data():

    def __init__(self, tfrecord_path, batch_size, out_channel, win, hin, num_threads):
        self.tfrecord_path = tfrecord_path
        self.batch_size = batch_size
        self.win = win
        self.hin = hin
        self.num_threads = num_threads
        self.out_channel = out_channel

    def read_and_decode(self):
        filename_queue = tf.train.string_input_producer([self.tfrecord_path], shuffle=False)
        reader = tf.TFRecordReader()
        _, serialized_example = reader.read(filename_queue)
        features = tf.parse_single_example(serialized_example,
                                           features={
                                               'image': tf.FixedLenFeature([], tf.string),
                                               'label': tf.FixedLenFeature([], tf.string)
                                           })

        images = tf.decode_raw(features['image'], tf.float32)
        images = tf.reshape(images, [self.win, self.hin, 3])

        labels = tf.decode_raw(features['label'], tf.float32)
        labels = tf.reshape(labels, [self.out_channel])

        # capacity:队列中元素的最大数量
        # min_after_dequeue出队后队列中元素的最小数量,用于确保元素的混合级别
        _images, _labels = tf.train.shuffle_batch([images, labels],
                                                  num_threads=self.num_threads,
                                                  batch_size=self.batch_size,
                                                  capacity=self.batch_size * 2,
                                                  min_after_dequeue=self.batch_size)

        return _images, _labels
3. 修改 net_work.py
修改 loop 、_train、_val 方法
    def loop(self, ):

        self.build()
        self.load_weight()

        sess = tf.Session()

        train_face_data = read_face_data(cfg.DATA.train_txt_path, cfg.TRAIN.batch_size, cfg.MODEL.out_channel,
                                         cfg.MODEL.win, cfg.MODEL.hin, 8)
        self.train_image_data, self.train_label_data = train_face_data.read_and_decode()

        val_face_data = read_face_data(cfg.DATA.val_txt_path, cfg.TRAIN.batch_size, cfg.MODEL.out_channel,
                                       cfg.MODEL.win, cfg.MODEL.hin, 8)
        self.val_image_data, self.val_label_data = val_face_data.read_and_decode()
        init_op = tf.global_variables_initializer()
        sess.run(init_op)
        ## 启动多线程处理输入数据
        coord = tf.train.Coordinator()
        threads = tf.train.start_queue_runners(sess=sess, coord=coord)
        with self._graph.as_default():
            # Create a saver.
            self.saver = tf.train.Saver(tf.global_variables(), max_to_keep=None)

            # Build the summary operation from the last tower summaries.
            self.summary_op = tf.summary.merge(self.summaries)

            self.summary_writer = tf.summary.FileWriter(cfg.MODEL.model_path, self._sess.graph)

        # epoch 2000
        min_loss_control = 1000.
        for epoch in range(cfg.TRAIN.epoch):
            self._train(epoch, sess)
            val_loss = self._val(epoch, sess)
            logger.info('**************'
                        'val_loss %f ' % (val_loss))

            # tmp_model_name=cfg.MODEL.model_path + \
            #               'epoch_' + str(epoch ) + \
            #               'L2_' + str(cfg.TRAIN.weight_decay_factor) + \
            #               '.ckpt'
            # logger.info('save model as %s \n'%tmp_model_name)
            # self.saver.save(self.sess, save_path=tmp_model_name)

            if 1:
                min_loss_control = val_loss
                low_loss_model_name = cfg.MODEL.model_path + \
                                      'epoch_' + str(epoch) + \
                                      'L2_' + str(cfg.TRAIN.weight_decay_factor) + '.ckpt'
                logger.info('A new low loss model  saved as %s \n' % low_loss_model_name)
                self.saver.save(self._sess, save_path=low_loss_model_name)

        self._sess.close()
        sess.close()
        coord.request_stop()
        coord.join(threads)

    def _train(self, _epoch, sess):
        #   config.TRAIN.train_set_size // config.TRAIN.num_gpu // config.TRAIN.batch_size
        for step in range(cfg.TRAIN.iter_num_per_epoch):
            self.ite_num += 1
            start_time = time.time()
            # 64 * 160 * 160 *3   64*143
            example_images, example_labels = sess.run([self.train_image_data, self.train_label_data])
            # example_images, example_labels = next(self.train_ds)
            # example_images = train_iter_data['image']
            # example_labels = train_iter_data['label']

            ########show_flag check the data
            if cfg.TRAIN.vis:
                for i in range(cfg.TRAIN.batch_size):
                    example_image = example_images[i, :, :, :] / 255.
                    example_label = example_labels[i, :]

                    Landmark = example_label[0:136]
                    cla = example_label[136:]

                    # print(np.max(example_image))
                    # print(np.min(example_image))
                    # print(Landmark)
                    print(cla)
                    Landmark = Landmark.reshape([-1, 2])
                    _h, _w, _ = example_image.shape
                    for _index in range(Landmark.shape[0]):
                        x_y = Landmark[_index]
                        cv2.circle(example_image, center=(int(x_y[0] * _w), int(x_y[1] * _w)), color=(122, 122, 122),
                                   radius=1, thickness=1)

                    # cv2.putText(img_show, 'left_eye:open', (xmax, ymin),
                    #             cv2.FONT_HERSHEY_SIMPLEX, 1,
                    #             (255, 0, 255), 2)
                    cv2.namedWindow('img', 0)
                    cv2.imshow('img', example_image)
                    cv2.waitKey(0)

            fetch_duration = time.time() - start_time

            feed_dict = {}
            for n in range(cfg.TRAIN.num_gpu):
                feed_dict[self.inputs[0][n]] = example_images[n * cfg.TRAIN.batch_size:(n + 1) * cfg.TRAIN.batch_size,
                                               :, :, :]
                feed_dict[self.inputs[1][n]] = example_labels[n * cfg.TRAIN.batch_size:(n + 1) * cfg.TRAIN.batch_size,
                                               :]

            feed_dict[self.inputs[2]] = True
            _, total_loss_value, loss_value, leye_loss_value, reye_loss_value, mouth_loss_value, \
            leye_cla_accuracy_value, reye_cla_accuracy_value, mouth_cla_accuracy_value, l2_loss_value, learn_rate, = \
                self._sess.run([*self.outputs],
                               feed_dict=feed_dict)

            duration = time.time() - start_time
            run_duration = duration - fetch_duration
            if self.ite_num % cfg.TRAIN.log_interval == 0:
                num_examples_per_step = cfg.TRAIN.batch_size * cfg.TRAIN.num_gpu
                examples_per_sec = num_examples_per_step / duration
                sec_per_batch = duration / cfg.TRAIN.num_gpu

                format_str = ('epoch %d: iter %d, '
                              'total_loss=%.6f '
                              'loss=%.6f '
                              'leye_loss=%.6f '
                              'reye_loss=%.6f '
                              'mouth_loss=%.6f '
                              'leye_acc=%.6f '
                              'reye_acc=%.6f '
                              'mouth_acc=%.6f '
                              'l2_loss=%.6f '
                              'learn_rate =%e '
                              '(%.1f examples/sec; %.3f sec/batch) '
                              'fetch data time = %.6f'
                              'run time = %.6f')
                logger.info(format_str % (_epoch,
                                          self.ite_num,
                                          total_loss_value,
                                          loss_value,
                                          leye_loss_value,
                                          reye_loss_value,
                                          mouth_loss_value,
                                          leye_cla_accuracy_value,
                                          reye_cla_accuracy_value,
                                          mouth_cla_accuracy_value,
                                          l2_loss_value,
                                          learn_rate,
                                          examples_per_sec,
                                          sec_per_batch,
                                          fetch_duration,
                                          run_duration))

            if self.ite_num % 100 == 0:
                summary_str = self._sess.run(self.summary_op, feed_dict=feed_dict)
                self.summary_writer.add_summary(summary_str, self.ite_num)

    def _val(self, _epoch, sess):
        all_total_loss = 0
        for step in range(cfg.TRAIN.val_iter):

            # example_images, example_labels = next(self.val_ds)  # 在会话中取出image和label
            example_images, example_labels = sess.run([self.val_image_data, self.val_label_data])

            feed_dict = {}
            for n in range(cfg.TRAIN.num_gpu):
                feed_dict[self.inputs[0][n]] = example_images[n * cfg.TRAIN.batch_size:(n + 1) * cfg.TRAIN.batch_size,
                                               :, :, :]
                feed_dict[self.inputs[1][n]] = example_labels[n * cfg.TRAIN.batch_size:(n + 1) * cfg.TRAIN.batch_size,
                                               :]
            feed_dict[self.inputs[2]] = False
            total_loss_value, loss_value, leye_loss_value, reye_loss_value, mouth_loss_value, \
            leye_cla_accuracy_value, reye_cla_accuracy_value, mouth_cla_accuracy_value, l2_loss_value, learn_rate = \
                self._sess.run([*self.val_outputs],
                               feed_dict=feed_dict)

            all_total_loss += total_loss_value - l2_loss_value

        return all_total_loss / cfg.TRAIN.val_iter
4. 重新开始训练,速度绝对飞起,gpu利用率达到 95%, 10个迭代大概在 5s 左右。
5. 我训练最终 loss 大概在 5.5左右 ,作者大概在 3 左右,可能训练参数还有待优化。然后将生成的模型转换成pb文件,找几张图片或者视频,验证下识别效果。
** 关于解决 tfrecord 文件太大问题:
当我们数据集增强后,有可能导致tfrecord文件太大,我试过大约写入100万多条的数据,tfrecord 文件大约接近 270G。
解决:
1. 压缩数据
 # 压缩数据
 writer_options = tf.python_io.TFRecordOptions(
        tf.python_io.TFRecordCompressionType.ZLIB)
 writer = tf.python_io.TFRecordWriter(record_path, options=writer_options)


#  解压缩数据
 tfrecord_options = tf.python_io.TFRecordOptions(tf.python_io.TFRecordCompressionType.ZLIB)
2. 将数据分成多个record文件保存,读取时,只需要将多个record文件的路径列表交给“tf.train.string_input_producer”
参考: https://www.ppkanshu.com/index.php/post/2856.html
 with open(self.tfrecord_path, "r") as f:
            lines = f.readlines()
            files_list = []
            for line in lines:
                files_list.append(line.rstrip())

filename_queue = tf.train.string_input_producer(files_list, shuffle=False)
*** 压缩后,10000条数据,大约 700多M
三、疲劳检测
通过识别的特征点,计算眼睛的最小的距离,来判断是否属于闭眼状态,然后定义单位时间内 (一般取1 分钟或者 30 秒) 眼睛闭合一定比例 (70%或80%) 所占的时间,来判断是否发生了瞌睡,即PERCLOS值。
四、源码地址
改编后的训练源码(tf1) : https://download.csdn.net/download/haiyangyunbao813/12363123
*** 如果 tfrecord 文件太大 ,可压缩、拆分数据集等办法解决。
识别 (参考作者源码): https://github.com/610265158/Peppa_Pig_Face_Engine
(dlib)标注工具 : https://download.csdn.net/download/haiyangyunbao813/12365194
*** 增加撤销 ,删除当前图片等功能,方便标注。
五、最后
本人属于小白一枚,很多地方懂的也不是很多,平时喜欢瞎搞搞,所以希望大家有什么好的建议或想法什么的,欢迎在下面留言,不对的地方,大家多多指正。
附几张检测效果图 :
** 在闭眼检测方面,表现十分优秀。
