Canvas补充接口
阴影
context.shadowColor
//指定阴影的位移值
context.shadowOffsetX
context.shadowOffsetY
//指定阴影的模糊距离
context.shadowBlur
context.fillStyle = 'red';

        context.shadowColor = 'gray';
        context.shadowOffsetX = 20;
        context.shadowOffsetY = 20;
        context.shadowBlur = 50;

        context.fillRect(200,200,400,400);
两个global属性
globalAlpha:使全局具有透明度
globalCompositeOperation = ‘source-over’(default)绘制的图像在重叠的时候产生的效
source-over: 后绘制的图像会覆盖在前绘制的图像之上
关于globalCompositeOperation 可以做个简单的demo来测试它里面的值都有神马效果
<html lang="en">
<head>
    <meta charset="UTF-8">
    <title>globalCompositeOperation小demotitle>
    <style type="text/css">
        .buttons{
            position: relative;
            width: 100%;
            text-align: center;
        }

    style>
head>
<body>
    <canvas id='canvas' style="border:1px solid #aaa;display:block;margin:50px auto;">canvas>
    <div class="buttons" id='buttons'>
        <a href="#">source-overa>
        <a href="#">source-atopa>
        <a href="#">source-ina>
        <a href="#">source-outa>
        <a href="#">destination-overa>
        <a href="#">destination-atopa>
        <a href="#">destination-ina>
        <a href="#">destination-outa>
        <a href="#">lightera>
        <a href="#">copya>
        <a href="#">xora>
    div>

    <script type="text/javascript">
        window.onload = function(){
            draw('source-over');
            var buttons = document.getElementById('buttons').getElementsByTagName('a');
            for(var i = 0;i < buttons.length; i ++){
                buttons[i].onclick = function(){
                    draw(this.text);
                    return false;
                }
            }
        }

        function draw(composite){
            var canvas = document.getElementById('canvas');
            canvas.width = 1200;
            canvas.height = 800;

            var context = canvas.getContext('2d');
            context.clearRect(0,0,canvas.width,canvas.height);

            //标题
            context.font = 'bold 40px Arial';
            context.textAlign = 'center';
            context.textBaseline = 'middle';
            context.fillStyle = '#058';
            context.fillText('globalCompositeOperation:'+composite,canvas.width/2,60);

            //画一个矩形
            context.fillStyle = 'blue';
            context.fillRect(300,150,500,500);

            //绘制一个三角形
            context.globalCompositeOperation = composite;
            context.fillStyle = 'red';
            context.beginPath();
            context.moveTo(600,300);
            context.lineTo(800,800);
            context.lineTo(400,800);
            context.closePath();
            context.fill();
        }
    script>
body>
html>
剪辑区域(可以做探照灯或者放大镜)
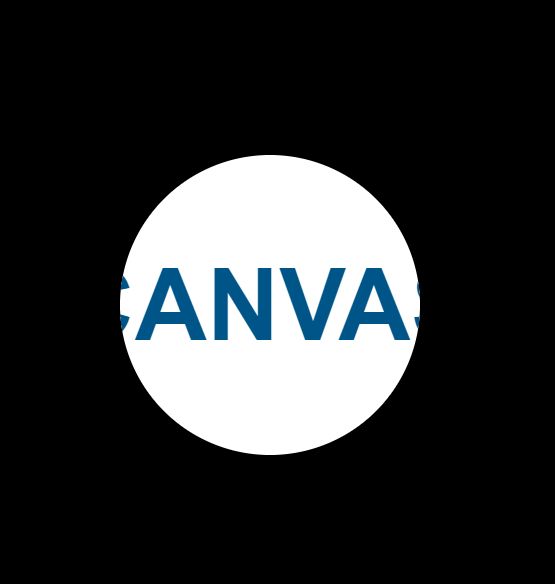
context.clip():经过剪辑操作之后,后面绘制的图形或者文字就只会出现在剪辑的区域内,
超出的部分会被剪辑区域切割掉,就没有了
效果类似于一个探照灯,如下
context.beginPath();
        context.fillStyle = '#000';
        context.fillRect(0,0,canvas.width,canvas.height);

        context.beginPath();
        context.arc(400,400,150,0,Math.PI * 2);
        context.fillStyle = '#fff';
        context.fill();
        /*
        这里经过clip后,下面绘制的内容就只会出现在这个白色的圆内
        */
        context.clip();

        context.fillStyle = '#058';
        context.textAlign = 'center';
        context.textBaseline = 'middle';
        context.font = 'bold 100px Arial';
        context.fillText('CANVAS',canvas.width / 2 , canvas.height / 2);
下面可以简单的做一个探照灯的demo看看效果:
<html lang="en">
<head>
    <meta charset="UTF-8">
    <title>探照灯title>
head>
<body>
    <canvas id='canvas' style="border:1px solid #aaa;display:block;margin:50px auto;">canvas>
    <script type="text/javascript">
        //探照灯的参数
        var searchLight = {x:400,y:400,radius:150,vx:Math.random() * 5 + 10,vy:Math.random()* 5+10};

        var canvas = document.getElementById('canvas');
        canvas.width = 800;
        canvas.height = 800;

        var context = canvas.getContext('2d');
        setInterval(function(){
            draw(context);
            update(canvas.width,canvas.height);
        },40);

        function draw(cxt){
            var canvas = cxt.canvas;
            cxt.clearRect(0,0,canvas.width,canvas.height);

            cxt.save();

            cxt.beginPath();
            cxt.fillStyle = '#000';
            cxt.fillRect(0,0,canvas.width,canvas.height);

            cxt.beginPath();
            cxt.arc(searchLight.x,searchLight.y,searchLight.radius,0,Math.PI * 2);
            cxt.fillStyle = '#fff';
            cxt.fill();
            cxt.clip();

            cxt.fillStyle = '#058';
            cxt.textAlign = 'center';
            cxt.textBaseline = 'middle';
            cxt.font = 'bold 100px Arial';
            cxt.fillText('CANVAS',canvas.width / 2 , canvas.height / 4);
            cxt.fillText('CANVAS',canvas.width / 2 , canvas.height / 2);
            cxt.fillText('CANVAS',canvas.width / 2 , canvas.height * 3 / 4);

            cxt.restore();
        }
        function update(canvasWidth,canvasHeight){
            searchLight.x += searchLight.vx;
            searchLight.y += searchLight.vy;
            //碰撞检测
            if(searchLight.x - searchLight.radius <= 0 ){
                searchLight.vx = -searchLight.vx;
                searchLight.x = searchLight.radius;
            }
            if(searchLight.x + searchLight.radius >= canvasWidth){
                searchLight.vx = -searchLight.vx;
                searchLight.x = canvasWidth - searchLight.radius;
            }

            if(searchLight.y - searchLight.radius <= 0){
                searchLight.vy = -searchLight.vy;
                searchLight.y = searchLight.radius;
            }
            if(searchLight.y + searchLight.radius >= canvasHeight){
                searchLight.vy = -searchLight.vy;
                searchLight.y = canvasHeight - searchLight.radius;
            }
        }
    script>
body>
html>
路径方向和剪纸效果
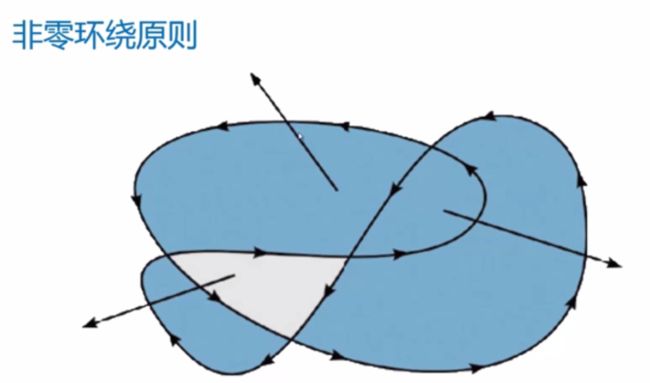
我们在进行context.fill()操作的时候,如果是不规则图形,比如好几条线都交叉形成的图形,就需要判断哪个区域是属性该图形的,哪个区域不属于该图形,使用“非零环绕原则”进行判断
非零环绕原则: 从一个区域内找一个点向外发出一条射线,与该图形的交叉点,每个交叉点所在的线段或者曲线有可能方向不同或者相同
那么比如定义顺时针为1,逆时针为-1的话,讲每个交叉点所在的线的值进行相加,如果相加的结果是大于0的,
那么说明该区域是属于该图形的,否则就不属于该图形
接下来我们来做一个demo来看该效果:
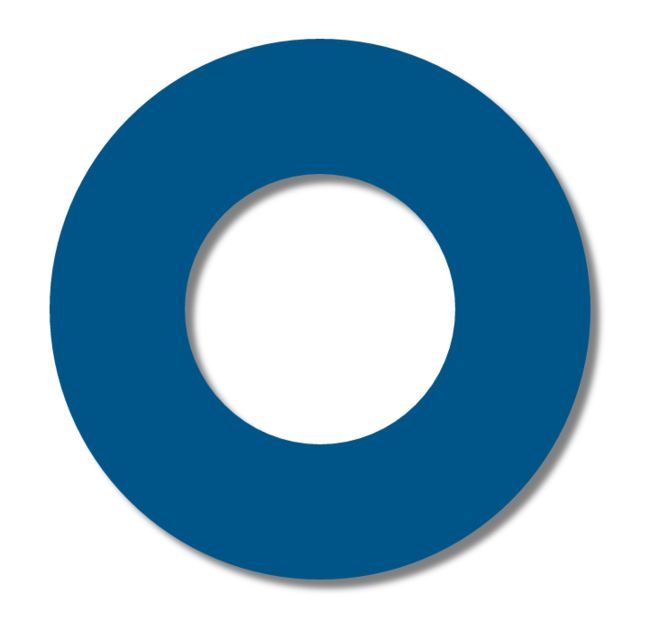
画一个蓝色圆环,并且加上阴影效果
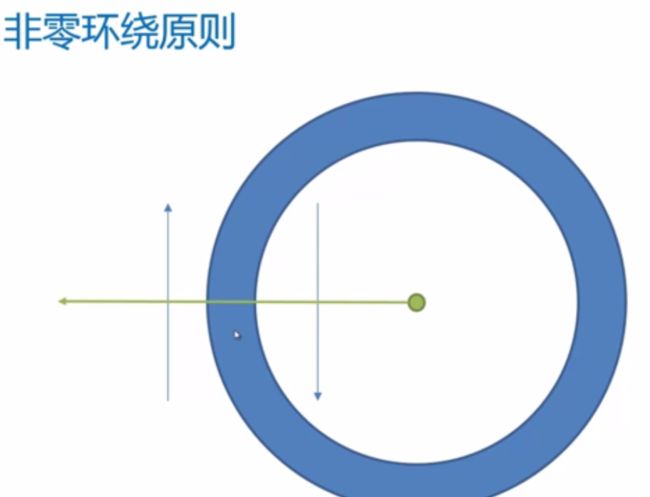
如果是外面画蓝色小圆,里面画白色小圆,那么形成的阴影会在白色的圆外面,
而圆环的效果是里面的白色小圆的阴影应该在里面,所以应该使用非零环绕原则进行绘制
首先绘制一个外圆的弧线为顺时针,里面的小圆为逆时针,这样采用非零环绕原则
那么中间的白色小圆就是不属于该圆环内部的,阴影自然会落在里面
/*
         */

         context.beginPath();
         context.arc(400,400,300,0,Math.PI*2,false);//顺时针
         context.arc(400,400,150,0,Math.PI*2,true);//逆时针

         context.fillStyle = '#058';
         context.shadowColor = 'gray';
         context.shadowOffsetX = 10;
         context.shadowOffsetY = 10;
         context.shadowBlur = 10;

context.fill();canvas交互效果
context.isPointInPath(x,y)
canvas中内置的点击检测
检测传入的x,y坐标是否在当前所规划的路径内
做点击小球使小球颜色变为红色
var balls = [];
         //创建随机大小的10个小球
         for(var i = 0;i < 10 ; i++){
            var iball = {
                x:Math.random() * canvas.width,
                y:Math.random() * canvas.height,
                r:Math.random() * 10 + 30//30-40之间的随机数
            }
            balls.push(iball);
         }
         drawBall();
         canvas.addEventListener('mouseup',detect);
         //画出所有的小球
         function drawBall(){
            for(var i = 0;i < balls.length;i++){
                context.beginPath();
                context.arc(balls[i].x, balls[i].y, balls[i].r, 0, Math.PI * 2);

                context.fillStyle = '#058';
                context.fill();
            }
         }
         //检测鼠标点击区域在canvas中的位置进行交互
         function detect(event){
            /**
             * 获取鼠标点击在canvas中的位置
             * getBoundingClientRect()方法是js中的方法,不是canvas独有的接口,获取dom对象的包围盒
             * getBoundingClientRect().left就是获取dom对象的包围盒距离整个文档左侧的距离
             */
            var x = event.clientX - canvas.getBoundingClientRect().left;
            var y = event.clientY - canvas.getBoundingClientRect().top;

            for(var i = 0;i < balls.length;i++){
                context.beginPath();
                context.arc(balls[i].x, balls[i].y, balls[i].r, 0, Math.PI * 2);

                if(context.isPointInPath(x,y)){//这里判断x,y是不是在上面arc绘制的路径内
                    context.fillStyle = 'red';
                    context.fill();
                }
            }
         }
鼠标移动的过程中,移动到小球上,小球变红,移出时,小球变为原来颜色
    //修改drawBall()和detect()方法
         drawBall2();
         canvas.addEventListener('mousemove',detect2);

         function drawBall2(x,y){
            context.clearRect(0,0,canvas.width,canvas.height);
            for(var i = 0; i < balls.length; i++){
                context.beginPath();
                context.arc(balls[i].x, balls[i].y, balls[i].r, 0, Math.PI * 2);

                if(context.isPointInPath(x,y)){//这里判断x,y是不是在上面arc绘制的路径内
                    context.fillStyle = 'red';
                }else{
                    context.fillStyle = '#058';
                }
                context.fill();

            }
         }
         function detect2(event){
            var x = event.clientX - canvas.getBoundingClientRect().left;
            var y = event.clientY - canvas.getBoundingClientRect().top;
            //在鼠标移动的过程中,不停的对canvas进行重新绘制
            drawBall2(x,y);
         }
扩展context
给context的原型添加一个自己定义的方法,
那么就可以直接context.arc的方式来调用自己定义的函数了
使用CanvasRenderingContext2D
CanvasRenderingContext2D.prototype.fillStar = function(){

        }
        //这样就可以使用context来调用fillStar方法了
        context,fillStar();
那么如果我们要重写lineTo这样的方法,我们需要拿到moveTo后的坐标,然后进行绘制,
这样应该怎么做呢
    //1.讲原有的moveTo方法保存起来
        var originalMoveTo = CanvasRenderingContext2D.prototype.moveTo;
        //2.给CanvasRenderingContext2D声明一个对象来保存moveTo的x,y坐标,这样之后再应用时,就用this.object.x就可以
        CanvasRenderingContext2D.prototype.lastMoveToLoc = {};
        //3.重写moveTo方法
        CanvasRenderingContext2D.prototype.moveTo = function(x,y){
            //首先先调用原有的moveTo方法,即刚才保存的originalMoveTo,使用apply的方式传入参数
            originalMoveTo.apply(context,[x,y]);
            //然后将x,y保存起来
            this.lastMoveToLoc.x = x;
            this.lastMoveToLoc.y = y;

        }
        /**
         * 经过上面的3步,我们在重写lineTo方法时,就可以通过拿到this.lastMoveToLoc.x来获取moveTo的坐标
         */
CanvasRenderingContext2D.prototype.fillStar = function(){
    this.lineTo(x+this.lastMoveToLoc.x , y+this.lastMoveToLoc.y);
}