struts2是基于mvc设计模式的web框架
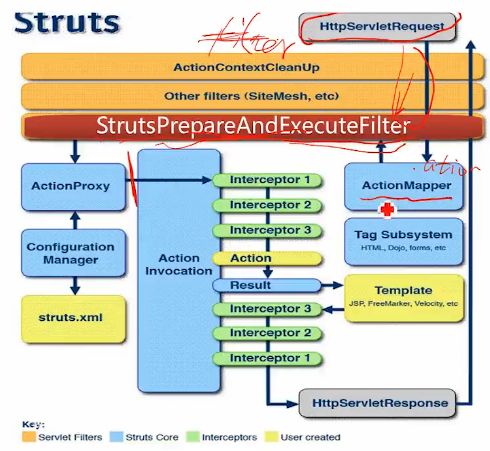
工作原理:
一.使用maven+struts2工具创建第一个helloworld
-
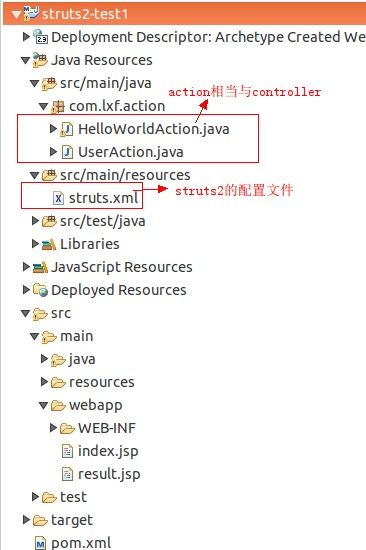
首先新建maven项目后的目录结构(项目名为:struts2-test1)
配置pom.xml对于struts2的依赖,只需要解决struts2-core一个依赖即可
        org.apache.struts
        struts2-core
        2.3.1
pom.xml整体内容如下:
  4.0.0
  struts2
  struts2-test1
  war
  0.0.1-SNAPSHOT
  struts2-test1 Maven Webapp
  http://maven.apache.org


      struts2-test1
      localTestServer
      http://localhost:8081/manager/text


      junit
      junit
      3.8.1
      test


        org.apache.struts
        struts2-core
        2.3.1


    struts2-test1


                    maven-compiler-plugin
                    3.5.1

                        1.7
                        1.7


             org.apache.tomcat.maven
             tomcat7-maven-plugin
             2.2

                  ${tomcat.deploy.serverUrl}
                  ${tomcat.deploy.server}
                  /${warPackageName}
配置完成后会看到如下依赖已经加载:(下面三个标红色的包必须加载)
- 配置web.xml 过滤器
    Archetype Created Web Application

        struts2
        org.apache.struts2.dispatcher.ng.filter.StrutsPrepareAndExecuteFilter


        struts2
        /*


        index.jsp
- 新建HelloWorldAction
package com.lxf.action;

import com.opensymphony.xwork2.ActionSupport;

public class HelloWorldAction  extends ActionSupport{

    @Override
    public String execute() throws Exception {
        // TODO Auto-generated method stub
        System.out.println("执行HelloWorld action!");
        return SUCCESS;
    }

}
- 新建UserAction
package com.lxf.action;

import com.opensymphony.xwork2.ActionSupport;

public class UserAction extends ActionSupport {
    private static final long serialVersionUID = -1417237614181805435L;
    private String name;
    private String password;
    /**
     * 跳转到登录界面
     * @return
     */
    public String login_input() {
        return SUCCESS;
    }

    /**
     * 登录
     * @return
     */
    public String login() {
        System.out.println("name->" + name);
        System.out.println("password->" + password);

        return SUCCESS;
    }
}
- 配置struts2.xml
            /result.jsp


                /index.jsp
- 创建index.jsp页面
Hello World!
- result.jsp页面
<%@ page language="java" contentType="text/html; charset=UTF-8"
    pageEncoding="UTF-8"%>


Insert title here


    This is result.jsp
- 在项目右击点击Run AS->ON Server选择tomcat7,启动web容器.(或者在pos.xml中Run AS->Maven build 使用 tomcat7:deploy部署到远程web服务器)
- 在浏览器中输入:
http://localhost:8081/struts2-test1/helloworld.action
http://localhost:8081/struts2-test1/login.action
二.功能介绍
-
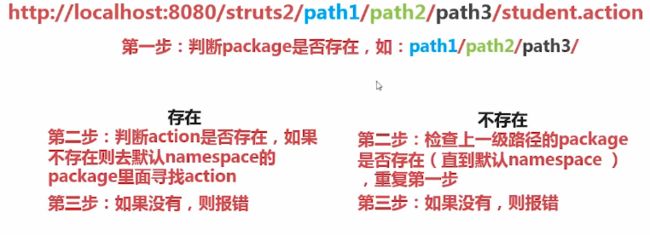
搜索action顺序
动态方法调用(一个action中有多个方法在xml的配置)
第一种方法,在struts.xml中每个action标签配置一个method(会导致多个action,不推荐使用)
            /result.jsp


            /result.jsp
第二种方法,感叹号方式(不推荐使用)
(1) 在struts.xml中配置常量
(2) action中添加update方法
    /**
     *  我是修改方法
     */
    public String update()
    {
        System.out.println("我是修改方法");
        return "update";
    }
(3)配置struts.xml的action标签
            /result.jsp
            /index.jsp
(4)访问方式:http://localhost:8081/struts2-test1/myRoute/helloworld2!update.action
第三种通配符方式(推荐使用)
(1) 配置struts.xml中的action
            /result.jsp
            /index.jsp
            /result.jsp
(2) 访问:
http://localhost:8081/struts2-test1/myRoute/helloworld_add.action (访问action中的add方法)
http://localhost:8081/struts2-test1/myRoute/helloworld_update.action(访问action中的update方法)
- structs.xml中包含多个模块的配置文件(注意:被包含文件的packag的name值不能一样)
helloworld.xml内容
            /result.jsp


            /result.jsp


            /result.jsp
            /index.jsp

...
helloworld2.xml内容
/result.jsp
- 默认action
/index.jsp
- struts2后缀名配置
(1)第一种方式配置struts.xml中的常量
访问以下路径完成的功能都是相同的
http://localhost:8081/struts2-test1/myHello/helloworld3.html
http://localhost:8081/struts2-test1/myHello/helloworld3.do
http://localhost:8081/struts2-test1/myHello/helloworld3.action
(2)第二种方式,还可以在struts.properties中配置
struts.action.extension=html,action,do
(3)第三种方式,web.xml在过滤器中配置
        struts2
        org.apache.struts2.dispatcher.ng.filter.StrutsPrepareAndExecuteFilter

            struts.action.extension
            action
- action中接收参数
- 第一种:使用Action属性接收
login.jsp内容
LoginAction内容定义属性和对应的set和get方法就可以接收
public class LoginAction  extends ActionSupport {
    private String username;
    private String password;
    public String login()
    {
        System.out.println(username+password);
        return SUCCESS;
    }
    public String getUsername() {
        return username;
    }
    public void setUsername(String username) {
        this.username = username;
    }
    public String getPassword() {
        return password;
    }
    public void setPassword(String password) {
        this.password = password;
    }
}
第二种:使用DomainModel接收(建立一个User类专门用来接收参数)
User.java内容如下:
package com.lxf.po;
/**
 * 用来在action中接收用户表单提交过来的数据
 * @author lxf
 *
 */

public class User {
    private String username;
    private String password;
    public String getUsername() {
        return username;
    }
    public void setUsername(String username) {
        this.username = username;
    }
    public String getPassword() {
        return password;
    }
    public void setPassword(String password) {
        this.password = password;
    }
}
login.xml内容如下:
LoginAction内容如下:(注意:需要为user对象添加get和set方法,并且user不需要实例化, html表单中需要指定user)
public class LoginAction  extends ActionSupport {
    private User user;
    public String login()
    {
        System.out.println(user.getUsername());
        return SUCCESS;
    }
    public User getUser() {
        return user;
    }
    public void setUser(User user) {
        this.user = user;
    }
}
第三种:使用ModelDiven接收:(注意:不需要为User对象设置set和get方法,并且user需要实例化,html表单中不需要指定user)推荐使用
在LoginAction中实现ModelDriven接口
User内容:
public class User {
    private String username;
    private String password;
    //接收form表单中的图书字符串数组
    private List bookList;
     //接收form表单中的用户对象数组
    private ListuserList;
    public String getUsername() {
        return username;
    }
    public void setUsername(String username) {
        this.username = username;
    }
    public String getPassword() {
        return password;
    }
    public void setPassword(String password) {
        this.password = password;
    }
    public List getBookList() {
        return bookList;
    }
    public void setBookList(List bookList) {
        this.bookList = bookList;
    }
    public List getUserList() {
        return userList;
    }
    public void setUserList(List userList) {
        this.userList = userList;
    }

}
LoginAction内容:
public class LoginAction  extends ActionSupport
implements ModelDriven{
    private User user = new User();
    public String login()
    {
        System.out.println(user.getUsername());
        System.out.println(user.getBookList().get(0));
        System.out.println(user.getBookList().get(1));
        System.out.println(user.getUserList().get(0).getUsername());
        System.out.println(user.getUserList().get(1).getUsername());
        return SUCCESS;
    }
    /**
     * 实现ModelDriven接口的方法
     * @return
     */
    @Override
    public User getModel() {
        // TODO Auto-generated method stub
        return user;
    }
login.jsp内容
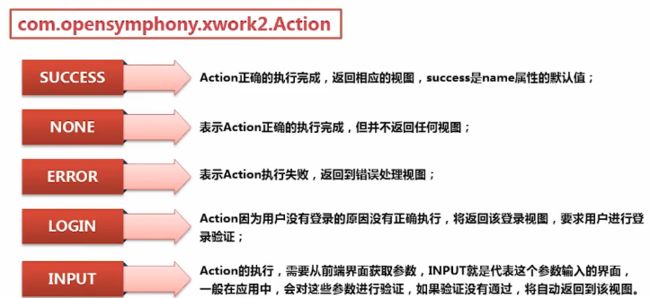
- 处理结果返回,如果result中的name标签不写,默认为success
            /result.jsp
            /index.jsp
处理结果的类型如下:
- 以下对于返回结果为input的介绍
(1)如果在User.php中属性为
    //年龄
    private int age;
在struts.xml对应的action中配置
            /index.jsp
             /success.jsp
那么在页面的input中就必须输入整数,否则会有异常:
(2)在action中重写父类的validate,做表单验证用
    @Override
    public void validate() {
        if(user.getUsername()==null || "".equals(user.getUsername()))
        {
            this.addFieldError("username", "用户名不能为空!");
        }
- 公共strut2配置配置公共result
t=/404.jsp
* struts2.xml中的result有param子标签
                /$(#request.path).jsp
                true默认为true,代表可以使用OGNL表达式获取session与域的信息
- 打开开发模式,在struts.xml中配置常量


