SpringBoot 2 整合 Spring Session 最简操作
SpringBoot 2 整合 SpringSession
- 前言
- Spring Session 介绍
- SpringBoot 快速整合 Spring Session
- Spring Session 测试
- 负责获取分布式 Session 的配置和代码:
- 负责创建分布式 Session 的配置和代码:
- SpringBoot 整合 Spring Session 自定义配置介绍
- 小结
- 代码示例
前言
通过该篇博客,你将了解到如何快速通过 SpringBoot 2 + Spring Session 来实现分布式 Session 环境的搭建。
Spring Session 介绍
SpringBoot 整合 Spring Session 前,先了解一下什么是 Spring Sessin。
Spring 官方 (https://spring.io/projects/spring-session)关于 Spring Session 介绍如下:
Spring Session provides an API and implementations for managing a user’s session information.
Spring Session makes it trivial to support clustered sessions without being tied to an application container specific solution. It also provides transparent integration with:
- HttpSession - allows replacing the HttpSession in an application container (i.e. Tomcat) neutral way, with support for providing
session IDs in headers to work with RESTful APIs- WebSocket - provides the ability to keep the HttpSession alive when receiving WebSocket messages
- WebSession - allows replacing the Spring WebFlux’s WebSession in an application container neutral way
中文翻译如下 :
Spring Session提供了用于管理用户会话信息的API和实现。
Spring Session使得支持集群会话变得微不足道,而不依赖于特定于应用程序容器的解决方案。它还提供透明集成:
- HttpSession - 允许以应用程序容器(即Tomcat)中立的方式替换HttpSession,支持在头文件中提供会话ID以使用RESTful API
- WebSocket - 提供在接收WebSocket消息时保持HttpSession活动的能力
- WebSession - 允许以应用程序容器中立方式替换Spring WebFlux的WebSession
从官方介绍中可以了解到 Spring Session 是用来解决,集群下实现全局 Session的一个框架实现。全局 Session 也可以理解成分布式Session。那什么是分布式Session呢?
分布式Session 就是我们的 Session 会话对于集群中的每个服务共享。我这里举一个例子:
假如一个商品服务通过2台机器 A和B 进行集群部署,用户访问 A服务器登录成功后,将此用户Session信息保存在 A 服务器上。突然A服务器突然宕机,用户访问跳转B服务器上。此时B服务器上并没有A服务的 Session。用户需要再次执行登录操作。而Spring Session 可以将用户登录后的Session 保存在Redis或者数据库中,当 A 服务器宕机切换到 B 服务器时,此时B服务器从Redis中获取Session,无需在进行登录操作。
SpringBoot 快速整合 Spring Session
该篇博客介绍 Spring Session 通过 Redis 存储Session的方式来实现。
在整合前你首先应该在本地或者远程的机器上安装 redis 服务,可以参考 Windows 安装 Redis
教程。其他系统可以百度或者期待我后续的博客教程。
SpringBoot 和 Spring Session 整合的配置需要引入2个 start依赖:
- spring-session-data-redis
- spring-boot-starter-data-redis
具体代码如下:
		<dependency>
			<groupId>org.springframework.bootgroupId>
			<artifactId>spring-boot-starter-data-redisartifactId>
		dependency>

		<dependency>
			<groupId>org.springframework.sessiongroupId>
			<artifactId>spring-session-data-redisartifactId>
		dependency>
如果你的 Redis服务是单机版默认配置,并且和你的 SpringBoot 应用在同台机器上。SpringBoot 和 Spring Session 的整合就搞定了。是不是很简单哈。
如果你的Redis服务在远程的机器上,那么你需要在 application.properties 配置文件中配置一下 Redis的主机ip 和 端口号即可。
spring.redis.host=远程 Redis 服务主机 IP
spring.redis.port=远程 Redis如果你的单机版Redis服务不是默认配置, 那么你需要像远程Redis服务一样进行配置其 主机ip 和端口号。
Spring Session 测试
创建 2个SpringBoot 应用实例, 通过设置不同的端口号进行区分。2个 SpringBoot 应用实例。一个负责创建Session、 一个负责获取Session。
负责获取分布式 Session 的配置和代码:
application.properties 配置如下:
server.port=8090
server.servlet.context-path=/sbe
spring.redis.host=localhost
获取Session 测试代码如下:
@RestController
@RequestMapping("/session")
public class SpringSessionTestController {

	@RequestMapping("/get/{name}")
	public String getSesseion(HttpServletRequest request,@PathVariable("name") String name){
		HttpSession session = request.getSession();
		String value = (String)session.getAttribute(name);
		return "sessionId:"+session.getId()+" value:"+value;
	}
}
负责创建分布式 Session 的配置和代码:
application.properties 配置如下:
server.port=8080
server.servlet.context-path=/sbe
spring.redis.host=localhost
创建Session测试代码如下:
@RestController
@RequestMapping("/session")
public class SpringSessionTestController {
	@RequestMapping("/add/{name}/{value}")
	public String addSession(HttpServletRequest request,@PathVariable("name") String name,@PathVariable("value") String value){
		HttpSession session = request.getSession();
		session.setAttribute(name,value);
		return "sessionId:"+session.getId()+" name:"+name;
	}
}
SpringBoot 整合 Spring Session 自定义配置介绍
在快速整合的介绍中 我们使用都是默认的配置。如果你想自定义定义 Session 过期时间 、session的刷新模式 、存储Session的命名空间。可以通过在 application.properties 中进行配置。
具体配置介绍如下:
-
spring.session.store-type=redis
设置 Spring Session 使用 Redis 进行存储。默认配置就是 redis
-
spring.session.timeout=10m
设置 Spring Session 的过期时间。如果不指定单位模式是 s。
也可以通过在启动类上声明@EnableRedisHttpSession进行配置。
例如:@EnableRedisHttpSession(maxInactiveIntervalInSeconds = 3600) -
spring.session.redis.flush-mode=on_save
session刷新模式,有2中
- on_save
保存时刷新,即响应结束后刷新。默认是 on_save - immediate
实时刷新
也可以通过在启动类上声明@EnableRedisHttpSession进行配置。
例如:@EnableRedisHttpSession(redisFlushMode = RedisFlushMode.ON_SAVE) - on_save
-
spring.session.redis.namespace=redis:session
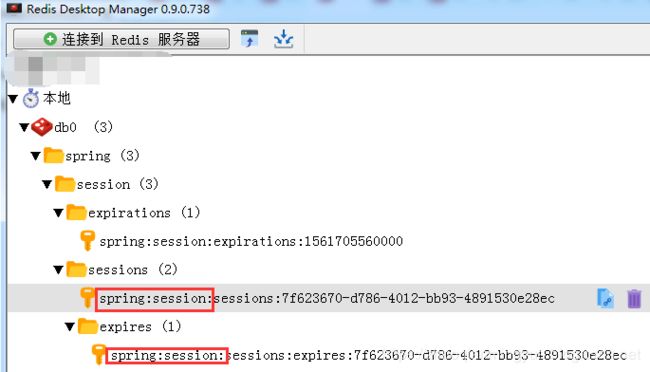
存储 Session的命名空间,默认是spring:session。
通过 Redis Desktop Manager 可以查看存储到Redis中的session信息的key都是以
spring:session打头的。

命名空间主要是用于多个服务之间进行区分 。
也可以通过在启动类上声明@EnableRedisHttpSession进行配置。
例如:@EnableRedisHttpSession(redisNamespace=“xxxx”)
小结
通过在 SpirngBoot 项目中引入Spring Session 和 SpringBoot 整合 Redis 的 start 依赖,我们可以快速搭建分布式 Session 环境,同时也可以在 application.properties 中自定义 Session 的过期时间、命名空间、刷新模式的配置。
代码示例
具体代码示例请查看 :
博客的读者可以通过查看下面仓库的中的模块工程名:spring-boot-2.x-spring-session-1 和spring-boot-2.x-spring-session-2
Github:
https://github.com/zhuoqianmingyue/springbootexamples/tree/master/spring-boot-2.x-spring-session-1 (获取Session)
https://github.com/zhuoqianmingyue/springbootexamples/tree/master/spring-boot-2.x-spring-session-2 (创建Session)
如果您对这些感兴趣,欢迎 star、或转发给予支持!转发请标明出处!

