Qt (六) -- Qt5.5.1实现通用串口程序
整理出来自己写的过程中较为纯净版的串口助手,给大家交流学习:http://download.csdn.net/detail/mao19931004/9737142
最近教研室在做高速相机,通过图像采集卡和自己做的高速相机链接,从而采集和收集图像。图像采集卡和高速相机是通过Cameralink连接,其中也包含了相机和图像采集卡之间的串口的硬件借口,在老师的要求下,实现了两种串口程序,一种是通过cameralink的API实现串口数据的传输,一种则是通过USB转RS422的转接器,实现对高速相机的寄存器的读写。本文主要介绍了通过Qt的QSerialPort和QSerialPortInfo两个类,实现的串口程序。
本文采用的的开发环境是VS2010+Qt5.5.1版本,所有程序不是通过Qt Creator编译的,如果有需要可以介绍VS2010和Qt环境的搭建和简单的使用。
- QSerialPort
QSerialPort这个类是从QT5.1开始引入的,之前都是通过QIODevice自己定义串口类,从而实现串口程序的开发。现在引入这个类了,将会非常方便的开发串口程序。为了使用这个类,需要在工程目录和附加依赖项中加入include的路径,以及链接库的路径,以及链接库的名称:
- 项目--->属性---> C++ ---> 常规 --->C:\Qt\Qt5.5.1\5.5\msvc2010\include\QtSerialPort
- 项目--->属性---> 输入++ ---> 附加依赖项--->Qt5SerialPort.lib(如果是Debug版本,则是Qt5SerialPortd.lib)版本
- 源文件或者头文件需要加入#include
串口数据的写入是通过writeData(const char * data, qint64 maxSize)以及write(const char * data, qint64 maxSize),前者是protected属性,只能在子类中访问,而后者则是public属性。在串口打开并且具有可写属性,即可通过write函数写入数据。
串口数据的读入是通过readData(char * data, qint64 maxSize) ,read(qint64 maxSize)实现的,如果需要一次性读完所有的数据,则可以通过readAll()全部读取串口缓冲区中的数据。
串口内部的缓冲区大小可以通过:setReadBufferSize(qint64 size)实现。当设定缓冲区大小时,串口只能接收size大小的数据流,因此存在数据丢书的可能。当设置为0的时候,并不是指的缓冲区大小为0,而是无穷大,这样就可以保存数据的全部接收完整。这是缓冲区大小的默认属性。
是否有新的数据读入缓冲区是通过readReady()信号来来确定的。这是通过时间驱动的方式来确定是否有数据可以读入。此外还有waitForReadyRead()来等待轮询是否有数据到达串口,但是这是一种阻塞性读入,个人觉得不是太好,所以写串口的时候采用的是事件驱动的方式来确定是够有数据可以读入。
- QSerialPortInfo
可能会用得比较多的函数是description(),manufacturer(),以及serialNumber()。从而得到描述性信息,比如通信端口。USB转串口等描述串口的信息、串口的
生产商信息以及串口名,在电脑上表现为COM~等。
- 如何获取电脑上所有的串口
void CameraSerialPort::getSerialPortID()
{
	 serialInfo=new QSerialPortInfo();
	 serialList=serialInfo->availablePorts();
	int nSerialnum=serialList.length();
	for(int i=0;iaddItem(serialName);
	}

	QString currentPort=serialPortAssitant.serialPortcomboBox->currentText();
	portToOpen=currentPort;
	QString  portStatus=currentPort+" closed";
	serialPortAssitant.status->statusInfo->setText(portStatus.toUpper());
	QPalette font_palette;
	font_palette.setColor(QPalette::WindowText,Qt::red);
	serialPortAssitant.status->statusInfo->setPalette(font_palette);
} 1、变量的定义,在头文件中,这里没有贴出来,截取定义如下:
	QSerialPortInfo* serialInfo;
QListserialList; 3、serialPortcomBox是一个QComboBox,下拉列表。
4、最后几行是用来显示串口的状态信息,达到的效果如图:

- 打开串口并且通过串口写数据
得到串口信息后,就可以选择端口,进行打开和读写数据。贴出代码,然后在给分析分析:
void CameraSerialPort::Write()
{
	QString sendMsg=serialPortAssitant.sendLine->text();
	QByteArray temp=sendMsg.toLatin1();
	if(IsSendByHex)
	{
		temp=HexStrToByteArray(sendMsg);
	}
	char *sendContent=temp.data();
	qint64 sendedNum=serialPort->write(sendContent,temp.count());

	//---------------判断发送数据是否成功----------------------//
	if(sendedNum==-1)
	{
		errorValue=serialPort->error();
		if(IsShowCurrentTime)
		{
			errorInfo=" ";
			currentTime=QDateTime::currentDateTime();
			timeinfo=currentTime.toString("yyyy__MM__d__hh:mm:ss");
			errorInfo=QString::fromLocal8Bit("错误提示信息   ");
			errorInfo+=timeinfo;
			errorInfo+="\n";
		}
		else
		{
			errorInfo=" ";
			errorInfo=QString::fromLocal8Bit("错误提示信息   ");
			errorInfo+="\n";
		}
		serialPortAssitant.ReciveWidget->append(errorInfo+getValueContent(errorValue));
		return;
	}
	//-------------显示发送数据-----------------------//

	//temp的size的依据是是否以16进制发送
	sendCount+=temp.count();
	serialPortAssitant.status->TxByte->setText(QString::number(sendCount));
	QString showSendMsg;
	if(IsShowSendMsg)
	{
		if(IsShowCurrentTime)
		{

			currentTime=QDateTime::currentDateTime();
			timeinfo=currentTime.toString("yyyy__MM__d__hh:mm:ss");
			showSendMsg+=QString::fromLocal8Bit("发送数据 : ");
			showSendMsg+=timeinfo;
			showSendMsg+="\n";
			//判断显示16进制还是ACSII字符
			if(IsSendByHex)
				showSendMsg+=ByteArrayToHexStr(temp);
			else
				showSendMsg+=temp;
		}
		else
		{
			showSendMsg=QString::fromLocal8Bit("发送数据 : ");
			if(IsSendByHex)
				showSendMsg+=ByteArrayToHexStr(temp);
			else
				showSendMsg+=temp;

		}
		serialPortAssitant.ReciveWidget->append(showSendMsg);

	}
	IsWrittenSuccessed=true;
}
void CameraSerialPort::sendData()
{
	if(!IsSerialPortOpen)
	{
			if(serialPort!=NULL)
			{
				serialPort->close();
			}
			serialPort=new QSerialPort(portToOpen);
			if(serialPort==NULL)
			{
				errorValue=serialPort->error();
				QString errorContent=getValueContent(errorValue);
				if(IsShowCurrentTime)
				{
						errorInfo=" ";
						currentTime=QDateTime::currentDateTime();
						timeinfo=currentTime.toString("yyyy__MM__d__hh:mm:ss");
						errorInfo=QString::fromLocal8Bit("错误提示信息   ");
						errorInfo+=timeinfo;
						errorInfo+="\n";
				}
					else
				{
						errorInfo=" ";
						errorInfo=QString::fromLocal8Bit("错误提示信息   ");
						errorInfo+="\n";
				}
					serialPortAssitant.ReciveWidget->append(errorInfo +errorContent+QString::fromLocal8Bit(", 请重新选择正确的端口\n"));
					return;
			}

		if(!serialPort->open(QIODevice::ReadWrite))
		{
			errorValue=serialPort->error();
			QString errorContent=getValueContent(errorValue);
			if(IsShowCurrentTime)
			{
				errorInfo=" ";
				currentTime=QDateTime::currentDateTime();
				timeinfo=currentTime.toString("yyyy__MM__d__hh:mm:ss");
				errorInfo=QString::fromLocal8Bit("错误提示信息   ");
				errorInfo+=timeinfo;
				errorInfo+="\n";
			}
			else
			{
				errorInfo=" ";
				errorInfo=QString::fromLocal8Bit("错误提示信息   ");
				errorInfo+="\n";
			}
			serialPortAssitant.ReciveWidget->append(errorInfo +errorContent);
			return;
		}
		connect(serialPort,SIGNAL(readyRead()),this,SLOT(onReadyRead()));
		serialPort->setDataBits(QSerialPort::Data8);
		serialPort->setStopBits(QSerialPort::OneStop);
		serialPort->setParity(QSerialPort::NoParity);
		serialPort->setFlowControl(QSerialPort::NoFlowControl);

		QString serialStatusInfo;
		serialStatusInfo=serialPortAssitant.serialPortcomboBox->currentText().toUpper();
		serialStatusInfo+=" OPENED";
		serialStatusInfo+=" , ";
		serialStatusInfo+=QString::number(serialPort->baudRate());
		serialStatusInfo+=" , ";
		serialStatusInfo+=serialPortAssitant.DataWidthcomboBox->currentText();
		serialStatusInfo+=" , ";
		serialStatusInfo+=serialPortAssitant.ParityWidthcomboBox->currentText().toUpper();
		serialStatusInfo+=" , ";
		serialStatusInfo+=serialPortAssitant.StopWidthcomboBox->currentText();
		serialStatusInfo+=" , ";
		serialStatusInfo+=serialPortAssitant.FLowControlcomboBox->currentText().toUpper();
		QPalette font_palette;
		font_palette.setColor(QPalette::WindowText,Qt::darkCyan);
		serialPortAssitant.status->statusInfo->setText(serialStatusInfo);
		serialPortAssitant.status->statusInfo->setPalette(font_palette);

		serialPortAssitant.sendBtn->setText(QString::fromLocal8Bit("发送"));
		IsSerialPortOpen=true;
	}

else
	{
		if(IsRepeatSend)
		{
			repeatSend->start();
		}
		Write();
	}
}
首先看write函数:以下是从write函数中抽离出来的几行关键代码:
  	QString sendMsg=serialPortAssitant.sendLine->text();
	QByteArray temp=sendMsg.toLatin1();
	char *sendContent=temp.data();
qint64 sendedNum=serialPort->write(sendContent,temp.count());2、第二行到第三行代码是需要把QString转换为char *的数据类型。
3、第四行则是通过QIODevice类的成员函数write写出数据。
4、剩余的部分是一些细节的错误提示显示以及显示信息,以及非常重要的是以ASCII形式发出数据还是以16进制发送数据。
接着是sendData()函数。
serialPort=new QSerialPort(portToOpen);
if(!serialPort->open(QIODevice::ReadWrite))
connect(serialPort,SIGNAL(readyRead()),this,SLOT(onReadyRead()));1、第一行是通过portToOpen实例化QSerialPort,构造函数为:QSerialPort(const QString & name, QObject * parent = Q_NULLPTR)
2、第二行是打开串口,打开模式是ReadWrite,可写可读
3、第三行是通过readRead()信号来实现串口数据的读出,事件驱动的方式。这一行我在源代码中加了红色,原因是,一定要在打开串口后,实现readyRead()信号和对应的槽函数的连接,如果在没有初始化串口成功后,然后信号才能启动。我最开始在CameraSerialPort这个类的初始化中就定义了这个信号槽的链接,一直没有读到串口数据,结果在网上找了半天的原因,也没有找到这个问题。想了一下,然后把代码移到了这里,就可以了。
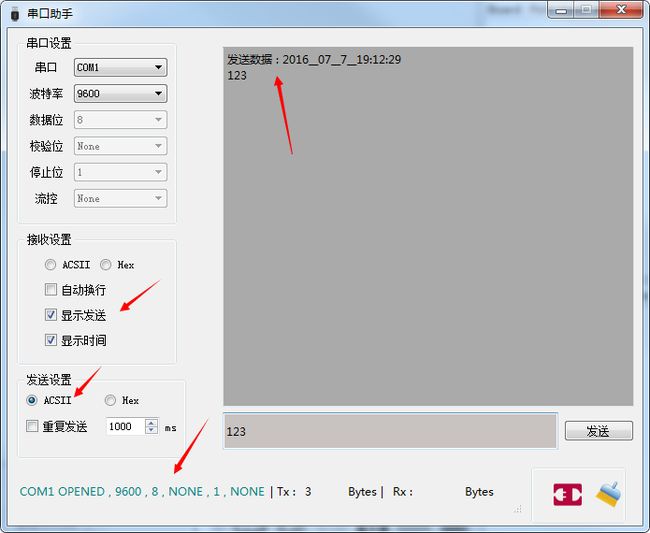
打开串口和发送数据的结果如图:

- 串口接收数据
void CameraSerialPort::Read()
{
	if(serialPort->bytesAvailable()<0)
	{
		serialPortAssitant.ReciveWidget->setText("No data");
		return;
	}


	QByteArray temp;
	temp=serialPort->readAll();

	QString  receiveMsg;
	if(IsReceiveByHex)
		receiveMsg=ByteArrayToHexStr(temp);
	else
		receiveMsg=temp;

	if(receiveMsg.isEmpty())
	{
		if(IsShowCurrentTime)
		{
			errorInfo=" ";
			currentTime=QDateTime::currentDateTime();
			timeinfo=currentTime.toString("yyyy__MM__d__hh:mm:ss");
			errorInfo=QString::fromLocal8Bit("错误提示信息   ");
			errorInfo+=timeinfo;
			errorInfo+="\n";
		}
		else
		{
			errorInfo=" ";
			errorInfo=QString::fromLocal8Bit("错误提示信息   ");
			errorInfo+="\n";
		}
		serialPortAssitant.ReciveWidget->append(errorInfo +QString::fromLocal8Bit("没有读到数据\n"));
		return;
	}

	//接收到的字节数以初始的bytes为依据
	reciveCount+=temp.count();
	serialPortAssitant.status->RxByte->setText(QString::number(reciveCount));
	QString showReciveMsg;
	if(IsShowCurrentTime)
		{

			currentTime=QDateTime::currentDateTime();
			timeinfo=currentTime.toString("yyyy__MM__d__hh:mm:ss");
			showReciveMsg+=QString::fromLocal8Bit("接收数据 : ");
			showReciveMsg+=timeinfo;
			showReciveMsg+="\n";
			showReciveMsg+=receiveMsg;
		}
		else
		{
			showReciveMsg=QString::fromLocal8Bit("接收数据 : ");
			showReciveMsg+=receiveMsg;
		}
		serialPortAssitant.ReciveWidget->append(showReciveMsg);

}

void CameraSerialPort::onReadyRead()
{
	Read();
}
1、读入数据之前,需要判断缓冲区是否有数据,有数据才去读数据
2、如果有数据,则全部读出缓冲区数据
- 总结
大致的有关Qt的串口类就介绍完了,主要是QSerialPort以及QSerialPortInfo两个类的使用,当然也需要了解QIODevice。