利用百度地图天气API开发微信小程序
微信小程序开发:帮你查天气——基于百度地图天气API
- 一、申请百度地图的AK
- 二、下载SDK
- 三、配置服务器域名
- 四、写代码
- 五、解析数据
- 六、`bmap-wx.js`简单介绍
先上截图:
|
|
|
小程序二维码:

完整代码:GItHub项目地址
https://github.com/MichaelLee826/weather_forecast
一、申请百度地图的AK
在百度地图开放平台上注册账号并登录,然后在“控制台”中创建一个应用。
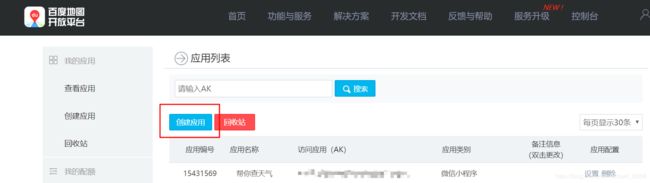
选择“微信小程序”,并填入创建小程序时得到的APP ID。
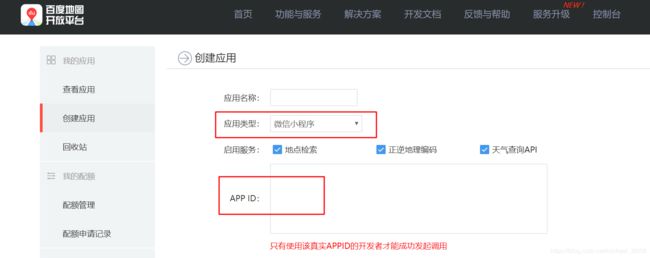
提交后就可以在前一个页面中看到新创建的应用的AK了。
二、下载SDK
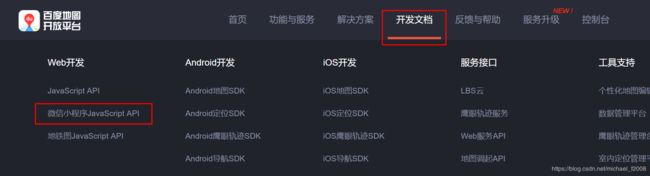
在“开发文档”中点击“微信小程序JavaScript API”
在“相关下载”中点击“全部下载”。
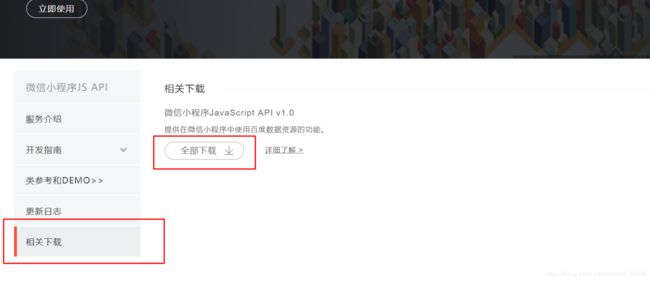
压缩包里主要包括两个文件夹:demo和src,开发时主要用到src里的js文件:bmap-wx.js(为讲解方便,本文不使用.min)。
三、配置服务器域名
登录微信小程序管理后台,进入开发——开发设置

在服务器域名中,填入request合法域名:https://api.map.baidu.com

PS:微信要求域名都为https,所以有些API为http的就不能用了。
四、写代码
打开微信开发者工具,并新建一个小程序项目,会自动生成一些文件(新建项目的方法、各文件的作用,网上有很多教程,不再赘述)。
1、打开index.js文件,添加对bmap-wx.js文件的引用:
//index.js
//获取应用实例
const app = getApp()
//调用百度地图天气API的js文件
var bmap = require('../../utils/bmap-wx.js');
2、在onLoad方法中,新建一个BMapWX对象,并填入AK:
var BMap = new bmap.BMapWX({
	ak: '你申请的百度地图AK'
});
3、在onLoad方法中,发起查询天气的请求:
BMap.weather({
	fail: fail,
	success: success
});
4、在onLoad方法中,定义查询成功和失败的方法:
var fail = function(data) {
	console.log('查询失败')
};
var success = function(data) {
	console.log('查询成功');
	var currentWeather = data;
	this.setData({
		currentWeather: currentWeather
	});
}
注意,setData中的currentWeather要与Page中的data部分对应:
data: {
        currentWeather: ''
    },
至此,就可以获得返回的天气数据了,剩下的工作就是解析返回的数据。
五、解析数据
在第三步中,查询成功获得的返回数据data包括了我们需要展示的信息,因此解析的工作也主要是针对data。
data主要包括两部分内容:currentWeather和originalData

1、解析data.currentWeather
结构如下:

解析方式如下:
var currentWeather = data.currentWeather[0];
	//currentWeather.currentCity:"济南市"
	//currentWeather.date:"周四 01月17日 (实时:3℃)"
	//currentWeather.pm25:"85"
	//currentWeather.temperature:"7 ~ -2℃"
	//currentWeather.weatherDesc:"晴"
	//currentWeather.wind:"南风微风"
注意,data.currentWeather是一个JSON数组,关键的数据都存在data.currentWeather[0]中
2、解析data.originalData
结构如下:

data.originalData也是JSON格式,我们关心的数据存在data.originalData.results数组中,结构如下:
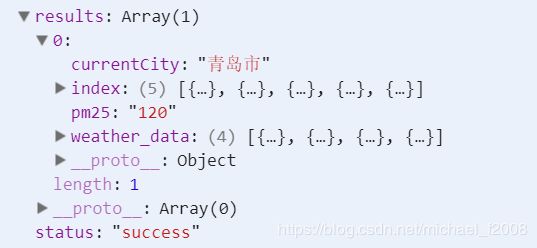
可以看出,data.originalData.results[0]数组中关键的部分也是两块:index数组和weather_data数组:

data.originalData.results[0].index[0]是穿衣的相关信息
data.originalData.results[0].index[1]是洗车的相关信息
data.originalData.results[0].index[2]是感冒的相关信息
data.originalData.results[0].index[3]是运动的相关信息
data.originalData.results[0].index[4]是紫外线强度的相关信息
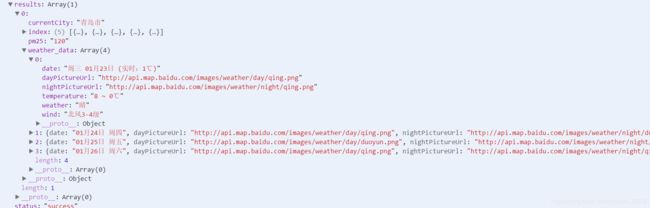
data.originalData.results[0].weather_data[0]是今天的天气情况
data.originalData.results[0].weather_data[1]是明天的天气情况
data.originalData.results[0].weather_data[2]是后天的天气情况
data.originalData.results[0].weather_data[3]是大后天的天气情况
至此,就完成了数据解析工作,通过setData可以将数据与index.wxml中的变量绑定。修改success如下:
var success = function(data) {
	console.log('查询成功');
	//实时天气
	var currentWeather = data.currentWeather[0];
	//感冒信息
	var flu = data.originalData.results[0].index[2];
	//未来三天的天气
	var forecast = new Array(3);
	for (var i = 0; i < 3; i++) {
		forecast[i] = data.originalData.results[0].weather_data[i + 1];
	}
	//配置数据
	this.setData({
		currentWeather: currentWeather,
		flu: flu,
		forecast: forecast
	});
}
在index.wxml文件中调用:
<view class='cityName'>{{currentWeather.currentCity}}view>


  <view class='forecast'>
    <view class='next-day' wx:key="{{index}}" wx:for="{{forecast}}">
      <view class='detail date'>{{item.date}}view>
      <view class='detail'>{{item.weather}}view>
      <view class='detail'>{{item.temperature}}view>
      <view class='detail'>{{item.wind}}view>
    view>
  view>


<view class='tips'>
	<view class='index'>感冒指数:{{flu.zs}}view>
	<view class='description'>{{flu.des}}view>
view>
六、bmap-wx.js简单介绍
打开bmap-wx.js文件,可以看到只有一个类BMapWX。该类包含了四个方法,而我们需要用到的是weather(param)方法:
/**
* 天气检索
*
* @param {Object} param 检索配置
*/
weather(param) {
	var that = this;
	param = param || {};
	let weatherparam = {
		coord_type: param["coord_type"] || 'gcj02',
        output: param["output"] || 'json',
        ak: that.ak,
        sn: param["sn"] || '',
        timestamp: param["timestamp"] || ''
	};
	let otherparam = {
		success: param["success"] || function () {},
		fail: param["fail"] || function () {}
	};
	let type = 'gcj02';
	let locationsuccess = function (result) {
		weatherparam["location"] = result["longitude"] + ',' + result["latitude"];
		wx.request({
			url: 'https://api.map.baidu.com/telematics/v3/weather',
			data: weatherparam,
			header: {"content-type": "application/json"},
			method: 'GET',
			success(data) {
				let res = data["data"];
				if (res["error"] === 0 && res["status"] === 'success') {
					let weatherArr = res["results"];
					// outputRes 包含两个对象,
					// originalData为百度接口返回的原始数据
					// wxMarkerData为小程序规范的marker格式
					let outputRes = {};
					outputRes["originalData"] = res;
					outputRes["currentWeather"] = [];
					outputRes["currentWeather"][0] = {
			 			currentCity: weatherArr[0]["currentCity"],
						pm25: weatherArr[0]["pm25"],
						date: weatherArr[0]["weather_data"][0]["date"],
						temperature: weatherArr[0]["weather_data"][0]["temperature"],
						weatherDesc: weatherArr[0]["weather_data"][0]["weather"],
						wind: weatherArr[0]["weather_data"][0]["wind"]
					};
					otherparam.success(outputRes);
				} else {
					otherparam.fail({
						errMsg: res["message"],
						statusCode: res["status"]
					});
				}
			},
			fail(data) {
				otherparam.fail(data);
			}
		});
	}
	let locationfail = function (result) {
		otherparam.fail(result);
	}
	let locationcomplete = function (result) {
	}
	if (!param["location"]) {
		that.getWXLocation(type, locationsuccess, locationfail, locationcomplete);
	} else {
		let longitude = param.location.split(',')[0];
		let latitude = param.location.split(',')[1];
		let errMsg = 'input location';
		let res = {
			errMsg: errMsg,
			latitude: latitude,
			longitude: longitude
		};
		locationsuccess(res);
	}
}
可以看出,成功返回的数据为data,通过解析,封装成了我们在前面得到的data.currentWeather和data.originalData两个数组。
另外,程序中默认查询的城市是当前定位的城市,依据的参数是经纬度坐标。
weatherparam["location"] = result["longitude"] + ',' + result["latitude"];
如果想查询其它城市,例如北京,可以修改为:
weatherparam["location"] = param["北京"];
其中param就是weather()函数的参数。
欢迎关注我的微信公众号: