Controllable Person Image Synthesis with Attribute-Decomposed GAN(CVPR20)
3. Method Description

framework中涉及到pose P ∈ R 18 × H × W P\in\mathbb{R}^{18\times H\times W} P∈R18×H×W表示为18通道的heatmap
3.1. Generator
Generator的输入为source person image I s I_s Is和target pose P t P_t Pt,输出为generated image I g I_g Ig
一个常见的做法是将 I s I_s Is和 P t P_t Pt拼接起来送入生成器
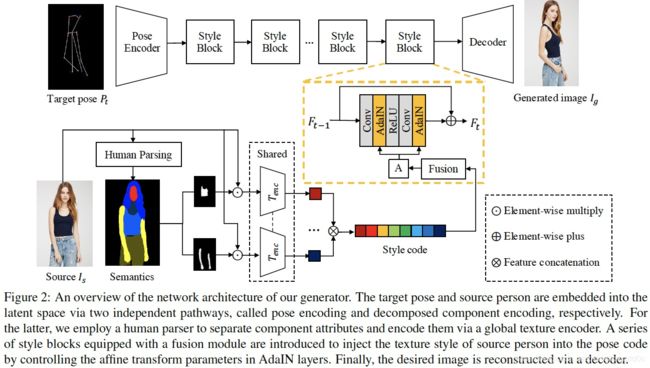
本文将 I s I_s Is和 P t P_t Pt编码为latent code,分别叫做pose encoding和decomposed component encoding
3.1.1 Pose encoding
如Fig.2上方所示,target pose P t P_t Pt输入pose encoder(是一个2层down-sampling convolutional layers结构),得到pose code C p o s e C_{pose} Cpose
3.1.2 Decomposed component encoding(DCE)
对source person image I s I_s Is提取semantic map S S S,将 S S S表示为 K K K通道的heatmap M ∈ R K × H × W M\in\mathbb{R}^{K\times H\times W} M∈RK×H×W, K K K为human parser的分割类别(实验中 K = 8 K=8 K=8,包括background, hair, face, upper clothes, pants, skirt, arm and leg),每一个通道是一个binary mask M i ∈ R H × W M_i\in\mathbb{R}^{H\times W} Mi∈RH×W,与 I s I_s Is进行点乘,就得到了decomposed person image,即通过分割mask完成了source image每一个component的分解
I s i = I s ⊙ M i ( 1 ) I_s^i=I_s\odot M_i \qquad(1) Isi=Is⊙Mi(1)
然后将每一个 I s i I_s^i Isi送入texture encoder T e n c T_{enc} Tenc,得到style code C s t y i C_{sty}^i Cstyi
C s t y i = T e n c ( I s i ) ( 2 ) C_{sty}^i=T_{enc}\left ( I_s^i \right ) \qquad(2) Cstyi=Tenc(Isi)(2)
将style code C s t y i C_{sty}^i Cstyi拼接到一起,得到full style code C s t y C_{sty} Csty,见Fig.2中的 ⊗ \otimes ⊗操作
In contrast to the common solution that directly encodes the entire source person image, this intuitive DCE module decomposes the source person into multiple components and recombines their latent codes to construct the full style code.
仔细想想,DCE的做法其实是等价于local patch的做法的,都是分离出不同的部分,单独进行处理
作者认为DCE有2点好处
- 能加速模型收敛
- 这是一种无监督的attribute separation方式,semantic map是human parser白送的,不需要任何annotation

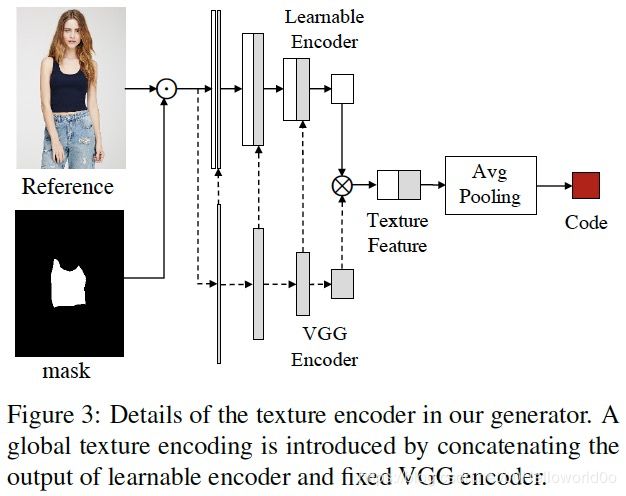
下面介绍texture encoder的结构,如Fig.3所示,texture encoder其实包含了2个encoder,Learnable Encoder和VGG Encoder(pretrained on the COCO dataset),这种双Encoder的方式称为global texture encoding(GTE)
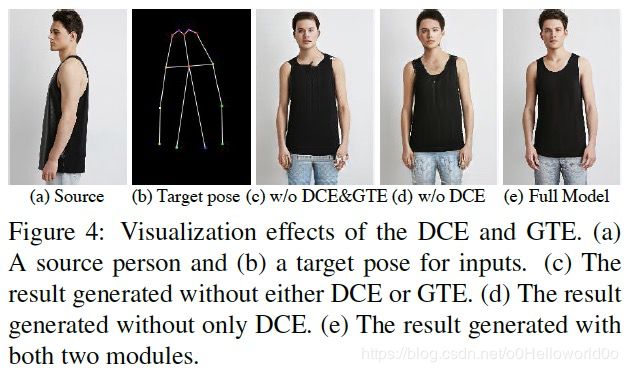
Fig.4展示了DCE和GTE的效果

3.1.3 Texture style transfer
Texture style transfer的目标是将source image的texture迁移到target pose上,是联系style code和pose code的桥梁
transfer network级联了若干个style block,内部细节见Fig.2黄色框
对于第 t t t个style block,输入是前一个feature map F t − 1 F_{t-1} Ft−1和full style code C s t y C_{sty} Csty,通过残差的方式得到输出的feature map F t F_t Ft
F t = ϕ t ( F t − 1 , A ) + F t − 1 ( 3 ) F_t=\phi_t\left ( F_{t-1}, A \right ) + F_{t-1} \qquad(3) Ft=ϕt(Ft−1,A)+Ft−1(3)
令 F 0 = C p o s e F_0=C_{pose} F0=Cpose,总共设置8个style block
Fig.2中的 A A A表示affine transform,输出scale μ \mu μ和shift σ \sigma σ用于执行AdaIN
Fig.2中的方框Fusion表示fusion module,包含3个fully connected layer,前两个layer用于select the desired features via linear recombination,最后一个layer用于维度变换
3.1.4 Person image reconstruction
将最后一个style block的输出送入decoder,得到生成结果 I g I_g Ig
3.2. Discriminators
参考文献[46],设置2个判别器 D p D_p Dp和 D t D_t Dt, D p D_p Dp用于使 I g I_g Ig具备target pose P t P_t Pt, D t D_t Dt用于使 I g I_g Ig的texture与 I s I_s Is相似
对于 D p D_p Dp,假样本定义为 ( P t , I g ) \left ( P_t, I_g \right ) (Pt,Ig),真样本定义为 ( P t , I t ) \left ( P_t, I_t \right ) (Pt,It)
注:数据集的特点是同一个人穿某件衣服,摆出不同pose,所以 I t I_t It其实是ground-truth
3.3. Training
L t o t a l = L a d v + λ r e c L r e c + λ p e r L p e r + λ C V L C X ( 4 ) \mathcal{L}_{total}=\mathcal{L}_{adv}+\lambda_{rec}\mathcal{L}_{rec}+\lambda_{per}\mathcal{L}_{per}+\lambda_{CV}\mathcal{L}_{CX} \qquad(4) Ltotal=Ladv+λrecLrec+λperLper+λCVLCX(4)
Adversarial loss
这里梳理一下 L a d v \mathcal{L}_{adv} Ladv所涉及的变量:原图 I s I_s Is指定 P t P_t Pt生成 I g = G ( I s , P t ) I_g=G(I_s, P_t) Ig=G(Is,Pt),ground-truth为 I t I_t It
L a d v = E I s , P t , I t [ log ( D t ( I s , I t ) ⋅ D p ( P t , I t ) ) ] + E I s , P t [ log ( 1 − D ( I s , I g ) ) ⋅ log ( 1 − D ( P t , I g ) ) ] ( 5 ) \begin{aligned} \mathcal{L}_{adv}=&\mathbb{E}_{I_s, P_t, I_t}\left [ \log\left ( D_t(I_s,I_t)\cdot D_p(P_t,I_t) \right ) \right ]+\\ &\mathbb{E}_{I_s,P_t}\left [ \log\left ( 1-D(I_s,I_g) \right )\cdot\log\left ( 1-D(P_t,I_g) \right ) \right ] \qquad(5) \end{aligned} Ladv=EIs,Pt,It[log(Dt(Is,It)⋅Dp(Pt,It))]+EIs,Pt[log(1−D(Is,Ig))⋅log(1−D(Pt,Ig))](5)
注:这个公式使用了一个符号 ⋅ \cdot ⋅,还是能够明白公式所表达的意思
Reconstruction loss
因为有ground-truth I t I_t It,所以直接最小化 I g I_g Ig与 I t I_t It之间的误差
L r e c = ∥ I g − I t ∥ 1 ( 6 ) \mathcal{L}_{rec}=\left \| I_g-I_t \right \|_1 \qquad(6) Lrec=∥Ig−It∥1(6)
注:因为有了ground-truth,所以就不需要一个令 I g I_g Ig有 P t P_t Pt的pose loss了
Perceptual loss
利用pretrained VGG19,取layer l = r e l u { 3 _ 2 , 4 _ 2 } l=relu\left \{ 3\_2,4\_2 \right \} l=relu{3_2,4_2}, F l \mathcal{F}^l Fl就对应了VGG19 layer l l l的feature map
作者认为visual style statistics本质上是feature correlations,所以考虑 I g I_g Ig和 I t I_t It的Gram matrix,以 I t I_t It为例,Gram matrix计算如下
G ( F l ( I t ) ) = [ F l ( I t ) ] [ F l ( I t ) ] T ( 7 ) \mathcal{G}\left ( \mathcal{F}^l(I_t) \right )=\left [ \mathcal{F}^l(I_t) \right ]\left [ \mathcal{F}^l(I_t) \right ]^T \qquad(7) G(Fl(It))=[Fl(It)][Fl(It)]T(7)
于是perceptual loss令 I g I_g Ig和 I t I_t It的Gram matrix之间的差异最小化
L p e r = ∥ G ( F l ( I g ) ) − G ( F l ( I t ) ) ∥ 2 ( 8 ) \mathcal{L}_{per}=\left \| \mathcal{G}\left ( \mathcal{F}^l(I_g) \right )-\mathcal{G}\left ( \mathcal{F}^l(I_t) \right ) \right \|^2 \qquad(8) Lper=∥∥G(Fl(Ig))−G(Fl(It))∥∥2(8)
Contextual loss
Contextual loss是文献[25]提出的
L C X = − log ( C X ( F l ( I g ) , F l ( I t ) ) ) ( 9 ) \mathcal{L}_{CX}=-\log\left ( CX\left ( \mathcal{F}^l(I_g), \mathcal{F}^l(I_t) \right ) \right ) \qquad(9) LCX=−log(CX(Fl(Ig),Fl(It)))(9)
其中 C X CX CX表示2个feature map之间的相似性度量,若similarity越大,则 − log ( similarity ) -\log\left ( \text{similarity} \right ) −log(similarity)的值就越小
Q:不是很明白为什么要加一个 log \log log
Implementation details
实验中设置 λ r e c = 2 , λ p e r = 2 , λ C X = 0.02 \lambda_{rec}=2, \lambda_{per}=2, \lambda_{CX}=0.02 λrec=2,λper=2,λCX=0.02
总共训练120k iterations,学习率设置为0.001,从60k iteration开始,线性衰减到0
注:文中没说batch size是多少