iOS Runloop底层详解、内部原理、结构框架
一:前言
RunLoop的基本作用
RunLoop对象
RunLoop与线程
二:Core Foundation中关于RunLoop的5个类
三:RunLoop的模式及状态
runloop的状态
每个模式做的事情
runloop model
四:RunLoop的运行逻辑
五:休眠的细节
六:苹果用 RunLoop 实现的功能
AutoreleasePool
事件响应
手势识别
界面更新
定时器
PerformSelecter
关于GCD
关于网络请求
七:RunLoop在实际开中的应用
控制线程生命周期
解决NSTimer在滑动时停止工作的问题(在滚动时,nstimer会失效)
八:面试题
一:前言
顾名思义:运行循环:在程序运行过程中循环做一些事情
应用范畴:
- 定时器(Timer)、PerformSelector
- GCD Async Main Queue
- 事件响应、手势识别、界面刷新
- 网络请求
- AutoreleasePool
命令行项目默认是没有runloop的。
int main(int argc, const char * argv[]) {
    @autoreleasepool {

        NSLog(@"Hello Word");
    }
    return 0;
}
如果没有runloop,执行完nslog代码行代码后,会即将退出程序
如果有runloop:程序并不会马上退出,而是保持运行状态
int main(int argc, char * argv[]) {
    @autoreleasepool {
        return UIApplicationMain(argc, argv, nil, NSStringFromClass([AppDelegate class]));
    }
}
下面是伪代码
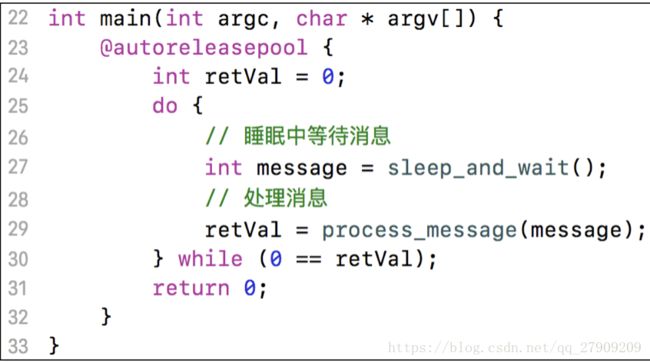
一般来讲,一个线程一次只能执行一个任务,执行完成后线程就会退出。如果我们需要一个机制,让线程能随时处理事件但并不退出,通常的代码逻辑是这样的:
function loop() {
    initialize();
    do {
        var message = get_next_message();
        process_message(message);
    } while (message != quit);
}
这种模型通常被称作 Event Loop。 Event Loop 在很多系统和框架里都有实现,比如 Node.js 的事件处理,比如 Windows 程序
的消息循环,
再比如 OSX/iOS 里的 RunLoop。实现这种模型的关键点在于:如何管理事件/消息,如何让线程在没有处理消息时休眠以避免资
源占用、在有消息到来时立刻被唤醒。
所以,RunLoop 实际上就是一个对象,这个对象管理了其需要处理的事件和消息,并提供了一个入口函数来执行上面 Event Loop 的逻辑。线程执行了这个函数后,就会一直处于这个函数内部 “接受消息->等待->处理” 的循环中,直到这个循环结束(比如传入 quit 的消息),函数返回。
RunLoop的基本作用
保持程序的持续运行
处理App中的各种事件(比如触摸事件、定时器事件等)
节省CPU资源,提高程序性能:该做事时做事,该休息时休息
......
RunLoop对象
OSX/iOS 系统中,提供了两个这样的对象:NSRunLoop 和 CFRunLoopRef。来访问和使用Runloop。
Foundation:NSRunLoop
Core Foundation:CFRunLoopRef
CFRunLoopRef 是在 CoreFoundation 框架内的,它提供了纯 C 函数的 API,所有这些 API 都是线程安全的。
NSRunLoop 是基于 CFRunLoopRef 的封装,提供了面向对象的 API,但是这些 API 不是线程安全的。
CFRunLoopRef是开源的:https://opensource.apple.com/tarballs/CF/
(Update: Swift 开源后,苹果又维护了一个跨平台的 CoreFoundation 版本:https://github.com/apple/swift-corelibs-foundation/,这
个版本的源码可能和现有 iOS 系统中的实现略不一样,但更容易编译,而且已经适配了 Linux/Windows。)
RunLoop与线程
首先,iOS 开发中能遇到两个线程对象: pthread_t 和 NSThread。过去苹果有份文档标明了 NSThread 只是 pthread_t 的封装,但那份
文档已经失效了,现在它们也有可能都是直接包装自最底层的 mach thread。苹果并没有提供这两个对象相互转换的接口,但不管怎么
样,可以肯定的是 pthread_t 和 NSThread 是一一对应的。比如,你可以通过 pthread_main_thread_np() 或 [NSThread mainThread]
来获取主线程;也可以通过 pthread_self() 或 [NSThread currentThread] 来获取当前线程。CFRunLoop 是基于 pthread 来管理的。
苹果不允许直接创建 RunLoop,它只提供了两个自动获取的函数:CFRunLoopGetMain() 和 CFRunLoopGetCurrent()。 这两个函数内
部的逻辑大概是下面这样:
/// 全局的Dictionary,key 是 pthread_t, value 是 CFRunLoopRef
static CFMutableDictionaryRef loopsDic;
/// 访问 loopsDic 时的锁
static CFSpinLock_t loopsLock;

/// 获取一个 pthread 对应的 RunLoop。
CFRunLoopRef _CFRunLoopGet(pthread_t thread) {
    OSSpinLockLock(&loopsLock);

    if (!loopsDic) {
        // 第一次进入时,初始化全局Dic,并先为主线程创建一个 RunLoop。
        loopsDic = CFDictionaryCreateMutable();
        CFRunLoopRef mainLoop = _CFRunLoopCreate();
        CFDictionarySetValue(loopsDic, pthread_main_thread_np(), mainLoop);
    }

    /// 直接从 Dictionary 里获取。
    CFRunLoopRef loop = CFDictionaryGetValue(loopsDic, thread));

    if (!loop) {
        /// 取不到时,创建一个
        loop = _CFRunLoopCreate();
        CFDictionarySetValue(loopsDic, thread, loop);
        /// 注册一个回调,当线程销毁时,顺便也销毁其对应的 RunLoop。
        _CFSetTSD(..., thread, loop, __CFFinalizeRunLoop);
    }

    OSSpinLockUnLock(&loopsLock);
    return loop;
}

CFRunLoopRef CFRunLoopGetMain() {
    return _CFRunLoopGet(pthread_main_thread_np());
}

CFRunLoopRef CFRunLoopGetCurrent() {
    return _CFRunLoopGet(pthread_self());
}
从上面的代码可以看出,
线程和 RunLoop 之间是一一对应的,其关系是保存在一个全局的 Dictionary 里,线程作为key,RunLoop作为value。
线程刚创建时并没有 RunLoop,如果你不主动获取,那它一直都不会有。
RunLoop 的创建是发生在第一次获取时,RunLoop 的销毁是发生在线程结束时。
你只能在一个线程的内部获取其 RunLoop(主线程除外)。
主线程的RunLoop已经自动获取(创建),子线程默认没有开启RunLoop
二:Core Foundation中关于RunLoop的5个类
- CFRunLoopRef
- CFRunLoopModeRef
- CFRunLoopSourceRef (平时的事情,点击事件 、刷新ui、滚动等)
- CFRunLoopTimerRef (定时器)
- CFRunLoopObserverRef (监听器)
CFRunLoopRef CFRunLoopGetMain(void) {
    CHECK_FOR_FORK();
    static CFRunLoopRef __main = NULL; // no retain needed
    if (!__main) __main = _CFRunLoopGet0(pthread_main_thread_np()); // no CAS needed
    return __main;
}

typedef struct CF_BRIDGED_MUTABLE_TYPE(id) __CFRunLoop * CFRunLoopRef;


struct __CFRunLoop {
    CFRuntimeBase _base;
    pthread_mutex_t _lock;			/* locked for accessing mode list */
    __CFPort _wakeUpPort;			// used for CFRunLoopWakeUp
    Boolean _unused;
    volatile _per_run_data *_perRunData;              // reset for runs of the run loop
    pthread_t _pthread;            // 线程对象
    uint32_t _winthread;
    CFMutableSetRef _commonModes;
    CFMutableSetRef _commonModeItems;
    CFRunLoopModeRef _currentMode; // 当前是什么模式
    CFMutableSetRef _modes;        // set是一个无序集合:一堆CFRunLoopModeRef对象
    struct _block_item *_blocks_head;
    struct _block_item *_blocks_tail;
    CFAbsoluteTime _runTime;
    CFAbsoluteTime _sleepTime;
    CFTypeRef _counterpart;
};

typedef struct __CFRunLoopMode *CFRunLoopModeRef;

struct __CFRunLoopMode {
    CFRuntimeBase _base;
    pthread_mutex_t _lock;	/* must have the run loop locked before locking this */
    CFStringRef _name;          // 模式的名字UITrackingRunLoopMode或者kCFRunLoopDefaultMode或者是系统不常用的模式
    Boolean _stopped;
    char _padding[3];
    CFMutableSetRef _sources0;    // 装CFRunLoopSourceRef对象
    CFMutableSetRef _sources1;    // 装CFRunLoopSourceRef对象
    CFMutableArrayRef _observers; // 装CFRunLoopObserverRef对象
    CFMutableArrayRef _timers;    // 装CFRunLoopTimerRef对象
    CFMutableDictionaryRef _portToV1SourceMap;
    __CFPortSet _portSet;
    CFIndex _observerMask;
#if USE_DISPATCH_SOURCE_FOR_TIMERS
    dispatch_source_t _timerSource;
    dispatch_queue_t _queue;
    Boolean _timerFired; // set to true by the source when a timer has fired
    Boolean _dispatchTimerArmed;
#endif
#if USE_MK_TIMER_TOO
    mach_port_t _timerPort;
    Boolean _mkTimerArmed;
#endif
#if DEPLOYMENT_TARGET_WINDOWS
    DWORD _msgQMask;
    void (*_msgPump)(void);
#endif
    uint64_t _timerSoftDeadline; /* TSR */
    uint64_t _timerHardDeadline; /* TSR */
};
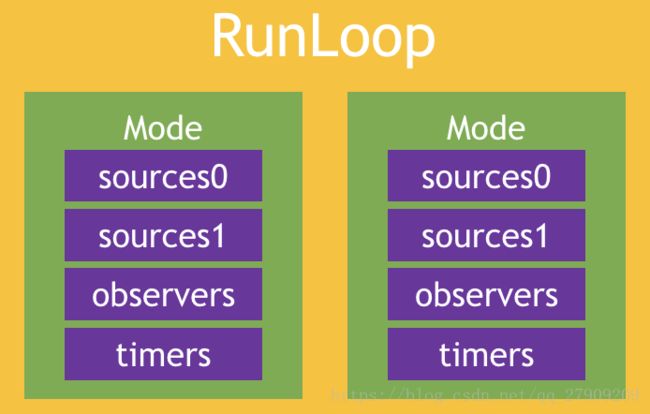
上述关系相当于是
(上面假设只有两个模式,这个模式就是指__CFRunLoopMode中_name,也就是上面紫色的区域,其实还有一个块块是代表模式)runloop中有很多模式(常用的只有两个),但是在运行中,只会选择一种模式来运行,比如上图中可能是左边 也可能是右边,运行在那种模式下取决于currentModel.
一个 RunLoop 包含若干个 Mode,每个 Mode 又包含若干个 Source/Timer/Observer。每次调用 RunLoop 的主函数时,只能指定其中一个 Mode,这个Mode被称作 CurrentMode。如果需要切换 Mode,只能退出 Loop,再重新指定一个 Mode 进入。这样做主要是为了分隔开不同组的 Source/Timer/Observer,让其互不影响。
CFRunLoopModeRef
CFRunLoopModeRef代表RunLoop的运行模式
一个RunLoop包含若干个Mode,每个Mode又包含若干个Source0/Source1/Timer/Observer
RunLoop启动时只能选择其中一个Mode,作为currentMode。如果需要切换Mode,只能退出当前Loop(切换模式,不会导致程序退出,而是在循环内部做的切换,模式起隔离的作用,比方说滚动下,只执行滚动模式下的逻辑,那默认模式下的逻辑就不会处理,这样滚动起来就比较流畅),再重新选择一个Mode进入。不同组的Source0/Source1/Timer/Observer能分隔开来,互不影响
如果Mode里没有任何Source0/Source1/Timer/Observer,RunLoop会立马退出
看下面的小问题
三:RunLoop的模式及状态
bt:打印函数调用栈
每个模式做的事情:
CFRunLoopSourceRef 是事件产生的地方。Source有两个版本:Source0 和 Source1。
Source0 只包含了一个回调(函数指针),它并不能主动触发事件。使用时,你需要先调用 CFRunLoopSourceSignal(source),将这个 Source 标记为待处理,然后手动调用 CFRunLoopWakeUp(runloop) 来唤醒 RunLoop,让其处理这个事件。
- Source0
触摸事件处理
performSelector:onThread:
Source1 包含了一个 mach_port 和一个回调(函数指针),被用于通过内核和其他线程相互发送消息。这种 Source 能主动唤醒 RunLoop 的线程,其原理在下面会讲到。
- Source1
基于Port的线程间通信
系统事件捕捉
CFRunLoopTimerRef 是基于时间的触发器,它和 NSTimer 是toll-free bridged 的,可以混用。其包含一个时间长度和一个回调(函数指针)。当其加入到 RunLoop 时,RunLoop会注册对应的时间点,当时间点到时,RunLoop会被唤醒以执行那个回调。
- Timers
NSTimer
performSelector:withObject:afterDelay:
CFRunLoopObserverRef 是观察者,每个 Observer 都包含了一个回调(函数指针),当 RunLoop 的状态发生变化时,观察者就能通过回调接受到这个变化。
- Observers
用于监听RunLoop的状态
UI刷新(BeforeWaiting)
Autorelease pool(BeforeWaiting)
(在线程睡觉之前 刷新UI(这些不是立刻刷新的), 设置颜色这些)
可以观测的时间点有以下几个:
也是runloop的状态:
typedef CF_OPTIONS(CFOptionFlags, CFRunLoopActivity) {
    kCFRunLoopEntry         = (1UL << 0), // 即将进入Loop
    kCFRunLoopBeforeTimers  = (1UL << 1), // 即将处理 Timer
    kCFRunLoopBeforeSources = (1UL << 2), // 即将处理 Source
    kCFRunLoopBeforeWaiting = (1UL << 5), // 即将进入休眠
    kCFRunLoopAfterWaiting  = (1UL << 6), // 刚从休眠中唤醒
    kCFRunLoopExit          = (1UL << 7), // 即将退出Loop
};
上面的 Source/Timer/Observer 被统称为 mode item,一个 item 可以被同时加入多个 mode。但一个 item 被重复加入同一个 mode 时是不会有效果的。如果一个 mode 中一个 item 都没有,则 RunLoop 会直接退出,不进入循环。
RunLoop模式:常见的2种Mode(前两种模式),其他的(后三种)都是不常见的 系统的
a:kCFRunLoopDefaultMode(NSDefaultRunLoopMode):App的默认Mode,通常主线程是在这个Mode下运行(应用普通状态下的)
b:UITrackingRunLoopMode:界面跟踪 Mode,用于 ScrollView 追踪触摸滑动,保证界面滑动时不受其他 Mode 影响(当一旦滚动屏幕,就会自动切换到这个模式)
c :UIInitializationRunLoopMode: ()在刚启动 App 时第进入的第一个 Mode,启动完成后就不再使用。
d:GSEventReceiveRunLoopMode: 接受系统事件的内部 Mode,通常用不到。
e:kCFRunLoopCommonModes: 这是一个占位的 Mode,没有实际作用。
你可以在这里看到更多的苹果内部的 Mode,但那些 Mode 在开发中就很难遇到了。
我们可以查看一下代码
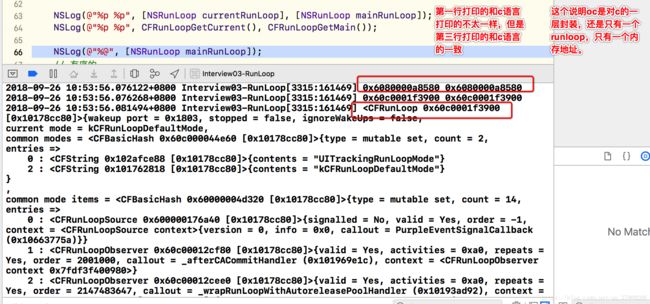
NSLog(@"%@", [NSRunLoop mainRunLoop]);{wakeup port = 0x2703, stopped = false, ignoreWakeUps = false,
current mode = kCFRunLoopDefaultMode, ////// 这里选择的是默认模式
common modes = {type = mutable set, count = 2,
entries => ////// 这个common mode在上模式设置为common的时候就有用了,可以看到这里面就有两种模式
0 : {contents = "UITrackingRunLoopMode"}
2 : {contents = "kCFRunLoopDefaultMode"}
}
,
common mode items = {type = mutable set, count = 14,
entries =>
0 : {signalled = No, valid = Yes, order = -1, context = {version = 0, info = 0x0, callout = PurpleEventSignalCallback (0x10b87f75a)}}
1 : {signalled = No, valid = Yes, order = 0, context = {port = 14099, subsystem = 0x107cfbfe8, context = 0x0}}
6 : {signalled = No, valid = Yes, order = -1, context = {version = 1, info = 0x2f03, callout = PurpleEventCallback (0x10b881bf7)}}
7 : {valid = Yes, activities = 0xa0, repeats = Yes, order = 2000000, callout = _ZN2CA11Transaction17observer_callbackEP19__CFRunLoopObservermPv (0x10c6b04ce), context = }
11 : {signalled = Yes, valid = Yes, order = 0, context = {version = 0, info = 0x60c0000a6e40, callout = FBSSerialQueueRunLoopSourceHandler (0x10afea82f)}}
12 : {signalled = No, valid = Yes, order = -2, context = {version = 0, info = 0x6080002454f0, callout = __handleHIDEventFetcherDrain (0x1074dfbbe)}}
13 : {valid = Yes, activities = 0x20, repeats = Yes, order = 0, callout = _UIGestureRecognizerUpdateObserver (0x1071686b3), context = }
14 : {valid = Yes, activities = 0xa0, repeats = Yes, order = 1999000, callout = _beforeCACommitHandler (0x106bb1da1), context = }
15 : {valid = Yes, activities = 0x1, repeats = Yes, order = -2147483647, callout = _wrapRunLoopWithAutoreleasePoolHandler (0x106b82d92), context = {type = mutable-small, count = 1, values = (
0 : <0x7fe61a002048>
)}}
16 : {valid = Yes, activities = 0xa0, repeats = Yes, order = 2001000, callout = _afterCACommitHandler (0x106bb1e1c), context = }
17 : {signalled = No, valid = Yes, order = -1, context = {version = 0, info = 0x60400015c460, callout = __handleEventQueue (0x1074dfbb2)}}
18 : {valid = Yes, activities = 0x4, repeats = No, order = 0, callout = _runLoopObserverWithBlockContext (0x1066ae960), context = }
19 : {valid = Yes, activities = 0xa0, repeats = Yes, order = 2147483647, callout = _wrapRunLoopWithAutoreleasePoolHandler (0x106b82d92), context = {type = mutable-small, count = 1, values = (
0 : <0x7fe61a002048>
)}}
20 : {signalled = No, valid = Yes, order = 0, context = {port = 23043, subsystem = 0x107d16668, context = 0x600000025b60}}
}
,
////// 这里是modes:
modes = {type = mutable set, count = 4,
entries =>
////// 模式一:UITrackingRunLoopMode: 可以看到有source0、sources1、observers、timers
2 : {name = UITrackingRunLoopMode, port set = 0x1f03, queue = 0x60800015c3b0, source = 0x608000196b30 (not fired), timer port = 0x1d03,
sources0 = {type = mutable set, count = 4,
entries =>
0 : {signalled = No, valid = Yes, order = -1, context = {version = 0, info = 0x0, callout = PurpleEventSignalCallback (0x10b87f75a)}}
1 : {signalled = Yes, valid = Yes, order = 0, context = {version = 0, info = 0x60c0000a6e40, callout = FBSSerialQueueRunLoopSourceHandler (0x10afea82f)}}
2 : {signalled = No, valid = Yes, order = -2, context = {version = 0, info = 0x6080002454f0, callout = __handleHIDEventFetcherDrain (0x1074dfbbe)}}
5 : {signalled = No, valid = Yes, order = -1, context = {version = 0, info = 0x60400015c460, callout = __handleEventQueue (0x1074dfbb2)}}
}
,
sources1 = {type = mutable set, count = 3,
entries =>
0 : {signalled = No, valid = Yes, order = 0, context = {port = 14099, subsystem = 0x107cfbfe8, context = 0x0}}
1 : {signalled = No, valid = Yes, order = 0, context = {port = 23043, subsystem = 0x107d16668, context = 0x600000025b60}}
2 : {signalled = No, valid = Yes, order = -1, context = {version = 1, info = 0x2f03, callout = PurpleEventCallback (0x10b881bf7)}}
}
,
observers = (
"{valid = Yes, activities = 0x1, repeats = Yes, order = -2147483647, callout = _wrapRunLoopWithAutoreleasePoolHandler (0x106b82d92), context = {type = mutable-small, count = 1, values = (\n\t0 : <0x7fe61a002048>\n)}}",
"{valid = Yes, activities = 0x20, repeats = Yes, order = 0, callout = _UIGestureRecognizerUpdateObserver (0x1071686b3), context = }",
"{valid = Yes, activities = 0x4, repeats = No, order = 0, callout = _runLoopObserverWithBlockContext (0x1066ae960), context = }",
"{valid = Yes, activities = 0xa0, repeats = Yes, order = 1999000, callout = _beforeCACommitHandler (0x106bb1da1), context = }",
"{valid = Yes, activities = 0xa0, repeats = Yes, order = 2000000, callout = _ZN2CA11Transaction17observer_callbackEP19__CFRunLoopObservermPv (0x10c6b04ce), context = }",
"{valid = Yes, activities = 0xa0, repeats = Yes, order = 2001000, callout = _afterCACommitHandler (0x106bb1e1c), context = }",
"{valid = Yes, activities = 0xa0, repeats = Yes, order = 2147483647, callout = _wrapRunLoopWithAutoreleasePoolHandler (0x106b82d92), context = {type = mutable-small, count = 1, values = (\n\t0 : <0x7fe61a002048>\n)}}"
),
timers = (null),
currently 559646742 (30436416494659) / soft deadline in: 1.84467136e+10 sec (@ -1) / hard deadline in: 1.84467136e+10 sec (@ -1)
},
////// 第二个模式:GSEventReceiveRunLoopMode :sources0、sources1、observers(空)、timers(空)
3 : {name = GSEventReceiveRunLoopMode, port set = 0x2c03, queue = 0x60800015c460, source = 0x608000196cd0 (not fired), timer port = 0x2e03,
sources0 = {type = mutable set, count = 1,
entries =>
0 : {signalled = No, valid = Yes, order = -1, context = {version = 0, info = 0x0, callout = PurpleEventSignalCallback (0x10b87f75a)}}
}
,
sources1 = {type = mutable set, count = 1,
entries =>
2 : {signalled = No, valid = Yes, order = -1, context = {version = 1, info = 0x2f03, callout = PurpleEventCallback (0x10b881bf7)}}
}
,
observers = (null),
timers = (null),
currently 559646742 (30436417513777) / soft deadline in: 1.84467136e+10 sec (@ -1) / hard deadline in: 1.84467136e+10 sec (@ -1)
},
////// 这里给的第三个模式:kCFRunLoopDefaultMode :sources0、sources1、observers、timers。
4 : {name = kCFRunLoopDefaultMode, port set = 0x1a03, queue = 0x60400015c250, source = 0x604000196580 (not fired), timer port = 0x2503,
sources0 = {type = mutable set, count = 4,
entries =>
0 : {signalled = No, valid = Yes, order = -1, context = {version = 0, info = 0x0, callout = PurpleEventSignalCallback (0x10b87f75a)}}
1 : {signalled = Yes, valid = Yes, order = 0, context = {version = 0, info = 0x60c0000a6e40, callout = FBSSerialQueueRunLoopSourceHandler (0x10afea82f)}}
2 : {signalled = No, valid = Yes, order = -2, context = {version = 0, info = 0x6080002454f0, callout = __handleHIDEventFetcherDrain (0x1074dfbbe)}}
5 : {signalled = No, valid = Yes, order = -1, context = {version = 0, info = 0x60400015c460, callout = __handleEventQueue (0x1074dfbb2)}}
}
,
sources1 = {type = mutable set, count = 3,
entries =>
0 : {signalled = No, valid = Yes, order = 0, context = {port = 14099, subsystem = 0x107cfbfe8, context = 0x0}}
1 : {signalled = No, valid = Yes, order = 0, context = {port = 23043, subsystem = 0x107d16668, context = 0x600000025b60}}
2 : {signalled = No, valid = Yes, order = -1, context = {version = 1, info = 0x2f03, callout = PurpleEventCallback (0x10b881bf7)}}
}
,
observers = (
"{valid = Yes, activities = 0x1, repeats = Yes, order = -2147483647, callout = _wrapRunLoopWithAutoreleasePoolHandler (0x106b82d92), context = {type = mutable-small, count = 1, values = (\n\t0 : <0x7fe61a002048>\n)}}",
"{valid = Yes, activities = 0x20, repeats = Yes, order = 0, callout = _UIGestureRecognizerUpdateObserver (0x1071686b3), context = }",
"{valid = Yes, activities = 0x4, repeats = No, order = 0, callout = _runLoopObserverWithBlockContext (0x1066ae960), context = }",
"{valid = Yes, activities = 0xa0, repeats = Yes, order = 1999000, callout = _beforeCACommitHandler (0x106bb1da1), context = }",
"{valid = Yes, activities = 0xa0, repeats = Yes, order = 2000000, callout = _ZN2CA11Transaction17observer_callbackEP19__CFRunLoopObservermPv (0x10c6b04ce), context = }",
"{valid = Yes, activities = 0xa0, repeats = Yes, order = 2001000, callout = _afterCACommitHandler (0x106bb1e1c), context = }",
"{valid = Yes, activities = 0xa0, repeats = Yes, order = 2147483647, callout = _wrapRunLoopWithAutoreleasePoolHandler (0x106b82d92), context = {type = mutable-small, count = 1, values = (\n\t0 : <0x7fe61a002048>\n)}}"
),
timers = {type = mutable-small, count = 2, values = (
0 : {valid = Yes, firing = No, interval = 0.5, tolerance = 0, next fire date = 559646742 (0.49159193 @ 30436910466673), callout = (NSTimer) [UITextSelectionView caretBlinkTimerFired:] (0x10580b48a / 0x10554337c) (/Applications/Xcode.app/Contents/Developer/Platforms/iPhoneOS.platform/Developer/Library/CoreSimulator/Profiles/Runtimes/iOS.simruntime/Contents/Resources/RuntimeRoot/System/Library/Frameworks/UIKit.framework/UIKit), context = }
1 : {valid = Yes, firing = No, interval = 0, tolerance = 0, next fire date = 559646743 (1.25698304 @ 30437676026131), callout = (Delayed Perform) UIApplication _accessibilitySetUpQuickSpeak (0x1057f6849 / 0x10707331b) (/Applications/Xcode.app/Contents/Developer/Platforms/iPhoneOS.platform/Developer/Library/CoreSimulator/Profiles/Runtimes/iOS.simruntime/Contents/Resources/RuntimeRoot/System/Library/Frameworks/UIKit.framework/UIKit), context = }
)},
currently 559646742 (30436417545494) / soft deadline in: 0.492921161 sec (@ 30436910466673) / hard deadline in: 0.492921134 sec (@ 30436910466673)
},
////// 这里给出的第四个模式:kCFRunLoopCommonModes:可以看出来下面都是空的
5 : {name = kCFRunLoopCommonModes, port set = 0x480b, queue = 0x60000015c460, source = 0x6000001963e0 (not fired), timer port = 0x410b,
sources0 = (null),
sources1 = (null),
observers = (null),
timers = (null),
currently 559646742 (30436419063687) / soft deadline in: 1.84467136e+10 sec (@ -1) / hard deadline in: 1.84467136e+10 sec (@ -1)
},
}
} 可以看到上面的模式有四种:UITrackingRunLoopMode、GSEventReceiveRunLoopMode、kCFRunLoopDefaultMode、kCFRunLoopCommonModes。
而前面设置的currentmode = kCFRunLoopDefaultMode,所以,会执行kCFRunLoopDefaultMode。
kCFRunLoopCommonModes默认包括kCFRunLoopDefaultMode、UITrackingRunLoopMode
- (void)viewDidLoad {
    // 1
    // 创建Observer
    CFRunLoopObserverRef observer = CFRunLoopObserverCreate(kCFAllocatorDefault, kCFRunLoopAllActivities, YES, 0, observeRunLoopActicities, NULL);
    // 添加Observer到RunLoop中
    CFRunLoopAddObserver(CFRunLoopGetMain(), observer, kCFRunLoopCommonModes);
    // 释放
    CFRelease(observer);
}


NSMutableDictionary *runloops;

void observeRunLoopActicities(CFRunLoopObserverRef observer, CFRunLoopActivity activity, void *info)
{
    switch (activity) {
        case kCFRunLoopEntry:
            NSLog(@"kCFRunLoopEntry");
            break;
        case kCFRunLoopBeforeTimers:
            NSLog(@"kCFRunLoopBeforeTimers");
            break;
        case kCFRunLoopBeforeSources:
            NSLog(@"kCFRunLoopBeforeSources");
            break;
        case kCFRunLoopBeforeWaiting:
            NSLog(@"kCFRunLoopBeforeWaiting");
            break;
        case kCFRunLoopAfterWaiting:
            NSLog(@"kCFRunLoopAfterWaiting");
            break;
        case kCFRunLoopExit:
            NSLog(@"kCFRunLoopExit");
            break;
        default:
            break;
    }
}
2018-09-26 14:21:02.217837+0800 Interview03-RunLoop[4744:336769] kCFRunLoopAfterWaiting
2018-09-26 14:21:02.218071+0800 Interview03-RunLoop[4744:336769] kCFRunLoopBeforeTimers
2018-09-26 14:21:02.218648+0800 Interview03-RunLoop[4744:336769] kCFRunLoopBeforeSources
2018-09-26 14:21:02.220133+0800 Interview03-RunLoop[4744:336769] --===-[ViewController touchesBegan:withEvent:]
2018-09-26 14:21:02.221260+0800 Interview03-RunLoop[4744:336769] kCFRunLoopBeforeTimers
2018-09-26 14:21:02.221541+0800 Interview03-RunLoop[4744:336769] kCFRunLoopBeforeSources
2018-09-26 14:21:02.221793+0800 Interview03-RunLoop[4744:336769] kCFRunLoopBeforeTimers
2018-09-26 14:21:02.222085+0800 Interview03-RunLoop[4744:336769] kCFRunLoopBeforeSources
2018-09-26 14:21:02.222190+0800 Interview03-RunLoop[4744:336769] kCFRunLoopBeforeTimers
2018-09-26 14:21:02.222517+0800 Interview03-RunLoop[4744:336769] kCFRunLoopBeforeSources
2018-09-26 14:21:02.223391+0800 Interview03-RunLoop[4744:336769] kCFRunLoopBeforeWaiting
2018-09-26 14:21:02.318849+0800 Interview03-RunLoop[4744:336769] kCFRunLoopAfterWaiting
2018-09-26 14:21:02.318979+0800 Interview03-RunLoop[4744:336769] kCFRunLoopBeforeTimers
2018-09-26 14:21:02.319341+0800 Interview03-RunLoop[4744:336769] kCFRunLoopBeforeSources
2018-09-26 14:21:02.319715+0800 Interview03-RunLoop[4744:336769] kCFRunLoopBeforeTimers
2018-09-26 14:21:02.319782+0800 Interview03-RunLoop[4744:336769] kCFRunLoopBeforeSources
2018-09-26 14:21:02.319871+0800 Interview03-RunLoop[4744:336769] kCFRunLoopBeforeWaiting证明模式切换 第二种方式:用block的方式
- (void)viewDidLoad
{
    //     第二种方式
    //    // 创建Observer
    CFRunLoopObserverRef observer = CFRunLoopObserverCreateWithHandler(kCFAllocatorDefault, kCFRunLoopAllActivities, YES, 0, ^(CFRunLoopObserverRef observer, CFRunLoopActivity activity) {
        switch (activity) {
            case kCFRunLoopEntry: {
                CFRunLoopMode mode = CFRunLoopCopyCurrentMode(CFRunLoopGetCurrent());
                NSLog(@"kCFRunLoopEntry - %@", mode);
                CFRelease(mode);
                break;
            }

            case kCFRunLoopExit: {
                CFRunLoopMode mode = CFRunLoopCopyCurrentMode(CFRunLoopGetCurrent());
                NSLog(@"kCFRunLoopExit - %@", mode);
                CFRelease(mode);
                break;
            }

            default:
                break;
        }
    });
    // 添加Observer到RunLoop中
    CFRunLoopAddObserver(CFRunLoopGetMain(), observer, kCFRunLoopCommonModes);
    // 释放
    CFRelease(observer);
}

- (void)touchesBegan:(NSSet *)touches withEvent:(UIEvent *)event
{
    [NSTimer scheduledTimerWithTimeInterval:3.0 repeats:NO block:^(NSTimer * _Nonnull timer) {
        NSLog(@"定时器-----------");
    }];

}
2018-09-26 14:23:00.886113+0800 Interview03-RunLoop[4789:343545] 定时器-----------
2018-09-26 14:23:06.659947+0800 Interview03-RunLoop[4789:343545] kCFRunLoopExit - kCFRunLoopDefaultMode
2018-09-26 14:23:06.660184+0800 Interview03-RunLoop[4789:343545] kCFRunLoopEntry - UITrackingRunLoopMode
2018-09-26 14:23:07.075695+0800 Interview03-RunLoop[4789:343545] kCFRunLoopExit - UITrackingRunLoopMode
2018-09-26 14:23:07.075877+0800 Interview03-RunLoop[4789:343545] kCFRunLoopEntry - kCFRunLoopDefaultMode
一开始 oberver内部是有的
RunLoop 的 Mode
CFRunLoopMode 和 CFRunLoop 的结构大致如下:
struct __CFRunLoopMode {
    CFStringRef _name;            // Mode Name, 例如 @"kCFRunLoopDefaultMode"
    CFMutableSetRef _sources0;    // Set
    CFMutableSetRef _sources1;    // Set
    CFMutableArrayRef _observers; // Array
    CFMutableArrayRef _timers;    // Array
    ...
};

struct __CFRunLoop {
    CFMutableSetRef _commonModes;     // Set
    CFMutableSetRef _commonModeItems; // Set
    CFRunLoopModeRef _currentMode;    // Current Runloop Mode
    CFMutableSetRef _modes;           // Set
    ...
};
这里有个概念叫 “CommonModes”:一个 Mode 可以将自己标记为”Common”属性(通过将其 ModeName 添加到 RunLoop 的 “commonModes” 中)。每当 RunLoop 的内容发生变化时,RunLoop 都会自动将 _commonModeItems 里的 Source/Observer/Timer 同步到具有 “Common” 标记的所有Mode里。
应用场景举例:主线程的 RunLoop 里有两个预置的 Mode:kCFRunLoopDefaultMode 和 UITrackingRunLoopMode。这两个 Mode 都已经被标记为”Common”属性。DefaultMode 是 App 平时所处的状态,TrackingRunLoopMode 是追踪 ScrollView 滑动时的状态。当你创建一个 Timer 并加到 DefaultMode 时,Timer 会得到重复回调,但此时滑动一个TableView时,RunLoop 会将 mode 切换为 TrackingRunLoopMode,这时 Timer 就不会被回调,并且也不会影响到滑动操作。
有时你需要一个 Timer,在两个 Mode 中都能得到回调,一种办法就是将这个 Timer 分别加入这两个 Mode。还有一种方式,就是将 Timer 加入到顶层的 RunLoop 的 “commonModeItems” 中。”commonModeItems” 被 RunLoop 自动更新到所有具有”Common”属性的 Mode 里去。
当运行在commonModel标记下,会发现,currentModel的值和状态依然没变,在普通状态下还是default,在滑动下还是track,但是不一样的点在于,正常两个状态下的(不是在标记下),track内部是模式没有timer的,timer默认是加在default下面的,所以滑动下才会产生不准,停顿的现象,之所以加入标记会好使是因为:标记下会看到track模式的model里也有timer了,也就是上面所说的会把:”commonModeItems” 被 RunLoop 自动更新到所有具有”Common”属性的 Mode 里去。但是随着状态的切换,currentmodel依然在换,只是两个model具有相同的东西就是commonModeItems的内容。
CFRunLoop对外暴露的管理 Mode 接口只有下面2个:
CFRunLoopAddCommonMode(CFRunLoopRef runloop, CFStringRef modeName);
CFRunLoopRunInMode(CFStringRef modeName, ...);
Mode 暴露的管理 mode item 的接口有下面几个:
CFRunLoopAddSource(CFRunLoopRef rl, CFRunLoopSourceRef source, CFStringRef modeName);
CFRunLoopAddObserver(CFRunLoopRef rl, CFRunLoopObserverRef observer, CFStringRef modeName);
CFRunLoopAddTimer(CFRunLoopRef rl, CFRunLoopTimerRef timer, CFStringRef mode);
CFRunLoopRemoveSource(CFRunLoopRef rl, CFRunLoopSourceRef source, CFStringRef modeName);
CFRunLoopRemoveObserver(CFRunLoopRef rl, CFRunLoopObserverRef observer, CFStringRef modeName);
CFRunLoopRemoveTimer(CFRunLoopRef rl, CFRunLoopTimerRef timer, CFStringRef mode);
你只能通过 mode name 来操作内部的 mode,当你传入一个新的 mode name 但 RunLoop 内部没有对应 mode 时,RunLoop会自动帮你创建对应的 CFRunLoopModeRef。对于一个 RunLoop 来说,其内部的 mode 只能增加不能删除。
苹果公开提供的 Mode 有两个:kCFRunLoopDefaultMode (NSDefaultRunLoopMode) 和 UITrackingRunLoopMode,你可以用这两个 Mode Name 来操作其对应的 Mode。
同时苹果还提供了一个操作 Common 标记的字符串:kCFRunLoopCommonModes (NSRunLoopCommonModes),你可以用这个字符串来操作 Common Items,或标记一个 Mode 为 “Common”。使用时注意区分这个字符串和其他 mode name。
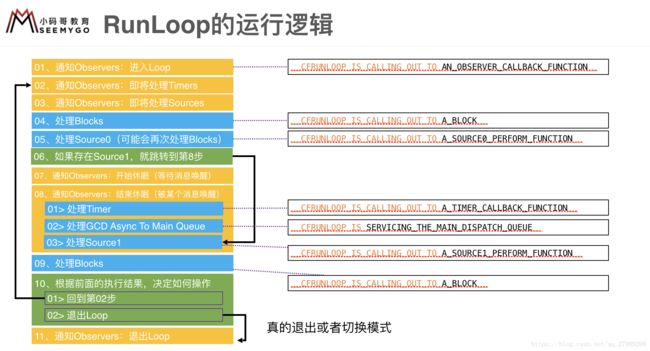
四:RunLoop的运行逻辑
请看代码执行流程 及源码流程
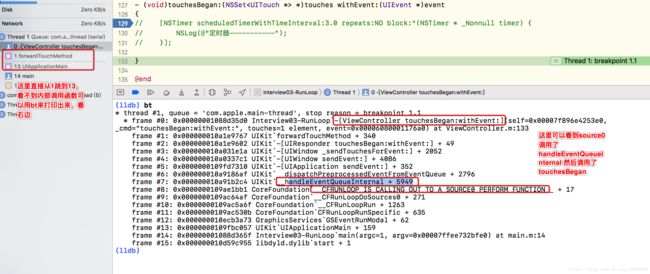
打断点看这里 下面的函数栈执行流程就是下面源码的流程过程。请对比
2018-09-26 15:21:45.901445+0800 Interview01-runloop流程[5242:400150] 11111111111
(lldb) bt
* thread #1, queue = 'com.apple.main-thread', stop reason = breakpoint 1.1
  * frame #0: 0x00000001003ed69d Interview01-runloop流程`-[ViewController touchesBegan:withEvent:](self=0x00007fdc3ff02e90, _cmd="touchesBegan:withEvent:", touches=1 element, event=0x0000608000104a40) at ViewController.m:39
    frame #1: 0x0000000101d03767 UIKit`forwardTouchMethod + 340
    frame #2: 0x0000000101d03602 UIKit`-[UIResponder touchesBegan:withEvent:] + 49
    frame #3: 0x0000000101b4be1a UIKit`-[UIWindow _sendTouchesForEvent:] + 2052
    frame #4: 0x0000000101b4d7c1 UIKit`-[UIWindow sendEvent:] + 4086
    frame #5: 0x0000000101af1310 UIKit`-[UIApplication sendEvent:] + 352
    frame #6: 0x00000001024326af UIKit`__dispatchPreprocessedEventFromEventQueue + 2796
    frame #7: 0x00000001024352c4 UIKit`__handleEventQueueInternal + 5949
    frame #8: 0x00000001015fbbb1 CoreFoundation`__CFRUNLOOP_IS_CALLING_OUT_TO_A_SOURCE0_PERFORM_FUNCTION__ + 17
    frame #9: 0x00000001015e04af CoreFoundation`__CFRunLoopDoSources0 + 271
    frame #10: 0x00000001015dfa6f CoreFoundation`__CFRunLoopRun + 1263
    frame #11: 0x00000001015df30b CoreFoundation`CFRunLoopRunSpecific + 635
    frame #12: 0x00000001067cda73 GraphicsServices`GSEventRunModal + 62
    frame #13: 0x0000000101ad6057 UIKit`UIApplicationMain + 159
    frame #14: 0x00000001003ed74f Interview01-runloop流程`main(argc=1, argv=0x00007ffeef811fb0) at main.m:14
    frame #15: 0x00000001050b6955 libdyld.dylib`start + 1
(lldb)
/* rl, rlm are locked on entrance and exit */
static int32_t __CFRunLoopRun(CFRunLoopRef rl, CFRunLoopModeRef rlm, CFTimeInterval seconds, Boolean stopAfterHandle, CFRunLoopModeRef previousMode) {
// 来保存do while循环的结果
int32_t retVal = 0;
// 从这里开始
do {
// 通知obervers:即将处理timers
__CFRunLoopDoObservers(rl, rlm, kCFRunLoopBeforeTimers);
// 通知obervers:即将处理sources
__CFRunLoopDoObservers(rl, rlm, kCFRunLoopBeforeSources);
// 处理blocks
__CFRunLoopDoBlocks(rl, rlm);
// 处理source0
Boolean sourceHandledThisLoop = __CFRunLoopDoSources0(rl, rlm, stopAfterHandle);
if (sourceHandledThisLoop) {
// 处理blocks
__CFRunLoopDoBlocks(rl, rlm);
}
// 判断有无source1:端口相关的东西
msg = (mach_msg_header_t *)msg_buffer;
if (__CFRunLoopServiceMachPort(dispatchPort, &msg, sizeof(msg_buffer), &livePort, 0, &voucherState, NULL)) {
// 如果有source1 就跳转到handle_msg
goto handle_msg;
}
didDispatchPortLastTime = false;
// 通知obervers即将休眠
__CFRunLoopDoObservers(rl, rlm, kCFRunLoopBeforeWaiting);
// 休眠
__CFRunLoopSetSleeping(rl);
CFAbsoluteTime sleepStart = poll ? 0.0 : CFAbsoluteTimeGetCurrent();
do { // 循环在做一件事情
// 做这件事情 :在等待别的消息 来唤醒当前线程。
__CFRunLoopServiceMachPort(waitSet, &msg, sizeof((mach_msg_header_t *)msg_buffer), &livePort, poll ? 0 : TIMEOUT_INFINITY, &voucherState, &voucherCopy);
} while (1);
// 不睡觉了
__CFRunLoopUnsetSleeping(rl);
// 通知obervers:结束休眠
__CFRunLoopDoObservers(rl, rlm, kCFRunLoopAfterWaiting);
// 去判断怎么醒来的 下面是很多种情况
handle_msg:;
__CFRunLoopSetIgnoreWakeUps(rl);
if (MACH_PORT_NULL == livePort) { CFRUNLOOP_WAKEUP_FOR_NOTHING();
} else if (livePort == rl->_wakeUpPort) { CFRUNLOOP_WAKEUP_FOR_WAKEUP();
} // 前面两种是什么事都不干 下面这两种就是:被timer唤醒 就会执行__CFRunLoopDoTimers
else if (modeQueuePort != MACH_PORT_NULL && livePort == modeQueuePort) {
CFRUNLOOP_WAKEUP_FOR_TIMER();
if (!__CFRunLoopDoTimers(rl, rlm, mach_absolute_time())) {
// Re-arm the next timer, because we apparently fired early
__CFArmNextTimerInMode(rlm, rl);
}
else if (rlm->_timerPort != MACH_PORT_NULL && livePort == rlm->_timerPort) {
CFRUNLOOP_WAKEUP_FOR_TIMER();
if (!__CFRunLoopDoTimers(rl, rlm, mach_absolute_time())) {
// Re-arm the next timer
__CFArmNextTimerInMode(rlm, rl);
}
}
else if (livePort == dispatchPort) { // 被GCD唤醒
CFRUNLOOP_WAKEUP_FOR_DISPATCH();
__CFRunLoopModeUnlock(rlm);
__CFRunLoopUnlock(rl);
_CFSetTSD(__CFTSDKeyIsInGCDMainQ, (void *)6, NULL);
// 处理GCD相关的事情
__CFRUNLOOP_IS_SERVICING_THE_MAIN_DISPATCH_QUEUE__(msg);
_CFSetTSD(__CFTSDKeyIsInGCDMainQ, (void *)0, NULL);
__CFRunLoopLock(rl);
__CFRunLoopModeLock(rlm);
sourceHandledThisLoop = true;
didDispatchPortLastTime = true;
} else { // 剩下的是被source1唤醒
// 处理source1
__CFRunLoopDoSource1(rl, rlm, rls, msg, msg->msgh_size, &reply) || sourceHandledThisLoop;
}
// 处理blocks
__CFRunLoopDoBlocks(rl, rlm);
// 设置返回值
if (sourceHandledThisLoop && stopAfterHandle) {
retVal = kCFRunLoopRunHandledSource;
} else if (timeout_context->termTSR < mach_absolute_time()) {
retVal = kCFRunLoopRunTimedOut;
} else if (__CFRunLoopIsStopped(rl)) {
__CFRunLoopUnsetStopped(rl);
retVal = kCFRunLoopRunStopped;
} else if (rlm->_stopped) {
rlm->_stopped = false;
retVal = kCFRunLoopRunStopped;
} else if (__CFRunLoopModeIsEmpty(rl, rlm, previousMode)) {
retVal = kCFRunLoopRunFinished;
}
voucher_mach_msg_revert(voucherState);
os_release(voucherCopy);
} while (0 == retVal);// 条件成立,又会执行里面的东西
if (timeout_timer) {
dispatch_source_cancel(timeout_timer);
dispatch_release(timeout_timer);
} else {
free(timeout_context);
}
return retVal;
}
// runloop入口
SInt32 CFRunLoopRunSpecific(CFRunLoopRef rl, CFStringRef modeName, CFTimeInterval seconds, Boolean returnAfterSourceHandled) { /* DOES CALLOUT */
// kCFRunLoopEntry通知oberver进入loop 已经传入一种模式:modeName
__CFRunLoopDoObservers(rl, currentMode, kCFRunLoopEntry);
// 最主要的逻辑,具体要做的事情
result = __CFRunLoopRun(rl, currentMode, seconds, returnAfterSourceHandled, previousMode);
// 通知obervers 退出loop
__CFRunLoopDoObservers(rl, currentMode, kCFRunLoopExit);
// 返回结果
return result;
}- 01、通知Observers:进入Loop
- 02、通知Observers:即将处理Timers
- 03、通知Observers:即将处理Sources
- 04、处理Blocks
- 05、处理Source0(可能会再次处理Blocks)
- 06、如果存在Source1,就跳转到第8步
- 07、通知Observers:开始休眠(等待消息唤醒)
- 08、通知Observers:结束休眠(被某个消息唤醒)
- 01> 处理Timer
- 02> 处理GCD Async To Main Queue
- 03> 处理Source1
- 09、处理Blocks
- 10、根据前面的执行结果,决定如何操作
- 01> 回到第02步
- 02> 退出Loop
- 11、通知Observers:退出Loop
GCD很多东西是不依赖于runloop的,只是GCD有一种情况会交给runloop去处理:
  dispatch_async(dispatch_get_global_queue(0, 0), ^{

        // 处理一些子线程的逻辑

        // 回到主线程去刷新UI界面 :依赖runloop
        dispatch_async(dispatch_get_main_queue(), ^{
            NSLog(@"11111111111");
        });
    });
五:休眠的细节
RunLoop 的底层实现
从上面代码可以看到,RunLoop 的核心是基于 mach port 的,其进入休眠时调用的函数是 mach_msg()。为了解释这个逻辑,下面稍微介绍一下 OSX/iOS 的系统架构。![]()
苹果官方将整个系统大致划分为上述4个层次:
应用层包括用户能接触到的图形应用,例如 Spotlight、Aqua、SpringBoard 等。
应用框架层即开发人员接触到的 Cocoa 等框架。
核心框架层包括各种核心框架、OpenGL 等内容。
Darwin 即操作系统的核心,包括系统内核、驱动、Shell 等内容,这一层是开源的,其所有源码都可以在 opensource.apple.com 里找到。
我们在深入看一下 Darwin 这个核心的架构:![]()
其中,在硬件层上面的三个组成部分:Mach、BSD、IOKit (还包括一些上面没标注的内容),共同组成了 XNU 内核。
XNU 内核的内环被称作 Mach,其作为一个微内核,仅提供了诸如处理器调度、IPC (进程间通信)等非常少量的基础服务。
BSD 层可以看作围绕 Mach 层的一个外环,其提供了诸如进程管理、文件系统和网络等功能。
IOKit 层是为设备驱动提供了一个面向对象(C++)的一个框架。
Mach 本身提供的 API 非常有限,而且苹果也不鼓励使用 Mach 的 API,但是这些API非常基础,如果没有这些API的话,其他任何工作都无法实施。在 Mach 中,所有的东西都是通过自己的对象实现的,进程、线程和虚拟内存都被称为”对象”。和其他架构不同, Mach 的对象间不能直接调用,只能通过消息传递的方式实现对象间的通信。”消息”是 Mach 中最基础的概念,消息在两个端口 (port) 之间传递,这就是 Mach 的 IPC (进程间通信) 的核心。
Mach 的消息定义是在
typedef struct {
  mach_msg_header_t header;
  mach_msg_body_t body;
} mach_msg_base_t;

typedef struct {
  mach_msg_bits_t msgh_bits;
  mach_msg_size_t msgh_size;
  mach_port_t msgh_remote_port;
  mach_port_t msgh_local_port;
  mach_port_name_t msgh_voucher_port;
  mach_msg_id_t msgh_id;
} mach_msg_header_t;
一条 Mach 消息实际上就是一个二进制数据包 (BLOB),其头部定义了当前端口 local_port 和目标端口 remote_port,
发送和接受消息是通过同一个 API 进行的,其 option 标记了消息传递的方向:
mach_msg_return_t mach_msg(
			mach_msg_header_t *msg,
			mach_msg_option_t option,
			mach_msg_size_t send_size,
			mach_msg_size_t rcv_size,
			mach_port_name_t rcv_name,
			mach_msg_timeout_t timeout,
			mach_port_name_t notify);
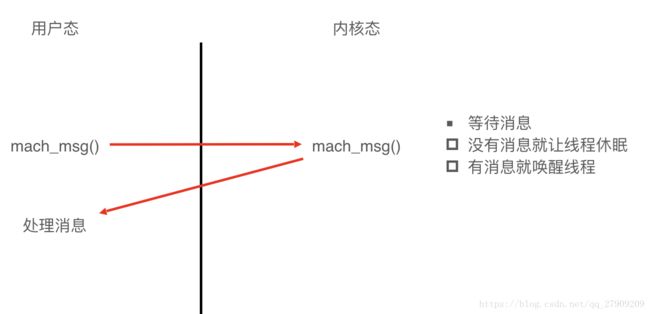
为了实现消息的发送和接收,mach_msg() 函数实际上是调用了一个 Mach 陷阱 (trap),即函数mach_msg_trap(),陷阱这个概念在 Mach 中等同于系统调用。当你在用户态调用 mach_msg_trap() 时会触发陷阱机制,切换到内核态;内核态中内核实现的 mach_msg() 函数会完成实际的工作,如下图:![]()
这些概念可以参考维基百科: System_call、Trap_(computing)。
开始睡觉 就是休眠 意味着:线程阻塞,不会往下走。cpu就不会给给资源。
实现方式 while(1)也可以实现阻塞,但是当前线程没有休息,一直在执行代码,这种不叫休眠。而runloop的那种是什么事情都不会做,真正的休息了。那如何做到呢
__CFRunLoopServiceMachPort
要达到睡觉,只有内核(操作系统)层面的才能达到。
// 内核层面API(一般不开放) 应用层面API(我们程序员用的)
休眠的 实现原理
static Boolean __CFRunLoopServiceMachPort(mach_port_name_t port, mach_msg_header_t **buffer, size_t buffer_size, mach_port_t *livePort, mach_msg_timeout_t timeout, voucher_mach_msg_state_t *voucherState, voucher_t *voucherCopy) {
    Boolean originalBuffer = true;
    kern_return_t ret = KERN_SUCCESS;
    for (;;) {		/* In that sleep of death what nightmares may come ... */

...
        if (TIMEOUT_INFINITY == timeout) { CFRUNLOOP_SLEEP(); } else { CFRUNLOOP_POLL(); }
        // mach_msg 比较底层的函数
        ret = mach_msg(msg, MACH_RCV_MSG|(voucherState ? MACH_RCV_VOUCHER : 0)|MACH_RCV_LARGE|((TIMEOUT_INFINITY != timeout) ? MACH_RCV_TIMEOUT : 0)|MACH_RCV_TRAILER_TYPE(MACH_MSG_TRAILER_FORMAT_0)|MACH_RCV_TRAILER_ELEMENTS(MACH_RCV_TRAILER_AV), 0, msg->msgh_size, port, timeout, MACH_PORT_NULL);

        // Take care of all voucher-related work right after mach_msg.
        // If we don't release the previous voucher we're going to leak it.
        voucher_mach_msg_revert(*voucherState);

        // Someone will be responsible for calling voucher_mach_msg_revert. This call makes the received voucher the current one.
        *voucherState = voucher_mach_msg_adopt(msg);
...

    }
    HALT;
    return false;
}
RunLoop 的核心就是一个 mach_msg() (见上面代码的第7步),RunLoop 调用这个函数去接收消息,如果没有别人发送 port 消息过来,内核会将线程置于等待状态。例如你在模拟器里跑起一个 iOS 的 App,然后在 App 静止时点击暂停,你会看到主线程调用栈是停留在 mach_msg_trap() 这个地方。
关于具体的如何利用 mach port 发送信息,可以看看 NSHipster 这一篇文章,或者这里的中文翻译 。
关于Mach的历史可以看看这篇很有趣的文章:Mac OS X 背后的故事(三)Mach 之父 Avie Tevanian。
六:苹果用 RunLoop 实现的功能
AutoreleasePool
App启动后,苹果在主线程 RunLoop 里注册了两个 Observer,其回调都是 _wrapRunLoopWithAutoreleasePoolHandler()。
第一个 Observer 监视的事件是 Entry(即将进入Loop),其回调内会调用 _objc_autoreleasePoolPush() 创建自动释放池。其 order 是-2147483647,优先级最高,保证创建释放池发生在其他所有回调之前。
第二个 Observer 监视了两个事件: BeforeWaiting(准备进入休眠) 时调用_objc_autoreleasePoolPop() 和 _objc_autoreleasePoolPush() 释放旧的池并创建新池;Exit(即将退出Loop) 时调用 _objc_autoreleasePoolPop() 来释放自动释放池。这个 Observer 的 order 是 2147483647,优先级最低,保证其释放池子发生在其他所有回调之后。
在主线程执行的代码,通常是写在诸如事件回调、Timer回调内的。这些回调会被 RunLoop 创建好的 AutoreleasePool 环绕着,所以不会出现内存泄漏,开发者也不必显示创建 Pool 了。
事件响应
苹果注册了一个 Source1 (基于 mach port 的) 用来接收系统事件,其回调函数为 __IOHIDEventSystemClientQueueCallback()。
当一个硬件事件(触摸/锁屏/摇晃等)发生后,首先由 IOKit.framework 生成一个 IOHIDEvent 事件并由 SpringBoard 接收。这个过程的详细情况可以参考这里。SpringBoard 只接收按键(锁屏/静音等),触摸,加速,接近传感器等几种 Event,随后用 mach port 转发给需要的App进程。随后苹果注册的那个 Source1 就会触发回调,并调用 _UIApplicationHandleEventQueue() 进行应用内部的分发。
_UIApplicationHandleEventQueue() 会把 IOHIDEvent 处理并包装成 UIEvent 进行处理或分发,其中包括识别 UIGesture/处理屏幕旋转/发送给 UIWindow 等。通常事件比如 UIButton 点击、touchesBegin/Move/End/Cancel 事件都是在这个回调中完成的。
手势识别
当上面的 _UIApplicationHandleEventQueue() 识别了一个手势时,其首先会调用 Cancel 将当前的 touchesBegin/Move/End 系列回调打断。随后系统将对应的 UIGestureRecognizer 标记为待处理。
苹果注册了一个 Observer 监测 BeforeWaiting (Loop即将进入休眠) 事件,这个Observer的回调函数是 _UIGestureRecognizerUpdateObserver(),其内部会获取所有刚被标记为待处理的 GestureRecognizer,并执行GestureRecognizer的回调。
当有 UIGestureRecognizer 的变化(创建/销毁/状态改变)时,这个回调都会进行相应处理。
界面更新
当在操作 UI 时,比如改变了 Frame、更新了 UIView/CALayer 的层次时,或者手动调用了 UIView/CALayer 的 setNeedsLayout/setNeedsDisplay方法后,这个 UIView/CALayer 就被标记为待处理,并被提交到一个全局的容器去。
苹果注册了一个 Observer 监听 BeforeWaiting(即将进入休眠) 和 Exit (即将退出Loop) 事件,回调去执行一个很长的函数:
_ZN2CA11Transaction17observer_callbackEP19__CFRunLoopObservermPv()。这个函数里会遍历所有待处理的 UIView/CAlayer 以执行实际的绘制和调整,并更新 UI 界面。
这个函数内部的调用栈大概是这样的:
_ZN2CA11Transaction17observer_callbackEP19__CFRunLoopObservermPv()
    QuartzCore:CA::Transaction::observer_callback:
        CA::Transaction::commit();
            CA::Context::commit_transaction();
                CA::Layer::layout_and_display_if_needed();
                    CA::Layer::layout_if_needed();
                        [CALayer layoutSublayers];
                            [UIView layoutSubviews];
                    CA::Layer::display_if_needed();
                        [CALayer display];
                            [UIView drawRect];
定时器
NSTimer 其实就是 CFRunLoopTimerRef,他们之间是 toll-free bridged 的。一个 NSTimer 注册到 RunLoop 后,RunLoop 会为其重复的时间点注册好事件。例如 10:00, 10:10, 10:20 这几个时间点。RunLoop为了节省资源,并不会在非常准确的时间点回调这个Timer。Timer 有个属性叫做 Tolerance (宽容度),标示了当时间点到后,容许有多少最大误差。
如果某个时间点被错过了,例如执行了一个很长的任务,则那个时间点的回调也会跳过去,不会延后执行。就比如等公交,如果 10:10 时我忙着玩手机错过了那个点的公交,那我只能等 10:20 这一趟了。
CADisplayLink 是一个和屏幕刷新率一致的定时器(但实际实现原理更复杂,和 NSTimer 并不一样,其内部实际是操作了一个 Source)。如果在两次屏幕刷新之间执行了一个长任务,那其中就会有一帧被跳过去(和 NSTimer 相似),造成界面卡顿的感觉。在快速滑动TableView时,即使一帧的卡顿也会让用户有所察觉。Facebook 开源的 AsyncDisplayLink 就是为了解决界面卡顿的问题,其内部也用到了 RunLoop,这个稍后我会再单独写一页博客来分析。
PerformSelecter
当调用 NSObject 的 performSelecter:afterDelay: 后,实际上其内部会创建一个 Timer 并添加到当前线程的 RunLoop 中。所以如果当前线程没有 RunLoop,则这个方法会失效。
当调用 performSelector:onThread: 时,实际上其会创建一个 Timer 加到对应的线程去,同样的,如果对应线程没有 RunLoop 该方法也会失效。
+ (id)performSelector:(SEL)sel {
    if (!sel) [self doesNotRecognizeSelector:sel];
    return ((id(*)(id, SEL))objc_msgSend)((id)self, sel);
}

+ (id)performSelector:(SEL)sel withObject:(id)obj {
    if (!sel) [self doesNotRecognizeSelector:sel];
    return ((id(*)(id, SEL, id))objc_msgSend)((id)self, sel, obj);
}

+ (id)performSelector:(SEL)sel withObject:(id)obj1 withObject:(id)obj2 {
    if (!sel) [self doesNotRecognizeSelector:sel];
    return ((id(*)(id, SEL, id, id))objc_msgSend)((id)self, sel, obj1, obj2);
}

- (id)performSelector:(SEL)sel {
    if (!sel) [self doesNotRecognizeSelector:sel];
    return ((id(*)(id, SEL))objc_msgSend)(self, sel);
}

- (id)performSelector:(SEL)sel withObject:(id)obj {
    if (!sel) [self doesNotRecognizeSelector:sel];
    return ((id(*)(id, SEL, id))objc_msgSend)(self, sel, obj);
}

- (id)performSelector:(SEL)sel withObject:(id)obj1 withObject:(id)obj2 {
    if (!sel) [self doesNotRecognizeSelector:sel];
    return ((id(*)(id, SEL, id, id))objc_msgSend)(self, sel, obj1, obj2);
}
而 performSelector: withObject: afterDelay: 这个需要注意 带有afterDelay的都是跟runloop有关的,这个底层用到了NSTimer。这里分不清的需要看一下timer的作用。
主线程几乎所有的事情都是交给了runloop去做,比如UI界面的刷新、点击时间的处理、performSelector等等
不是所有的代码都是交给runloop去做的,比如:打印不是runloop去做的。
关于GCD
实际上 RunLoop 底层也会用到 GCD 的东西,比如 RunLoop 是用 dispatch_source_t 实现的 Timer(评论中有人提醒,NSTimer 是用了 XNU 内核的 mk_timer,我也仔细调试了一下,发现 NSTimer 确实是由 mk_timer 驱动,而非 GCD 驱动的)。但同时 GCD 提供的某些接口也用到了 RunLoop, 例如 dispatch_async()。
当调用 dispatch_async(dispatch_get_main_queue(), block) 时,libDispatch 会向主线程的 RunLoop 发送消息,RunLoop会被唤醒,并从消息中取得这个 block,并在回调 __CFRUNLOOP_IS_SERVICING_THE_MAIN_DISPATCH_QUEUE__() 里执行这个 block。但这个逻辑仅限于 dispatch 到主线程,dispatch 到其他线程仍然是由 libDispatch 处理的。
关于网络请求
iOS 中,关于网络请求的接口自下至上有如下几层:
CFSocket
CFNetwork       ->ASIHttpRequest
NSURLConnection ->AFNetworking
NSURLSession    ->AFNetworking2, Alamofire
• CFSocket 是最底层的接口,只负责 socket 通信。
• CFNetwork 是基于 CFSocket 等接口的上层封装,ASIHttpRequest 工作于这一层。
• NSURLConnection 是基于 CFNetwork 的更高层的封装,提供面向对象的接口,AFNetworking 工作于这一层。
• NSURLSession 是 iOS7 中新增的接口,表面上是和 NSURLConnection 并列的,但底层仍然用到了 NSURLConnection 的部分功能 (比如 com.apple.NSURLConnectionLoader 线程),AFNetworking2 和 Alamofire 工作于这一层。
下面主要介绍下 NSURLConnection 的工作过程。
通常使用 NSURLConnection 时,你会传入一个 Delegate,当调用了 [connection start] 后,这个 Delegate 就会不停收到事件回调。实际上,start 这个函数的内部会会获取 CurrentRunLoop,然后在其中的 DefaultMode 添加了4个 Source0 (即需要手动触发的Source)。CFMultiplexerSource 是负责各种 Delegate 回调的,CFHTTPCookieStorage 是处理各种 Cookie 的。
当开始网络传输时,我们可以看到 NSURLConnection 创建了两个新线程:com.apple.NSURLConnectionLoader 和 com.apple.CFSocket.private。其中 CFSocket 线程是处理底层 socket 连接的。NSURLConnectionLoader 这个线程内部会使用 RunLoop 来接收底层 socket 的事件,并通过之前添加的 Source0 通知到上层的 Delegate。
![]()
NSURLConnectionLoader 中的 RunLoop 通过一些基于 mach port 的 Source 接收来自底层 CFSocket 的通知。当收到通知后,其会在合适的时机向 CFMultiplexerSource 等 Source0 发送通知,同时唤醒 Delegate 线程的 RunLoop 来让其处理这些通知。CFMultiplexerSource 会在 Delegate 线程的 RunLoop 对 Delegate 执行实际的回调。
七:RunLoop在实际开中的应用
a、控制线程生命周期(线程保活,耗时操作,子线程的事情做完了就会自动销毁,不希望早挂掉,就可以用runloop控制生命周期)
b、解决NSTimer在滑动时停止工作的问题(在滚动时,nstimer会失效)
c、监控应用卡顿
d、性能优化
b、首先讲定时器失效的问题
因为定时器是在默认模式下工作,不是在UITrackingRunLoopMode模式下工作
可以自己写一个定时器 然后滚动页面 可以看到定时器停止了。
 [NSTimer scheduledTimerWithTimeInterval:1.0 repeats:YES block:^(NSTimer * _Nonnull timer) {
        NSLog(@"%d", ++count);
    }];
带有scheduledTimer的方法,就会默认直接将nstimer对象添加到默认模式,如果自己想添加的话可以用下面的这种
- (void)viewDidLoad {
    [super viewDidLoad];

    static int count = 0;
    NSTimer *timer = [NSTimer timerWithTimeInterval:1.0 repeats:YES block:^(NSTimer * _Nonnull timer) {
        NSLog(@"%d", ++count);
    }];
//    [[NSRunLoop currentRunLoop] addTimer:timer forMode:NSDefaultRunLoopMode];
//    [[NSRunLoop currentRunLoop] addTimer:timer forMode:UITrackingRunLoopMode];

    // NSDefaultRunLoopMode、UITrackingRunLoopMode才是真正存在的模式
    // NSRunLoopCommonModes并不是一个真的模式,它只是一个标记
    // timer能在_commonModes数组中存放的模式下工作
    [[NSRunLoop currentRunLoop] addTimer:timer forMode:NSRunLoopCommonModes];
}
如果填写的是NSRunLoopCommonModes,就是告诉runloop会运行到下面结构体的_commonModes这个数组中的模式(上面一个源码中,我们也看到了,可以向上翻),而这个数组恰好装着NSDefaultRunLoopMode和UITrackingRunLoopMode两个,也就是标记为通用的模式,所以就是可以运行到两种模式下。平时runloop会切换到你传入两种模式的任何一个模式,但是你传入common,也就是会到commonModes数组下的模式,数组中有两个模式,所以两个模式下都可以运行。而common并不是一种模式。
timer被标记为NSRunLoopCommonModes,那么能在commonModes模式工作,那这个timer就会被放到commonModeItems里面去(因为平常的模式都有对应的modes)。
从流程上说,timer可以唤醒runloop,这样就开始处理timer了。
struct __CFRunLoop {
    CFRuntimeBase _base;
    pthread_mutex_t _lock;			/* locked for accessing mode list */
    __CFPort _wakeUpPort;			// used for CFRunLoopWakeUp
    Boolean _unused;
    volatile _per_run_data *_perRunData;              // reset for runs of the run loop
    pthread_t _pthread;            // 线程对象
    uint32_t _winthread;
    CFMutableSetRef _commonModes;  // 这是有common标记的
    CFMutableSetRef _commonModeItems;
    CFRunLoopModeRef _currentMode; // 当前是什么模式
    CFMutableSetRef _modes;        // set是一个无序集合:一堆CFRunLoopModeRef对象
    struct _block_item *_blocks_head;
    struct _block_item *_blocks_tail;
    CFAbsoluteTime _runTime;
    CFAbsoluteTime _sleepTime;
    CFTypeRef _counterpart;
};
a、控制线程生命周期(线程保活,AFNetWorking2.X)
任务可以接受串行,不是并发的,可以采用这种方式来做,因为任务都是交给一个线程来做的(并发没有意义)。
控制子线程声明周期,让子线程一直在内存中,这样的好处是 经常要在子线程中处理事情。
子线程的特点:做完自己的事情,直接挂掉,我们现在不希望它立刻挂掉。
在当前线程获取runloop就自动创建好runloop了。[NSRunLoop currentRunLoop]
还需要注意:如果Mode里没有任何Source0/Source1/Timer/Observer,RunLoop会立马退出
port就是source1。port对象可以随便写。所以可以下面方式做, 在run中就不会死掉,真正想让做的事情是在某个时刻做test方法。
#import

@interface MJThread : NSThread

@end
#import "MJThread.h"

@implementation MJThread

- (void)dealloc
{
    NSLog(@"%s", __func__);
}

@end

#import "ViewController.h"
#import "MJThread.h"

@interface ViewController ()
@property (strong, nonatomic) MJThread *thread;
@end

@implementation ViewController

- (void)viewDidLoad {
    [super viewDidLoad];

    self.thread = [[MJThread alloc] initWithTarget:self selector:@selector(run) object:nil];
    [self.thread start];
}

- (void)touchesBegan:(NSSet *)touches withEvent:(UIEvent *)event
{
    [self performSelector:@selector(test) onThread:self.thread withObject:nil waitUntilDone:NO];
}

// 子线程需要执行的任务
- (void)test
{
    NSLog(@"%s %@", __func__, [NSThread currentThread]);
}

// 这个方法的目的:线程保活
- (void)run {
    NSLog(@"%s %@", __func__, [NSThread currentThread]);

    // 往RunLoop里面添加Source\Timer\Observer
    [[NSRunLoop currentRunLoop] addPort:[[NSPort alloc] init] forMode:NSDefaultRunLoopMode];
    [[NSRunLoop currentRunLoop] run];

    NSLog(@"%s ----end----", __func__); // 所以一直不会执行这一行
}

@end
2018-09-27 10:34:56.829966+0800 Interview03-线程保活[1888:120690] -[ViewController run] {number = 3, name = (null)}
2018-09-27 10:35:16.747305+0800 Interview03-线程保活[1888:120690] -[ViewController test] {number = 3, name = (null)}
2018-09-27 10:35:17.561778+0800 Interview03-线程保活[1888:120690] -[ViewController test] {number = 3, name = (null)}
2018-09-27 10:35:19.930440+0800 Interview03-线程保活[1888:120690] -[ViewController test] {number = 3, name = (null)}
上面有一个问题就是:target强引用这控制器,控制器不会销毁,线程也不会销毁,因为rubloop的任务一直没结束。
实现
#import "ViewController.h"
#import "MJThread.h"

@interface ViewController ()
@property (strong, nonatomic) MJThread *thread; // 假设希望这个线程跟随控制器
@property (assign, nonatomic, getter=isStoped) BOOL stopped;
@end

@implementation ViewController

- (void)viewDidLoad {
    [super viewDidLoad];

    __weak typeof(self) weakSelf = self;

    self.stopped = NO;
    self.thread = [[MJThread alloc] initWithBlock:^{
        NSLog(@"%@----begin----", [NSThread currentThread]);

        // 往RunLoop里面添加Source\Timer\Observer
        [[NSRunLoop currentRunLoop] addPort:[[NSPort alloc] init] forMode:NSDefaultRunLoopMode];
        while (!weakSelf.isStoped) {
            // beforeData:超时     distantFuture:遥远的未来
            // 一旦执行完任务,runloop就退出了。
            [[NSRunLoop currentRunLoop] runMode:NSDefaultRunLoopMode beforeDate:[NSDate distantFuture]];
        }

        NSLog(@"%@----end----", [NSThread currentThread]);

        // NSRunLoop的run方法是无法停止的,它专门用于开启一个永不销毁的线程(NSRunLoop)
//                [[NSRunLoop currentRunLoop] run];
        /*
         it runs the receiver in the NSDefaultRunLoopMode by repeatedly invoking runMode:beforeDate:.
         In other words, this method effectively begins an infinite(无限的) loop that processes data from the run loop’s input sources and timers
         */

    }];
    [self.thread start];
}

- (void)touchesBegan:(NSSet *)touches withEvent:(UIEvent *)event
{
    [self performSelector:@selector(test) onThread:self.thread withObject:nil waitUntilDone:NO];
NSLog(@"如果上面是NO,则不会等上面的子线程执行完,就先执行这个打印");
}

// 子线程需要执行的任务
- (void)test
{
    NSLog(@"%s %@", __func__, [NSThread currentThread]);
}

- (IBAction)stop {
    // 在子线程调用stop
    [self performSelector:@selector(stopThread) onThread:self.thread withObject:nil waitUntilDone:NO];
}

// 用于停止子线程的RunLoop
- (void)stopThread
{
    // 设置标记为YES
    self.stopped = YES;

    // 停止RunLoop
    CFRunLoopStop(CFRunLoopGetCurrent());
    NSLog(@"%s %@", __func__, [NSThread currentThread]);
}

- (void)dealloc
{
    NSLog(@"%s", __func__);

//    [self stop];
}

@end
2018-09-27 11:19:28.051542+0800 Interview03-线程保活[2280:165391] {number = 5, name = (null)}----begin----
2018-09-27 11:19:30.032698+0800 Interview03-线程保活[2280:165391] -[ViewController test] {number = 5, name = (null)}
2018-09-27 11:19:30.584124+0800 Interview03-线程保活[2280:165391] -[ViewController test] {number = 5, name = (null)}
2018-09-27 11:19:31.045202+0800 Interview03-线程保活[2280:165391] -[ViewController test] {number = 5, name = (null)}
2018-09-27 11:19:31.922878+0800 Interview03-线程保活[2280:165391] -[ViewController test] {number = 5, name = (null)}
2018-09-27 11:19:32.901617+0800 Interview03-线程保活[2280:165391] -[ViewController stopThread] {number = 5, name = (null)}
2018-09-27 11:19:32.901958+0800 Interview03-线程保活[2280:165391] {number = 5, name = (null)}----end----
如果想让控制器销毁 runloop也销毁,则在dealloc里打开stop方法: 但是打开后就崩溃了,原因:waitUntilDone:NO 这个参数
这个代表不等了,不等这个子线程执行方法,而主线程依然往下走,是两条路。而当主线程直接走下去,而这个stop函数就结束了,所以dealloc就结束了,控制器就挂掉了,而与此同时,这个子线程在执行stropThread方法,这个方法是控制器的方法,还要执行控制器的属性啥的,引用是runloop在处理这个子线程的访问。
performSelector:onThread:底层就是通过子线程的runloop去执行的。[self performSelector:@selector(stopThread) onThread:self.thread withObject:nil waitUntilDone:YES];这个perform是执行stopThread方法到self.thread这个线程,那就是给这个线程发一个消息,就相当于是基于port的概念,要基于runloop去处理的,所以也就是说这个runloop在处理这个perform的时候出问题了,因为runloop内部在处理performselector的时候需要拿到控制器对象来调用stopThread做事情,但是控制器已经销毁了,所以就发生了坏内存访问。所以这个坏内存指的是控制器坏掉了。所以就需要设置为YES,代表让子线程代码执行完毕后才会往下走。但是仅仅设置为YES,又会发生另外一个问题,也就是weakSelf提前释放的问题。当控制器退出的时候,weakself指向的对象销毁了,所以weakself就会被释放掉,这个时候
while ( !weakSelf.isStoped) {
[[NSRunLoop currentRunLoop] runMode:NSDefaultRunLoopMode beforeDate:[NSDate distantFuture]];
}
这个就是空的也就是NO,取反就是YES,所以就又会进入while循环重新runloop,所以会看到一直打印不了end,所以线程也释放不了。
看解决方案,判断一下weakself,判断必须有值,
#import "ViewController.h"
#import "MJThread.h"

@interface ViewController ()
@property (strong, nonatomic) MJThread *thread;
@property (assign, nonatomic, getter=isStoped) BOOL stopped;
@end

@implementation ViewController

- (void)viewDidLoad {
    [super viewDidLoad];

    __weak typeof(self) weakSelf = self;

    self.stopped = NO;
    self.thread = [[MJThread alloc] initWithBlock:^{
        NSLog(@"%@----begin----", [NSThread currentThread]);

        // 往RunLoop里面添加Source\Timer\Observer
        [[NSRunLoop currentRunLoop] addPort:[[NSPort alloc] init] forMode:NSDefaultRunLoopMode];

        while ( weakSelf  && !weakSelf.isStoped) {
            [[NSRunLoop currentRunLoop] runMode:NSDefaultRunLoopMode beforeDate:[NSDate distantFuture]];
        }

        NSLog(@"%@----end----", [NSThread currentThread]);
    }];
    [self.thread start];
}

- (void)touchesBegan:(NSSet *)touches withEvent:(UIEvent *)event
{
    [self performSelector:@selector(test) onThread:self.thread withObject:nil waitUntilDone:NO];
}

// 子线程需要执行的任务
- (void)test
{
    NSLog(@"%s %@", __func__, [NSThread currentThread]);
}

- (IBAction)stop {

    // 在子线程调用stop(waitUntilDone设置为YES,代表子线程的代码执行完毕后,这个方法才会往下走)
    [self performSelector:@selector(stopThread) onThread:self.thread withObject:nil waitUntilDone:YES];
}

// 用于停止子线程的RunLoop
- (void)stopThread
{
    // 设置标记为YES
    self.stopped = YES;

    // 停止RunLoop
    CFRunLoopStop(CFRunLoopGetCurrent());
    NSLog(@"%s %@", __func__, [NSThread currentThread]);

}

- (void)dealloc
{
    NSLog(@"%s", __func__);

    [self stop];
}

@end
但是又发现一个问题,就是点击页面,停止,会崩溃看下图
发生上述的原因是因为:进来 点击 然后停止之后,就已经把runloop停止掉了,而且线程已经是空的了,当退出控制器的时候,会再次调用stop,再调用这个方法,因为线程已经是空的了,所以就会爆坏内存访问。所以修改如下:把线程置位空,并且判断一下
//
//  ViewController.m
//  Interview03-线程保活
//
//  Created by MJ Lee on 2018/6/3.
//  Copyright © 2018年 MJ Lee. All rights reserved.
//

#import "ViewController.h"
#import "MJThread.h"

@interface ViewController ()
@property (strong, nonatomic) MJThread *thread;
@property (assign, nonatomic, getter=isStoped) BOOL stopped;
@end

@implementation ViewController

- (void)viewDidLoad {
    [super viewDidLoad];

    __weak typeof(self) weakSelf = self;

    self.stopped = NO;
    self.thread = [[MJThread alloc] initWithBlock:^{
        NSLog(@"%@----begin----", [NSThread currentThread]);

        // 往RunLoop里面添加Source\Timer\Observer
        [[NSRunLoop currentRunLoop] addPort:[[NSPort alloc] init] forMode:NSDefaultRunLoopMode];

        while (weakSelf && !weakSelf.isStoped) {
            [[NSRunLoop currentRunLoop] runMode:NSDefaultRunLoopMode beforeDate:[NSDate distantFuture]];
        }

        NSLog(@"%@----end----", [NSThread currentThread]);
    }];
    [self.thread start];
}

- (void)touchesBegan:(NSSet *)touches withEvent:(UIEvent *)event
{
    if (!self.thread) return;
    [self performSelector:@selector(test) onThread:self.thread withObject:nil waitUntilDone:NO];
}

// 子线程需要执行的任务
- (void)test
{
    NSLog(@"%s %@", __func__, [NSThread currentThread]);
}

- (IBAction)stop {
    if (!self.thread) return;

    // 在子线程调用stop(waitUntilDone设置为YES,代表子线程的代码执行完毕后,这个方法才会往下走)
    [self performSelector:@selector(stopThread) onThread:self.thread withObject:nil waitUntilDone:YES];
}

// 用于停止子线程的RunLoop
- (void)stopThread
{
    // 设置标记为YES
    self.stopped = YES;

    // 停止RunLoop
    CFRunLoopStop(CFRunLoopGetCurrent());
    NSLog(@"%s %@", __func__, [NSThread currentThread]);

    // 清空线程
    self.thread = nil;
}

- (void)dealloc
{
    NSLog(@"%s", __func__);

    [self stop];
}

@end
用起来比较麻烦,现在封装起来
#import

typedef void (^MJPermenantThreadTask)(void);

@interface MJPermenantThread : NSObject

/**
 开启线程
 */
//- (void)run;

/**
 在当前子线程执行一个任务
 */
- (void)executeTask:(MJPermenantThreadTask)task;

/**
 结束线程
 */
- (void)stop;

@end
#import "MJPermenantThread.h"

/** MJThread **/
@interface MJThread : NSThread
@end
@implementation MJThread
- (void)dealloc
{
    NSLog(@"%s", __func__);
}
@end

/** MJPermenantThread **/
@interface MJPermenantThread()
@property (strong, nonatomic) MJThread *innerThread;
@property (assign, nonatomic, getter=isStopped) BOOL stopped;
@end

@implementation MJPermenantThread
#pragma mark - public methods
- (instancetype)init
{
    if (self = [super init]) {
        self.stopped = NO;

        __weak typeof(self) weakSelf = self;

        self.innerThread = [[MJThread alloc] initWithBlock:^{
            [[NSRunLoop currentRunLoop] addPort:[[NSPort alloc] init] forMode:NSDefaultRunLoopMode];

            while (weakSelf && !weakSelf.isStopped) {
                [[NSRunLoop currentRunLoop] runMode:NSDefaultRunLoopMode beforeDate:[NSDate distantFuture]];
            }
        }];

        [self.innerThread start];
    }
    return self;
}

//- (void)run
//{
//    if (!self.innerThread) return;
//
//    [self.innerThread start];
//}

- (void)executeTask:(MJPermenantThreadTask)task
{
    if (!self.innerThread || !task) return;

    [self performSelector:@selector(__executeTask:) onThread:self.innerThread withObject:task waitUntilDone:NO];
}

- (void)stop
{
    if (!self.innerThread) return;

    [self performSelector:@selector(__stop) onThread:self.innerThread withObject:nil waitUntilDone:YES];
}

- (void)dealloc
{
    NSLog(@"%s", __func__);

    [self stop];
}

#pragma mark - private methods
- (void)__stop
{
    self.stopped = YES;
    CFRunLoopStop(CFRunLoopGetCurrent());
    self.innerThread = nil;
}

- (void)__executeTask:(MJPermenantThreadTask)task
{
    task();
}

@end
调用
#import "ViewController.h"
#import "MJPermenantThread.h"

@interface ViewController ()
@property (strong, nonatomic) MJPermenantThread *thread;
@end

@implementation ViewController

- (void)viewDidLoad {
    [super viewDidLoad];

    self.thread = [[MJPermenantThread alloc] init];
}

- (void)touchesBegan:(NSSet *)touches withEvent:(UIEvent *)event
{
    [self.thread executeTask:^{
        NSLog(@"执行任务 - %@", [NSThread currentThread]);
    }];
}

- (IBAction)stop {
    [self.thread stop];
}

- (void)dealloc
{
    NSLog(@"%s", __func__);
}

@end
当然也可以用c语言的来写
- (instancetype)init
{
    if (self = [super init]) {
        self.innerThread = [[MJThread alloc] initWithBlock:^{
            NSLog(@"begin----");

            // 创建上下文(要初始化一下结构体)
            CFRunLoopSourceContext context = {0};

            // 创建source
            CFRunLoopSourceRef source = CFRunLoopSourceCreate(kCFAllocatorDefault, 0, &context);

            // 往Runloop中添加source
            CFRunLoopAddSource(CFRunLoopGetCurrent(), source, kCFRunLoopDefaultMode);

            // 销毁source
            CFRelease(source);

            // 启动
            CFRunLoopRunInMode(kCFRunLoopDefaultMode, 1.0e10, false);

//            while (weakSelf && !weakSelf.isStopped) {
//                // 第3个参数:returnAfterSourceHandled,设置为true,代表执行完source后就会退出当前loop
//                CFRunLoopRunInMode(kCFRunLoopDefaultMode, 1.0e10, true);
//            }

            NSLog(@"end----");
        }];

        [self.innerThread start];
    }
    return self;
}
看一下
AFNetworking
AFURLConnectionOperation 这个类是基于 NSURLConnection 构建的,其希望能在后台线程接收 Delegate 回调。为此 AFNetworking 单独创建了一个线程,并在这个线程中启动了一个 RunLoop:
+ (void)networkRequestThreadEntryPoint:(id)__unused object {
    @autoreleasepool {
        [[NSThread currentThread] setName:@"AFNetworking"];
        NSRunLoop *runLoop = [NSRunLoop currentRunLoop];
        [runLoop addPort:[NSMachPort port] forMode:NSDefaultRunLoopMode];
        [runLoop run];
    }
}

+ (NSThread *)networkRequestThread {
    static NSThread *_networkRequestThread = nil;
    static dispatch_once_t oncePredicate;
    dispatch_once(&oncePredicate, ^{
        _networkRequestThread = [[NSThread alloc] initWithTarget:self selector:@selector(networkRequestThreadEntryPoint:) object:nil];
        [_networkRequestThread start];
    });
    return _networkRequestThread;
}
RunLoop 启动前内部必须要有至少一个 Timer/Observer/Source,所以 AFNetworking 在 [runLoop run] 之前先创建了一个新的 NSMachPort 添加进去了。通常情况下,调用者需要持有这个 NSMachPort (mach_port) 并在外部线程通过这个 port 发送消息到 loop 内;但此处添加 port 只是为了让 RunLoop 不至于退出,并没有用于实际的发送消息。
- (void)start {
    [self.lock lock];
    if ([self isCancelled]) {
        [self performSelector:@selector(cancelConnection) onThread:[[self class] networkRequestThread] withObject:nil waitUntilDone:NO modes:[self.runLoopModes allObjects]];
    } else if ([self isReady]) {
        self.state = AFOperationExecutingState;
        [self performSelector:@selector(operationDidStart) onThread:[[self class] networkRequestThread] withObject:nil waitUntilDone:NO modes:[self.runLoopModes allObjects]];
    }
    [self.lock unlock];
}
当需要这个后台线程执行任务时,AFNetworking 通过调用 [NSObject performSelector:onThread:..] 将这个任务扔到了后台线程的 RunLoop 中
AsyncDisplayKit
AsyncDisplayKit 是 Facebook 推出的用于保持界面流畅性的框架,其原理大致如下:
UI 线程中一旦出现繁重的任务就会导致界面卡顿,这类任务通常分为3类:排版,绘制,UI对象操作。
排版通常包括计算视图大小、计算文本高度、重新计算子式图的排版等操作。
绘制一般有文本绘制 (例如 CoreText)、图片绘制 (例如预先解压)、元素绘制 (Quartz)等操作。
UI对象操作通常包括 UIView/CALayer 等 UI 对象的创建、设置属性和销毁。
其中前两类操作可以通过各种方法扔到后台线程执行,而最后一类操作只能在主线程完成,并且有时后面的操作需要依赖前面操作的结果 (例如TextView创建时可能需要提前计算出文本的大小)。ASDK 所做的,就是尽量将能放入后台的任务放入后台,不能的则尽量推迟 (例如视图的创建、属性的调整)。
为此,ASDK 创建了一个名为 ASDisplayNode 的对象,并在内部封装了 UIView/CALayer,它具有和 UIView/CALayer 相似的属性,例如 frame、backgroundColor等。所有这些属性都可以在后台线程更改,开发者可以只通过 Node 来操作其内部的 UIView/CALayer,这样就可以将排版和绘制放入了后台线程。但是无论怎么操作,这些属性总需要在某个时刻同步到主线程的 UIView/CALayer 去。
ASDK 仿照 QuartzCore/UIKit 框架的模式,实现了一套类似的界面更新的机制:即在主线程的 RunLoop 中添加一个 Observer,监听了 kCFRunLoopBeforeWaiting 和 kCFRunLoopExit 事件,在收到回调时,遍历所有之前放入队列的待处理的任务,然后一一执行。
具体的代码可以看这里:_ASAsyncTransactionGroup。
八:面试题
runloop如何响应用户操作的,具体流程是什么样的
首先是由source1来把系统事件捕捉,也就是你一点击屏幕,这个就是一个source1事件,source1会把它包装成一个事件队列EventQueue, 这个事件队列又在source0里面处理,是先由source1捕捉,再由source0去处理。
线程和runloop的关系?
一条线程对应一个runloop,默认情况下,线程的runloop是没有创建的,在第一次获取的时候创建runloop。
timer跟runloop的关系?
timer是运行在runloop里面的,runloop来控制timer什么时候执行。
runloop是如何响应用户操作的,具体流程
首先是由source1来捕捉触摸事件,再由source0去处理触摸事件。
线程的任务一旦执行完毕,生命周期就结束,无法再使用当前线程。
保住线程的命为什么要用runloop,用强指针不就好了么?
准确来讲,使用runloop是为了让线程保持激活状态
强指针指向,当任务执行完毕,这个线程还在内存中,它没有销毁,但是它不会处于激活状态,不能再做事情了。
部分转载参考自https://blog.ibireme.com/2015/05/18/runloop/
