树莓派python OpenCV捕获颜色块并通过串口返回坐标信息
树莓派python OpenCV捕获颜色块并通过串口返回坐标信息
- 树莓派python OpenCV捕获颜色块并通过串口返回坐标信息
- 介绍
- 开发环境
- 思路
- 代码
- 串口部分
- 图像处理部分
- 后续处理
树莓派python OpenCV捕获颜色块并通过串口返回坐标信息
介绍
该代码起初是用在无人机寻找彩色物体定位上面,在无人机上面挂载树莓派,借助树莓派的高运算能力和可拓展性来弥补飞控的不足。在摄像头通过USB接口挂载到树莓派上,借助OpenCV来进行图像处理,并通过串口发送彩色物体位置信息给飞控,以实现无人机的定位。实则代码可以用在其他任何场景。
开发环境
在Windows下通过pycharm pro通过SSH连接树莓派进行传输数据和调试程序。这样的好处是具有代码补全和提示功能,提高效率。
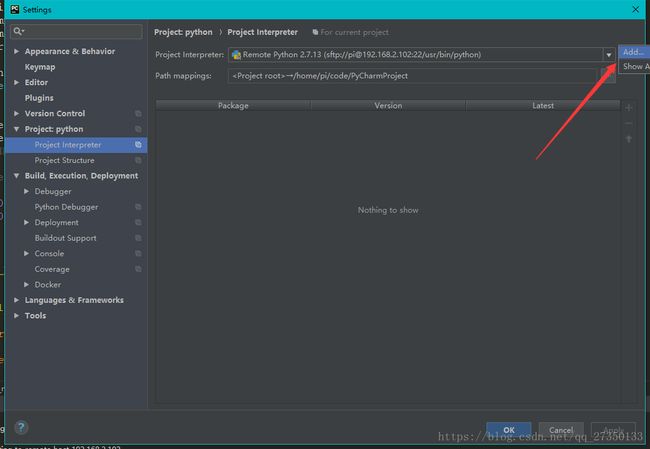
在pycharm pro工程里的setting找到project Interpreter选择add如图:

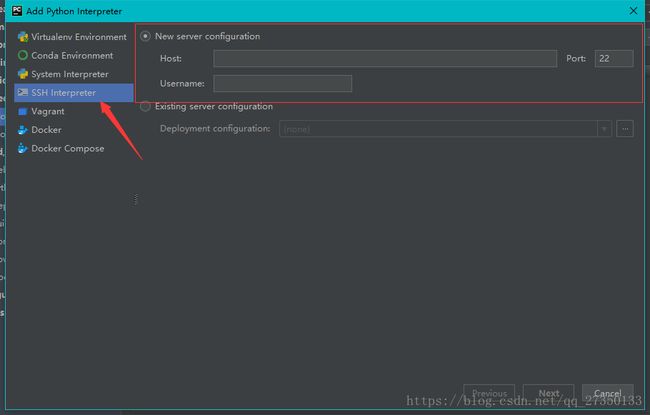
然后选择SSH Interpreter后输入Host 和 Username 点击下一步按照提示即可连接上树莓派。
在连接上树莓派后,它会从树莓派上下载python虚拟环境,需要一定的时间,下载完成后就可以像在树莓派上编写程序了。pyCharm很强大,在同步过后有很多实用 的功能值得去探索。包括代码同步,代码对比等等。
远程调试树莓派(PyCharm实现)
思路
首先从摄像头获取图像>择摄像头中心为ROI>缩小图像降低处理时间>转换为hsv颜色空间>提取出指定颜色(这里为蓝色)>灰度处理>二值化>膨胀消除内部干扰>找出重心>串口编码>发送坐标。
代码
串口部分
# -*- coding:utf-8 -*-

import serial
import time

# 串口配置
def serialConfig(port, buat):
    ser = serial.Serial(port, buat)
    ser.flushInput()
    ser.flushOutput()
    if ser.isOpen() is False:
        ser.open()
        return True, ser
    return True, ser


if __name__ == "__main__":
    isOpen, Ser = serialConfig("/dev/ttyAMA0", 9600)

    if isOpen is True:
        try:
            while True:
                size = Ser.inWaiting()  # 获得缓冲区字符
                if size != 0:
                    response = Ser.read(size)  # 读取内容并显示
                    print response
                    Ser.write(bytes(response))
                    Ser.flushOutput()
                    Ser.flushInput()  # 清空接收缓存区
                    time.sleep(0.2)  # 软件延时
        except KeyboardInterrupt:
            Ser.close()
    else:
        print("port false")
图像处理部分
# -*- coding:utf-8 -*-

import cv2
import tkinter
import numpy as np
import time
import SerialPort as sp

win = tkinter.Tk(':0.0')  # 指定输出设备,否则报错 必须加这一句 不然找不到显示设备将报错
cv2.setUseOptimized(True)  # 优化opencv

# 蓝色阈值
lower_blue = np.array([50, 50, 50])
upper_blue = np.array([130, 255, 255])
# 可以这样知道想要查找颜色对应的hsv空间
# green = np.uint8([[[0, 255, 0]]])
# hsv_green = cv2.cvtColor(green, cv2.COLOR_BGR2HSV)

lastCX = 0
lastCY = 0
cx = 0
cy = 0

def image_process(frame):
    global cx, cy
    global lastCY, lastCX
    times = cv2.getTickCount()

    hsv = cv2.cvtColor(frame, cv2.COLOR_BGR2HSV)

    mask = cv2.inRange(hsv, lower_blue, upper_blue)  # 得到蓝色掩模
    blue = cv2.bitwise_and(frame, frame, mask=mask)  # 位与
    gray = cv2.cvtColor(blue, cv2.COLOR_BGR2GRAY)  # 灰度处理

    #  cv2.medianBlur(gray, 3)  # 中值滤波
    #  bin_blue = cv2.adaptiveThreshold(gray, 255, cv2.ADAPTIVE_THRESH_MEAN_C, cv2.THRESH_BINARY, 11, 2)
    temp, bin_blue = cv2.threshold(gray, 50, 255, cv2.THRESH_BINARY)  # 简单二值化
    kernel = np.ones((10, 10), np.uint8)  # 膨胀将要用到的内核
    bin_blue = cv2.erode(bin_blue, kernel, iterations=1)  # 膨胀以消除内部干扰
    # 获取图像轮廓
    dst_image, contours, hierarchy = cv2.findContours(bin_blue, cv2.RETR_TREE, cv2.CHAIN_APPROX_NONE)
    frame = cv2.drawContours(frame, contours, -1, (0, 255, 0), 2)  # 原始图像上画出轮廓

    m = cv2.moments(dst_image)  # 寻找轮廓的距

    lastCX = cx
    lastCY = cy

    try: #防止除零发生异常
        cx = int(m['m10'] / m['m00'])  # 计算重心
        cy = int(m['m01'] / m['m00'])

        cv2.circle(frame, (cx, cy), 5, (0, 0, 255), -1)  # 标记重心

        cx = cx - 120
        cy = cy - 120

    except ZeroDivisionError:

        cy = lastCY
        cx = lastCX
        cv2.circle(frame, (cx+120, cy+120), 5, (0, 0, 255), -1)  # 标记重心

    if cx > 120:
        cx = 120
    if cy >120:
        cy = 120
    if cx < -120:
        cx = -120
    if cy < -120:
        cy = -120

    timed = cv2.getTickCount()  # 计算处理一帧的时间
    time = (timed - times) / cv2.getTickFrequency()
    font = cv2.FONT_HERSHEY_SIMPLEX
    cv2.putText(frame, str(time)[: 5], (50, 50), font, 1, (255, 0, 0), 2)

    # print time
    return cx, cy, frame, dst_image


def serialSend(SerPort, data, flag = 0):

    SerPort.write(chr(int( 0xaa ))) # 帧头
    for i in data:
        SerPort.write(chr(int(i)))

    SerPort.write(chr(int(flag)))
    SerPort.write(chr(int( 0xab ))) # 帧尾


if __name__ == "__main__":
    isOpened, ser = sp.serialConfig('/dev/ttyAMA0', 115200)  # 配置串口
    cap = cv2.VideoCapture(0)
    while cap.isOpened():
        ts = cv2.getTickCount()

        ret, video = cap.read()
        videoROI = video[ :480, 80:560]  # 取图像中心为ROI

        ROI = cv2.resize(videoROI, None, fx=0.5, fy=0.5, interpolation=cv2.INTER_CUBIC)  # 缩小图像以提高运算速率
        x, y, image, dstImage = image_process(ROI)  # 图像处理

        finalX = x / 2 + 60# s缩小到<256 方便串口发送
        finalY = y / 2 + 60 # 由于串口不能发送负数 所以这样处理后数据范围被限定在0-255 串口才能正常发送 ,主要是python运用不是很熟练
        data=[finalX,finalY]
        serialSend(ser, data)

        # print("imageX:{0} imageY:{1} finalX:{2} finalY:{3}".format(x, y, finalX, finalY))
        #
        # 放大以方便查看
        # image = cv2.resize(image, None, fx=2, fy=2, interpolation=cv2.INTER_CUBIC)
        # dstImage = cv2.resize(dstImage, None, fx=2, fy=2, interpolation=cv2.INTER_CUBIC)
        #
        # cv2.imshow('image', image)
        # cv2.imshow('dst_image', dstImage)
        #
        # k = cv2.waitKey(1) & 0xff
        # if k == 27:
        #     break
        # if k == ord('s'):
        #     print(video.shape)

        te = cv2.getTickCount()
        tt = (te - ts) / cv2.getTickFrequency()
        print(tt)

    ser.close()
    cap.release()
    cv2.destroyAllWindows()
后续处理
飞机接收到坐标信息后就可以进行定位了。