pwcnet中的函数
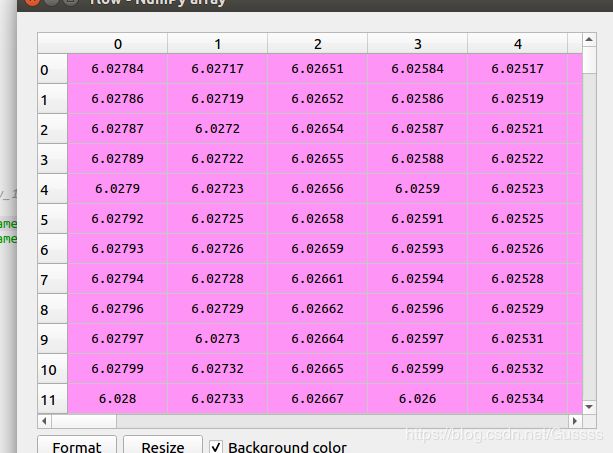
t=np.array(range(300)).reshape(3,436,1024,2) 假如此为一张图片,3为batch,4为通道的话,应该这么想象。batch的想象没有问题,主要是(436,1024,2)这里。这里使用spyder可视化,选择axis=2之后,下图1尺寸为(436,1024),因为axis2=2,表示可以选择两张这种尺寸的图。
图1
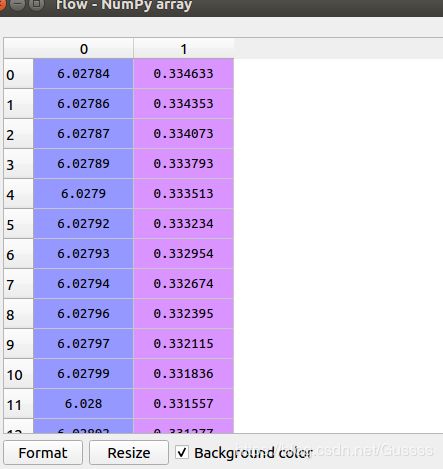
假如看axis=0的话,那么显示如下,尺寸为(1024,2),有436个这样的,下图为图片的第一行,下图虽然竖着,但是其实放图片中就是第一行,把两个通道都显示了
假如看axis=1的话,那么尺寸为(436,2),有1024个这样的,就是图像的第一列。
tf.unstack
给定tensor(A,B,C,D),
假如axis=0,那么输出的第i个tensor的shape为(B,C,D)。代表切片(i,B,C,D)
假如axis=1,那么输出的第i个tensor的shape为(A,C,D)。代表切片(A,i,C,D)
Unpacks the given dimension of a rank-R tensor into rank-(R-1) tensors.
given dimension of 是修饰rank-r tensor,就像a large number of。
tf.gather_nd
直接上例子
import tensorflow as tf


indices = [1]                                             #(1,)
params = [[['a0', 'b0'], ['c0', 'd0']],
          [['a1', 'b1'], ['c1', 'd1']]]
output = [['a1', 'b1'], ['c1', 'd1']]                 ##(2,2)


indices = [[1]]                                          #(1,1)
params = [[['a0', 'b0'], ['c0', 'd0']],
          [['a1', 'b1'], ['c1', 'd1']]]
output = [[['a1', 'b1'], ['c1', 'd1']]]  #############1 (1,2,2)

indices = [[0, 1], [1, 0]]                                ##(2,2)
params = [[['a0', 'b0'], ['c0', 'd0']],
          [['a1', 'b1'], ['c1', 'd1']]]                  ##(2,2,2)
output = [['c0', 'd0'], ['a1', 'b1']]##################2  (2,2)

indices = [[0, 0, 1], [1, 0, 1]]                          #(2,3)
params = [[['a0', 'b0'], ['c0', 'd0']],
          [['a1', 'b1'], ['c1', 'd1']]]
output = ['b0', 'b1']                 ###################3  (2,)

x_00 = tf.gather_nd(params, indices)
print (x_00)
上面代码一共4个例子,[1]索引到第一个(2,2)数组,[[1]]索引到(2,2)但是因为[[1]],外面还有一个括号,所以最终得到(1,2,2),但是和[1]的结果是一样的。
第一个例子,params的shape为2,2,2.indices为[[1]],indices中最外侧的[]在output中不改变,indices里面的[1]代表选取params的slices,这个1代表选取params中第一个2,2.把这个2,2尺寸的矩阵放到indices中最外侧的[]中。
第二个例子,indices最外侧的[]不变,从indices中可以看出,output中有两个元素,第一个元素对应params中0,1的位置,0代表第一个矩阵,1代表举证中第二行。
以下代码为此函数更深入理解:
params=np.array(range(48)).reshape(2,2,3,4)

indices=[[[[0,1],
          [1,1],
          [1,2]],
          [[1,1],
          [1,0],
          [0,1]]],
          [[[1,1],
          [1,0],
          [1,1]],
          [[1,0],
          [0,1],
          [0,1]]]]

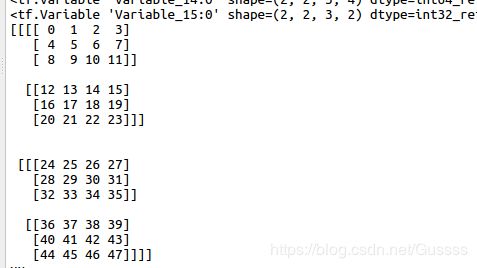
a=tf.Variable(params)     ##
print (a)
b=tf.Variable(indices) ###
print (b)
x_00 = tf.gather_nd(params, indices)   ####"GatherNd_7:0", shape=(2, 2, 3, 3, 4), dtype=int64
with tf.Session() as sess:
    init=tf.global_variables_initializer()
    sess.run(init)
    print (a.eval())
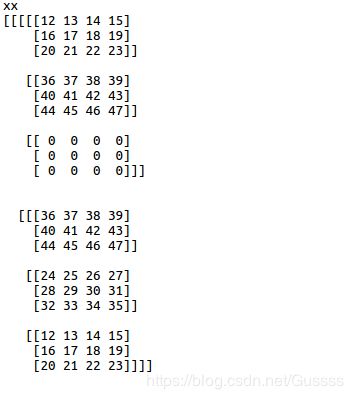
    print ('xx')
    print (x_00.eval())
    print('x')
    print (x_00)
indices此处为(2,2,3,2),前面3个维度(2,2,3)规定了输出大小,最后一个维度规定了输出最后一个维度的大小。
如输出x_00的维度为(2,2,3,3,4),前面(2,2,3)代表这个数组的大小,最后(3,4)代表单个元素是一个3X4的数组,(3,4)是这么来的:因为indices的最后一个维度为2,那么就取到params的前2个维度。
下面为a:
输出x__00:(2, 2, 3, 3, 4)
tf.floor
floor( x, name=None )
x是float32类型的,使用这个函数返回不大于x的最大整数
tf.meshgrid
import tensorflow as tf
x = [1]
y = [4, 5, 6]
z = [7, 8, 9,10,16]
X, Y ,Z = tf.meshgrid(x, y,z, indexing='ij')
print (X)
print (Y)
print (Z)
with tf.Session() as sess:
    init=tf.global_variables_initializer()
    sess.run(init)
    print (X.eval())
    print ('xx')
    print (Y.eval())
    print ('xx')
    print (Z.eval())
当indexing='xy' 时,为下面结果
当indexing='ij'的时候,为如下结果
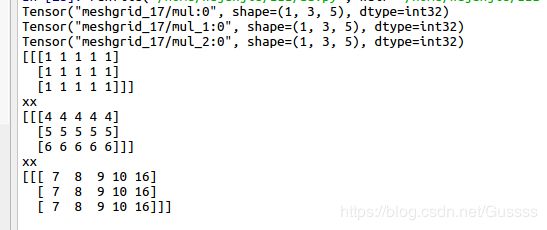
这个函数的本质是用来产生坐标的,如(1,4,7),(1,4,8),(1,4,9)这样的坐标,全部遍历。indexing='ij'或者'xy'只是在output的输出维度有区别。产生的维度这么计算:x原本维度(1,),y原本维度(3,),z原本维度(5,),那么使用indexing'ij'产生的维度为(1,3,5),就按照传入的顺序(x,y,z,indexing='ij')做维度
tf.clip_by_value
clip_by_value(
    t,
    clip_value_min,
    clip_value_max,
    name=None
)
这个函数返回一个tensor,尺寸和输入t一样,但是最小值是clip_value_min,最大值是clip_value_max。
tf.pad
t = tf.constant([[1, 2, 3], [4, 5, 6]])
paddings = tf.constant([[2, 1,], [1, 2]])
# 'constant_values' is 0.
# rank of 't' is 2.
a=tf.pad(t, paddings, "CONSTANT")
with tf.Session() as sess:
    init=tf.global_variables_initializer()
    sess.run(init)
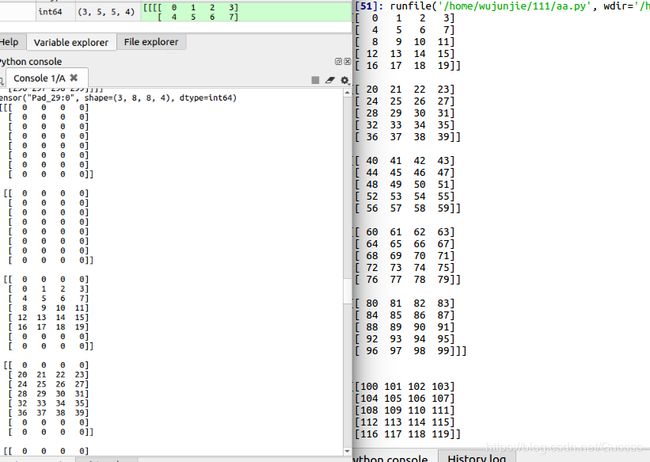
print (a.eval())padding中的[2,1],[1,2]代表:因为t为(2,2)的矩阵,所以第一个[2,1]代表0维,也就是行方向,上面添加2个元素,下面添加1个元素。第二个[1,2]代表列方向,左边添加一个元素,右边添加两个元素。假如按照立方体的方法解释,本文最上方,开头:比如这种函数tf.pad(x, [[0, 0], [2, 1], [1, 2], [0, 0]]),pad图像的。因为是自上而下的堆叠,所以[2,1],2对应向图像的上边扩展2个维度,1对应图像的下边扩展1个维度。[1, 2]这个,1对应图像左边扩展,2对应图像右边。
tf.keras.layers.Cropping2D
以下为官网例子
# Crop the input 2D images or feature maps
model = Sequential()
model.add(Cropping2D(cropping=((2, 2), (4, 4)),
                     input_shape=(28, 28, 3)))
# now model.output_shape == (None, 24, 20, 3)
model.add(Conv2D(64, (3, 3), padding='same))
model.add(Cropping2D(cropping=((2, 2), (2, 2))))
# now model.output_shape == (None, 20, 16. 64)
以下为自己实验例子
import tensorflow as tf
import numpy as np

t=np.array(range(300)).reshape(3,5,5,4)
print (t)
c=tf.Variable(t)
def crop2d(x, vcrop, hcrop):
    return tf.keras.layers.Cropping2D([vcrop, hcrop])(x)
print (qq)
qq=crop2d(c, [1, 2], [2, 1])
#paddings = tf.constant([[2, 1,], [1, 2]])
#b=tf.keras.layers.Cropping2D([[1,2],[2,1]])(c)
# 'constant_values' is 0.
# rank of 't' is 2.
#a=tf.pad(t, paddings, "CONSTANT")
with tf.Session() as sess:
    init=tf.global_variables_initializer()
    sess.run(init)
    print (qq.eval())
可以看出,t为(3,5,5,4),表示3个(5,5,4)的矩阵,然后(5,5,4)又等于5个(5,4)矩阵。
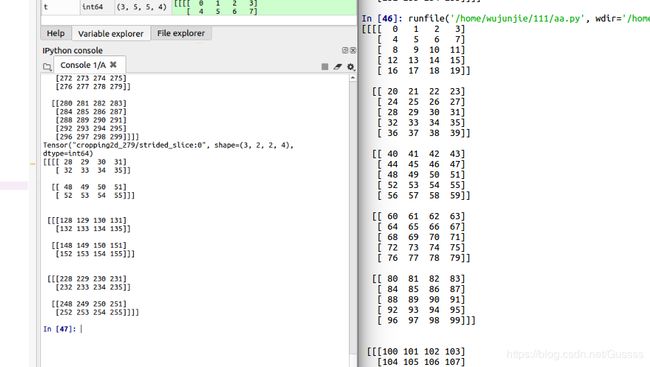
tf.keras.layers.Cropping2D这个函数只对四维tensor的第2,第3维有作用,也就是矩阵的长和宽。qq=crop2d(c, [1, 2], [2, 1])这句话第一个[1,2]代表输入尺寸(3,5,5,4)的第二个5,也就是5个(5,4)矩阵,下图右边为5个(5,4),上面裁掉1个,下面裁掉2个。
第二个[2,1]代表(5,4)矩阵中,5这个维度,也就是行方向,上面裁掉2个,下面裁掉1个。 。
Train
glob
glob模块提供了一个函数用于从目录通配符搜索中生成文件列表:
>>> import glob
>>> glob.glob('*.py')
['primes.py', 'random.py', 'quote.py']
groupby
from operator import itemgetter #itemgetter用来去dict中的key,省去了使用lambda函数
from itertools import groupby #itertool还包含有其他很多函数,比如将多个list联合起来。。
d1={'name':'zhangsan','age':20,'country':'China'}
d2={'name':'wangwu','age':19,'country':'USA'}
d3={'name':'lisi','age':22,'country':'JP'}
d4={'name':'zhaoliu','age':22,'country':'USA'}
d5={'name':'pengqi','age':22,'country':'USA'}
d6={'name':'lijiu','age':22,'country':'China'}
lst=[d1,d2,d3,d4,d5,d6]

#通过country进行分组:

lst.sort(key=lambda x:x['country']) #需要先排序,然后才能groupby。lst排序后自身被改变
lstg = groupby(lst,key=lambda x:x['country'])
#a=list(lstg)
#lstg = groupby(lst,key=lambda x:x['country']) 等同于使用itemgetter()


for key,group in lstg:
    for g in group: #group是一个迭代器,包含了所有的分组列表
        print (key,g)
下图为lst里面的样子,是按照country来排序的。
可以看出groupby函数可以把列表中相同key的,放在同一个组里面
这个组是一个可以迭代的对象。
可以看到打印输出为
from pathlib import Path
from pathlib import Path
a='/home/wujunjie/UNET/unet-master/data/liewen/test/1.jpg'
c=Path(a)
print (c)
b=a.exists()
a 是字符串str,print(c)也是长字符串的样子,但是不是字符串。主要要判断 a.exists(),a是字符串,那么会报错,c这里虽然长字符串样子,但是不是字符串,不会报错,print出来是true
writelines
代码如下
from pathlib import Path
a='/home'
b=Path(a)
d=[('u','o'),('n','m'),('v','x')]
with open('/home/wujunjie/误判原始/val.txt', 'w') as f:
    f.writelines((','.join(i) + '\n' for i in d))
显示如下
strip()函数
主要就是去除空格
str = "00000003210Runoob01230000000";
print str.strip( '0' );  # 去除首尾字符 0


str2 = "   Runoob      ";   # 去除首尾空格
print str2.strip();
yield
这里,最难理解的就是generator和函数的执行流程不一样。函数是顺序执行,遇到return语句或者最后一行函数语句就返回。而变成generator的函数,在每次调用next()的时候执行,遇到yield语句返回,再次执行时从上次返回的yield语句处继续执行。
def odd():
    print('step 1')
    yield 1
    print('step 2')
    yield(3)
    print('step 3')
    yield(5)
>>> o = odd()
>>> next(o)
step 1
1
>>> next(o)
step 2
3
>>> next(o)
step 3
5
>>> next(o)
Traceback (most recent call last):
File "", line 1, in
StopIteration glob模块
Python replace()
Python replace() 方法把字符串中的 old(旧字符串) 替换成 new(新字符串),如果指定第三个参数max,则替换不超过 max 次。
str = "this is string example....wow!!! this is really string";
print str.replace("is", "was");
print str.replace("is", "was", 3);

thwas was string example....wow!!! thwas was really string
thwas was string example....wow!!! thwas is really string
PWCNET中读取光流数据函数
from pathlib import Path
from itertools import groupby
from itertools import islice

def window(seq, n=2):
    "Returns a sliding window (of width n) over data from the iterable"
    "   s -> (s0,s1,...s[n-1]), (s1,s2,...,sn), ...                   "
    it = iter(seq)
    result = tuple(islice(it, n))
    if len(result) == n:
        yield result
    for elem in it:
        result = result[1:] + (elem,)
        ee=result[1:]
        cc = result[1]
        dd=(elem,)

        yield result


p = Path('/media/wujunjie/study/paper/OpticalFlow/DataSet/Sintel')
print ('p',p)
p_img = p / 'training' / 'clean'
print ('p_img',p_img)
#p_flow = p / 'training/flow'

a = list(map(str, p_img.glob('**/*.png')))
b = list(map(str, p_img.glob('*/*.png')))
collections_of_scenes = sorted(map(str, p_img.glob('**/*.png')))
#print ('collections_of_scenes',collections_of_scenes)
print ('collections_of_scenes_split',collections_of_scenes[0].split('/')[-2])
collections = [list(g) for k, g in groupby(collections_of_scenes, lambda x: x.split('/')[-2])]
d=list(groupby(collections_of_scenes, lambda x: x.split('/')[-2]))
c=list(collections)
#print ('collections',collections)

for collection in collections:
    for i in window(collection, 2):
        qwe=(*i, i[0].replace('clean', 'flow').replace('.png', '.flo'))

samples = [(*i, i[0].replace('clean', 'flow').replace('.png', '.flo'))\
           for collection in collections for i in window(collection, 2)]
print ('samples',samples)
result = tuple(islice(it, n))的结果为两张,如下图
这时候执行下面一个for循环,因为迭代器 it已经弹出了两个元素,所以从第三个元素开始循环,如下图。
在这行代码中,使用这样的代码 result = result[1:] + (elem,),elem的type为str,使用(elem,)就变成tuple了。因为原本result为tuple,里面的内容为两个str,所以result[1] 为一个字符串,但是result[1:]为tuple,因为1:是切片。
PWC中的损失函数
import tensorflow as tf
import numpy as np
a=np.array(range(72)).reshape(4,3,3,2)
b=tf.Variable(a)
c=tf.reduce_mean(tf.reduce_sum(tf.norm(a, ord = 1, axis = 3), axis = (1,2)))
e=tf.norm(a, ord = 1, axis = 3)
f=tf.reduce_sum(tf.norm(a, ord = 1, axis = 3), axis = (1,2))
print (c)
with tf.Session() as sess:
    init=tf.global_variables_initializer()
    sess.run(init)
    meann=c.eval()
    norm=e.eval()
    summ=f.eval()
    print ('a',a)
    print ('norm',norm)
    print ('summ',summ)
    print ('meann',meann)
f=tf.reduce_sum(tf.norm(a, ord = 1, axis = 3), axis = (1,2)),这条命令,axis=(1,2),可以看作把维度1,2删除,那么下图会变成(4,)维度
![]()
tf.train.piecewise_constant
use a learning rate that's 1.0 for the first 100000 steps, 0.5 for steps 100001 to 110000, and 0.1 for any additional steps.
global_step = tf.Variable(0, trainable=False)
boundaries = [100000, 110000]
values = [1.0, 0.5, 0.1]
learning_rate = tf.train.piecewise_constant(global_step, boundaries, values)
tf.nn.l2_loss
l2_loss(
    t,
    name=None
)
output = sum(t ** 2) / 2计算L2范数的和,但是没有Sqrt操作
show_progress(epoch, batch, batch_total, **kwargs)
def show_progress(epoch, batch, batch_total, **kwargs):
    message = f'\r{epoch} epoch: [{batch}/{batch_total}'
    for key, item in kwargs.items():
        message += f', {key}: {item}'
    sys.stdout.write(message+']')
    sys.stdout.flush()
cv2.resize
cv2.resize(src,dsize,dst=None,fx=None,fy=None,interpolation=None)
scr:原图
dsize:输出图像尺寸
fx:沿水平轴的比例因子
fy:沿垂直轴的比例因子
interpolation:插值方法
tqdm
reuse
在命名空间中使用reuse,那么就会共享网络参数
