理论:目录和文件管理 理论讲解
文章目录
- 一:Linux目录结构
- 1.1:树形目录结构
- 1.2:根目录
- 1.3常见的子目录
- 二:查看及检索文件
- 2.1:查看文件内容cat命令
- 2.2 查看文件内容more命令
- 2.3 less命令
- 2.4 查看文件内容head、tail命令
- 2.5:统计文件内容wc命令
- 2.6:检索和过滤文件内容grep命令
- 三:备份及恢复目录
- 3.1:压缩命令gzip、bzip2命令
- 3.2压缩命令gunzip、bunzip2命令
- 3.3归档命令tar命令
- 四: vi文本编辑器
- 4.1:文本编辑器vi命令
- 4.2vi编辑器的工作模式
- 4.4末行模式的基本操作
一:Linux目录结构
1.1:树形目录结构
树形结构目录,一般是指针对某个范围或某群特定的有着相互联系、影响的主导体和执行体组成的一个表现为树状结构分布的上下、左右等协调合作、领导部署等一系列的结构示意图。
1.2:根目录
- 所有分区、目录、文件等的位置起点
- 整个树形目录结构中,使用独立的一个“/”表示
1.3常见的子目录
| 目录 | 注释 | 目录 | 注释 |
|---|---|---|---|
| /root | 管理的家目录(宿主目录) | /bin | 所有用户的可执行命令文件目录 |
| /boot | 启动分区(grub启动菜单,压缩系统内核等) | /dev | 设备文件目录(磁盘,光驱等)(设备文件是黄色的) |
| /etc | 配置文件目录 | /home | 普通用户的家目录 |
| /var | 可变长文件目录(日志) | /usr | 应用程序目录 |
| /sbin | 管理员的可执行命令文件目录 | /lib | 服务管理文件(systemctl) /lib/systemed/system/ |
| /opt | 空目录 | /mnt | 空目录 |
| /tmp | 临时文件 | /proc | 硬件信息(CPU,内存) |
二:查看及检索文件
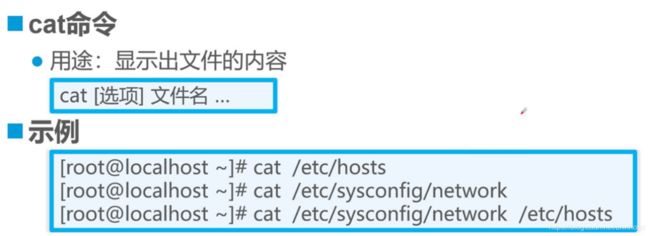
2.1:查看文件内容cat命令
yum intallhttpd -y 安装httpd插件,在/mnt下
2.2 查看文件内容more命令
more命令
- 用途:全屏方式分页显示文件内容
more 【选项】文件名…
- 交互操作方法
按Enter键向下逐行滚动
按空格键向下翻一屏
按q键退出
按b键往回看一页
more缺点:看到末尾会自动退出,无法会写
cat局限性高,文件若超出屏幕,没有滚轮的话就看不到上面
2.3 less命令
用途:与more命令相同,但扩展功能更多
less 【选项】 文件名
交互操作方法
Page Up 向上翻页,Page Down 向下翻页
按 “/”键查找内容,“n”下一个内容,“N”上一个内容
其他功能与more命令类似
切换界面命令:
init 0 代表关机
init 1 单用户模式字符界面(系统维护,破解管理员密码)
initi 2 多用户模式字符界面,无网络
init 3 多用模式有网络字符界面 *常用
init 4 保留
init 5 多用户模式图形化界面有网络 *常用
init 6 重启 (reboot)
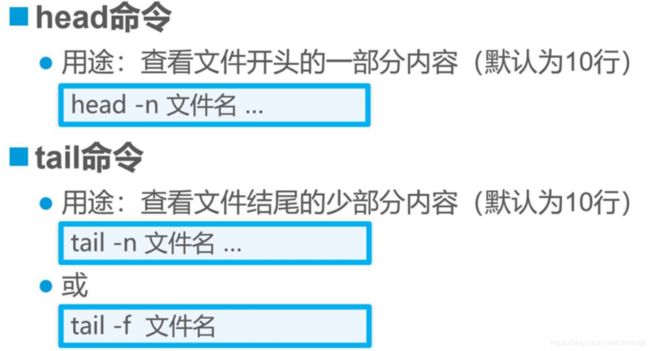
2.4 查看文件内容head、tail命令
-n查看开头部分n行,不写就是默认十行
通常用这个命令去查看帐号文件的首位
vim /etc/passwd,passwd是账号文件,这里是编辑paswd
新创建的用户都会在后面
tail /etc/passwd 查看末尾十行
tail -2 /etc/passwd 查看末尾两行
useradd lisi 创建用户 lisi
passwd lisi 密码设置为lisi
[root@localhost ~]# tail /etc/passwd
'查看/etc/passwd配置文件目录下面的passwd用户账号记录中的末尾十行(默认)'
radvd:x:75:75:radvd user:/:/sbin/nologin
setroubleshoot:x:993:988::/var/lib/setroubleshoot:/sbin/nologin
sssd:x:992:987:User for sssd:/:/sbin/nologin
gdm:x:42:42::/var/lib/gdm:/sbin/nologin
gnome-initial-setup:x:991:986::/run/gnome-initial-setup/:/sbin/nologin
sshd:x:74:74:Privilege-separated SSH:/var/empty/sshd:/sbin/nologin
avahi:x:70:70:Avahi mDNS/DNS-SD Stack:/var/run/avahi-daemon:/sbin/nologin
postfix:x:89:89::/var/spool/postfix:/sbin/nologin
tcpdump:x:72:72::/:/sbin/nologin
gsy:x:1000:1000:gsy:/home/gsy:/bin/bash
[root@localhost ~]# tail -2 /etc/passwd	'查看账号记录的末尾两行'
tcpdump:x:72:72::/:/sbin/nologin
gsy:x:1000:1000:gsy:/home/gsy:/bin/bash
[root@localhost ~]# useradd lisi	'创建用户lisi'
[root@localhost ~]# passwd lisi	'配置密码'
更改用户 lisi 的密码 。
新的 密码:
无效的密码: 密码少于 8 个字符
重新输入新的 密码:
passwd:所有的身份验证令牌已经成功更新。
[root@localhost ~]# tail -2 /etc/passwd	'查看账号记录的末尾两行'
gsy:x:1000:1000:gsy:/home/gsy:/bin/bash
lisi:x:1001:1001::/home/lisi:/bin/bash	'刚才创建的lisi穿现在最后一行'
可以给账号文件加密,让别人无法访问
2.5:统计文件内容wc命令
[root@localhost ~]# wc /etc/passwd	'统计/etc/passwd文件中的行数,单词书,字节数'
  42   82 2140 /etc/passwd
[root@localhost ~]# wc -l /etc/passwd	'统计/etc/passwd文件中的行数'
42 /etc/passwd
[root@localhost ~]# wc -w /etc/passwd	'统计/etc/passwd文件中的单词数'
82 /etc/passwd
[root@localhost ~]# wc -c /etc/passwd	'统计/etc/passwd文件中的字节数'
2140 /etc/passwd
分析得出结论:行 单词 字节,选项处什么都不敲就是默认每个都有
2.6:检索和过滤文件内容grep命令
[root@localhost ~]# cd / '切换到/跟目录'
[root@localhost /]# ls '查看'
abc boot etc lib media opt root sbin sys usr
bin dev home lib64 mnt proc run srv tmp var
[root@localhost /]# cd etc '进入到etc配置文件'
[root@localhost etc]# ls '只列举其中之一'
at.deny hosts.deny purple
audisp hp python
audit httpd qemu-ga
autofs.conf idmapd.conf qemu-kvm
autofs_ldap_auth.conf init.d radvd.conf
[root@localhost etc]# cd httpd/
'切换到httpd工具,没有这个目录的需要安装httpd软件包,可以查看我的安装程序的博文学习'
[root@localhost httpd]# ls '查看'
conf conf.d conf.modules.d logs modules run
[root@localhost httpd]# cd conf '切换到conf配置目录'
[root@localhost conf]# ls
httpd.conf magic
[root@localhost conf]# grep -v "#" httpd.conf > /opt/abc.conf
'过滤掉带有#的行,然后把所得结果注入到abc.conf文件中(没有文件会新建,有的话会覆盖原有内容)'
[root@localhost conf]# cd /opt '切换到/opt目录'
[root@localhost opt]# ls
abc.conf httpd-2.4.2 rh test
[root@localhost opt]# vim abc.conf 'vim 查看编辑abc.conf'
ServerRoot "/etc/httpd"
Listen 80
Include conf.modules.d/*.conf
User apache
Group apache
ServerAdmin root@localhost
"/var/www">
AllowOverride None
Require all granted
"/var/www/html">
Options Indexes FollowSymLinks
AllowOverride None
Require all granted
[root@localhost conf]# vim httpd.conf '查看原有的httpd.conf'
#
# This is the main Apache HTTP server configuration file. It contains the
# configuration directives that give the server its instructions.
# See <URL:http://httpd.apache.org/docs/2.4/> for detailed information.
# In particular, see
# <URL:http://httpd.apache.org/docs/2.4/mod/directives.html>
# for a discussion of each configuration directive.
#
# Do NOT simply read the instructions in here without understanding
# what they do. They're here only as hints or reminders. If you are unsure
# consult the online docs. You have been warned.
#
# Configuration and logfile names: If the filenames you specify for many
# of the server's control files begin with "/" (or "drive:/" for Win32), the
# server will use that explicit path. If the filenames do *not* begin
# with "/", the value of ServerRoot is prepended -- so 'log/access_log'
# with ServerRoot set to '/www' will be interpreted by the
# server as '/www/log/access_log', where as '/log/access_log' will be
# interpreted as '/log/access_log'.
#
# ServerRoot: The top of the directory tree under which the server's
# configuration, error, and log files are kept.
#
# Do not add a slash at the end of the directory path. If you point
# ServerRoot at a non-local disk, be sure to specify a local disk on the
# Mutex directive, if file-based mutexes are used. If you wish to share the
# same ServerRoot for multiple httpd daemons, you will need to change at
# least PidFile.
#
ServerRoot "/etc/httpd"
“>”重定向符号可以覆盖文件,而两个重定向符号则不会覆盖原有文件;演示一下
[root@localhost opt]# echo "hello world" > /opt/abc.conf
'在/opt/abc.conf中输入hello world'
[root@localhost opt]# cat abc.conf 	'cat查看文件'
hello world	'显示原有内容已被覆盖'
[root@localhost opt]# echo "gsy " >> abc.conf 	'用两个重定向符号'
[root@localhost opt]# cat abc.conf 	'查看'
hello world
gsy 	'显示原有内容未被覆盖,另起一行去记录数据'
ctrl+r,然后就可以搜索历史命令
(reverse-i-search)`':
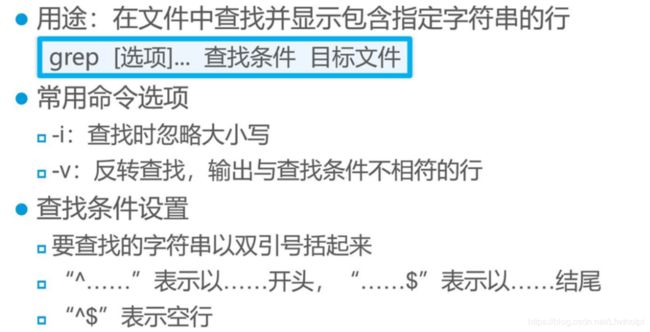
grep “^root” /etc/passwd 查找文件中以ROOT为开头的行
bin/bash 是可登录用户后面所特有的
管道符号 | 的意思是,把上一个命令执行的结果,转交给后面的一个命令去处理
[root@localhost grub2]# grep "^root" /etc/passwd
'查找/etc/passwd账号文件中以root为开头的行'
root:x:0:0:root:/root:/bin/bash
[root@localhost grub2]# grep "bash$" /etc/passwd
'查找/etc/passwd账号文件中以bash为结尾的行'
root:x:0:0:root:/root:/bin/bash
gsy:x:1000:1000:gsy:/home/gsy:/bin/bash
lisi:x:1001:1001::/home/lisi:/bin/bash
[root@localhost grub2]# grep "bash$" /etc/passwd | wc -l
'利用管道符号把上一个结果延续到下一个命令执行,即统计有几行'
3
备注:不可以把查找文件所得到的内容输入到它原本的文件中,因为这个时候是进程占用状态
[root@localhost grub2]# cd /opt
[root@localhost opt]# ls
abc.conf  httpd-2.4.2  rh  test
[root@localhost opt]# grep -v "<" abc.conf > /opt/abc.conf
grep: 输入文件 ‘abc.conf’ 同时也作输出
三:备份及恢复目录
3.1:压缩命令gzip、bzip2命令
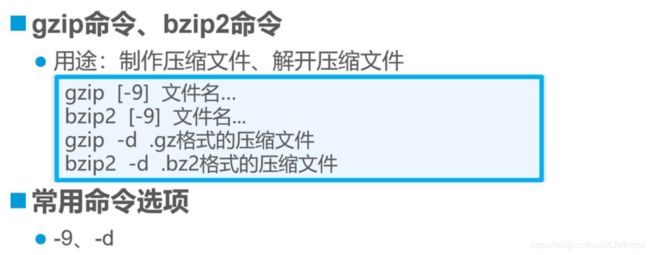
-9表示高压缩比,压缩之后的文件特别小,它执行的是压缩指令
解压缩使用-d
gzip -9 abc.conf 压缩abc.conf文件
这个命令会把abc.conf直接压缩,并不会产生另外一个文件,跟微软不同
gizp -d abc.conf.gz 解压abc.conf.gz 文件
bzip2 跟gzip的指令一样,他们之间的区别是bzip2的压缩效率更快,而gzip的压缩容量更小
[root@localhost opt]# ls
abc.conf  httpd-2.4.2  rh  test
[root@localhost opt]# gzip -9 abc.conf 	'压缩abc.conf'
[root@localhost opt]# ls
abc.conf.gz  httpd-2.4.2  rh  test	'用gzip命令压缩,得到的是gz格式压缩包'
[root@localhost opt]# gzip -d abc.conf.gz 	'解压'
[root@localhost opt]# ls
abc.conf  httpd-2.4.2  rh  test
[root@localhost opt]# bzip2 -9 abc.conf 	'用bzip命令压缩'
[root@localhost opt]# ls
abc.conf.bz2  httpd-2.4.2  rh  test	'得到的是bz2格式压缩包'
[root@localhost opt]# bzip2 -d abc.conf.bz2
[root@localhost opt]# ls
abc.conf  httpd-2.4.2  rh  test
3.2压缩命令gunzip、bunzip2命令
3.3归档命令tar命令
-c 创建压缩包
x 解压
-v详细过程
-f 执行 (必须要有)
-p 保留原有权限打包压缩
-t查看压缩包内容
-C 解压到哪个地方去
-z 指的是GZ格式
-j 指的是bzip2格式
归档文件名,是压缩包名称
使用归档tar不会让原有文件消失,解压也不会让压缩包消失,这个命令就跟微软的压缩rar很相似了
rm -rf /home/*.conf 删除后面是.conf的文件
[root@localhost opt]# bzip2 -d abc.conf.bz2 	'解压之前abc.conf.bz2'
[root@localhost opt]# ls
abc.conf  httpd-2.4.2  rh  test  test.tar.gz
[root@localhost opt]# gzip -d test.tar.gz '解压test.tar.gz'
[root@localhost opt]# ls
abc.conf  httpd-2.4.2  rh  test  test.tar
'发现gz格式被解压掉,但是tar后缀还在,此时依旧是解压文件'
[root@localhost opt]# rm -rf test.tar
[root@localhost opt]# ls
abc.conf  httpd-2.4.2  rh  test
[root@localhost opt]# touch b.conf	'创建一个新的测试文件b.conf'
[root@localhost opt]# ls
abc.conf  b.conf  httpd-2.4.2  rh  test
[root@localhost opt]# ta	'输入ta 后连按两下tab,会出现命令提示,后面可以接哪些命令'
tabs       tail       tapestat   targetcli  taskset
tac        tailf      tar        targetctl
[root@localhost opt]# tar czvf test.tar.gz abc.conf b.conf
 	'创建c一个gz格式z的名为test文件,要压缩的文件为abc.conf和b.conf,执行f'
abc.conf
b.conf	'显示过程v'
[root@localhost opt]# ls	'查看'
abc.conf  b.conf  httpd-2.4.2  rh  test  test.tar.gz
[root@localhost opt]# tar xzvf test.tar.gz -C /home
'解压x之前生成的gz格式的压缩包z,名为test.tar.gz压缩包,-C指定解压到/home 目录下'
abc.conf
b.conf '显示过程'
[root@localhost opt]# ls /home	'查看/home目录下'
abc.conf  b.conf  gsy  lisi	'/home是普通用户的家目录,此时出现了两个测试文件'
[root@localhost opt]# rm -rf /home/*.conf
'不需要确认-r强制删除-f,/home目录下的带有.conf后缀的文件'
[root@localhost opt]# ls /home '查看此时结果'
gsy  lisi
备注:选项文件格式要与后面文件的格式一致,否则会失败
[root@localhost opt]# tar xjvf test.tar.gz -C /home	'解压x格式j为bzip2显示过程v执行f 解压文件名为test.tar.gz 指定解压目录-C为/home'
bzip2: (stdin) is not a bzip2 file.	'显示不可行,压缩包格式不是bzip2格式'
tar: Child returned status 2
tar: Error is not recoverable: exiting now
[root@localhost opt]# ls /home
gsy  lisi
[root@localhost opt]# mv test.tar.gz test.tar.bz2	'改个后缀,把bz2改为gz'
[root@localhost opt]# ls
abc.conf  b.conf  httpd-2.4.2  rh  test  test.tar.bz2
[root@localhost opt]# tar xjvf test.tar.bz2 -C /home	'再次尝试解压'
bzip2: (stdin) is not a bzip2 file.		'改后缀还是没啥用'
tar: Child returned status 2
tar: Error is not recoverable: exiting now
四: vi文本编辑器
4.1:文本编辑器vi命令
vim可以辨别语法,vi不可以辨别语法
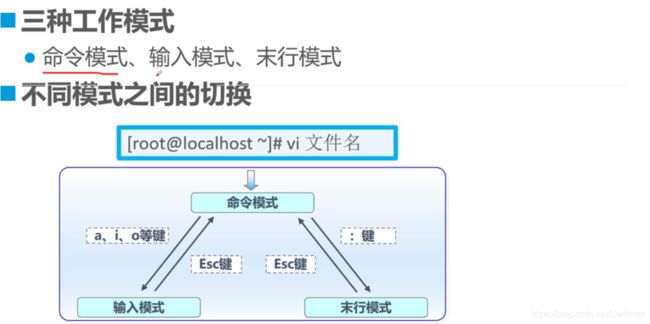
4.2vi编辑器的工作模式
a、i、o、O四个字母,
a代表在光标所在位置之后插入,
i代表在所在光标位置之前插入
o代表在所在光标位置的下一行插入
O代表在所在光标位置的下一行插入
esc,到命令模式,按下冒号,进入末行模式
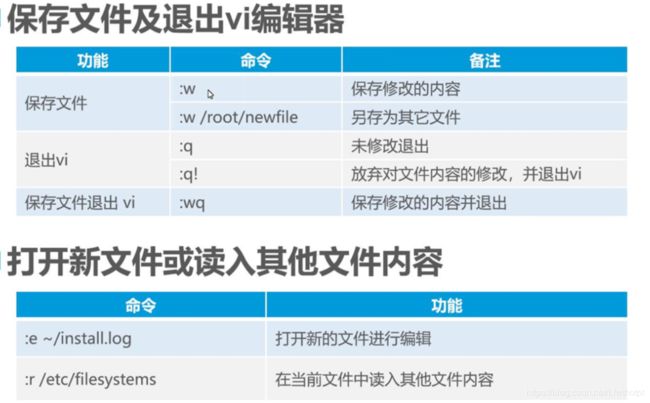
末行模式:w保存,q退出,回车确定
4.3命令模式的基本操作
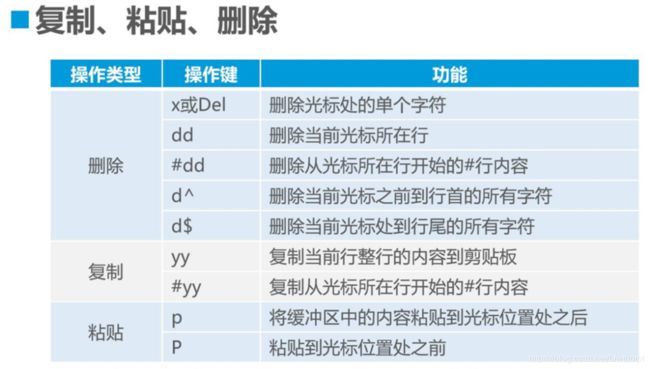
dw delete word 删除单词
shift+r 替换当前文字
小p是在光标下一行粘贴,大P相反
命令模式下的操作
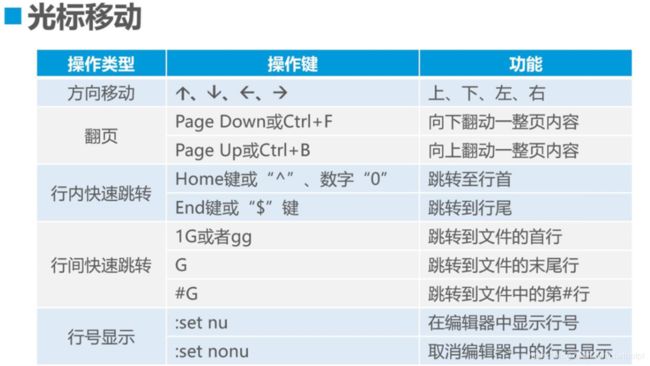
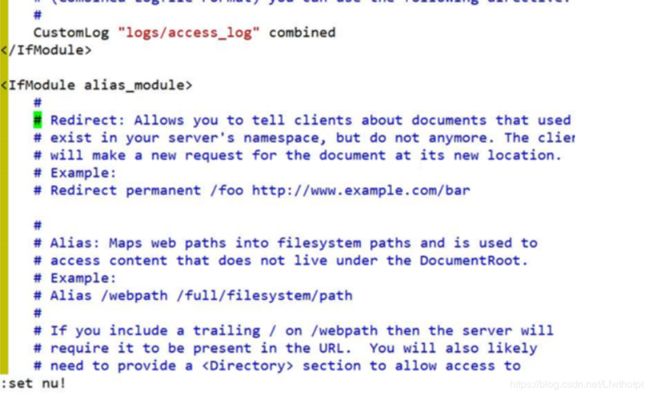
:set nu! 也是取消行号的操作
q! 强制退出,不保存
