springboot搭建一个后台管理(一):环境配置及整合mybatis
项目搭建准备
项目运行环境:jdk1.8,tomcat8.5
代码编辑器:Intellij IDEA
数据库使用:mysql5.7
项目框架:基于springboot1.5.x为框架主体搭建的项目
搭建项目及配置
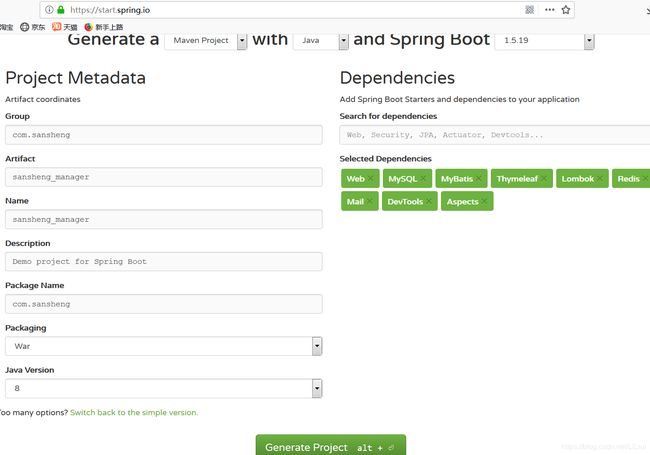
去https://start.spring.io/官网进行项目构建:以下是官网所支持的依赖(有很多,自行选择)
通过Generate Project下载项目,在IDEA里面直接打开,然后还需要再额外的增加几个依赖:
com.alibaba
druid
1.0.20


com.fasterxml.jackson.datatype
jackson-datatype-guava
2.5.3


com.alibaba
fastjson
1.2.56


commons-collections
commons-collections
3.2.2

commons-codec
commons-codec
1.10


org.apache.commons
commons-lang3
3.5


com.google.collections
google-collections
1.0
使用alibaba数据源,以及谷歌guava提供的工具类,还有tools ,commons 提供的非常好的工具验证,如:字符串验证..等
接下来需要配置application.properties,也是核心的配置
#热部署生效
spring.devtools.restart.enabled=true
#设置重启的目录,添加那个目录的文件需要restart
spring.devtools.restart.additional-paths=src/main/java
#排除那个目录的文件不需要restart
#spring.devtools.restart.exclude=static/**,public/**
#classpath目录下的WEB-INF文件夹内容修改不重启
#spring.devtools.restart.exclude=WEB-INF/**

# 配置数据源相关	使用阿里巴巴的 druid 数据源
spring.datasource.url=jdbc:mysql://localhost:3306/sanshengdb?useSSL=true&useUnicode=true&characterEncoding=UTF-8
spring.datasource.username=root
spring.datasource.password=root
spring.datasource.driver-class-name=com.mysql.jdbc.Driver
spring.datasource.druid.initial-size=1
spring.datasource.druid.min-idle=1
spring.datasource.druid.max-active=20
spring.datasource.druid.test-on-borrow=true
spring.datasource.druid.stat-view-servlet.allow=true

# mybatis,指向自己工程下的包名,xml所在的路径包
mybatis.type-aliases-package=com.sansheng.model
mybatis.mapper-locations=classpath:mapper/*.xml

# REDIS 配置
# Redis数据库索引(默认为0)
#spring.redis.database=1
# Redis服务器地址
#spring.redis.host=127.0.0.1
# Redis服务器连接端口
#spring.redis.port=6379
# Redis服务器连接密码(默认为空)
#spring.redis.password=
# 连接池最大连接数(使用负值表示没有限制)
spring.redis.pool.max-active=1000
# 连接池最大阻塞等待时间(使用负值表示没有限制)
spring.redis.pool.max-wait=-1
# 连接池中的最大空闲连接
spring.redis.pool.max-idle=10
# 连接池中的最小空闲连接
spring.redis.pool.min-idle=2
# 连接超时时间(毫秒)
#spring.redis.timeout=0

#设定静态文件路径,js,css等
spring.mvc.static-path-pattern=/resources/static/**
# thymeleaf静态资源配置
spring.thymeleaf.prefix=classpath:/templates/
spring.thymeleaf.suffix=.html
spring.thymeleaf.mode=HTML5
spring.thymeleaf.encoding=UTF-8
spring.thymeleaf.content-type=text/html
spring.thymeleaf.cache=false

# 配置api端口号
server.port=80
# 配置context-path
#server.context-path=/
# 错误页,指定发生错误时,跳转的URL --> BasicErrorController
#server.error.path=/error
# session最大超时时间(分钟),默认为30分钟
#server.session-timeout=60


# tomcat最大线程数, 默认为200
#server.tomcat.max-threads=250
# tomcat的URI编码
server.tomcat.uri-encoding=UTF-8
# 存放Tomcat的日志、Dump等文件的临时文件夹,默认为系统的tmp文件夹
#(如:C:\Users\Shanhy\AppData\Local\Temp)
#server.tomcat.basedir=H:/springboot-tomcat-tmp
# 打开Tomcat的Access日志,并可以设置日志格式的方法:
#server.tomcat.access-log-enabled=true
#server.tomcat.access-log-pattern=
# accesslog目录,默认在basedir/logs
#server.tomcat.accesslog.directory=
# 日志文件目录
#logging.path=H:/springboot-tomcat-logs
# 日志文件名称,默认为spring.log
#logging.file=myapp.log
这时候项目其实还不能运行的,因为配置里设置了mybatis的配置相关,如果运行会报找不到文件的错误。所以还需要配置下mybatis。这里我使用的是mybatis-generator逆向生成工具。也是目前用的非常多的。所以这里需要从官方或者github上去下载
generator,https://github.com/yundianzixun/mybatis-generator-1.35
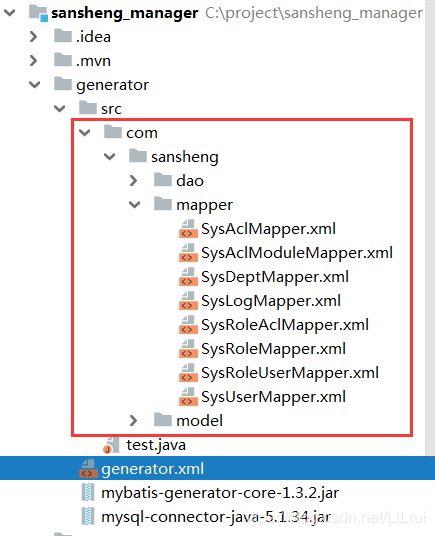
把generator工程导入项目里,记住和我们的src保持平级目录:
然后需要进入generator.xml里去修改配置:
修改好以上配置,然后进入到idea控制台,进入generator目录下输入命令: java -jar mybatis-generator-core-1.3.2.jar -configfile generator.xml -overwrite,然后执行,如果控制台输出successfully,说明生成成功了。
这时候,把生成的代码复制到我们自己工程目录下的包里(复制完记得把generator包下生成的代码删掉,已经没有用了,养成习惯):
然后mapper目录下的xml文件此时需要被springboot扫描到,所以还需要添加:
1.进入properties里添加

# mybatis
mybatis.type-aliases-package=com.sansheng.model
mybatis.mapper-locations=classpath:mapper/*.xml

2.在Application启动类里添加注解:

@SpringBootApplication
@MapperScan(basePackages = "com.sansheng.dao")//导入tk的包
public class SanshengManagerApplication {

	public static void main(String[] args) {
		SpringApplication.run(SanshengManagerApplication.class, args);
	}

}
这个时候我们就可以build项目然后启动看是否成功:
启动没问题说明项目的最初搭建已经好了,下一篇就来测试下最基础的crud功能看看持久化操作是否正常!


