飞桨之七天Python小白逆袭大神结营心得
第一天
python基础
第一天讲一些Python入门学习,数据类型、循环的操作以及人工智能概述。
1.基础操作
age = 20  		# 声明一个变量age 用来存储一个数字 20
1+1		        # 基础数学加法
print('Hello World!')   # 打印Hello World!
2.条件判断if
if 1 == 2: # 如果 if 跟随的条件为 假 那么不执行属于if 的语句,然后寻找 else
    print("假的")
else: # 寻找到 else 之后 执行属于else中的语句
    print("1==2是假的")
3.循环操作—for
for i in range(5):
    print(i)
3.循环操作—while
sum = 0
n = 99
while n > 0:
    sum = sum + n
    n = n - 1
print(sum)
4.break、continue、pass
break语句可以跳出 for 和 while 的循环体
n = 1
while n <= 100:
    if n > 10:
        break
    print(n)
    n += 1
continue语句跳过当前循环,直接进行下一轮循环
n = 1
while n < 10:
    n = n + 1
    if n % 2 == 0:
        continue
    print(n)
pass是空语句,一般用做占位语句,不做任何事情
 for letter in 'Room':
    if letter == 'o':
        pass
        print('pass')
    print(letter)
5.数据类型—Number(数字)
Python支持int, float, complex三种不同的数字类型
a = 3
b = 3.14
c = 3 + 4j
print(type(a), type(b), type(c))
5.数据类型—String(字符串)
支持字符串拼接、截取等多种运算
a = "Hello"
b = "Python"
print("a + b 输出结果:", a + b)
print("a[1:4] 输出结果:", a[1:4])
5.数据类型—Tuple(元组)
tuple与list类似,不同之处在于tuple的元素不能修改。tuple写在小括号里,元素之间用逗号隔开。元组的元素不可变,但可以包含可变对象,如list。
t1 = ('abcd', 786 , 2.23, 'runoob', 70.2)
t2 = (1, )
t3 = ('a', 'b', ['A', 'B'])
t3[2][0] = 'X'
print(t3)
5.数据类型—dict(字典)
字典是无序的对象集合,使用键-值(key-value)存储,具有极快的查找速度。
键(key)必须使用不可变类型。
同一个字典中,键(key)必须是唯一的。
d = {'Michael': 95, 'Bob': 75, 'Tracy': 85}
print(d['Michael'])
5.数据类型—set(集合)
set和dict类似,也是一组key的集合,但不存储value。由于key不能重复,所以,在set中,没有重复的key。
set是无序的,重复元素在set中自动被过滤。
s = set([1, 1, 2, 2, 3, 3])
print(s)
第一天作业
答案:
for x in range(1,10):
    for y in range(1,x+1):
        print("%s*%s=%s" % (y,x,x*y),end=" ")
    print("")#print默认参数"换行",没有此条语句输出打印时将不会换行
结果展示
1*1=1
1*2=2 2*2=4
1*3=3 2*3=6 3*3=9
1*4=4 2*4=8 3*4=12 4*4=16
1*5=5 2*5=10 3*5=15 4*5=20 5*5=25
1*6=6 2*6=12 3*6=18 4*6=24 5*6=30 6*6=36
1*7=7 2*7=14 3*7=21 4*7=28 5*7=35 6*7=42 7*7=49
1*8=8 2*8=16 3*8=24 4*8=32 5*8=40 6*8=48 7*8=56 8*8=64
1*9=9 2*9=18 3*9=27 4*9=36 5*9=45 6*9=54 7*9=63 8*9=72 9*9=81
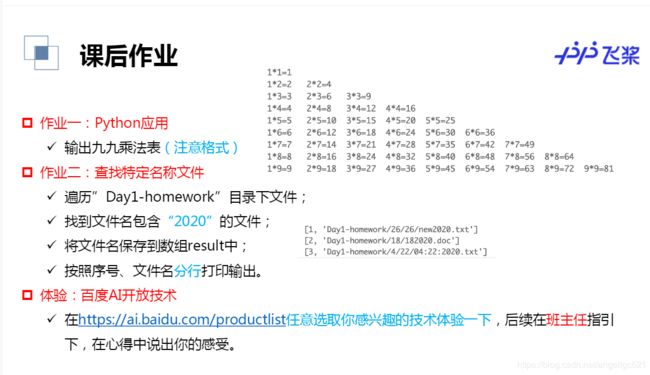
作业二:查找特定名称文件
遍历”Day1-homework”目录下文件;
找到文件名包含“2020”的文件;
将文件名保存到数组result中;
按照序号、文件名分行打印输出。
注意:提交作业时要有代码执行输出结果。
#导入OS模块
import os
#待搜索的目录路径
path = "Day1-homework"
#待搜索的名称
filename = "2020"
#定义保存结果的数组
result = []
index =0
def findfiles(path):
    #在这里写下您的查找文件代码吧!
    #

    dir_list =os.listdir(path)
    #print(dir_list)
    for i in dir_list:
        path_temp = i
        path_name = os.path.join(path,i)
        #print(path_temp)
        #print(path_name)
        #print(path)
        global index
        if os.path.isdir(path_name):
            findfiles(path_name)
        elif os.path.isfile(path_name):
            #print(path_temp.find(filename))
            if(path_temp.find(filename) != -1):
                result =[]
                #print(index)
                index = index +1
                result.append(index)
                #print(index)
                result.append(path_name)
                if (len(result) > 0):
                    print(result)
if __name__ == '__main__':
    findfiles(path)
结果展示
[1, 'Day1-homework/4/22/04:22:2020.txt']
[2, 'Day1-homework/26/26/new2020.txt']
[3, 'Day1-homework/18/182020.doc']
第二天
python进阶学习
1. Python数据结构
数字
Python Number 数据类型用于存储数值。
Python Number 数据类型用于存储数值,包括整型、长整型、浮点型、复数。
(1)Python math 模块:Python 中数学运算常用的函数基本都在 math 模块
(2)Python随机数 :首先import random,使用random()方法即可随机生成一个[0,1)范围内的实数
字符串
字符串连接:+
重复输出字符串:
通过索引获取字符串中字符[]
判断字符串中是否包含给定的字符: in, not in
字符串截取[:] 牢记:左开右闭
join():以字符作为分隔符,将字符串中所有的元素合并为一个新的字符串
三引号让程序员从引号和特殊字符串的泥潭里面解脱出来,自始至终保持一小块字符串的格式是所谓的WYSIWYG(所见即所得)格式的。
列表
作用:类似其他语言中的数组
声明一个列表
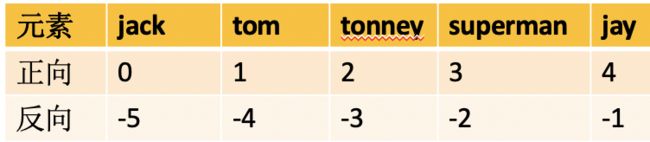
names = ['jack','tom','tonney','superman','jay']
通过下标或索引获取元素
print(names[0])
print(names[1])
获取最后一个元素
print(names[-1])
print(names[len(names)-1])
获取第一个元素
print(names[-5])
遍历列表,获取元素
for name in names:
    print(name)
查询names里面有没有superman
for name in names:
    if name == 'superman':
        print('有超人')
        break
else:
    print('有超人')
更简单的方法,来查询names里有没有superman
if 'superman' in names:
    print('有超人')
else:
    print('有超人')
列表元素添加
声明一个空列表
girls = []
append(),末尾追加
girls.append('杨超越')
print(girls)
extend(),一次添加多个。把一个列表添加到另一个列表 ,列表合并。
models = ['刘雯','奚梦瑶']
girls.extend(models)
#girls = girls + models
print(girls)
insert():指定位置添加
girls.insert(1,'虞书欣')
print(girls)
列表元素修改,通过下标找到元素,然后用=赋值
fruits = ['apple','pear','香蕉','pineapple','草莓']
print(fruits)
fruits[-1] = 'strawberry'
print(fruits)
将fruits列表中的‘香蕉’替换为‘banana’
for fruit in fruits:
    if '香蕉' in fruit:
        fruit = 'banana'
print(fruits)

for i in range(len(fruits)):
    if '香蕉' in fruits[i]:
        fruits[i] = 'banana'
        break
print(fruits)
列表元素删除
words = ['cat','hello','pen','pencil','ruler']
del words[1]
print(words)
words = ['cat','hello','pen','pencil','ruler']
words.remove('cat')
print(words)
words = ['cat','hello','pen','pencil','ruler']
words.pop(1)
print(words)
列表切片
在Python中处理列表的部分元素,称之为切片。
创建切片,可指定要使用的第一个元素和最后一个元素的索引。注意:左开右闭
将截取的结果再次存放在一个列表中,所以还是返回列表
animals = ['cat','dog','tiger','snake','mouse','bird']
print(animals[2:5])
print(animals[-1:])
print(animals[-3:-1])
print(animals[-5:-1:2])
print(animals[::2])
列表排序
生成10个不同的随机整数,并存至列表中
import  random
random_list = []
for i in range(10):
    ran = random.randint(1,20)
    if ran not in  random_list:
        random_list.append(ran)
print(random_list)
上述代码存在什么问题吗?
import  random

random_list = []
i = 0
while i < 10:
    ran = random.randint(1,20)
    if ran not in  random_list:
        random_list.append(ran)
        i+=1
print(random_list)
默认升序
new_list = sorted(random_list)
print(new_list)
降序
new_list = sorted(random_list,reverse =True)
print(new_list)
元组
与列表类似,元祖中的内容不可修改
tuple1 = ()
print(type(tuple1))
tuple2 = ('hello')
print(type(tuple2))
注意:元组中只有一个元素时,需要在后面加逗号!
tuple3 = ('hello',)
print(type(tuple3))
元组不能修改,所以不存在往元组里加入元素。
那作为容器的元组,如何存放元素?
import random
random_list = []
for i in range(10):
    ran = random.randint(1,20)
    random_list.append(ran)
print(random_list)
random_tuple = tuple(random_list)
print(random_tuple)
元组访问
print(random_tuple)
print(random_tuple[0])
print(random_tuple[-1])
print(random_tuple[1:-3])
print(random_tuple[::-1])
元组的修改:
t1 = (1,2,3)+(4,5)
print(t1)
t2 = (1,2) * 2
print(t2)
元组的一些函数:
print(max(random_tuple))
print(min(random_tuple))
print(sum(random_tuple))
print(len(random_tuple))
统计元组中4的个数
print(random_tuple.count(4))
元组中4所对应的下标,如果不存在,则会报错
print(random_tuple.index(4))
判断元组中是否存在1这个元素
print(4 in random_tuple)
返回元组中4所对应的下标,不会报错
if(4 in random_tuple):
    print(random_tuple.index(4))
元组的拆包与装包
定义一个元组
t3 = (1,2,3)
将元组赋值给变量a,b,c
a,b,c = t3
打印a,b,c
print(a,b,c)
当元组中元素个数与变量个数不一致时
定义一个元组,包含5个元素
t4 = (1,2,3,4,5)
将t4[0],t4[1]分别赋值给a,b;其余的元素装包后赋值给c
a,b,*c = t4
print(a,b,c)
print(c)
print(*c)
字典
#定义一个空字典
dict1 = {}
dict2 = {'name':'杨超越','weight':45,'age':25}
print(dict2['name'])
#list可以转成字典,但前提是列表中元素都要成对出现
dict3 = dict([('name','杨超越'),('weight',45)])
print(dict3)
dict4 = {}
dict4['name'] = '虞书欣'
dict4['weight'] = 43
print(dict4)
dict4['weight'] = 44
print(dict4)
#字典里的函数 items()  keys() values()
dict5 = {'杨超越':165,'虞书欣':166,'上官喜爱':164}
print(dict5.items())
for key,value in dict5.items():
    if value > 165:
        print(key)
#values() 取出字典中所有的值,保存到列表中
results = dict5.values()
print(results)
#求小姐姐的平均身高
heights = dict5.values()
print(heights)
total = sum(heights)
avg = total/len(heights)
print(avg)
names = dict5.keys()
print(names)
#print(dict5['赵小棠'])
print(dict5.get('赵小棠'))
print(dict5.get('赵小棠',170)) #如果能够取到值,则返回字典中的值,否则返回默认值170
dict6 = {'杨超越':165,'虞书欣':166,'上官喜爱':164}
del dict6['杨超越']
print(dict6)
result = dict6.pop('虞书欣')
print(result)
print(dict6)
Python面向对象
定义一个类Animals:
(1)init()定义构造函数,与其他面向对象语言不同的是,Python语言中,会明确地把代表自身实例的self作为第一个参数传入
(2)创建一个实例化对象 cat,init()方法接收参数
(3)使用点号 . 来访问对象的属性。
class Animal:

    def __init__(self,name):
        self.name = name
        print('动物名称实例化')
    def eat(self):
        print(self.name +'要吃东西啦!')
    def drink(self):
        print(self.name +'要喝水啦!')
cat =  Animal('miaomiao')
print(cat.name)
cat.eat()
cat.drink()
class Person:
    def __init__(self,name):
        self.name = name
        print ('调用父类构造函数')

    def eat(self):
        print('调用父类方法')
class Student(Person):  # 定义子类
   def __init__(self):
      print ('调用子类构造方法')

   def study(self):
      print('调用子类方法')
s = Student()          # 实例化子类
s.study()              # 调用子类的方法
s.eat()                # 调用父类方法
Python JSON
JSON(JavaScript Object Notation) 是一种轻量级的数据交换格式,易于人阅读和编写。
json.dumps 用于将 Python 对象编码成 JSON 字符串。
import json
data = [ { 'b' : 2, 'd' : 4, 'a' : 1, 'c' : 3, 'e' : 5 } ]
json = json.dumps(data)
print(json)
为了提高可读性,dumps方法提供了一些可选的参数。
sort_keys=True表示按照字典排序(a到z)输出。
indent参数,代表缩进的位数
separators参数的作用是去掉,和:后面的空格,传输过程中数据越精简越好
import json
data = [ { 'b' : 2, 'd' : 4, 'a' : 1, 'c' : 3, 'e' : 5 } ]
json = json.dumps(data, sort_keys=True, indent=4,separators=(',', ':'))
print(json)
json.loads 用于解码 JSON 数据。该函数返回 Python 字段的数据类型。
import json
jsonData = '{"a":1,"b":2,"c":3,"d":4,"e":5}'
text = json.loads(jsonData)  #将string转换为dict
print(text)
Python异常处理
当Python脚本发生异常时我们需要捕获处理它,否则程序会终止执行。
捕捉异常可以使用try/except语句。
try/except语句用来检测try语句块中的错误,从而让except语句捕获异常信息并处理。
try:
    fh = open("/home/aistudio/data/testfile01.txt", "w")
    fh.write("这是一个测试文件,用于测试异常!!")
except IOError:
    print('Error: 没有找到文件或读取文件失败')
else:
    print ('内容写入文件成功')
    fh.close()
finally中的内容,退出try时总会执行
try:
    f = open("/home/aistudio/data/testfile02.txt", "w")
    f.write("这是一个测试文件,用于测试异常!!")
finally:
    print('关闭文件')
    f.close()
常见Linux命令
!ls /home
!ls ./
ls  -l
!pwd
cp :复制文件或目录
!cp test.txt ./test_copy.txt
mv:移动文件与目录,或修改文件与目录的名称
!mv /home/aistudio/work/test_copy.txt /home/aistudio/data/
rm :移除文件或目录
!rm /home/aistudio/data/test_copy.txt
很多大型文件或者数据从服务器上传或者下载的时候都需要打包和压缩解压,这时候知道压缩和解压的各种命令是很有必要的。
常见的压缩文件后缀名有.tar.gz,.gz,和.zip,下面来看看在Linux上它们分别的解压和压缩命令。
gzip:
linux压缩文件中最常见的后缀名即为.gz,gzip是用来压缩和解压.gz文件的命令。
常用参数:
-d或–decompress或–uncompress:解压文件;
-r或–recursive:递归压缩指定文件夹下的文件(该文件夹下的所有文件被压缩成单独的.gz文件);
-v或–verbose:显示指令执行过程。
注:gzip命令只能压缩单个文件,而不能把一个文件夹压缩成一个文件(与打包命令的区别)。
#会将文件压缩为文件 test.txt.gz,原来的文件则没有了,解压缩也一样
!gzip /home/aistudio/work/test.txt
In[10]
!gzip -d /home/aistudio/test.gz
tar:
tar本身是一个打包命令,用来打包或者解包后缀名为.tar。配合参数可同时实现打包和压缩。
常用参数:
-c或–create:建立新的备份文件;
-x或–extract或–get:从备份文件中还原文件;
-v:显示指令执行过程;
-f或–file:指定备份文件;
-C:指定目的目录;
-z:通过gzip指令处理备份文件;
-j:通过bzip2指令处理备份文件。
最常用的是将tar命令与gzip命令组合起来,直接对文件夹先打包后压缩:
!tar -zcvf /home/aistudio/work/test.tar.gz /home/aistudio/work/test.txt
In[ ]
!tar -zxvf /home/aistudio/work/test.tar.gz
zip和unzip
zip命令和unzip命令用在在Linux上处理.zip的压缩文件。
zip:
-v:显示指令执行过程;
-m:不保留原文件;
-r:递归处理。
unzip:
-v:显示指令执行过程;
-d:解压到指定目录。
!zip -r /home/aistudio/work/test.zip /home/aistudio/work/test.txt
!unzip  /home/aistudio/work/test.zip
作业
request模块:
requests是python实现的简单易用的HTTP库,官网地址:http://cn.python-requests.org/zh_CN/latest/
requests.get(url)可以发送一个http get请求,返回服务器响应内容。
BeautifulSoup库:
BeautifulSoup 是一个可以从HTML或XML文件中提取数据的Python库。网址:https://beautifulsoup.readthedocs.io/zh_CN/v4.4.0/
BeautifulSoup支持Python标准库中的HTML解析器,还支持一些第三方的解析器,其中一个是 lxml。
BeautifulSoup(markup, “html.parser”)或者BeautifulSoup(markup, “lxml”),推荐使用lxml作为解析器,因为效率更高。
一、爬取百度百科中《青春有你2》中所有参赛选手信息,返回页面数据
import json
import re
import requests
import datetime
from bs4 import BeautifulSoup
import os
#获取当天的日期,并进行格式化,用于后面文件命名,格式:20200420
today = datetime.date.today().strftime('%Y%m%d')
def crawl_wiki_data():
"""
爬取百度百科中《青春有你2》中参赛选手信息,返回html
"""
headers = {
'User-Agent': 'Mozilla/5.0 (Windows NT 10.0; WOW64) AppleWebKit/537.36 (KHTML, like Gecko) Chrome/67.0.3396.99 Safari/537.36'
}
url='https://baike.baidu.com/item/青春有你第二季'
try:
response = requests.get(url,headers=headers)
print(response.status_code)
#将一段文档传入BeautifulSoup的构造方法,就能得到一个文档的对象, 可以传入一段字符串
soup = BeautifulSoup(response.text,'lxml')
#返回的是class为table-view log-set-param的所有标签
tables = soup.find_all('table',{'class':'table-view log-set-param'})
crawl_table_title = "参赛学员"
for table in tables:
#对当前节点前面的标签和字符串进行查找
table_titles = table.find_previous('div').find_all('h3')
for title in table_titles:
if(crawl_table_title in title):
return table
except Exception as e:
print(e)
二、对爬取的页面数据进行解析,并保存为JSON文件
def parse_wiki_data(table_html):
'''
从百度百科返回的html中解析得到选手信息,以当前日期作为文件名,存JSON文件,保存到work目录下
'''
bs = BeautifulSoup(str(table_html),'lxml')
all_trs = bs.find_all('tr')
error_list = ['\'','\"']
stars = []
for tr in all_trs[1:]:
all_tds = tr.find_all('td')
star = {}
#姓名
star["name"]=all_tds[0].text
#个人百度百科链接
star["link"]= 'https://baike.baidu.com' + all_tds[0].find('a').get('href')
#籍贯
star["zone"]=all_tds[1].text
#星座
star["constellation"]=all_tds[2].text
#身高
star["height"]=all_tds[3].text
#体重
star["weight"]= all_tds[4].text
#花语,去除掉花语中的单引号或双引号
flower_word = all_tds[5].text
for c in flower_word:
if c in error_list:
flower_word=flower_word.replace(c,'')
star["flower_word"]=flower_word
#公司
if not all_tds[6].find('a') is None:
star["company"]= all_tds[6].find('a').text
else:
star["company"]= all_tds[6].text
stars.append(star)
json_data = json.loads(str(stars).replace("\'","\""))
with open('work/' + today + '.json', 'w', encoding='UTF-8') as f:
json.dump(json_data, f, ensure_ascii=False)
三、爬取每个选手的百度百科图片,并进行保存
def crawl_pic_urls():
'''
爬取每个选手的百度百科图片,并保存
'''
with open('work/'+ today + '.json', 'r', encoding='UTF-8') as file:
json_array = json.loads(file.read())
headers = {
'User-Agent': 'Mozilla/5.0 (Windows NT 10.0; WOW64) AppleWebKit/537.36 (KHTML, like Gecko) Chrome/67.0.3396.99 Safari/537.36'
}
for star in json_array:
name = star['name']
link = star['link']
#!!!请在以下完成对每个选手图片的爬取,将所有图片url存储在一个列表pic_urls中!!!
response = requests.get(link,headers=headers)
bs=BeautifulSoup(response.txt,'lxml') ##获取网页数据
pic_list_url =bs.select(".summary-pic a")[0].get('href')
pic_list_url = "https://baike.baidu.com"+pic_list_url
response1 =requests.get(pic_list_url,headers=headers)
bs1=BeautifulSoup(response1.txt,'lxml')
pic_hmtls = soup.select('.pic-list img')
#!!!根据图片链接列表pic_urls, 下载所有图片,保存在以name命名的文件夹中!!!
pic_urls= []
for pic_html in pic_hmtls:
pic_url = pic_html.get('src')
pic_urls.append(pic_url)
down_pic(name,pic_urls)
def down_pic(name,pic_urls):
'''
根据图片链接列表pic_urls, 下载所有图片,保存在以name命名的文件夹中,
'''
path = 'work/'+'pics/'+name+'/'
if not os.path.exists(path):
os.makedirs(path)
for i, pic_url in enumerate(pic_urls):
try:
pic = requests.get(pic_url, timeout=15)
string = str(i + 1) + '.jpg'
with open(path+string, 'wb') as f:
f.write(pic.content)
print('成功下载第%s张图片: %s' % (str(i + 1), str(pic_url)))
except Exception as e:
print('下载第%s张图片时失败: %s' % (str(i + 1), str(pic_url)))
print(e)
continue
四、打印爬取的所有图片的路径
def show_pic_path(path):
'''
遍历所爬取的每张图片,并打印所有图片的绝对路径
'''
pic_num = 0
for (dirpath,dirnames,filenames) in os.walk(path):
for filename in filenames:
pic_num += 1
print("第%d张照片:%s" % (pic_num,os.path.join(dirpath,filename)))
print("共爬取《青春有你2》选手的%d照片" % pic_num)
if __name__ == '__main__':
#爬取百度百科中《青春有你2》中参赛选手信息,返回html
html = crawl_wiki_data()
#解析html,得到选手信息,保存为json文件
parse_wiki_data(html)
#从每个选手的百度百科页面上爬取图片,并保存
crawl_pic_urls()
#打印所爬取的选手图片路径
show_pic_path('/home/aistudio/work/pics/')
print("所有信息爬取完成!")
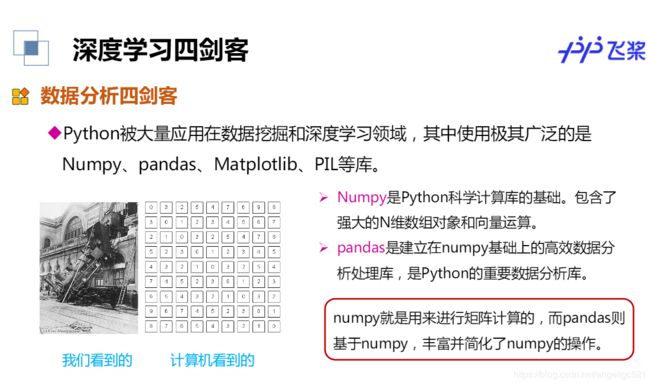
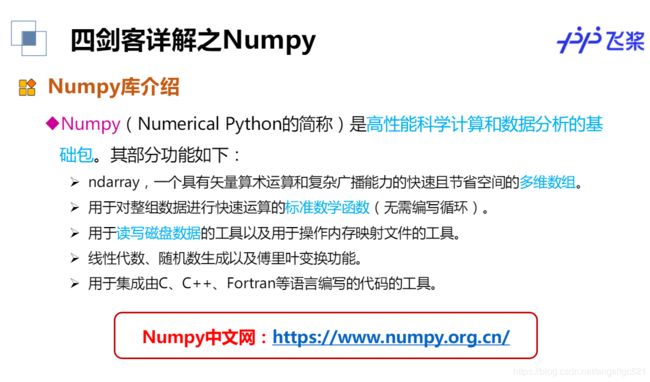
第三天 深度学习常用Python库介绍
通常,数组的元素最初是未知的,但它的大小是已知的。因此,NumPy提供了几个函数来创建具有初始占位符内容的数组。
-
zeros():可以创建指定长度或者形状的全0数组
-
ones():可以创建指定长度或者形状的全1数组
-
empty():创建一个数组,其初始内容是随机的,取决于内存的状态


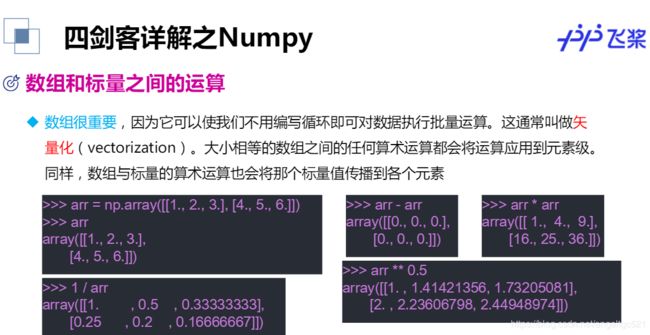
2.数组的计算
数组很重要,因为它可以使我们不用编写循环即可对数据执行批量运算。这通常叫做矢量化(vectorization)。
大小相等的数组之间的任何算术运算都会将运算应用到元素级。同样,数组与标量的算术运算也会将那个标量值传播到各个元素.
矩阵的基础运算:
arr1 = np.array([[1,2,3],[4,5,6]])
arr2 = np.ones([2,3],dtype=np.int64)
print(arr1 + arr2)
print(arr1 - arr2)
print(arr1 * arr2)
print(arr1 / arr2)
print(arr1 ** 2)
矩阵乘法
#矩阵乘法
arr3 = np.array([[1,2,3],[4,5,6]])
arr4 = np.ones([3,2],dtype=np.int64)
print(arr3)
print(arr4)
print(np.dot(arr3,arr4))
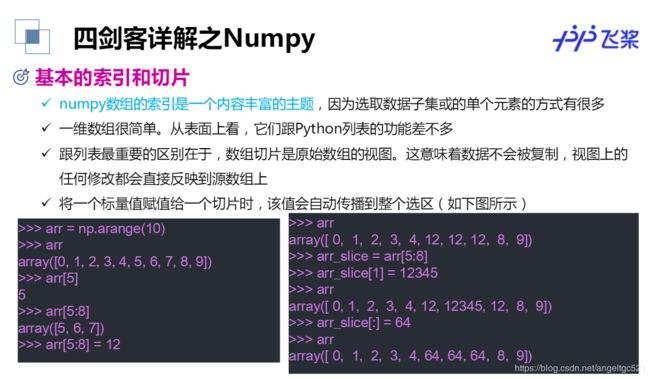
数组的索引与切片
arr5 = np.arange(0,6).reshape([2,3])
print(arr5)
print(arr5[1])
print(arr5[1][2])
print(arr5[1,2])
print(arr5[1,:])
print(arr5[:,1])
print(arr5[1,0:2])
padas库
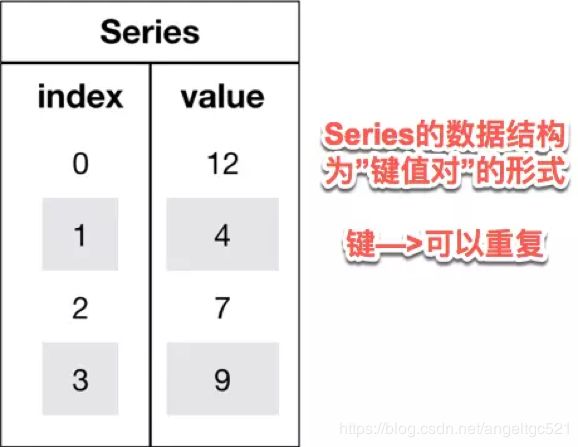

1.Series
Series是一种类似于一维数组的对象,它由一维数组(各种numpy数据类型)以及一组与之相关的数据标签(即索引)组成.
可理解为带标签的一维数组,可存储整数、浮点数、字符串、Python 对象等类型的数据。
Seris中可以使用index设置索引列表。
与字典不同的是,Seris允许索引重复
Series 可以用字典实例化
可以通过Series的values和index属性获取其数组表示形式和索引对象
#与普通numpy数组相比,可以通过索引的方式选取Series中的单个或一组值
print(s[100])
print(s[[400, 500]])
Series中最重要的一个功能是:它会在算术运算中自动对齐不同索引的数据
Series 和多维数组的主要区别在于, Series 之间的操作会自动基于标签对齐数据。因此,不用顾及执行计算操作的 Series 是否有相同的标签。
DataFrame


DataFrame是一个表格型的数据结构,类似于Excel或sql表
它含有一组有序的列,每列可以是不同的值类型(数值、字符串、布尔值等)
DataFrame既有行索引也有列索引,它可以被看做由Series组成的字典(共用同一个索引)
用多维数组字典、列表字典生成 DataFrame
如果指定了列顺序,则DataFrame的列就会按照指定顺序进行排列
frame1 = pd.DataFrame(data, columns=['year', 'state', 'pop'])
print(frame1)
跟原Series一样,如果传入的列在数据中找不到,就会产生NAN值
用 Series 字典或字典生成 DataFrame
#通过类似字典标记的方式或属性的方式,可以将DataFrame的列获取为一个Series,返回的Series拥有原DataFrame相同的索引
print(frame2['state'])
列可以通过赋值的方式进行修改,例如,给那个空的“delt”列赋上一个标量值或一组值
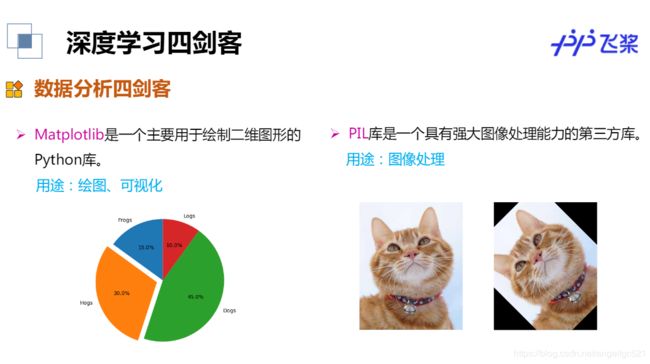
PIL库
PIL库是一个具有强大图像处理能力的第三方库。
图像的组成:由RGB三原色组成,RGB图像中,一种彩色由R、G、B三原色按照比例混合而成。0-255区分不同亮度的颜色。
图像的数组表示:图像是一个由像素组成的矩阵,每个元素是一个RGB值
Image 是 PIL 库中代表一个图像的类(对象)
展示图片,并获取图像的模式,长宽.
from PIL import Image
import matplotlib.pyplot as plt
#显示matplotlib生成的图形
%matplotlib inline
#读取图片
img = Image.open('/home/aistudio/work/yushuxin.jpg')
#显示图片
#img.show() #自动调用计算机上显示图片的工具
plt.imshow(img)
plt.show(img)
#获得图像的模式
img_mode = img.mode
print(img_mode)
width,height = img.size
print(width,height)
from PIL import Image
import matplotlib.pyplot as plt
#显示matplotlib生成的图形
%matplotlib inline
#读取图片
img = Image.open('/home/aistudio/work/yushuxin.jpg')
#显示图片
plt.imshow(img)
plt.show(img)
#将图片旋转45度
img_rotate = img.rotate(45)
#显示旋转后的图片
plt.imshow(img_rotate)
plt.show(img_rotate)
from PIL import Image
#打开图片
img1 = Image.open('/home/aistudio/work/yushuxin.jpg')
#剪切 crop()四个参数分别是:(左上角点的x坐标,左上角点的y坐标,右下角点的x坐标,右下角点的y坐标)
img1_crop_result = img1.crop((126,0,381,249))
#保存图片
img1_crop_result.save('/home/aistudio/work/yushuxin_crop_result.jpg')
#展示图片
plt.imshow(img1_crop_result)
plt.show(img1_crop_result)
from PIL import Image
#打开图片
img2 = Image.open('/home/aistudio/work/yushuxin.jpg')
width,height = img2.size
#缩放
img2_resize_result = img2.resize((int(width*0.6),int(height*0.6)),Image.ANTIALIAS)
print(img2_resize_result.size)
#保存图片
img2_resize_result.save('/home/aistudio/work/yushuxin_resize_result.jpg')
#展示图片
plt.imshow(img2_resize_result)
plt.show(img2_resize_result)
(319, 180)
from PIL import Image
#打开图片
img3 = Image.open('/home/aistudio/work/yushuxin.jpg')
#左右镜像
img3_lr = img3.transpose(Image.FLIP_LEFT_RIGHT)
#展示左右镜像图片
plt.imshow(img3_lr)
plt.show(img3_lr)
#上下镜像
img3_bt = img3.transpose(Image.FLIP_TOP_BOTTOM)
#展示上下镜像图片
plt.imshow(img3_bt)
plt.show(img3_bt)
Matplotlib库
Matplotlib库由各种可视化类构成,内部结构复杂。
matplotlib.pylot是绘制各类可视化图形的命令字库
更多学习,可参考Matplotlib中文网:网址
import matplotlib.pyplot as plt
import numpy as np
#显示matplotlib生成的图形
%matplotlib inline
x = np.linspace(-1,1,50) #等差数列
y = 2*x + 1
#传入x,y,通过plot()绘制出折线图
plt.plot(x,y)
#显示图形
plt.show()
import matplotlib.pyplot as plt
import numpy as np
x = np.linspace(-1,1,50) #等差数列
y1 = 2*x + 1
y2 = x**2
plt.figure()
plt.plot(x,y1)
plt.figure(figsize=(7,5))
plt.plot(x,y2)
plt.show()
import matplotlib.pyplot as plt
import numpy as np
plt.figure(figsize=(7,5))
plt.plot(x,y1,color='red',linewidth=1)
plt.plot(x,y2,color='blue',linewidth=5)
plt.xlabel('x',fontsize=20)
plt.ylabel('y',fontsize=20)
plt.show()
import matplotlib.pyplot as plt
import numpy as np
l1, = plt.plot(x,y1,color='red',linewidth=1)
l2, = plt.plot(x,y2,color='blue',linewidth=5)
plt.legend(handles=[l1,l2],labels=['aa','bb'],loc='best')
plt.xlabel('x')
plt.ylabel('y')
#plt.xlim((0,1)) #x轴只截取一段进行显示
#plt.ylim((0,1)) #y轴只截取一段进行显示
plt.show()
#dots1 = np.array([2,3,4,5,6])
#dots2 = np.array([2,3,4,5,6])
dots1 =np.random.rand(50)
dots2 =np.random.rand(50)
plt.scatter(dots1,dots2,c='red',alpha=0.5) #c表示颜色,alpha表示透明度
plt.show()
x = np.arange(10)
y = 2**x+10
plt.bar(x,y,facecolor='#9999ff',edgecolor='white')
plt.show()
x = np.arange(10)
y = 2**x+10
plt.bar(x,y,facecolor='#9999ff',edgecolor='white')
for ax,ay in zip(x,y):
plt.text(ax,ay,'%.1f' % ay,ha='center',va='bottom')
plt.show()
你可能感兴趣的:(paddlepaddle,CV)