使用到的东西
OpenSSL 1.1.0e
https://www.openssl.org/source/openssl-1.1.0f.tar.gz
https://www.openssl.org/source/
MariaDB 10.3.0
https://codeload.github.com/MariaDB/server/zip/10.3
https://mariadb.com/downloads/mariadb-tx
PCRE 8.40(貌似PHP还不支持PCRE2)
ftp://ftp.pcre.org/pub/pcre/pcre-8.41.tar.bz2
https://ftp.pcre.org/pub/pcre/
Nginx 1.13.0
http://nginx.org/download/nginx-1.13.5.tar.gz
http://nginx.org/en/download.html
PHP 7.1.4
http://am1.php.net/distributions/php-7.1.10.tar.bz2
http://php.net/downloads.php
CURL 7.55.1(可选)
https://curl.haxx.se/download/curl-7.55.1.tar.bz2
https://curl.haxx.se/download/
LibJPEG(可选)
http://www.ijg.org/files/jpegsrc.v9b.tar.gz
http://www.ijg.org
LibPNG(可选)
https://download.sourceforge.net/libpng/libpng-1.6.32.tar.gz
http://www.libpng.org/
LibXML2(可选)
http://xmlsoft.org/sources/libxml2-2.9.5.tar.gz
http://xmlsoft.org/sources/
下载&&安装
你可能被上面的一大堆连接吓到了?
别怕,我已经整理好了,运行下面的语句即可!
#!/bin/bash
cd ~
# 建立临时目录 #
mkdir LNP
cd LNP

# 开始下载各项安装包 #
wget -c https://www.openssl.org/source/openssl-1.1.0f.tar.gz
wget -c https://ftp.pcre.org/pub/pcre/pcre-8.41.tar.gz
wget -c http://nginx.org/download/nginx-1.13.5.tar.gz
wget -c http://am1.php.net/distributions/php-7.1.10.tar.bz2
wget -c https://curl.haxx.se/download/curl-7.55.1.tar.bz2
wget -c http://www.ijg.org/files/jpegsrc.v9b.tar.gz
wget -c https://download.sourceforge.net/libpng/libpng-1.6.32.tar.gz
wget -c http://xmlsoft.org/sources/libxml2-2.9.5.tar.gz
sudo apt-get install -y libjpeg libmcrypt-dev git

# 解压 #
ls *.tar.gz | xargs -n 1 tar -xzf
ls *.tar.bz2 | xargs -n 1 tar -xjf

# 安装OpenSSL #
cd openssl-1.1.0f
sudo ./config;
sudo make;
sudo make install;

# 安装nginx #
cd ../nginx-1.13.5
# 建立用户 #
sudo groupadd nginx
sudo useradd -g nginx -M -s /usr/bin/nologin nginx
sudo ./configure --prefix=/usr/local/nginx \
--user=nginx --group=nginx \
--with-http_flv_module --with-http_mp4_module \
--with-http_gzip_static_module \
--with-http_stub_status_module --with-http_ssl_module -\
-with-pcre=../pcre-8.41 --with-cc=gcc --with-cc-opt=' -O3' \
--with-http_realip_module --with-http_v2_module
sudo make;
sudo make install;

# 安装libjpeg #
cd ../jpeg-9b
./configure --prefix=/usr/local/libjpeg --enable-shared --enable-static
sudo make;
sudo make install;

# 安装libpng #
cd ../libpng-1.6.32
./configure --prefix=/usr/local/libpng --enable-shared --enable-static
sudo make;
sudo make install;

# 安装libxml2 #
cd ../libxml2-2.9.5
sudo ./configure --prefix=/usr/local/libxml2
sudo make
sudo make install

# 安装CURL #
cd ../curl-7.55.1
./configure --prefix=/usr/local/curl
sudo make;
sudo make install

# 更新动态链接库 #
sudo echo /usr/local/libxml2>/etc/ld.so.conf.d/php.conf
sudo echo /usr/local/libjpeg>>/etc/ld.so.conf.d/php.conf
sudo echo /usr/local/libpng>>/etc/ld.so.conf.d/php.conf
sudo echo /usr/local/libjpeg/lib>>/etc/ld.so.conf.d/php.conf
sudo echo /usr/local/libpng/lib>>/etc/ld.so.conf.d/php.conf
sudo ldconfig

# 安装PHP #
cd ../php-7.1.10
sudo ./configure --prefix=/usr/local/php7 --enable-mbstring \
--with-iconv --enable-zip --with-zlib --with-mcrypt \
--with-gd --with-jpeg-dir=/usr/local/libjpeg --with-png-dir=/usr/local/libpng \
--with-libxml-dir=/usr/local/libxml2 --with-curl=/usr/local/curl \
--enable-pcntl --enable-sockets --with-openssl
sudo make;
sudo make install;


printf "[\033[1;32m--------done!--------\033[m]"
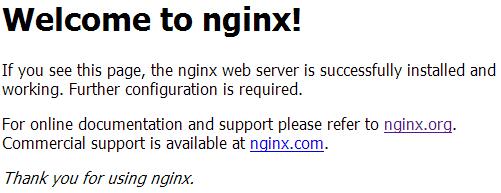
在浏览器输入你的树莓派IP,是不是能看到开始页面了?
MariaDB
wget http://ftp.gnu.org/gnu/ncurses/ncurses-6.0.tar.gz
cd ncurses-6.0
export CPPFLAGS="-P"
./configure && make && sudo make install;
export CPPFLAGS=
git clone https://github.com/MariaDB/server.git mariadb
cd mariadb
BUILD/autorun.sh
./configure
make
sudo make install
配置
由于我们用的是树莓派,所以要优化一下部分的性能
对mysql的调优,打开配置文件/etc/mysql/my.cnf修改以下几处。
[mysqld]
key_buffer = 16k
max_allowed_packet = 1M
thread_stack = 64K
thread_cache_size = 4
query_cache_limit = 1M
default-storage-engine = InnoDB
优化php.ini,php-fpm,打开配置文件/etc/php5/fpm/php.ini和/etc/php5/fpm/php-fpm.conf修改以下几处。
memory_limit=16M
process.max=4
执行sudo vi /usr/local/nginx/conf/nginx.conf,编辑NginX的配置文档如下。
#user  nobody;
# 四个服务进程 #
worker_processes 4;

#error_log  logs/error.log;
#error_log  logs/error.log  notice;
#error_log  logs/error.log  info;

#pid		logs/nginx.pid;
# 最大打开的文件描述符个数 #
worker_rlimit_nofile 65535;
# 每个服务进程最大客户端连接数 #
events {
	worker_connections  256;
}

http {
	include	   mime.types;
	default_type  application/octet-stream;

	#log_format  main  '$remote_addr - $remote_user [$time_local] "$request" '
	#				  '$status $body_bytes_sent "$http_referer" '
	#				  '"$http_user_agent" "$http_x_forwarded_for"';

	#access_log  logs/access.log  main;

	sendfile		on;
	#tcp_nopush	 on;

	# 维持连接30秒 #
	#keepalive_timeout  0;
	keepalive_timeout  30;

	# 压缩页面后传输 #
	gzip  on;

	server {
		# 监听80端口 #
		listen 80;
		server_name localhost;

		#charset koi8-r;

		#access_log  logs/host.access.log  main;

		# 根目录在/var/www/html #
		root /var/www/html;
		index index.html index.htm index.php;
		location / {
			allow all;
		}

		#error_page  404			  /404.html;

		# redirect server error pages to the static page /50x.html
		#
		error_page   500 502 503 504  /50x.html;
		location = /50x.html {
			root   html;
		}

		# proxy the PHP scripts to Apache listening on 127.0.0.1:80
		#
		#location ~ \.php$ {
		#	proxy_pass   http://127.0.0.1;
		#}

		# pass the PHP scripts to FastCGI server listening on 127.0.0.1:9000
		# 设置FastCGI
		location ~ \.php$ {
			root		   /var/www/html;

			# 禁止部分目录的php执行,视服务器自身设置
			set $dontrun 0;
			if ($uri ~ "^/chat/upload/") { set $dontrun 1; }
			if ($uri ~ "^/chat/upload-img/") { set $dontrun 1; }
			if ($uri ~ "^/cloud/data/") { set $dontrun 1; }
			if ($dontrun = 0) { fastcgi_pass 127.0.0.1:9000; }

			fastcgi_index  index.php;
			# 如果修改了根目录,请将此处的目录名一起更改。不要漏掉目录和$fastcgi_script_name中间的斜杠 #
			fastcgi_param  SCRIPT_FILENAME  /var/www/html/$fastcgi_script_name;
			include		fastcgi_params;
		}

		# deny access to .htaccess files, if Apache's document root
		# concurs with nginx's one
		#
		#location ~ /\.ht {
		#	deny  all;
		#}
	}


	# another virtual host using mix of IP-, name-, and port-based configuration
	#
	#server {
	#	listen	   8000;
	#	listen	   somename:8080;
	#	server_name  somename  alias  another.alias;

	#	location / {
	#		root   html;
	#		index  index.html index.htm;
	#	}
	#}


	# HTTPS server
	# 开启HTTPS服务,没有域名&SSL证书的同学可以不开启 #
	server {
		listen	   443 ssl http2;
		server_name localhost;

		# 证书路径不一致的话在这里修改即可 #
		ssl_certificate	  cert.crt;
		ssl_certificate_key  private.key;

		ssl_session_cache	shared:SSL:1m;
		ssl_session_timeout  5m;

		ssl_ciphers  HIGH:!aNULL:!MD5;
		ssl_prefer_server_ciphers  on;

		# 此处配置同HTTP #
		root /var/www/html;
		index index.html index.htm index.php;
			location / {
			allow all;
			}

		location ~ \.php$ {
			root		   /var/www/html;

			# 记得此处也要禁止PHP的执行
			set $dontrun 0;
			if ($uri ~ "^/chat/upload/") { set $dontrun 1; }
			if ($uri ~ "^/chat/upload-img/") { set $dontrun 1; }
			if ($uri ~ "^/cloud/data/") { set $dontrun 1; }
			if ($dontrun = 0) { fastcgi_pass 127.0.0.1:9000; }

			fastcgi_index  index.php;
			fastcgi_param  SCRIPT_FILENAME  /var/www/html/$fastcgi_script_name;
			# 但是要注意这里要开启FastCGI的HTTPS支持 #
			fastcgi_param HTTPS on;
			include		fastcgi_params;
		}
	}

}
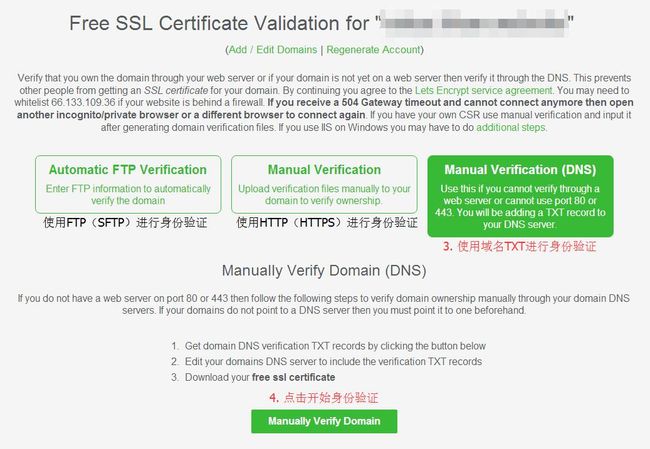
如何获得免费SSL证书?
首先你需要一个域名(大概30~80一年,也就几顿饭而已)
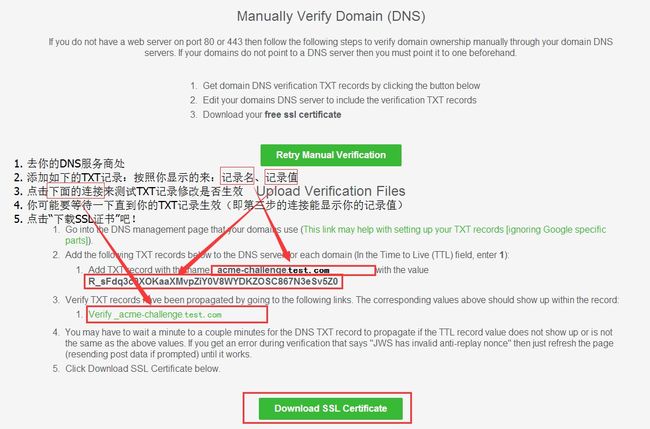
推荐到SSL For Free网站获取Let'sencrypt的证书(每次一键延期有3个月)。
PS:国外网站访问较慢,有能力的同学可以使用科学上网。
你将会下载到三个文件ca_bundle.crt、certificate.crt和private.key。
但是证书一般只有两个文件(公钥和私钥)啊。
哦,那是因为SSL For Free把公钥拆开了。
新建一个文档cert.crt,手动合并两个公钥:certificate.crt在前,ca_bundle.crt在后
新建的cert.crt即为公钥,private.key即为私钥,把这两个文件放入/usr/local/nginx/conf文件夹中,使用上面的配置即可,开始享受吧!
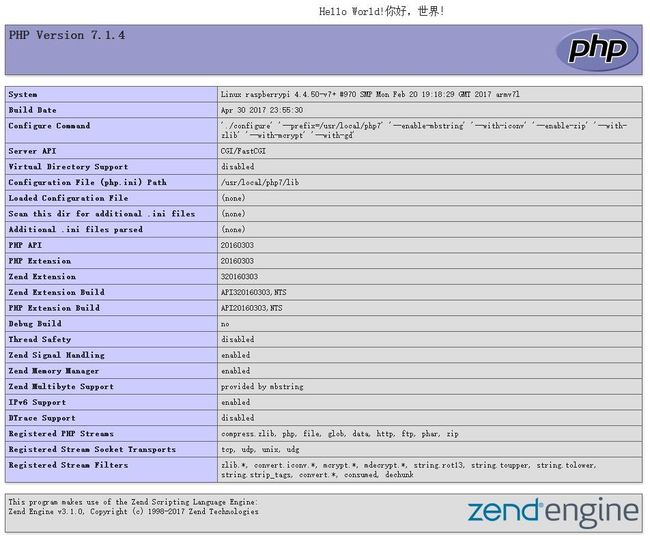
成果
小科普
wget是一个常见的linux下载器,常与-c(断点续传)连用xargs可以将传来的字串分割成-n指定个数的参数传递给后面的命令- 终端文字颜色可以用字符\033[<是否高亮>;<前景色>;<背景色>m来更改,留空即为恢复默认。
- 如:\033[1;41m即为高亮红底默认前景色,顺序可任意颠倒。
下图的四列分别为:前景色+不高亮;前景色+高亮;背景色+不高亮;背景色+高亮;
(图中第一行为黑色,由于默认背景色为黑色,所以显示不出来)
| 前景色 | 背景色 | 颜色 |
| 30 | 40 | 黑色 |
| 31 | 41 | 红色 |
| 32 | 42 | 绿色 |
| 33 | 43 | 黄色 |
| 34 | 44 | 蓝色 |
| 35 | 45 | 紫色 |
| 36 | 46 | 青色 |
| 37 | 47 | 白色 |
Nginx的configure各项中文说明
–prefix=– Nginx安装路径。如果没有指定,默认为 /usr/local/nginx。 –sbin-path= – Nginx可执行文件安装路径。只能安装时指定,如果没有指定,默认为 /sbin/nginx。 –conf-path= – 在没有给定-c选项下默认的nginx.conf的路径。如果没有指定,默认为 /conf/nginx.conf。 –pid-path= – 在nginx.conf中没有指定pid指令的情况下,默认的nginx.pid的路径。如果没有指定,默认为 /logs/nginx.pid。 –lock-path= – nginx.lock文件的路径。 –error-log-path= – 在nginx.conf中没有指定error_log指令的情况下,默认的错误日志的路径。如果没有指定,默认为 /logs/error.log。 –http-log-path= – 在nginx.conf中没有指定access_log指令的情况下,默认的访问日志的路径。如果没有指定,默认为 /logs/access.log。 –user= – 在nginx.conf中没有指定user指令的情况下,默认的nginx使用的用户。如果没有指定,默认为 nobody。 –group= – 在nginx.conf中没有指定user指令的情况下,默认的nginx使用的组。如果没有指定,默认为 nobody。 –with-perl_modules_path=PATH – 指定 perl 模块的路径 –with-perl=PATH – 指定 perl 执行文件的路径 –with-pcre=DIR – 指定 PCRE 库的源代码的路径。 –with-cc=PATH – 指定 C 编译器的路径 –with-http_ssl_module – 开启HTTP SSL模块,使NGINX可以支持HTTPS请求。这个模块需要已经安装了OPENSSL,在DEBIAN上是libssl –with-http_realip_module – 启用 ngx_http_realip_module
php中configure参数具体含义
./configure
–prefix=/usr/local/php                      php 安装目录
–with-config-file-path=/usr/local/php/etc      指定php.ini位置
–enable-safe-mode                              打开安全模式
–enable-ftp                                 打开ftp的支持
–enable-zip                                 打开对zip的支持
–with-bz2                    打开对bz2文件的支持
–with-jpeg-dir                                 打开对jpeg图片的支持
–with-png-dir                                 打开对png图片的支持
–with-freetype-dir              打开对freetype字体库的支持
–without-iconv                关闭iconv函数,种字符集间的转换
–with-libxml-dir                 打开libxml2库的支持
–with-xmlrpc              打开xml-rpc的c语言
–with-zlib-dir                                 打开zlib库的支持
–with-gd                                    打开gd库的支持
–enable-gd-native-ttf               支持TrueType字符串函数库
–with-curl                      打开curl浏览工具的支持
–with-curlwrappers                 运用curl工具打开url流
–enable-mbstring                  多字节,字符串的支持
–enable-sockets                  打开 sockets 支持
–disable-debug                  关闭调试模式
–enable-fpm                     打上php-fpm 补丁后才有这个参数,cgi方式安装的启动程序
–enable-fastcgi                  支持fastcgi方式启动php
–enable-pcntl           mhash和mcrypt算法的扩展
–with-mcrypt                     算法
–with-mhash                     算法
–with-openssl           openssl的支持,加密传输时用到的


