百度飞浆 小白逆袭大神学习笔记
文章目录
- 前言
- 第一天
- 路径搜寻的代码(效果不是很好)
- 第二天
- python基础知识
- 列表&元组&字典
- python面向对象
- python json & 异常处理
- linux基础
- gzip & tar & zip/unzip
- 实战爬取图片
- 第三天
- python中常见的库
- numpy库
- padas库
- PIL库
- Matplotlib库
- 实战数据可视化
- 第四天
- 使用paddlehub 进行5分类的识别
- 循环切割人脸并自动化保存的代码
- 改进hub进行在训练
- 配置策略
- 组建Finetune Task
- 开始Finetune
- 第五天综合大作业
- 爬取心得-细心观察,仔细看网上攻略
- 数据处理
- 数据清洗
- jieba分词
- 数据去除
- 数据可视化
- 使用hub进行语句检测
- 词云统计
- 总结
前言
参加的第二次课程拉,记录一下自己的学习笔记与学习心得
课程目录见下:
第一天
路径搜寻的代码(效果不是很好)
#导入OS模块
import os
#待搜索的目录路径
path = "Day1-homework"
#待搜索的名称
filename = "2020"
#定义保存结果的数组
result = []
index = 0
def findfiles(path):
    #在这里写下您的查找文件代码吧!
    global result
    li = os.listdir(path)

    for p in li:
        tempPathName = p
        pathname = os.path.join(path,p)
        if os.path.isdir(pathname):
            #print(pathname)
            findfiles(pathname)

        if (tempPathName.find(filename) !=-1):
            result.append(pathname)

def print_result():
    result_f =['0','1']
    global index
    for t in result:
        index = index+1
        result_f[0]=index
        result_f[1]=t
        print(result_f)

if __name__ == '__main__':
    findfiles(path)
    print_result()
第二天
python基础知识
如math库,string(join运算符;+运算符),随机数等等
列表&元组&字典
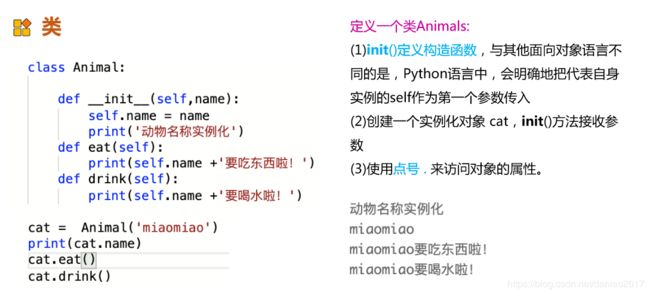
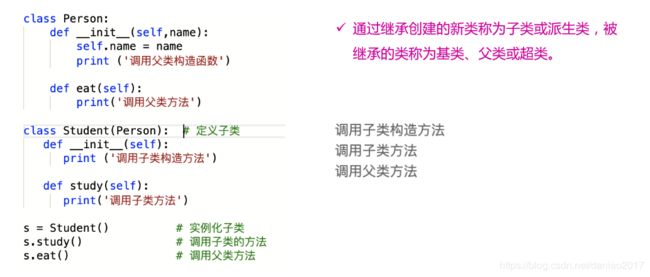
python面向对象
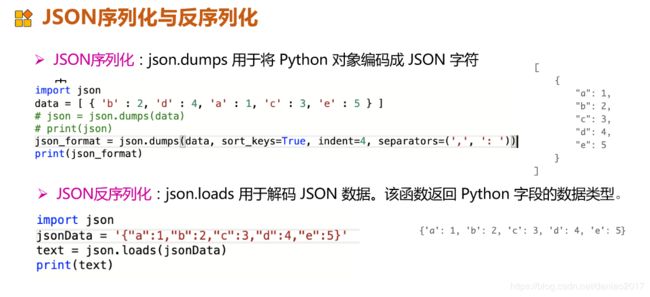
python json & 异常处理
linux基础
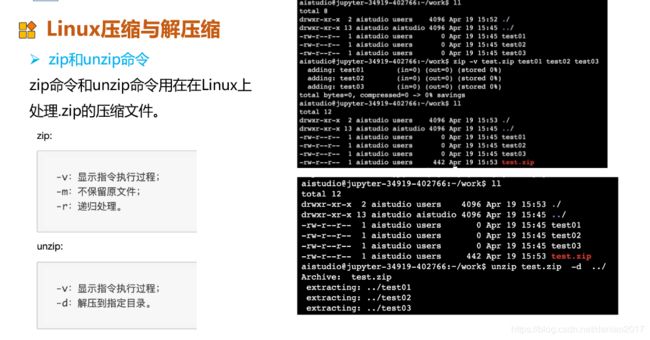
gzip & tar & zip/unzip
实战爬取图片
思路如下:
选手信息爬取 -> 对爬取页面进行解析保存为json数据 -> 爬取选手百度百科图片 -> 打印图片路径
具体可见代码sh
第三天
python中常见的库
numpy,pandas,Matplotlib,PIL
numpy库
numpy是Python科学计算库的基础。包含了强大的N维数组对象和向量运算。
更多学习,可参考numpy中文网:https://www.numpy.org.cn/
- 数组创建
- 数组的计算
- 数组的索引与切片
padas库
pandas是python第三方库,提供高性能易用数据类型和分析工具。
pandas是python第三方库,提供高性能易用数据类型和分析工具。
更多学习,请参考pandas中文网:https://www.pypandas.cn/
-
Series
Series是一种类似于一维数组的对象,它由一维数组(各种numpy数据类型)以及一组与之相关的数据标签(即索引)组成。
可理解为带标签的一维数组,可存储整数、浮点数、字符串、Python 对象等类型的数据。 -
DataFrame
DataFrame是一个表格型的数据结构,类似于Excel或sql表。它含有一组有序的列,每列可以是不同的值类型(数值、字符串、布尔值等)
DataFrame既有行索引也有列索引,它可以被看做由Series组成的字典(共用同一个索引)用多维数组字典、列表字典生成 DataFrame
PIL库
PIL库是一个具有强大图像处理能力的第三方库。Image 是 PIL 库中代表一个图像的类(对象)
Matplotlib库
Matplotlib库由各种可视化类构成,内部结构复杂。
matplotlib.pylot是绘制各类可视化图形的命令字库
更多学习,可参考Matplotlib中文网:https://www.matplotlib.org.cn
实战数据可视化
# 数据处理
import matplotlib.pyplot as plt
import numpy as np
import json
import matplotlib.font_manager as font_manager
import pandas as pd

#显示matplotlib生成的图形
%matplotlib inline
weight_size0 = 0
weight_size1 = 0
weight_size2 = 0
weight_size3 = 0
weight_size = []
df = pd.read_json('data/data31557/20200422.json')
weights = df['weight']
for weight in weights:
    weight =float(weight.replace('kg',''))
    #print(weight)
    if weight <45:
        weight_size0 += 1
    elif weight < 50:
        weight_size1 += 1
    elif weight < 55:
        weight_size2 += 1
    else:
        weight_size3 += 1
#print(weight_size0)
weight_size.append(weight_size0)
weight_size.append(weight_size1)
weight_size.append(weight_size2)
weight_size.append(weight_size3)
print(weight_size)
# 数据可视化
import matplotlib.pyplot as plt
import numpy as np
import json
import matplotlib.font_manager as font_manager
import pandas as pd

#显示matplotlib生成的图形
%matplotlib inline

labels = ('<45kg','45~50kg','50~55kg','>55kg')
explode = (0,0,0.1,0)
plt.pie(weight_size,explode=explode,labels=labels,autopct='%1.1f%%',shadow=False,startangle=150)
plt.axis('equal')
plt.title('《青春有你2》参赛队员体重的百分比')
第四天
使用paddlehub 进行5分类的识别
思路是用paddlehub进行人脸分割,然后在进行路径写入与分类,最后将测试集的人脸进行分割预测。
难点
- 自动化的数据爬取
- 自动化的数据整理与分类
- 路径的写入与读取
- 测试集&验证集&预测集的划分
循环切割人脸并自动化保存的代码
# 循环切割并保存图片
import matplotlib.pyplot as plt
import matplotlib.image as mpimg
import cv2
def face_write(path):
    global list_facea
    input_dict = {"image": list_face}
    #print(list_face)
    results = module.face_detection(data=input_dict)
    list_face = []
    res = results[0]['data']
    if res:
        #print(res)
        img = mpimg.imread(face_result)
        left = int(res[0]['left'])
        right= int(res[0]['right'])
        top = int(res[0]['top'])
        bottom = int(res[0]['bottom'])
        roi = img[top:bottom, left:right]
        img_path_face = "work/face/"+ str(path) +"/" +str(i) + ".jpg"
        print(img_path_face)
        mpimg.imsave(img_path_face,roi)
        #cv2.imwrite(img_path_face,roi)
    else:
        pass
i = 0
for  face_result in test_img_path:
    #print(face_result)
    list_face = []
    list_face.append(face_result)
    i += 1
    a = face_result[11:13]
    #print(a)
    if(a== '安崎'):
        face_write('3')
    if(a== '赵小'):
        face_write('2')
    if(a== '王承'):
        face_write('4')
    if(a== '许佳'):
        face_write('1')
    if(a== '虞书'):
        face_write('0')
改进hub进行在训练
这个地方没有搞明白,但是代码还是要存档保存一下的。
配置策略
config = hub.RunConfig(
    use_cuda=False,                              #是否使用GPU训练,默认为False;
    num_epoch=5,                                #Fine-tune的轮数;
    checkpoint_dir="cv_finetune_turtorial_demo",#模型checkpoint保存路径, 若用户没有指定,程序会自动生成;
    batch_size=3,                              #训练的批大小,如果使用GPU,请根据实际情况调整batch_size;
    eval_interval=10,                           #模型评估的间隔,默认每100个step评估一次验证集;
    strategy=hub.finetune.strategy.DefaultFinetuneStrategy())  #Fine-tune优化策略;
组建Finetune Task
有了合适的预训练模型和准备要迁移的数据集后,我们开始组建一个Task。
由于该数据设置是一个二分类的任务,而我们下载的分类module是在ImageNet数据集上训练的千分类模型,所以我们需要对模型进行简单的微调,把模型改造为一个二分类模型:
- 获取module的上下文环境,包括输入和输出的变量,以及Paddle Program;
- 从输出变量中找到特征图提取层feature_map;
- 在feature_map后面接入一个全连接层,生成Task;
input_dict, output_dict, program = module1.context(trainable=True)
img = input_dict["image"]
feature_map = output_dict["feature_map"]
feed_list = [img.name]

task = hub.ImageClassifierTask(
    data_reader=data_reader,
    feed_list=feed_list,
    feature=feature_map,
    num_classes=dataset.num_labels,
    config=config)
开始Finetune
我们选择finetune_and_eval接口来进行模型训练,这个接口在finetune的过程中,会周期性的进行模型效果的评估,以便我们了解整个训练过程的性能变化。
run_states = task.finetune_and_eval()
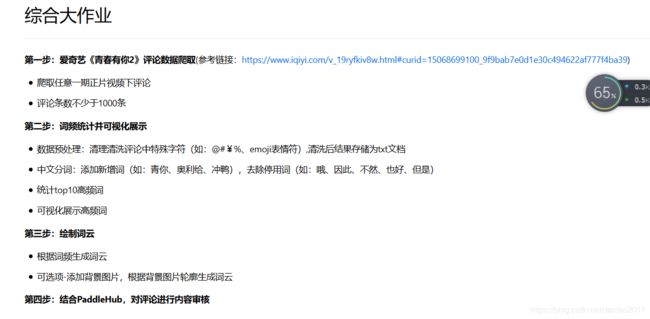
第五天综合大作业
爬取心得-细心观察,仔细看网上攻略
import json
import re
import requests
import datetime
import os
#请求爱奇艺评论接口,返回response信息
def getMovieinfo(url):
    '''
    请求爱奇艺评论接口,返回response信息
    参数  url: 评论的url
    :return: response信息
    '''
    session = requests.Session()
    headers = {
        "User-Agent": "Mozilla/5.0",
        "Accept": "application/json",
        "Referer": "http://m.iqiyi.com/v_19rqriflzg.html",
        "Origin": "http://m.iqiyi.com",
        "Host": "sns-comment.iqiyi.com",
        "Connection": "keep-alive",
        "Accept-Language": "en-US,en;q=0.9,zh-CN;q=0.8,zh;q=0.7,zh-TW;q=0.6",
        "Accept-Encoding": "gzip, deflate"
    }
    response = session.get(url, headers=headers)
    if response.status_code == 200:
        #print(response.text)
        return response.text
    return None
#解析json数据,获取评论
def saveMovieInfoToFile(arr):
    '''
    解析json数据,获取评论
    参数  lastId:最后一条评论ID  arr:存放文本的list
    :return: 新的lastId
    '''
    global lastId
    url_1 = "https://sns-comment.iqiyi.com/v3/comment/get_comments.action?agent_type=118&agent_version=9.11.5&authcookie=null&business_type=17&content_id=15068699100&hot_size=0&last_id="
    url = url_1 +str(lastId)
    ResponseTest = getMovieinfo(url)
    ResponseJosn = json.loads(ResponseTest)
    comments= ResponseJosn['data']['comments']
    ##print(comments)
    for val in  comments :
        #print(val["content"])
        if 'content' in val.keys():
            #print(val["content"])
            arr.append(val["content"])
            #print(val)
            lastId = val['id']
            #print(lastId)
    return lastId


'''
if __name__ == '__main__':

    num = 20
    lastId = "240189679121"
    arr = []
    for i in range(0,num):
        lastId = saveMovieInfoToFile(arr)
        #print(lastId)

    print(len(arr))

lastId = "240189679121"
arr = []
saveMovieInfoToFile(arr)
#getMovieinfo()
'''
数据处理
数据清洗
#去除文本中特殊字符
def clear_special_char(content):
    '''
    正则处理特殊字符
    参数 content:原文本
    return: 清除后的文本
    '''
    s = re.sub(r"| |\t|\r","",content)
    s = re.sub(r"\n","",s)
    s = re.sub(r"\*","\\*",s)
    s = re.sub("[^\u4e00-\u9fa5^a-z^A-Z^0-9]","",s)
    s = re.sub("[\001\002\003\004\005\006\007\x08\x09\x0a\x0b\x0c\x0d\x0e\x0f\x10\x11\x12\x13\x14\x15\x16\x17\x18\x19\x1a]+","", s)
    s = re.sub("[a-zA-Z]","",s)
    s = re.sub("^d+(\.\d+)?$","",s)
    return s
#content = "孔雪儿加油!"
#clear_special_char(content)
jieba分词
直接搜例子,老师的封装很到位
数据去除
去除停用词,统计词频
def movestopwords(sentence,stopwords,counts):
    '''
    去除停用词,统计词频
    参数 file_path:停用词文本路径 stopwords:停用词list counts: 词频统计结果
    return:None
    '''
    out = []
    for word in sentence:
        if word not in stopwords:
            if len(word) != -1:
                counts[word] = counts.get(word,0) + 1

    return None
数据可视化
def drawcounts(counts,num):
    '''
    绘制词频统计表
    参数 counts: 词频统计结果 num:绘制topN
    return:none
    '''
    x_aixs =[]
    y_aixs = []
    c_order = sorted(counts.items(),key=lambda x:x[1],reverse=True)

    #print(c_order[2:50])
    for c in c_order[2:len(c_order)]:
        #print(len(c[0]))
        if len(c[0]) <= 1:
            pass
        else:
            x_aixs.append(c[0])
            y_aixs.append(c[1])
    # 设置显示中文
    plt.rcParams['font.sans-serif'] = ['SimHei'] # 指定默认字体
    plt.rcParams['axes.unicode_minus'] = False
    plt.bar(x_aixs[0:num],y_aixs[0:num])
    plt.title('词频统计结果')
    plt.show()
使用hub进行语句检测
访问hub官网,查看手册即可
词云统计
def drawcloud(counts):
    '''
    参数 counts :统计出的词频结果
    return:none
    '''
    cloud_mask = np.array(Image.open("work/心型.png"))
    wc = WordCloud(
    background_color="white", #背景颜色
    max_words=1000, #显示最大词数
    mask=cloud_mask,
    font_path="work/simhei.ttf",  #使用字体
    min_font_size=5,
    max_font_size=50,
    relative_scaling = 0.3,
    width=400  #图幅宽度
    )
    wc.fit_words(counts)
    wc.to_file("pic.png")
#print(counts)
##print(len(counts))
##drawcloud(counts)
总结
本次实践收获还是非常大的拉,特别是
爬虫&路径搜查与读取&hub的使用
各位讲师的代码封装都很到位~~
啦啦啦,人美心善文姐姐无敌棒!!!
班主任大大也很鼎力!!!
群里的老哥个个都是人才,超喜欢呆在里面~~


