分库分表-----shardingsphere分库分表+读写分离
分库分表+读写分离
1:工具:idea,技术:springboot+shardingsphere+mybatis
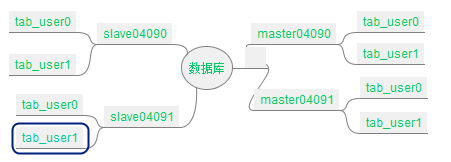
2:数据库:master04090,master04091,slave04090,slave04091
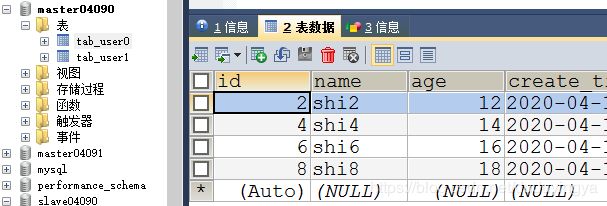
master04090主库,进行写操作,slave04090为 master04090下的从库,进行读操作。master04091,为主库,进行写操作。slave04091为master04091下的从库。进行读操作。每个库下面有2个表tab_user0和tab_user1,逻辑表为tab_user

3 新建实体类
package com.bean;

import com.fasterxml.jackson.annotation.JsonFormat;
import lombok.AllArgsConstructor;
import lombok.Data;
import lombok.NoArgsConstructor;
import org.springframework.format.annotation.DateTimeFormat;

import java.util.Date;

@Data
@AllArgsConstructor
@NoArgsConstructor
public class User {
	private int id; //id
	private String name ; //姓名
	private int age; // 年龄
	@JsonFormat(pattern = "yyyy-MM-dd HH:mm:ss",timezone = "GMT+8")
	@DateTimeFormat(pattern = "yyyy-MM-dd HH:mm:ss")
	private Date create_time; //创建时间
}
4 :新建mapper类
package com.mapper;

import com.bean.User;
import org.apache.ibatis.annotations.Insert;
import org.apache.ibatis.annotations.Param;
import org.apache.ibatis.annotations.Select;
import org.springframework.stereotype.Repository;

import java.util.Date;
import java.util.List;

@Repository
public interface UserMa {

	/**
	 * 添加
	 */
	@Insert({
			" INSERT INTO tab_user (id,name,age,create_time) ",
			" VALUES ( " ,
			"#{id,jdbcType=INTEGER}, ",
			"#{name,jdbcType=VARCHAR}, ",
			"#{age,jdbcType=INTEGER}, ",
			"#{create_time,jdbcType=TIMESTAMP})"
	})
	int addUser(@Param("id")  Integer id,
				@Param("name") String name,
				@Param("age") Integer age,
				@Param("create_time") Date create_time);

	/**
	 * 查询
	 */
	@Select({
			"select id,name,age,create_time ",
			"from tab_user "
	})
	List getAllUsers();

}
5:新建service类
//接口类
package com.service.imp;

import com.bean.User;
import com.util.ResponseUser;
public interface UserSer {
	ResponseUser addUser(User user);
	ResponseUser getAllUsers();
}

//实体类
package com.service;

import com.bean.User;
import com.mapper.UserMa;
import com.service.imp.UserSer;
import com.util.ResponseUser;
import org.springframework.beans.factory.annotation.Autowired;
import org.springframework.stereotype.Service;
import java.util.List;

@Service
public class UserSerDao implements UserSer {

	@Autowired
	private ResponseUser resUser;
	@Autowired
	private UserMa userMa;

	@Override
	public ResponseUser addUser(User user) {
		int count=userMa.addUser(
				user.getId(),user.getName(),user.getAge(),user.getCreate_time());
		if(count==0)
			resUser.setAll(1,"添加失败",null);
		else
			resUser.setAll(0,"添加成功",count);
		return resUser;
	}

	@Override
	public ResponseUser getAllUsers() {
		List users= userMa.getAllUsers();
		if(users.size()==0)
			resUser.setAll(1,"查询失败",null);
		else
			resUser.setAll(0,"查询成功",users);
		return resUser;
	}
}
6:新建控制类
package com.controller;

import com.bean.User;
import com.google.common.collect.Lists;
import com.service.UserSerDao;
import com.util.ResponseUser;
import org.springframework.beans.factory.annotation.Autowired;
import org.springframework.web.bind.annotation.GetMapping;
import org.springframework.web.bind.annotation.PostMapping;
import org.springframework.web.bind.annotation.RestController;
import javax.annotation.PostConstruct;
import java.util.Date;
import java.util.List;


@RestController
public class UserCon {

	@Autowired
	private UserSerDao userSer;

	@Autowired
	private ResponseUser responseUser;

	@GetMapping("/getUsers")
	public ResponseUser getUsers(){
		responseUser=userSer.getAllUsers();
		if (responseUser!=null)
			return responseUser;
		else
			responseUser.setAll(1,"fail",null);
		return responseUser;
	}

	/**
			* 模拟插入数据
	 */
	User user = new User();
	/**
	 * 初始化插入数据,这个注解在启动时就执行了,
	 */
	@PostConstruct
	private void getData() {
		user=new User(7,"小小", 3,new Date());
	}
	/**
	 * 添加数据,可以发现向主库中添加
	 */
	@GetMapping("/save-user")
	public Object saveUser() {
		return userSer.addUser(user);
	}
}
7:新建启动类
package com;

import org.mybatis.spring.annotation.MapperScan;
import org.springframework.boot.SpringApplication;
import org.springframework.boot.autoconfigure.SpringBootApplication;

@SpringBootApplication
@MapperScan(basePackages = "com.mapper")
public class SpringSphere0409 {
	public static void main(String[] args){
		SpringApplication.run(SpringSphere0409.class);
	}
}
8:新建配置文件
server.port=8082

#在控制台打印sql
spring.shardingsphere.props.sql.show=true
spring.main.allow-bean-definition-overriding=true

#数据源
spring.shardingsphere.datasource.names=master04090,master04091,slave04090,slave04091
#分别配置4个数据库的参数
spring.shardingsphere.datasource.master04090.type=com.zaxxer.hikari.HikariDataSource
spring.shardingsphere.datasource.master04090.driver-class-name=com.mysql.jdbc.Driver
spring.shardingsphere.datasource.master04090.jdbc-url=jdbc:mysql://localhost:3306/master04090?characterEncoding=utf-8&&serverTimezone=GMT%2B8
spring.shardingsphere.datasource.master04090.username=root
spring.shardingsphere.datasource.master04090.password=1234

spring.shardingsphere.datasource.slave04090.type=com.zaxxer.hikari.HikariDataSource
spring.shardingsphere.datasource.slave04090.driver-class-name=com.mysql.jdbc.Driver
spring.shardingsphere.datasource.slave04090.jdbc-url=jdbc:mysql://localhost:3306/slave04090?characterEncoding=utf-8&&serverTimezone=GMT%2B8
spring.shardingsphere.datasource.slave04090.username=root
spring.shardingsphere.datasource.slave04090.password=1234

spring.shardingsphere.datasource.master04091.type=com.zaxxer.hikari.HikariDataSource
spring.shardingsphere.datasource.master04091.driver-class-name=com.mysql.jdbc.Driver
spring.shardingsphere.datasource.master04091.jdbc-url=jdbc:mysql://localhost:3306/master04091?characterEncoding=utf-8&&serverTimezone=GMT%2B8
spring.shardingsphere.datasource.master04091.username=root
spring.shardingsphere.datasource.master04091.password=1234

spring.shardingsphere.datasource.slave04091.type=com.zaxxer.hikari.HikariDataSource
spring.shardingsphere.datasource.slave04091.driver-class-name=com.mysql.jdbc.Driver
spring.shardingsphere.datasource.slave04091.jdbc-url=jdbc:mysql://localhost:3306/slave04091?characterEncoding=utf-8&&serverTimezone=GMT%2B8
spring.shardingsphere.datasource.slave04091.username=root
spring.shardingsphere.datasource.slave04091.password=1234

#根据id分库,通过对存入数据的id对2取模来确定存入哪个库
spring.shardingsphere.sharding.default-database-strategy.inline.sharding-column=id
spring.shardingsphere.sharding.default-database-strategy.inline.algorithm-expression=master0409$->{id % 2}

#根据年龄分表,通过对存入数据的id对2取模来确定存入哪个表
spring.shardingsphere.sharding.tables.tab_user.actual-data-nodes=master0409$->{0..1}.tab_user$->{0..1}
spring.shardingsphere.sharding.tables.tab_user.table-strategy.inline.sharding-column=age
spring.shardingsphere.sharding.tables.tab_user.table-strategy.inline.algorithm-expression=tab_user$->{age % 2}

#指定master04090为主库,进行写
spring.shardingsphere.sharding.master-slave-rules.master04090.master-data-source-name=master04090
#slave04090为它的从库,进行读
spring.shardingsphere.sharding.master-slave-rules.master04090.slave-data-source-names=slave04090
#指定master04091为主库,进行写
spring.shardingsphere.sharding.master-slave-rules.master04091.master-data-source-name=master04091
#slave04091为它的从库,进行读
spring.shardingsphere.sharding.master-slave-rules.master04091.slave-data-source-names=slave04091
9:新建测试类
package com;

import com.bean.User;
import com.service.UserSerDao;
import com.util.ResponseUser;
import org.junit.Test;
import org.junit.runner.RunWith;
import org.springframework.boot.test.context.SpringBootTest;
import org.springframework.test.context.junit4.SpringRunner;

import javax.annotation.Resource;
import java.util.Date;
import java.util.List;

@RunWith(SpringRunner.class)
@SpringBootTest(classes ={SpringSphere0409.class})
public class SpringTest {

	@Resource
	private UserSerDao userSer;

	/**
	 * id分库
	 * age分表
	 */
	@Test
	public void test1(){
		User user=new User();
		for (int i = 1; i < 10; i++) {
			user.setId(i);
			user.setName("shi"+i);
			user.setAge(i+10);
			user.setCreate_time(new Date());
			ResponseUser ru=userSer.addUser(user);
			System.out.println("user.toString()~~"+user.toString());
			System.out.println("ru~~"+ru.toString());
		}
	}
	/**
	 * 读
	 */
	@Test
	public void test2(){
		ResponseUser ru=userSer.getAllUsers();
		List us=(List)ru.getData();
		for (User u:us) {
			System.out.println(u.toString());
		}
	}
}
完成:


