开发Chrome插件教程
插件由不同组件构成,组件包括background脚本, content脚本,一个选项页, UI元素和一些逻辑文件。扩展组件的实现技术包括HTML、CSS和Javascript。
创建Manifest
扩展从Manifest文件开始,文件名叫manifest.json。
1、打开chrome://extensions,也可以通过更多工具-扩展程序来打开这个页面。
2、打开开发者模式。
3、加载未打包按钮
这个扩展会被成功加载。
增加功能
现在还没有任何功能,现在通过background.js增加一个后台功能。
首先在manifest.json里配置注册后台脚本。
  {
    "name": "Getting Started Example",
    "version": "1.0",
    "description": "Build an Extension!",
    "manifest_version": 2
  }
现在扩展就会知道了插件包含一个非永久驻存的后台脚本,并扫描注册的脚本文件并加载事件监听。
当安装插件后,需要有一些永久可用的信息。
我们可以在安装时,通过storage API设置一个值。
这样可以允许多个扩展组件区访问这个值,并更新他。
chrome.runtime.onInstalled.addListener(function () {
    chrome.storage.sync.set({
        color: '#3aa757'
    }, function () {
        console.log("The color is green.");
    });
});
大部分API需要在权限permissions里注册一下才允许使用。
{
"name": "Getting Started Example",
"version": "1.0",
"description": "Build an Extension!",
"permissions": ["storage"],
"background": {
  "scripts": ["background.js"],
  "persistent": false
},
"manifest_version": 2
}
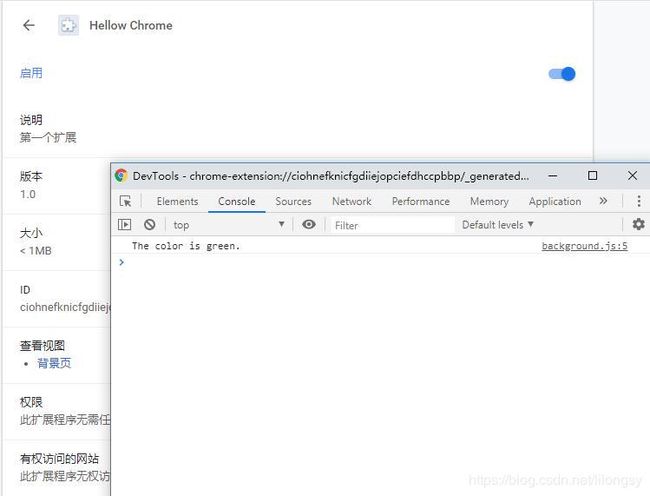
点击扩展右下角的更新图标,然后点击查看详情信息,就会在查看视图下就有一个蓝色的链接,点击背景页。
就会在控制台输出The color is green.。
用户界面(UI)
插件有很多格式的用户界面,这里介绍一个popup。
首先创建一个popup.html文件。
  <html>
    <head>
      <style>
        button {
          height: 30px;
          width: 30px;
          outline: none;
        }
      style>
    head>
    <body>
      <button id="changeColor">button>
    body>
  html>
这个文件仍然需要通过修改manifest.json来告诉Chrome的存在。
  {
    "name": "Getting Started Example",
    "version": "1.0",
    "description": "Build an Extension!",
    "permissions": ["storage"],
    "background": {
      "scripts": ["background.js"],
      "persistent": false
    },
    "page_action": {
      "default_popup": "popup.html",
      "default_icon": {
        "16": "images/get_started16.png",
        "32": "images/get_started32.png",
        "48": "images/get_started48.png",
        "128": "images/get_started128.png"
      }
    },
    "manifest_version": 2
  }
增加了一个page_action,并且default_icon里在配置了图标。
另外在扩展管理页、权限提示页也需要图标,可以在icons里注册配置。
  {
    "name": "Getting Started Example",
    "version": "1.0",
    "description": "Build an Extension!",
    "permissions": ["storage"],
    "background": {
      "scripts": ["background.js"],
      "persistent": false
    },
    "page_action": {
      "default_popup": "popup.html",
      "default_icon": {
        "16": "images/get_started16.png",
        "32": "images/get_started32.png",
        "48": "images/get_started48.png",
        "128": "images/get_started128.png"
      }
    },
    "icons": {
      "16": "images/get_started16.png",
      "32": "images/get_started32.png",
      "48": "images/get_started48.png",
      "128": "images/get_started128.png"
    },
    "manifest_version": 2
  }
现阶段重新加载,插件的图标是灰色的,没有任何功能。这是因为没有在manifest里声明了page_action,需要告诉浏览器popup.html。
为了使用自定义的弹出页面,需要把浏览器自带的弹出框去掉,并用popup.html。
  chrome.runtime.onInstalled.addListener(function() {
    chrome.storage.sync.set({color: '#3aa757'}, function() {
      console.log('The color is green.');
    });
    chrome.declarativeContent.onPageChanged.removeRules(undefined, function() {
      chrome.declarativeContent.onPageChanged.addRules([{
        conditions: [new chrome.declarativeContent.PageStateMatcher({
          // pageUrl: {hostEquals: 'developer.chrome.com'},
        })
        ],
            actions: [new chrome.declarativeContent.ShowPageAction()]
      }]);
    });
  });
这里用到了declarativeContent,需要在manifest里授权。
"permissions": ["declarativeContent", "storage"],
现阶段用户访问"developer.chrome.com"时,点击插件图标,就会显示完整页面了,图片也是彩色的。
最后一步是给按钮添加颜色。创建文件popup.js:
  let changeColor = document.getElementById('changeColor');

  chrome.storage.sync.get('color', function(data) {
    changeColor.style.backgroundColor = data.color;
    changeColor.setAttribute('value', data.color);
  });
这段代码会从storage里获取颜色,然后把popup.html的按钮变成这个色值。
<html>
...
  <body>
    <button id="changeColor">button>
    <script src="popup.js">script>
  body>
html>
重新加载插件,就会看到绿色的按钮。
业务逻辑层
接下来就是给弹出页的按钮添加事件监听,改变浏览器activeTab的背景色:
  let changeColor = document.getElementById('changeColor');
  ...
  changeColor.onclick = function(element) {
    let color = element.target.value;
    chrome.tabs.query({active: true, currentWindow: true}, function(tabs) {
      chrome.tabs.executeScript(
          tabs[0].id,
          {code: 'document.body.style.backgroundColor = "' + color + '";'});
    });
  };
另外还需要增加权限:
"permissions": ["activeTab", "declarativeContent", "storage"],
用户选项
现在只能设置背景色为绿色,如果用户像改变其他颜色就需要用户选项页。
首先增加一个选项页options.html:
  <html>
    <head>
      <style>
        button {
          height: 30px;
          width: 30px;
          outline: none;
          margin: 10px;
        }
      style>
    head>
    <body>
      <div id="buttonDiv">
      div>
      <div>
        <p>Choose a different background color!p>
      div>
    body>
    <script src="options.js">script>
  html>
其次需要在manifest里面注册一下这个页面:
"options_page": "options.html",
最后增加逻辑功能options.js:
  let page = document.getElementById('buttonDiv');
  const kButtonColors = ['#3aa757', '#e8453c', '#f9bb2d', '#4688f1'];
  function constructOptions(kButtonColors) {
    for (let item of kButtonColors) {
      let button = document.createElement('button');
      button.style.backgroundColor = item;
      button.addEventListener('click', function() {
        chrome.storage.sync.set({color: item}, function() {
          console.log('color is ' + item);
        })
      });
      page.appendChild(button);
    }
  }
  constructOptions(kButtonColors);
现在就可以在选项页配置颜色了。