天池大赛-数智重庆比赛日志
文章目录
- 基本环境与mmdetection配置与应用
- 1. 安装cuda和cudnn
- 2.anaconda安装+创建子环境
- 3.安装mmdetection
- mmd论文翻译
- coco数据集以及标注方式
- 简介
- json标注文件的格式
- 在酒瓶数据集上进行配置与训练
- 数据集准备与处理
- 数据集下载地址:
- 数据集清洗
- ~~预训练模型的修改~~
- coco文件修改
- configuration文件修改
- Start
- 训练
- 测试
- 结果提交
- 关于测试评分的一些研究
- TP、FP、FN以及precision、recall
- P-R曲线
- 数据集分类代码
此帖子用于记录天池大赛的比赛经历,同时为组内人员做笔记
比赛详情:https://tianchi.aliyun.com/competition/entrance/231763/forum
基本环境与mmdetection配置与应用
先说下基本环境:ubuntu18.04,gcc 7.4.0 ,显卡2060s(8g)
以下的配置都是根据官网给出的傻瓜教程的要求完成的:BaseLine开源mmdetection
1. 安装cuda和cudnn
anaconda 的 cudatoolkit 不包含完整安装cuda的全部文件,只是包含了用于 tensorflow,pytorch,xgboost 和 Cupy 等所需要的共享库文件。这里涉及到cuda编译,所以仅仅安装conda中的cudatookit是不够的,会报错,所以需要安装cuda和cudnn
具体安装教程网上都有,我就不细说,但是记录几个要点:
- ubuntu下选择的显卡驱动为430驱动,gcc版本为7.4.0
nvidia-smi #查看驱动是否安装好
gcc --version#查看gcc版本
- cuda的版本为10.1,按理说可以更高,但10.1肯定没问题,cuda安装成功的最好验证方式就是编译Sample。
这里记录一下Sample的编译做法:
cd /usr/local/cuda/samples/1_Utilities/deviceQuery
sudo make
./deviceQuery
最后一定要输出true,不然一定是有问题的,再检查一下是否自己的驱动,gcc版本有问题。
3. 要记得安装cudnn.
2.anaconda安装+创建子环境
anaconda官方下载地址:下载地址
anaconda清华源下载地址:下载地址
直接下最新的就好了,使用时单独创建不同的python环境。
注意:这两种方式下载的都是*.sh文件,在安装时直接定位到下载路径:
sudo sh Anaconda3-2019.10-Linux-x86_64.sh
然后跟着提示做就好了。
NOTICE: 到了这里,不要以为就完了,这里需要执行环境变量添加操作:
source ~/.bashrc
你可以用cat指令看到此环境变量,随后,创建子环境
conda create -n mmdetection python=3.7 #创建子环境
conda activate mmdetection   #激活/进入子环境
conda list  #列出子环境的包
接下来进行一个比较常规的操作,由于conda的服务器在国外,下载速度会比较慢,这里可以配置一下清华镜像源:这里直接参考我之前的帖子好了。CSDN链接
3.安装mmdetection
根据BaseLine开源mmdetection来就好了。
NOTICE: 教程中给出了
conda install pytorch=1.1.0 torchvision=0.3.0 cudatoolkit=10.0 -c pytorch
但实际上,加-c是为了从原channel进行下载,但是原channel可能在国外,我们安装的过程中会下载失败或者下载缓慢。但是下载失败之后,会有下载链接弹出来,这时候直接根据提示,用浏览器下载:
我这里给出两个会出错的包的链接:
pytorch1.1.0链接删了
torchvision0.3.0
下载好之后,直接复制到./anaconda3/pkgs/下面,进入该目录,用:
conda install --use-local torchvision-0.3.0-py37_cu10.0.130.tar.bz2 可以安装成功。
NOTICE: 按照此方式下安装pillow的版本是7.0.0版本或者以上的,会在后面报错,PIL的** VERSION **什么的。
解决方法:pip install pillow==6.1 降低版本就可以解决。
接下来就跟着论坛上的内容跟着做就OK了。
mmd论文翻译
详见另一篇帖子:https://blog.csdn.net/qq_20549061/article/details/104129115
coco数据集以及标注方式
简介
总类别:80类
3种标注类型,使用json文件存储,每种类型包含了训练和验证
object instances(目标实例): 也就是目标检测object detection
object keypoints(目标上的关键点)
image captions(看图说话)
json标注文件的格式
在python里面,读取出json标注格式文件,实际上是一个dict,除了info,其余都是对应的数据类型的数组,如下所示:
{
    "info": info,
    "licenses": [license],
    "images": [image],
    "annotations": [annotation],
    "categories": [category]
}
object instances(目标实例)、object keypoints(目标上的关键点)、image captions(看图说话)这3种类型共享这些基本类型:info、image、license,annotation和category这两种字段,他们在不同类型的JSON文件中是不一样的。
下面以目标检测为例,概述一下其中每个字段的结构与包含的信息:
(1)images字段列表元素的长度等同于划入训练集(或者测试集)的图片的数量;
(2)annotations字段列表元素的数量等同于训练集(或者测试集)中bounding box的数量;
(3)categories字段列表元素的数量等同于类别的数量,coco为80(2017年);
info{
    "year": int,  #
    "version": str,
    "description": str,
    "contributor": str,
    "url": str,
    "date_created": datetime,
}
###这个一般用不到
license{
    "id": int,
    "name": str,
    "url": str,
}
###比较重要的就是这个,有时候只包含4种实际需要的信息:id,file_name,width,height.
image{
    "id": int,     #图片唯一识别号
    "width": int,   #尺寸
    "height": int,
    "file_name": str ,#文件名
    "license": int,
    "flickr_url": str,
    "coco_url": str,
    "date_captured": datetime,
}
下面举出几个标注的实例:
1,info 类型,比如一个info类型的实例:
"info":{
	"description":"This is stable 1.0 version of the 2014 MS COCO dataset.",
	"url":"http:\/\/mscoco.org",
	"version":"1.0","year":2014,
	"contributor":"Microsoft COCO group",
	"date_created":"2015-01-27 09:11:52.357475"
},
2,image类型的实例:
{
	"license":3,
	"file_name":"COCO_val2014_000000391895.jpg",
	"coco_url":"http:\/\/mscoco.org\/images\/391895",
	"height":360,
	"width":640,
	"date_captured":"2013-11-14 11:18:45",
	"flickr_url":"http:\/\/farm9.staticflickr.com\/8186\/8119368305_4e622c8349_z.jpg",
	"id":391895
},
3,license类型的实例:
{
	"url":"http:\/\/creativecommons.org\/licenses\/by-nc-sa\/2.0\/",
	"id":1,
	"name":"Attribution-NonCommercial-ShareAlike License"
},
接下来介绍一下比较重要的annotation和category这两个字段:
这个类型中的annotation结构体包含了Object Instance中annotation结构体的所有字段,再加上2个额外的字段。
新增的keypoints是一个长度为3*k的数组,其中k是category中keypoints的总数量。每一个keypoint是一个长度为3的数组,第一和第二个元素分别是x和y坐标值,第三个元素是个标志位v,v为0时表示这个关键点没有标注(这种情况下x=y=v=0),v为1时表示这个关键点标注了但是不可见(被遮挡了),v为2时表示这个关键点标注了同时也可见。
num_keypoints表示这个目标上被标注的关键点的数量(v>0),比较小的目标上可能就无法标注关键点。
annotation{
    "keypoints": [x1,y1,v1,...],  #新增的
    "num_keypoints": int,     #新增的
    "id": int,                           #annotation的id,id的个数对应的就是bbox的个数
    "image_id": int,
    "category_id": int,        #列别编号
    "segmentation": RLE or [polygon],
    "area": float,
    "bbox": [x,y,width,height],
    "iscrowd": 0 or 1,
}
最后,对于每一个category结构体,相比Object Instance中的category新增了2个额外的字段,keypoints是一个长度为k的数组,包含了每个关键点的名字;skeleton定义了各个关键点之间的连接性(比如人的左手腕和左肘就是连接的,但是左手腕和右手腕就不是)。目前,COCO的keypoints只标注了person category (分类为人)。
定义如下:
{
    "id": int,
    "name": str,
    "supercategory": str,   #大类名字,比如西瓜,属于水果大类这种意思
    "keypoints": [str],
    "skeleton": [edge]    #新增的,主要用于人体
}
这次比赛的数据集比较简单,四个大类,11个小类别,包括了
'背景','瓶盖破损', '瓶盖变形', '瓶盖坏边', '瓶盖打旋', '瓶盖断点', '标贴歪斜', '标贴起皱', '标贴气泡', '喷码正常', '喷码异常'
除了背景外,每一个annotation都应该包含了类别信息和bbox
以下是数据集的实例:有效标注只有3种
"images": [
{"file_name": "img_0017151.jpg",
 "height": 492,
 "id": 1,
  "width": 658},..................]

 "categories": [
   {"supercategory": "\u74f6\u76d6\u7834\u635f",   //这里用的是Unicode的中文编码,大类名
    "id": 1,                                 //列别编号
     "name": "\u74f6\u76d6\u7834\u635f"},    //小类名
     {"supercategory": "\u55b7\u7801\u6b63\u5e38",
      "id": 9,
       "name": "\u55b7\u7801\u6b63\u5e38"},.......]


"annotations": [
{"area": 2522.739400000001,
"iscrowd": 0,
"image_id": 1,
"bbox": [165.14, 53.71, 39.860000000000014, 63.29],
"category_id": 2, "id": 213},

 {"area": 207.50240000000025,
 "iscrowd": 0,
 "image_id": 2,
 "bbox": [465.71, 314.86, 13.580000000000041, 15.279999999999973],
 "category_id": 5, "id": 1169}, .........]
在酒瓶数据集上进行配置与训练
这里记录一下我能够成功训练的配置
数据集准备与处理
数据集下载地址:
训练集 ,测试集
数据集清洗
然后我们需要对数据进行清洗,这里的清洗实际上是为了清除掉json文件中只有"背景"(class_id=0)的图片,并且要清除掉所有的背景的标签(由于是个多分类,多目标的问题,所以,同一个图片也会有背景的标签,所以需要清除)。
关于为什么要进行这样的清洗,我的理解是这样的:之前也问过程老师这个问题,就是在工业检测的过程中,我们应当关注正常的数据还是应该关注瑕疵,不同于识别技术,识别技术力求于整个对象的特征表达,并进行一个建模,去做区分。而我们的检测技术,更注重于需要关注的信息,比如在图片中检测到一个人,那么我们的重点是需要证明它是一个人的证据(特征),检测瑕疵也是同样的道理,我们关注的不是整个产品,而是要寻找到这个产品上的瑕疵,并对这个瑕疵进行一个表达。那么我们在训练过程中,训练的也是对瑕疵的表达,比如破损,裂痕等等。在数据集中如果存在了大量的正常数据,由于正常数据中也包含了瓶子,也包含有类似于瑕疵的东西,反而会造成对瑕疵表达有偏差。论坛里也有人给出了这样的说法: 背景类在 mAP 评价里面权重为 0,而且背景的标注也比较随意,很多都是左上角一个小框,反而可能对结果有副作用。
清洗的方法同样,在论坛上能够找到(PS:真的感谢这些无私的大佬能够对我们这群小白这照顾,技术届这样的氛围,何愁计算机技术不能蓬勃发展,程序员才是改变世界的人)。
下面给出链接:数据清洗
我是直接用的大佬给出的json文件替换了原本的文件,注意:这里的清洗实际上并没有删除图片,只删除了这些背景图片在json文件种的标注,使其不纳入训练。
预训练模型的修改
2020/2/6:不存在实际训练影响
我这里是按照论坛上大佬的帖子做的,用的是cascade_rcnn的模型,先给出两个预训练模型的下载链接:链接:https://pan.baidu.com/s/1blfAtzi5TfLQ8gecYMD6PA 提取码:2dzb(来源于论坛)
由于原本的预训练模型应该是对应coco数据集的81个类别,但实际上应该只有11个类别,所以我们要对预训练模型在全连接层进行一个维度的修改。至于为什么这么改,代码是什么意思,我有时间再来解释。
新建一个文件夹checkpoints在项目的根目录,并放入下载的两个模型文件,再新建一个文件modify.py放在checkpoints文件夹下,文件内容如下。并修改参数,运行。
def main():
    #gen coco pretrained weight
    import torch
    num_classes = 11     #重点在这里,11个类别
    model_coco = torch.load("/media/liuxin/DATA/CV/Project/TianChi/mmdetection-master/checkpoints/cascade_rcnn_r50_fpn_1x_20190501-3b6211ab.pth") # weight
    model_coco["state_dict"]["bbox_head.0.fc_cls.weight"] = \
    model_coco["state_dict"]["bbox_head.0.fc_cls.weight"][ :num_classes, :]
    model_coco["state_dict"]["bbox_head.1.fc_cls.weight"] = \
    model_coco["state_dict"]["bbox_head.1.fc_cls.weight"][ :num_classes, :]
    model_coco["state_dict"]["bbox_head.2.fc_cls.weight"] = \
    model_coco["state_dict"]["bbox_head.2.fc_cls.weight"][ :num_classes, :]
    # bias
    model_coco["state_dict"]["bbox_head.0.fc_cls.bias"] = \   # zheng  wen 操作:取消注释
    model_coco["state_dict"]["bbox_head.0.fc_cls.bias"][ :num_classes]
    model_coco["state_dict"]["bbox_head.1.fc_cls.bias"] = \
    model_coco["state_dict"]["bbox_head.1.fc_cls.bias"][ :num_classes]
    model_coco["state_dict"]["bbox_head.2.fc_cls.bias"] = \
    model_coco["state_dict"]["bbox_head.2.fc_cls.bias"][ :num_classes]
    # save new model
    torch.save(model_coco, "/media/liuxin/DATA/CV/Project/TianChi/mmdetection-master/checkpoints/cascade_rcnn_r50_coco_pretrained_weights_classes_%d.pth" % num_classes)
if __name__ == "__main__":
    main()
运行之后我们会得到新的模型文件。
coco文件修改
    CLASSES = ('背景', '瓶盖破损','瓶盖变形','瓶盖坏边','瓶盖打旋','瓶盖断点'
               ,'标贴歪斜','标贴起皱','标贴气泡','喷码正常','喷码异常')
configuration文件修改
2020/2/6:重新修改配置
修改configs文件夹下的cascade_rcnn_r50_fpn_1x.py文件
这里与论坛上的文件相比较,注释了fp16 = dict(loss_scale=512.)这句代码,否则会在训练时报错。
# fp16 settings
fp16 = dict(loss_scale=512.)
# model settings
model = dict(
    type='CascadeRCNN',
    num_stages=3,
    pretrained='torchvision://resnet50',
    backbone=dict(
        type='ResNet',
        depth=50,
        num_stages=4,
        out_indices=(0, 1, 2, 3),
        frozen_stages=1,
        style='pytorch',
        # gen_attention=dict(
        #     spatial_range=-1, num_heads=8, attention_type='0010', kv_stride=2),
        # stage_with_gen_attention=[[], [], [0, 1, 2, 3, 4, 5], [0, 1, 2]],
        dcn=dict(
            type='DCN', deformable_groups=1, fallback_on_stride=False),
        stage_with_dcn=(False, True, True, True)
    ),
    neck=dict(
        type='FPN',
        in_channels=[256, 512, 1024, 2048],
        out_channels=256,
        num_outs=5),
    rpn_head=dict(
        type='RPNHead',
        in_channels=256,
        feat_channels=256,
        anchor_scales=[8],
        anchor_ratios=[0.5, 1.0, 2.0], # 添加了0.2,5,过两天发图
        anchor_strides=[4, 8, 16, 32, 64],
        target_means=[.0, .0, .0, .0],
        target_stds=[1.0, 1.0, 1.0, 1.0],
        loss_cls=dict(
            type='CrossEntropyLoss', use_sigmoid=True, loss_weight=1.0), # 修改了loss,为了调控难易样本与正负样本比例
        loss_bbox=dict(type='SmoothL1Loss', beta=1.0 / 9.0, loss_weight=1.0)),
    bbox_roi_extractor=dict(
        type='SingleRoIExtractor',
        roi_layer=dict(type='RoIAlign', out_size=7, sample_num=2),
        out_channels=256,
        featmap_strides=[4, 8, 16, 32]),
    bbox_head=[
        dict(
            type='SharedFCBBoxHead',
            num_fcs=2,
            in_channels=256,
            fc_out_channels=1024,
            roi_feat_size=7,
            num_classes=11,
            target_means=[0., 0., 0., 0.],
            target_stds=[0.1, 0.1, 0.2, 0.2],
            reg_class_agnostic=True,
            loss_cls=dict(
                type='CrossEntropyLoss', use_sigmoid=False, loss_weight=1.0),
            loss_bbox=dict(type='SmoothL1Loss', beta=1.0, loss_weight=1.0)),
        dict(
            type='SharedFCBBoxHead',
            num_fcs=2,
            in_channels=256,
            fc_out_channels=1024,
            roi_feat_size=7,
            num_classes=11,
            target_means=[0., 0., 0., 0.],
            target_stds=[0.05, 0.05, 0.1, 0.1],
            reg_class_agnostic=True,
            loss_cls=dict(
                type='CrossEntropyLoss', use_sigmoid=False, loss_weight=1.0),
            loss_bbox=dict(type='SmoothL1Loss', beta=1.0, loss_weight=1.0)),
        dict(
            type='SharedFCBBoxHead',
            num_fcs=2,
            in_channels=256,
            fc_out_channels=1024,
            roi_feat_size=7,
            num_classes=11,                              #注意11个类别
            target_means=[0., 0., 0., 0.],
            target_stds=[0.033, 0.033, 0.067, 0.067],
            reg_class_agnostic=True,
            loss_cls=dict(
                type='CrossEntropyLoss', use_sigmoid=False, loss_weight=1.0),
            loss_bbox=dict(type='SmoothL1Loss', beta=1.0, loss_weight=1.0))
    ])
# model training and testing settings
train_cfg = dict(
    rpn=dict(
        assigner=dict(
            type='MaxIoUAssigner',
            pos_iou_thr=0.7,
            neg_iou_thr=0.3,
            min_pos_iou=0.3,
            ignore_iof_thr=-1),
        sampler=dict(
            type='RandomSampler',
            num=256,
            pos_fraction=0.5,
            neg_pos_ub=-1,
            add_gt_as_proposals=False),
        allowed_border=0,
        pos_weight=-1,
        debug=False),
    rpn_proposal=dict(
        nms_across_levels=False,
        nms_pre=2000,
        nms_post=2000,
        max_num=2000,
        nms_thr=0.7,
        min_bbox_size=0),
    rcnn=[
        dict(
            assigner=dict(
                type='MaxIoUAssigner',
                pos_iou_thr=0.5, # 更换
                neg_iou_thr=0.5,
                min_pos_iou=0.5,
                ignore_iof_thr=-1),
            sampler=dict(
                type='RandomSampler',
                num=512,
                pos_fraction=0.25,
                neg_pos_ub=-1,
                add_gt_as_proposals=True),
            pos_weight=-1,
            debug=False),
        dict(
            assigner=dict(
                type='MaxIoUAssigner',
                pos_iou_thr=0.6,
                neg_iou_thr=0.6,
                min_pos_iou=0.6,
                ignore_iof_thr=-1),
            sampler=dict(
                type='RandomSampler', # 解决难易样本,也解决了正负样本比例问题。
                num=512,
                pos_fraction=0.25,
                neg_pos_ub=-1,
                add_gt_as_proposals=True),
            pos_weight=-1,
            debug=False),
        dict(
            assigner=dict(
                type='MaxIoUAssigner',
                pos_iou_thr=0.7,
                neg_iou_thr=0.7,
                min_pos_iou=0.7,
                ignore_iof_thr=-1),
            sampler=dict(
                type='RandomSampler',
                num=512,
                pos_fraction=0.25,
                neg_pos_ub=-1,
                add_gt_as_proposals=True),
            pos_weight=-1,
            debug=False)
    ],
    stage_loss_weights=[1, 0.5, 0.25])
test_cfg = dict(
    rpn=dict(
        nms_across_levels=False,
        nms_pre=1000,
        nms_post=1000,
        max_num=1000,
        nms_thr=0.7,
        min_bbox_size=0),
    rcnn=dict(
        score_thr=0.05, nms=dict(type='nms', iou_thr=0.5), max_per_img=100)) # 这里可以换为sof_tnms
# dataset settings
dataset_type = 'CocoDataset'
data_root = '/home/liusiyu/liuxin/mmdetection/data/coco/' #数据集根目录
img_norm_cfg = dict(
    mean=[123.675, 116.28, 103.53], std=[58.395, 57.12, 57.375], to_rgb=True)
train_pipeline = [
    dict(type='LoadImageFromFile'),
    dict(type='LoadAnnotations', with_bbox=True),
    dict(type='Resize', img_scale=[(1333, 800), (1333, 1200)], multiscale_mode='range',keep_ratio=True), #这里可以更换多尺度[(),()]
    dict(type='RandomFlip', flip_ratio=0.5),
    dict(type='Normalize', **img_norm_cfg),
    dict(type='Pad', size_divisor=32),
    dict(type='DefaultFormatBundle'),
    dict(type='Collect', keys=['img', 'gt_bboxes', 'gt_labels']),
]
test_pipeline = [
    dict(type='LoadImageFromFile'),
    dict(
        type='MultiScaleFlipAug',
        img_scale=[(1333, 800), (1333, 1200)],
        flip=False,
        transforms=[
            dict(type='Resize', keep_ratio=True),
            dict(type='RandomFlip'),
            dict(type='Normalize', **img_norm_cfg),
            dict(type='Pad', size_divisor=32),
            dict(type='ImageToTensor', keys=['img']),
            dict(type='Collect', keys=['img']),
        ])
]
data = dict(
    imgs_per_gpu=2,
    workers_per_gpu=2,
    train=dict(
        type=dataset_type,
        ann_file=data_root + 'annotations/train2017.json',
        img_prefix=data_root + 'images/',
        pipeline=train_pipeline),
    val=dict(
        type=dataset_type,
        ann_file=data_root + 'annotations/val2017.json',
        img_prefix=data_root + 'images/',
        pipeline=test_pipeline),
    test=dict(
        type=dataset_type,
        ann_file=data_root + 'annotations/test2017.json',
        img_prefix=data_root + 'testimages/',
        pipeline=test_pipeline))
# optimizer
optimizer = dict(type='SGD', lr=0.005, momentum=0.9, weight_decay=0.0001) # lr = 0.00125*batch_size,不能过大,否则梯度爆炸。
optimizer_config = dict(grad_clip=dict(max_norm=35, norm_type=2))
# learning policy
lr_config = dict(
    policy='step',
    warmup='linear',
    warmup_iters=500,
    warmup_ratio=1.0 / 3,
    step=[8,11])
checkpoint_config = dict(interval=1)
# yapf:disable
log_config = dict(
    interval=50,
    hooks=[
        dict(type='TextLoggerHook'), # 控制台输出信息的风格
        # dict(type='TensorboardLoggerHook') # 需要安装tensorflow and tensorboard才可以使用
    ])
# yapf:enable
# runtime settings
total_epochs =25
dist_params = dict(backend='nccl')
log_level = 'INFO'
import datetime
a=datetime.datetime.now().strftime('%Y%m%d%H%M')
work_dir = '/home/liusiyu/liuxin/mmdetection/checkpoints/cascade_rcnn_r50_fpn_1x/{}'.format(a)
# load_from = "/home/liusiyu/liuxin/mmdetection/model/cascade_rcnn_r50_fpn_1x_20190501-3b6211ab.pth"
load_from = "/home/liusiyu/liuxin/mmdetection/checkpoints/cascade_rcnn_r50_fpn_1x/latest.pth"
resume_from = None
workflow = [
    ('train', 1)]

# runtime settings
# total_epochs = 20
# dist_params = dict(backend='nccl')
# log_level = 'INFO'
# work_dir = '/home/liusiyu/liuxin/mmdetection/checkpoints/cascade_rcnn_r50_fpn_1x/' #训练的权重和日志保存路径
# load_from = '/home/liusiyu/liuxin/mmdetection/checkpoints/cascade_rcnn_r50_fpn_1x/cascade_rcnn_r50_fpn_1x_20190501-3b6211ab.pth'
# resume_from =None
# workflow = [('train', 1)]
Start
在根目录下,运行命令行(分布式训练):
训练
tools/dist_train.sh configs/cascade_rcnn_r50_fpn_1x.py 2 --validate
–validate表示在训练时进行评估,只有在分布式训练时能够进行评估
测试
tools/dist_test.sh configs/cascade_rcnn_r50_fpn_1x.py work_dir/epoch_x.pth 4 --json_out reslut.json
python tools/train.py configs/cascade_rcnn_r50_fpn_1x.py --gpus 1
就可以训练了。
python tools/train.py configs/cascade_rcnn_r50_fpn_1x.py --gpus 1 --validate
–validate表示在训练时进行评估,只有在分布式训练时能够进行评估(至少两张显卡,所以要买自己服务器的时候懂了吧,双显卡主板+2070s+2060 6G,香)练结束后,没有双卡,如何进行测试:
输出图片:
python tools/test.py configs/cascade_rcnn_r50_fpn_1x.py work_dirs/cascade_rcnn_r50_fpn_1x/epoch_10.pth --show
结果提交
利用测试指令已经生成了基本reslut.json但是需要修改成官方得格式:
# #encoding:utf/8
import sys
from mmdet.apis import inference_detector, init_detector
import json
import cv2
import os
import numpy as np
import argparse
from tqdm import tqdm
class MyEncoder(json.JSONEncoder):
    def default(self, obj):
        if isinstance(obj, np.integer):
            return int(obj)
        elif isinstance(obj, np.floating):
            return float(obj)
        elif isinstance(obj, np.ndarray):
            return obj.tolist()
        else:
            return super(MyEncoder, self).default(obj)

class COCO_Set():
    '''
    des:
    '''
    # 定义类变量,完全不变
    categories = [{"supercategory": "\u74f6\u76d6\u7834\u635f", "id": 1, "name": "\u74f6\u76d6\u7834\u635f"},
                  {"supercategory": "\u55b7\u7801\u6b63\u5e38", "id": 9, "name": "\u55b7\u7801\u6b63\u5e38"},
                  {"supercategory": "\u74f6\u76d6\u65ad\u70b9", "id": 5, "name": "\u74f6\u76d6\u65ad\u70b9"},
                  {"supercategory": "\u74f6\u76d6\u574f\u8fb9", "id": 3, "name": "\u74f6\u76d6\u574f\u8fb9"},
                  {"supercategory": "\u74f6\u76d6\u6253\u65cb", "id": 4, "name": "\u74f6\u76d6\u6253\u65cb"},
                  {"supercategory": "\u80cc\u666f", "id": 0, "name": "\u80cc\u666f"},
                  {"supercategory": "\u74f6\u76d6\u53d8\u5f62", "id": 2, "name": "\u74f6\u76d6\u53d8\u5f62"},
                  {"supercategory": "\u6807\u8d34\u6c14\u6ce1", "id": 8, "name": "\u6807\u8d34\u6c14\u6ce1"},
                  {"supercategory": "\u6807\u8d34\u6b6a\u659c", "id": 6, "name": "\u6807\u8d34\u6b6a\u659c"},
                  {"supercategory": "\u55b7\u7801\u5f02\u5e38", "id": 10, "name": "\u55b7\u7801\u5f02\u5e38"},
                  {"supercategory": "\u6807\u8d34\u8d77\u76b1", "id": 7, "name": "\u6807\u8d34\u8d77\u76b1"}]

    def __init__(self, name, images_path='./images/'):
        # 初始化coco数据集基本信息
        self.name = name
        self.images_pth = images_path
        self.info = []
        self.images = []
        self.license = []
        self.annotations = []
        self.json_file = None

    # 转化json对象为python对象
    def load_json(self,json_path):
        with  open(json_path)  as f:
            self.json_file = json.load(f)  # 读入到python对象
            return self.json_file
        return None

    # 获取json values
    def get_items(self, key):
        return self.json_file[key]

    # 写入json
    def write_file(self, json_name):
        self.write_json = {'info': self.info, 'images': self.images, 'license': self.license,
                           'categories': self.categories, 'annotations': self.annotations}
        with open(json_name, "w") as f:
            json.dump(self.write_json, f, indent=4)

def main():

    parser = argparse.ArgumentParser(description="Generate result")
    parser.add_argument("--test_input",default='/home/liusiyu/liuxin/mmdetection/data/coco/annotations/test2017.json',help="test_json path", type=str,)
    parser.add_argument('--reslut_input', default='/home/liusiyu/liuxin/mmdetection/checkpoints/cascade_rcnn_r50_fpn_1x/202002051610/reslut.bbox.json',help="result_json path", type=str,)
    parser.add_argument('-o', "--out",default='/home/liusiyu/liuxin/mmdetection/checkpoints/cascade_rcnn_r50_fpn_1x/202002051610/reslut.json',help="Save path", type=str,)
    args = parser.parse_args()
    # 	model2make_json = args.model
    test_set = COCO_Set('test_json', images_path=None)
    reslut_set = COCO_Set('result_json', images_path=None)
    tejson_file=test_set.load_json(json_path=args.test_input)
    resjson_file=reslut_set.load_json(json_path=args.reslut_input)
    test_set.images=tejson_file['images']
    #进行一个非常粗糙的滤波
    for index ,i in enumerate(resjson_file):
        if i["category_id"] == 6 or i["category_id"] == 7 or i["category_id"] == 8:
            if i["score"] > 0.05:
                score = i["score"]
                i["score"] = round(score, 4)
                test_set.annotations.append(i)
        else:
            if i["score"] > 0.01:
                score = i["score"]
                i["score"] = round(score, 4)
                test_set.annotations.append(i)

    test_set.write_file(json_name=args.out)


if __name__ == "__main__":
    main()
关于测试评分的一些研究
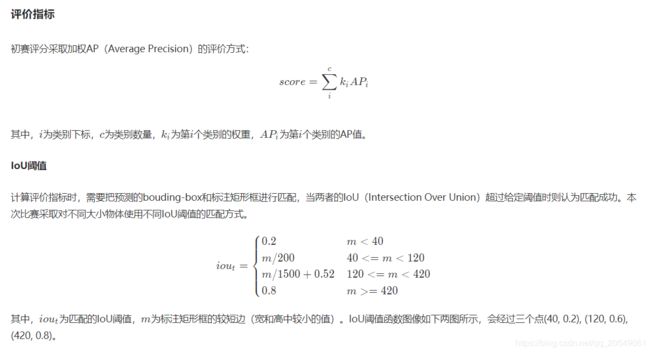
先看一下官方给出的评分标准:

大多数指标是非常好理解的,但是 A P i AP_i APi的计算需要记录一下。这里不得不说,网上的大部分帖子,描述得还是很有问题,并且不相同。这里我首先要注明,目标检测与单纯的图像分类是有比较大的区别的(目标检测不仅有标签、置信度,还存在bbox以及IOU这个概念,但是图像分类则只有标签、置信度,所以难免很多概念要复杂一点。),我这里先介绍一个写得非常清楚的帖子:https://github.com/rafaelpadilla/Object-Detection-Metrics。
TP、FP、FN以及precision、recall
我们在进行预测的时候对得到每个bbox的image_id、label_id(类别信息)、bbox(x,y,w,h)、score。我们在计算AP的时候,都是针对于整个i
这里的概念都是建立在单个类别情况下的,每个类别都有自己单独的AP值以及TP等等,在计算时只有检测到了和未检测到这两种区别。
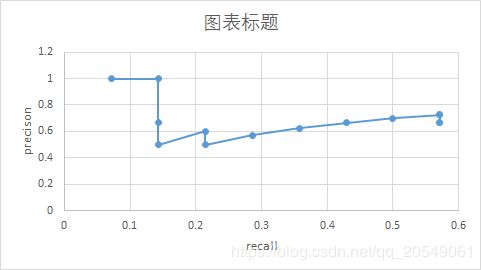
我这里贴出一组我用excel模拟的数据(按照置信度进行了排序):

这组数据模拟以下几种情况:
- 正常检测:包括了一个物体一个框和冗余检测中(冗余检测:哪怕进行了非极大值抑制,也难以避免重复检测的问题)
- 漏检:原本这里有一个物体,但未检测出或者说,检测到了,但是预测的标签错误,不是这个类别,对于计算当前类别来说,都叫做没检测到。
- 错误检测:这里没有物体,但却检测出了一个框。
我们根据上面的数据对几个概念进行说明:
TP:检测正确的正样本
具体而言:就是正常检测,且IOU大于等于 I O U t h r IOU_{thr} IOUthr,为了方便说明,我们统一设置 I O U t h r IOU_{thr} IOUthr为0.5。
FP:检测错误的正样本
具体而言:错误检测(此情况下,IOU等于0)的数量或正常检测中IOU小于 I O U t h r IOU_{thr} IOUthr的数量。
FN:检测错误的负样本
具体而言:FN的情况比较复杂,常规的定义并不能很多好的说明在目标检测中的FN。但总而言之,TP+FN表示所有真实存在物体的个数,上面的数据中,我们一共有14个物体(要去除重复的)。
p r e c i s i o n = T P / ( T P + F P ) precision=TP/(TP+FP) precision=TP/(TP+FP):表示准确度,也就是正确检测的bbox/一共检测到bbox
r e c a l l = T P / T P + F N recall=TP/TP+FN recall=TP/TP+FN:表示召回率,也就是所有真实存在的物体中,我们正确检测到的比例。
P-R曲线
接下来开始介绍P-R曲线:

我们可以看到P-R曲线是由多个P-R对构成的,而一个P-R对则是在某一个 s c o r e t h r score_{thr} scorethr下所确定的。
我们以 s c o r e t h r score_{thr} scorethr=0.8为例:
TP=count{1,3,7,9}=4;
FP=count{4,5,8}=3;
那么precision=4/(4+3)=0.571
而所有真实存在的物体的数量不会随着score而改变,也就是14个不会变
recal=4/14=0.2857
最后,我们通过对阈值进行排序,取出Top1-N的数据,能够得出这样一张表:

最后可绘制出上面的曲线。
(注:真正的 s c o r e t h r score_{thr} scorethr的划分也会有0.1,0.2…0.9这样的)
最后,根据网上的方法获得P-R曲线下的面积即为AP值。10个类就会有10个AP值。
数据集分类代码
由于官方只给出了测试集和训练集,所以需要我们把训练集的一部分分给验证集,并正确的分离出coco标注。
我写了一个简单的分离代码:
import os,shutil
import json
import random


class COCO_Set():
    '''
    des:
    '''
    #定义类变量,完全不变
    categories = [{"supercategory": "\u74f6\u76d6\u7834\u635f", "id": 1, "name": "\u74f6\u76d6\u7834\u635f"},
            {"supercategory": "\u55b7\u7801\u6b63\u5e38", "id": 9, "name": "\u55b7\u7801\u6b63\u5e38"},
            {"supercategory": "\u74f6\u76d6\u65ad\u70b9", "id": 5, "name": "\u74f6\u76d6\u65ad\u70b9"},
            {"supercategory": "\u74f6\u76d6\u574f\u8fb9", "id": 3, "name": "\u74f6\u76d6\u574f\u8fb9"},
            {"supercategory": "\u74f6\u76d6\u6253\u65cb", "id": 4, "name": "\u74f6\u76d6\u6253\u65cb"},
            {"supercategory": "\u80cc\u666f", "id": 0, "name": "\u80cc\u666f"},
            {"supercategory": "\u74f6\u76d6\u53d8\u5f62", "id": 2, "name": "\u74f6\u76d6\u53d8\u5f62"},
            {"supercategory": "\u6807\u8d34\u6c14\u6ce1", "id": 8, "name": "\u6807\u8d34\u6c14\u6ce1"},
            {"supercategory": "\u6807\u8d34\u6b6a\u659c", "id": 6, "name": "\u6807\u8d34\u6b6a\u659c"},
            {"supercategory": "\u55b7\u7801\u5f02\u5e38", "id": 10, "name": "\u55b7\u7801\u5f02\u5e38"},
            {"supercategory": "\u6807\u8d34\u8d77\u76b1", "id": 7, "name": "\u6807\u8d34\u8d77\u76b1"}]

    def __init__(self,name,images_path='./images/',json_path='./'):
        #初始化coco数据集基本信息
        self.name=name
        self.images_pth=images_path
        self.json_path=json_path
        self. info=[]
        self.images = []
        self.license = []
        self.annotations=[]
        self.json_file=None

    #转化json对象为python对象
    def load_json(self):
        with  open(self.json_path)  as f:
            self.json_file = json.load(f)     #读入到python对象
            return self.json_file
        return None
    #获取json values
    def get_items(self,key):
        return self.json_file[key]

    #写入json
    def write_file(self,json_name):
        self.write_json = {'info':self.info,'images':self.images,'license':self.license,'categories':self.categories,'annotations':self.annotations}
        with open(json_name, "w") as f:
            json.dump( self.write_json, f,indent=4)


def main():
    DATASET_PATH =  '/media/liuxin/DATA/CV/Project/TianChi/mmdetection/data/'
    Src = DATASET_PATH+'src/images/'
    origin_json=DATASET_PATH+'src/annotations.json'
    train_json=DATASET_PATH+'train/tra_annotations.json'
    val_json=DATASET_PATH+'val/val_annotations.json'

    origin_set=COCO_Set('origin',images_path=Src,json_path=origin_json)
    train_set=COCO_Set('train',images_path=Src,json_path=train_json)
    val_set=COCO_Set('val',images_path=Src,json_path=val_json)

    origin_json_obj = origin_set.load_json()
    # if not train_json_obj:
    #     return

    images_list=origin_json_obj['images']   #获取json文件中的images的列表
    random.shuffle(images_list)   #随机打乱整个列表
    images_num=len(images_list)
    print(images_num)
    val_set.images=images_list[:int(0.1*images_num)]  #取出前30%的数据作为验证集存入val_set中
    train_set.images=images_list[int(0.1*images_num):]  #取出剩下的
    print(len( train_set.images))

    annotations_list=origin_set.get_items("annotations")
    print(len(annotations_list))
    image_id_list=[image['id'] for image in val_set.images ]    #获取val_set.images中每个元素的id形成新的列表
     #找出train与val重合的图片的annotations
    val_set.annotations=[annotation for  annotation in annotations_list if (annotation["image_id"] in image_id_list)]
    print(len(val_set.annotations))
    val_set.write_file(val_json)

    #获取train_set.images中每个元素的id形成新的列表
    image_id_list=[image['id'] for image in train_set.images ]
    #找出train与val重合的图片的annotations
    train_set.annotations=[annotation for  annotation in annotations_list if (annotation["image_id"] in image_id_list)]
    print(len(train_set.annotations))
    train_set.write_file(train_json)


if __name__ == "__main__":
    main()