Vue详细使用
再次观看Vue教程,重新总结
1. Vue的入门实例
工具:vscode 使用node安装插件 包括vue
// 创建项目

// 初始化node   npm init -y

// 安装vue   npm i vue
Document
{{ message }}
2. 双向数据绑定 v-model
{{ message }}
3. 字符串拼接js与vue操作对比
document
结果:孙悟空
vue
结果:{{ firstName+lastName }}
4. v-on注册事件 methods
5. 商品价格小案例
价格:
{{ count }}
总价:{{ price * count }}
6. v-for、v-model、@keydown.enter、v-bind、@click指令的综合应用
Document
Todo小案例
{{ todos.filter(item => !item.done).length }} of {{ todos.length }} remaining [archive]
{{ item.title }}
7. vue实例创建
new Vue({
    // el: document.getElementById('app')
    el: '#app'
})

==

// .$mount更像是动作意图
new Vue({

}).$mount('#app')
8. v-once 一次性 以后不会改变它
{{ message }}
9. v-html 脚本
{{ rawHtml }}
const app = new Vue({
el: '#app',
data: {
rawHtml: 'Hello
'
}
})10. v-bind 绑定参数
11. v-if
12. 总结指令
- v-if 条件渲染
- v-for 列表渲染
- v-on 注册事件
- v-bind 属性绑定
- v-once 只绑定一次
- v-html 绑定输出html
- v-on:click.prevent 阻止默认事件的发生
- .filter过滤器
- .some()
- .every()
13. 官方综合案例TodoMVC
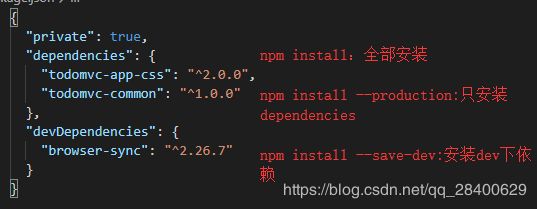
1) 插件
- node
- vue
- browser-sync npm install --save-dev browser-sync 将包装在项目中 (--save-dev)
2) 资源安装指令
3) 别名

4) 所要实现的功能
- No todos
- New todo
- Mark all as complete
- Item
- Editing
- Counter
- Clear completed button
- Persistence
- Routing
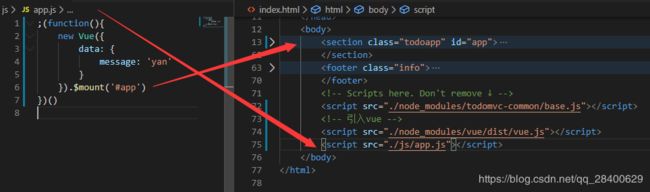
5) 基本入口
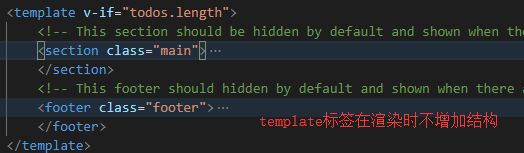
6) 渲染列表以及隐藏footer
7) 添加、清除、自动聚焦
Template • TodoMVC
{{ message }}
;(function(){
	const todos = [
		{
			id: 1,
			name: '唐僧',
			completed: false
		},
		{
			id: 2,
			name: '悟空',
			completed: false
		},
		{
			id: 3,
			name: '八戒',
			completed: false
		},
		{
			id: 4,
			name: '沙僧',
			completed: false
		}
	]

	const app = new Vue({
		data: {
			message: 'yan',
			todos: todos,
			currentEditing: null
		},
		methods: {
			// 这是添加todo方法
			handleTodoAdd(e) {
				const target = e.target
				// .trim()  去除空格的方法
				const value = target.value.trim()

				// 首先判断是否值是否为空
				if(!value.length){
					return
				}

				// 判断collection中是否还有数据  如果使用const 此为常量的意思,下面就无法改变,因此在这使用let
				let id = 0
				if(!this.todos.length){
					id = 0
				}else{
					id = this.todos[this.todos.length-1].id+1
				}

				// push到集合中
				this.todos.push({
					id: id,
					name: value,
					completed: false
				})

				// 然后清空
				target.value = ''

			},
			// 当还想要event事件时,参数里可以添加  $event
			remove(index){
				if(!this.todos.length){
					return
				}
				// 删除
				this.todos.splice(index,1)
			},
			// 全选方法
			handleToggleAll(e){
				const checked = e.target.checked
				this.todos.forEach(item => {
					item.completed = checked
				});
			},
			// 双击方法
			handleGetEditingDblclick(item){
				this.currentEditing = item

			},
			// 双击后改变方法
			handleSaveTodo(item,index,e){
				const target = e.target
				const value = target.value.trim()

				if(!value.length){
					this.todos.splice(index,1)
				}else{
					item.name = value
					this.currentEditing = null
				}
			},
			// esc取消方法
			handleESC(){
				this.currentEditing = null
			},
			// 清除所有已完成方法
			handleClearAllDone(){
				// 不要使用foreach去删除,会导致索引混乱,因此使用for循环
				for(let i=0;i
13. v-text和v-cloak
正常情况下使用{{ message }},浏览器在渲染的时候首先出现{{ message }},在引入vue后,才渲染出数据
但是这样的话,显示比较麻烦,因此又有v-cloak指令 先不显示{{ message }},渲染之后才显示
{{ message }}
14. v-if和v-show
- v-if:根据条件渲染不渲染
- v-show:根据条件显示不显示
15. v-pre
{{ this will not be compiled }}
// 显示的是{{ this will not be compiled }}

{{msg}}
// 即使data里面定义了msg这里仍然是显示的{{msg}}
16. 计算属性 避免重复调用
计算属性不是方法,只能当作属性使用
computed: {
	remianingCounts() {
		return this.todos.filter(item => !item.completed).length
	}

    // 该完整的写法  会自动调用其中的get方法
    remianingCounts() {
        get(){
            return this.todos.filter(item => !item.completed).length
        },
        set(){
            console.log('123')
        }
    }
}
17. 本地数据持久化localstorage
todos: JSON.parse(window.localStorage.getItem(todos) || '[]'),windows.localStorage.setItem('todos',JSON.stringify(todos))18. watch
watch: {
	// 监视todos的改变,当todos发生改变的时候做业务定制处理
	// 引用类型只能监视一层,无法监视内部成员的子成员的改变
	todos: {
		// 党建是todos发生改变的时候,深度监视
		handler() {
			window.localStorage.setItem('todos',JSON.stringify(this.todos))
		},
		deep: true
	}
},
19. 路由切换
// 计算属性
filterTodos(){
	// all return todas
	// active todos.filter(item => !item.completed)
	// completed todos.filter(item => item.completed)
	switch (this.filterText) {
		case 'active':
			return this.todos.filter(item => !item.completed)
			break;
		case 'completed':
			return this.todos.filter(item => item.completed)
			break;
		default:
			return this.todos
			break;
	}
}
20. 高亮
21. 自定义语法
当需要操作底层的dom元素时需要使用自定义指令
- 全局
- 局部
起名规则:
- 指令的名字前面避免上 v-
- 如果是驼峰起名,在使用时需要转换为小写并用 - 连接 例:autoFocus => v-auto-focus
指令的钩子函数
// 只调用一次,指令第一次绑定到元素时调用。在这里可以进行一次性的初始化设置
// bind钩子函数中拿不到父节点
bind(){


},

// 被绑定元素插入父节点时调用 (仅保证父节点存在,但不一定已被插入文档中)。
inserted(){


},

// 所在组件的 VNode 更新时调用
update(){


},

// 指令所在组件的 VNode 及其子 VNode 全部更新后调用
componentUpdated(){


},

// 只调用一次,指令与元素解绑时调用
unbind() {


}
例子: my-show
自定义指令
当需要同时使用bind和update钩子函数时,可简写
Vue.directive('color-swatch', function (el, binding) {
el.style.backgroundColor = binding.value
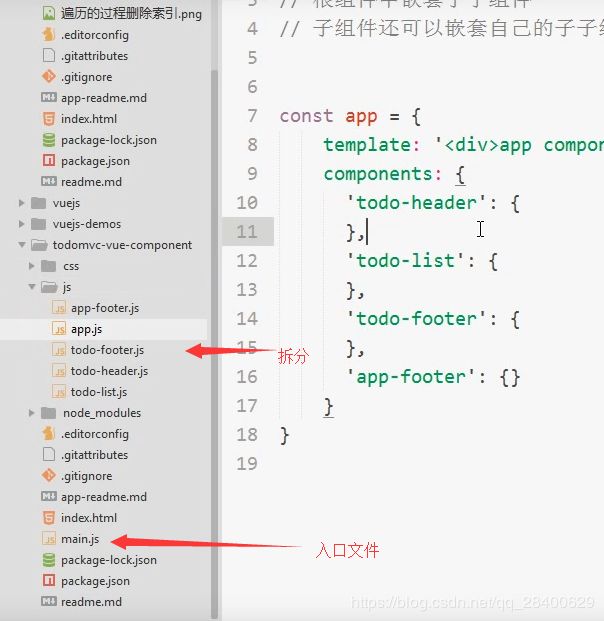
})22. 组件
组件化思想 封装视图
Element-ui npm i element-ui
例子:
Document
1) component基本使用
2) template
Document
3) 全局组件与局部组件
全局组件
Vue.component('global-1',{
template: `
全局组件1
全局组件2
`,
})局部组件
Vue.component('global-1',{
template: `
全局组件1
4) 组件的管理

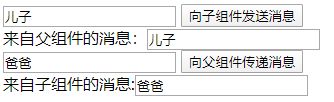
5) 父子组件之间的通信
父传子 props prop是单向传递,子组件不能更改父组件传来的数据
Vue.component('global-1',{
template: `
全局组件1
子传父 $emit() 子组件将修改的数据传入到父组件,让父组件来进行修改,这样可以很好的管理,不会出现数据乱改出错而无法定位
Vue.component('global-1',{
template: `
全局组件1
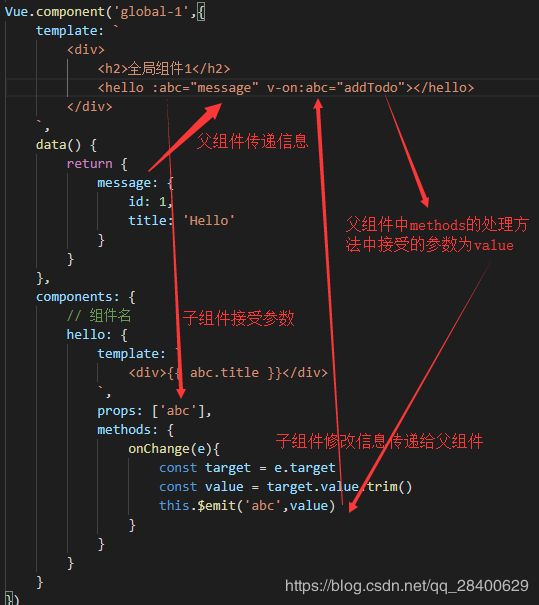

案例:
Document
23. router
前端路由是通过hash来进行跳转的
1) vue-router npm i vue-router
入门例子:
路由的基本使用
2) router-link使用
使用此标签是为了去掉hash中的#
登录 3) redirect重定向解决路由不明确问题
const routerObj = new VueRouter({
    routes: [
        {
            path: '/',
            // 页面重定向
            redirect: '/login'
        },
        {
            path: '/login',
            component: login
        },
        {
            path: '/register',
            component: register
        }
    ]
})
4) 动画简单须知
5) 路由中的参数
方式一:字符串传参
登录
// 路由中的组件是否必须是对象
const login = {
template: '登录组件 -- {{ $route.query.id }} -- {{ $route.query.name }}
',
data(){
return{
}
},
// 生命周期钩子函数
created(){
console.log(this.$route)
}
}方式二:restful规则
登录
const login = {
template: '登录组件 -- {{ $route.params.id }} -- {{ $route.params.name }}
',
data(){
return{
}
},
// 生命周期钩子函数
created(){
console.log(this.$route)
}
}
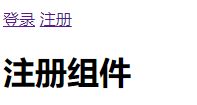
const register = {
template: '注册组件
'
}
const routerObj = new VueRouter({
routes: [
{
path: '/',
// 页面重定向
redirect: '/login'
},
{
path: '/login/:id/:name',
component: login
},
{
path: '/register',
component: register
}
]
})6) 路由的嵌套 children属性的使用
路由的基本使用
Account
Account
登录
注册
24. 视图布局

路由的基本使用
25. nrm
解决npm下载慢的问题
npm i nrm -g 全局安装
nrm ls 查看
nrm use npm 或者 nrm use taobao
26. webpack
1) 网页常见静态资源
- JS:.js .jsx .coffee .ts(TypeScript)
- CSS:.css .less .scss
- Images: .jpg .png .gif .bmp .svg
- Fonts:.svg .ttf .eot .woff .woff2
- 模板文件:.ejs .jade
2) webpack npm i webpack webpack-cli
前端的一个项目构建工具,基于node.js开发
作用:
- 处理js文件的互相依赖关系
- 处理js的兼容问题,把高级的浏览器不识别的语法转换为低级的
1) 入门案例

结合es6语法管理资源头文件
webpack.config.js 使用npx webpack 或者 webpack构建项目
![]()
let path = require('path')

module.exports = {
    // 模式  development和production
    mode: 'development',
    // 入口
    entry: './src/main.js',
    output: {
        // 打包后的文件名
        filename: 'bundle.js',
        // 将路径变为绝对路径
        path: path.resolve(__dirname,'dist'),
    }
}
2) webpack-dev-server工具使用自动打包
使用方式:
- node nodemon
- webpack webpack-dev-server
全局安装:可直接使用webpack
因此需要在package.json配置简化 npm run dev
"scripts": {
    "test": "echo \"Error: no test specified\" && exit 1",
    "dev": "webpack-dev-server"
},
托管给服务器更改js出现页面无法更新的情况注意
webpack-dev-server常用命令参数:
方式一:推荐
"dev": "webpack-dev-server --open --port 3000 --contenBase src --hot"方式二:配置
const path = require('path')
const webpack = require('webpack') // 热更新-2

module.exports = {
    // 模式  development和production
    // mode: 'development',
    // 入口
    entry: './src/main.js',
    output: {
        // 打包后的文件名
        filename: 'bundle.js',
        // 将路径变为绝对路径
        path: path.resolve(__dirname,'./dist'),
    },
    devServer:{
        open: true,   // 自动打开浏览器
        port: 3000,   // 设置启动端口
        contentBase: 'src',  // 指定托管项目的根目录
        hot: true   // 热更新-1
    },
    plugins:[
        new webpack.HotModuleReplacementPlugin() // 热更新-3
    ]

}
3) html-webpack-plugin
可以帮省去bundle.js的路径的引用
const path = require('path')
const webpack = require('webpack') // 热更新-2
const htmlWebPack = require('html-webpack-plugin')

module.exports = {
    // 模式  development和production
    // mode: 'development',
    // 入口
    entry: './src/main.js',
    output: {
        // 打包后的文件名
        filename: 'bundle.js',
        // 将路径变为绝对路径
        path: path.resolve(__dirname,'./dist'),
    },
    devServer:{
        open: true,   // 自动打开浏览器
        port: 3000,   // 设置启动端口
        contentBase: 'src',  // 指定托管项目的根目录
        hot: true   // 热更新-1
    },
    plugins:[
        new webpack.HotModuleReplacementPlugin(), // 热更新-3
        new htmlWebPack({  // 创建生成一个在内存中生成的html
            // 指定模板页面, 以后会根据指定的页面路径去生成内存中的页面
            template: path.join(__dirname,'./src/index.html'),
            // 指定生成的页面的名称
            filename: 'index123.html'
        })
    ]

}
4) loader管理第三方css
npm i style-loader css-loader :处理非js文件的引入问题
且在webpack.config.js中配置module节点加载第三方配置
module:{
    rules: [
       { test: /\.css$/,use:['style-loader','css-loader'] },
    ]
}
npm i less-loader less
npm i sass-loader sass
npm i url-loader file-loader
module:{
    rules: [
        { test: /\.css$/,use:['style-loader','css-loader'] },
        { test: /\.less$/,use:['style-loader','css-loader','less-loader'] },
        { test: /\.scss$/,use:['style-loader','css-loader','less-loader','sass-loader'] },
        // limit给定的值是图片的大小,若引用的图片大于或等于limit值,则不会转为base64格式
        // name后面的参数是保持图片的名字不变   8为hash防止重命名
        { test: /\.(jpg|png|gif|bmp|jpeg)$/,use: 'url-loader?limit=7631&name=[hash:8]-[name].[ext]' },
        // 字体文件
        { test: /\.(ttf|eot|svg|woff|woff2)$/,use: 'url-loader' }
    ]
}
JSON中不能注释
5) babel配置
将高级语法转换为低级语法
注意:babel版本的对应
- babel-loader 8.x对应babel-core 7.x
- babel-loader 7.x对应babel-core 6.x

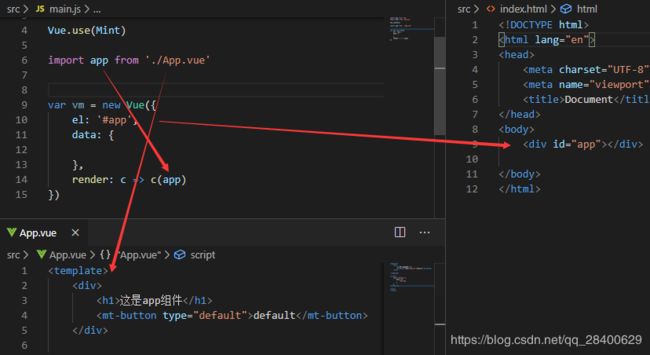
27. Vue中render
Document
这是登录组件
28. vue与webpack
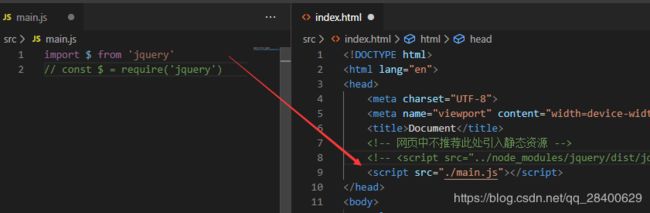
1) 包的查找规则:
import Vue from 'vue'
这样的功能不全(runtime-only)
因此import时候需要导入module里面的
import Vue from '../node_modules/vue/dist/vue.js'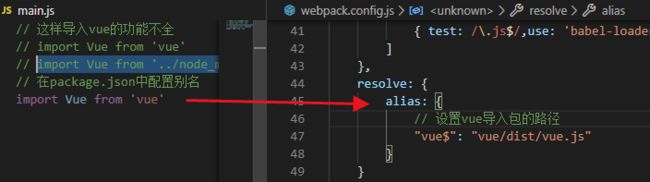
2) .vue第三方包且依赖插件
npm i vue-loader vue-template-compiler

// 依赖的插件 在webpack.config.js中存在
const vueLoaderPlugin = require('vue-loader/lib/plugin')
匹配规则:
{ test: /\.vue$/,use: 'vue-loader' }
29. export default与export
暴露对象给外界
需要安装插件 npm i babel-register
30. webpack与vue-router

抽离路由模板:router.js
import VueRouter from 'vue-router'

var router = new VueRouter({
    routes: [

    ]
})

export default router
31. style样式中的scope和lang
// 本组件中有效


// 指定样式格式
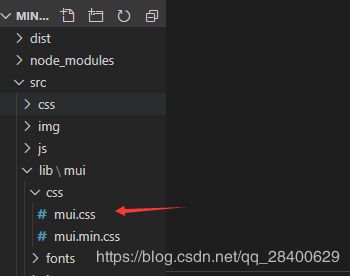
32. Mint-UI与Element-UI
-
mint-ui:移动端
-
element-ui: PC端
mint-ui
npm i mint-ui

// 引入全部组件
import Mint from 'mint-ui'
import Vue from 'vue'

vue.use(Mint)

// 按需导入组件
import {Cell,Checklist} from 'minu-ui'

Vue.use(Cell.name,Cell)
Vue.use(Checklist.name,Checklist)
按需导入需要注意安装插件
npm i babel-plugin-component

// 在babelrc配置
"plugins": ["transform-runtime",
            "component", [
                {
                    "libraryName": "mint-ui",
                    "style": true
                }]
            ]
1) 入门实例
2) mui与bootstrap一样,不依赖于vue等前端框架,不存在技术捆绑
主要需要引入:
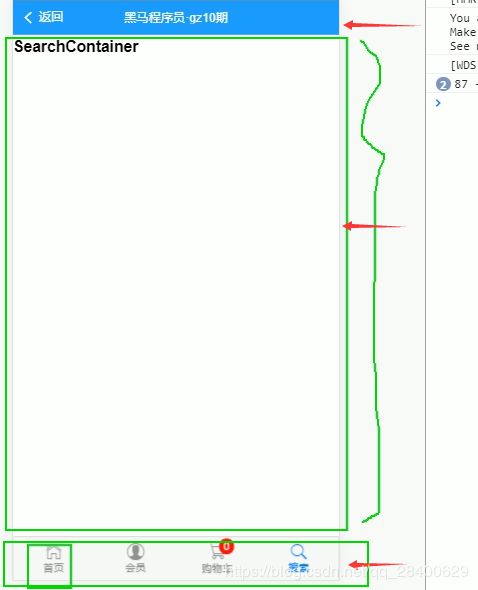
33. 大型商场项目
1) 项目资源展示
2) 页面布局
3) git管理项目
.gitignore、README.md和开源协议
// 在PC端配置全局属性
git config --global user.email "邮箱"
git config --global user.name "用户名"
// git在本地
git init
git status 展示所有文件状态
git add . 添加
git commit -m "init my project"
// 将本地代码上传到git中
// 在你的git仓库中创建空项目
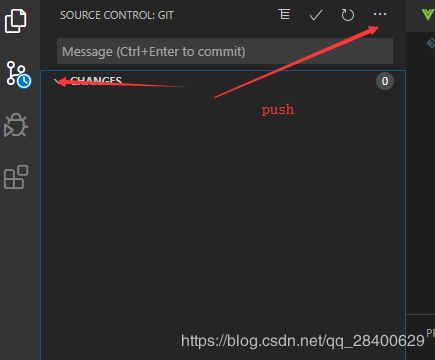
git remote add origin https://github.com/yanshiwu/Vue_Mall.git
git push -u origin mastervscode插件快速提交代码: 自带
4) 页面图标的修改icon,使用mui中的icon和icon-extra 导入样式 字体样式的导入
router-link-active
5) 路由高亮
webpack使用路由,加载vue-router且使用Vue(VueRouter)
6) tabbar切换
7) 轮播图
第一步:轮播图
第二步:加载数据
vue-resource
8) 九宫格
本地图片显示[object-module]问题
解决办法:转载 https://blog.csdn.net/simper_boy/article/details/103455444 作者:Smirky-boy
10) tabbar切换时的动画
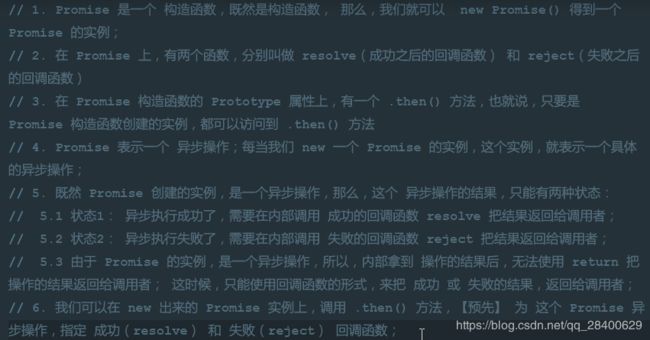
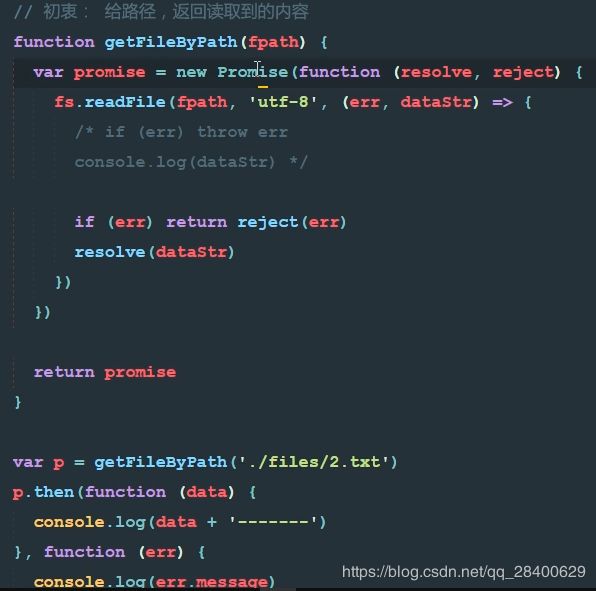
11) ES6中的Promise

使用场景:
- 前面有失败了就终止执行 使用catch捕获异常
- 前面失败不影响后面的执行
使用.then(),前面失败了不影响后面的结果
11) NewsList路由及其页面
- 页面
- 数据获取
- 页面中时间的处理,需要定义全局过滤器 且使用moment插件
// 需要使用moment  时间格式插件
import moment from 'moment'

// 定义全局过滤器
Vue.filter('dateFormat',function(dataStr,pattern="yyyy-MM-dd HH:mm:ss"){
    return moment(dataStr).format(pattern)
})


发表时间:{{ item.add_time | dateFormat('YYYY-MM-DD') }} - 新闻列表中的跳转
- 评论展示
- 加载更多
- 添加评论
12) 图片路由 来自复制文档
绘制 图片列表 组件页面结构并美化样
-
需要借助于 MUI 中的 tab-top-webview-main.html
-
需要把 slider 区域的 mui-fullscreen 类去掉
-
滑动条无法正常触发滑动,通过检查官方文档,发现这是JS组件,需要被初始化一下:
-
导入 mui.js
-
调用官方提供的 方式 去初始化:
  mui('.mui-scroll-wrapper').scroll({
    deceleration: 0.0005 //flick 减速系数,系数越大,滚动速度越慢,滚动距离越小,默认值0.0006
});-
我们在初始化 滑动条 的时候,导入的 mui.js ,但是,控制台报错:
Uncaught TypeError: 'caller', 'callee', and 'arguments' properties may not be accessed on strict mode
-
经过我们合理的推测,觉得,可能是 mui.js 中用到了 'caller', 'callee', and 'arguments' 东西,但是, webpack 打包好的 bundle.js 中,默认是启用严格模式的,所以,这两者冲突了;
-
解决方案: 1. 把 mui.js 中的 非严格 模式的代码改掉;但是不现实; 2. 把 webpack 打包时候的严格模式禁用掉;
-
最终,我们选择了 plan B 移除严格模式: 使用这个插件 babel-plugin-transform-remove-strict-mode
-
刚进入 图片分享页面的时候, 滑动条无法正常工作, 经过我们认真的分析,发现, 如果要初始化 滑动条,必须要等 DOM 元素加载完毕,所以,我们把 初始化 滑动条 的代码,搬到了 mounted 生命周期函数中;
-
当 滑动条 调试OK后,发现, tabbar 无法正常工作了,这时候,我们需要把 每个 tabbar 按钮的 样式中
mui-tab-item重新改一下名字; -
获取所有分类,并渲染 分类列表;
制作图片列表区域
-
图片列表需要使用懒加载技术,我们可以使用 Mint-UI 提供的现成的 组件
lazy-load -
根据
lazy-load的使用文档,尝试使用 -
渲染图片列表数据
实现了 图片列表的 懒加载改造和 样式美化
实现了 点击图片 跳转到 图片详情页面
-
在改造 li 成 router-link 的时候,需要使用 tag 属性指定要渲染为 哪种元素
实现 详情页面的布局和美化,同时获取数据渲染页面
实现 图片详情中 缩略图的功能
-
使用 插件 vue-preview 这个缩略图插件
-
获取到所有的图片列表,然后使用 v-for 指令渲染数据
-
注意: img标签上的class不能去掉
-
注意: 每个 图片数据对象中,必须有 w 和 h 属性
13) 商品列表
手机上调试
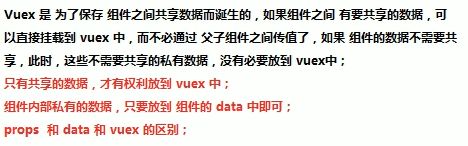
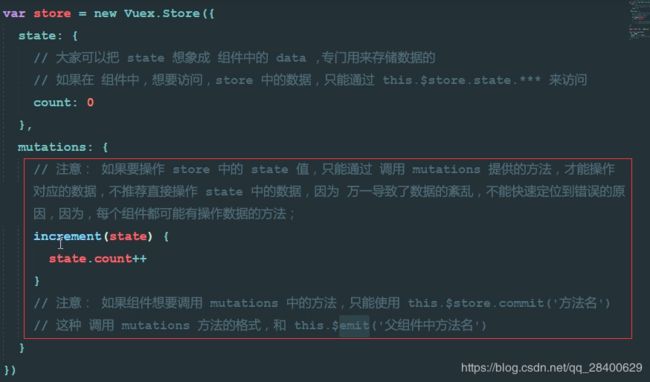
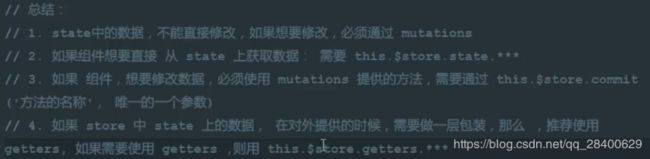
14) Vuex

剩下的差不多。。。