spring-cloud-alibaba.2.2.x Sentinel整合nacos持久化
spring-cloud-alibaba.2.2.x Sentinel整合nacos持久化
文章目录
- spring-cloud-alibaba.2.2.x Sentinel整合nacos持久化
- 1、生产环境的 Sentinel Dashboard 需要具备下面几个特性:
- 2、规则管理及推送
- 2.1、原始模式
- 2.2、Pull模式
- 2.3、Push模式
- 3、动态数据源支持
- 4、Push模式的演示,代码整合演示
- 4.1、在pom文件中,新增`nacos-discovery`、`Sentinel-datasource-nacos`
- 4.2、yaml文件中,新增nacos注册中心配置
- 4.3、业务代码中,新增服务注册和发现的注解`@EnableDiscoveryClient`
- 5、测试
- 5.1、启动对应的应用
本地项目的基础环境
| 环境 | 版本 |
|---|---|
| jdk | 1.8.0_201 |
| maven | 3.6.0 |
| Spring-boot | 2.2.4.RELEASE |
| Spring-cloud-alibaba | 2.2.1.RELEASE |
| Spring-cloud | Hoxton.SR2 |
| nacos | 1.2.1 |
| sentinel-dashboard | 1.7.1 |
构建本项目之前,请详细参看如下步骤,如果已经搭建好,略过即可;
项目地址的码云的git地址https://gitee.com/liqi01/badger-spring-cloud-alibaba.git
《spring-cloud-alibaba.2.2.x 服务注册与发现nacos简介以及环境搭建》
《spring-cloud-alibaba2.2.x 远程调用负载均衡ribbon搭建使用》
《spring-cloud-alibaba2.2.x 远程调用负载均衡openfeign搭建使用》
《spring-cloud-alibaba.2.2.x Sentinel分布式系统的流量防卫兵的简介以及环境搭建》
《spring-cloud-alibaba.2.2.x Sentinel持久化整合nacos,nacos无法获取配置信息bug解决》
在官方文档在生产环境中使用-Sentinel这个章节里,有详细介绍生产环境中,sentinel的配置以及数据持久化;
详细参看
https://github.com/alibaba/Sentinel/wiki/%E5%9C%A8%E7%94%9F%E4%BA%A7%E7%8E%AF%E5%A2%83%E4%B8%AD%E4%BD%BF%E7%94%A8-Sentinel
1、生产环境的 Sentinel Dashboard 需要具备下面几个特性:
- 规则管理及推送,集中管理和推送规则。
sentinel-core提供 API 和扩展接口来接收信息。开发者需要根据自己的环境,选取一个可靠的推送规则方式;同时,规则最好在控制台中集中管理。 - 监控,支持可靠、快速的实时监控和历史监控数据查询。
sentinel-core记录秒级的资源运行情况,并且提供 API 来拉取资源运行信息。当机器大于一台以上的时候,可以通过 Dashboard 来拉取,聚合,并且存储这些信息。这个时候,Dashboard 需要有一个存储媒介,来存储历史运行情况。 - 权限控制,区分用户角色,来进行操作。生产环境下的权限控制是非常重要的,理论上只有管理员等高级用户才有权限去修改应用的规则。
由于开发者有各自不一样的环境和需求,我们会对“规则管理和推送”,“监控”这两个方面给出建议以及最佳实践;对于权限控制,由于每个开发者的环境都不一样,我们在最佳实践中仅仅使用了简单的认证。开发者可以依循自己的需求,结合实际生产环境,选择最适合自己的方式。
2、规则管理及推送
一般来说,规则的推送有下面三种模式:
| 推送模式 | 说明 | 优点 | 缺点 |
|---|---|---|---|
| 原始模式 | API 将规则推送至客户端并直接更新到内存中,扩展写数据源(WritableDataSource) |
简单,无任何依赖 | 不保证一致性;规则保存在内存中,重启即消失。严重不建议用于生产环境 |
| Pull 模式 | 扩展写数据源(WritableDataSource), 客户端主动向某个规则管理中心定期轮询拉取规则,这个规则中心可以是 RDBMS、文件 等 |
简单,无任何依赖;规则持久化 | 不保证一致性;实时性不保证,拉取过于频繁也可能会有性能问题。 |
| Push 模式 | 扩展读数据源(ReadableDataSource),规则中心统一推送,客户端通过注册监听器的方式时刻监听变化,比如使用 Nacos、Zookeeper 等配置中心。这种方式有更好的实时性和一致性保证。生产环境下一般采用 push 模式的数据源。 |
规则持久化;一致性;快速 | 引入第三方依赖 |
2.1、原始模式
如果不做任何修改,Dashboard 的推送规则方式是通过 API 将规则推送至客户端并直接更新到内存中;
这种做法的好处是简单,无依赖;坏处是应用重启规则就会消失,仅用于简单测试,不能用于生产环境。
2.2、Pull模式
pull 模式的数据源(如本地文件、RDBMS 等)一般是可写入的。使用时需要在客户端注册数据源:将对应的读数据源注册至对应的 RuleManager,将写数据源注册至 transport 的 WritableDataSourceRegistry 中。以本地文件数据源为例:
public class FileDataSourceInit implements InitFunc {

    @Override
    public void init() throws Exception {
        String flowRulePath = "xxx";

        ReadableDataSource<String, List<FlowRule>> ds = new FileRefreshableDataSource<>(
            flowRulePath, source -> JSON.parseObject(source, new TypeReference<List<FlowRule>>() {})
        );
        // 将可读数据源注册至 FlowRuleManager.
        FlowRuleManager.register2Property(ds.getProperty());

        WritableDataSource<List<FlowRule>> wds = new FileWritableDataSource<>(flowRulePath, this::encodeJson);
        // 将可写数据源注册至 transport 模块的 WritableDataSourceRegistry 中.
        // 这样收到控制台推送的规则时,Sentinel 会先更新到内存,然后将规则写入到文件中.
        WritableDataSourceRegistry.registerFlowDataSource(wds);
    }

    private <T> String encodeJson(T t) {
        return JSON.toJSONString(t);
    }
}
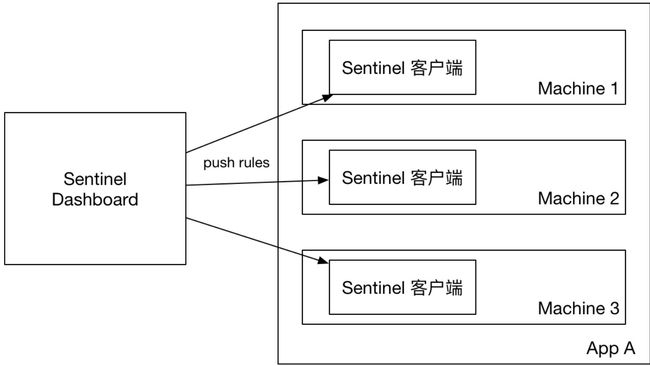
本地文件数据源会定时轮询文件的变更,读取规则。这样我们既可以在应用本地直接修改文件来更新规则,也可以通过 Sentinel 控制台推送规则。以本地文件数据源为例,推送过程如下图所示:
首先 Sentinel 控制台通过 API 将规则推送至客户端并更新到内存中,接着注册的写数据源会将新的规则保存到本地的文件中。使用 pull 模式的数据源时一般不需要对 Sentinel 控制台进行改造。
这种实现方法好处是简单,不引入新的依赖,坏处是无法保证监控数据的一致性。
2.3、Push模式
生产环境下一般更常用的是 push 模式的数据源。对于 push 模式的数据源,如远程配置中心(ZooKeeper, Nacos, Apollo等等),推送的操作不应由 Sentinel 客户端进行,而应该经控制台统一进行管理,直接进行推送,数据源仅负责获取配置中心推送的配置并更新到本地。因此推送规则正确做法应该是 配置中心控制台/Sentinel 控制台 → 配置中心 → Sentinel 数据源 → Sentinel,而不是经 Sentinel 数据源推送至配置中心。这样的流程就非常清晰了:
3、动态数据源支持
SentinelProperties 内部提供了 TreeMap 类型的 datasource 属性用于配置数据源信息。
比如配置 4 个数据源:
spring.cloud.sentinel.datasource.ds1.file.file=classpath: degraderule.json
spring.cloud.sentinel.datasource.ds1.file.rule-type=flow

#spring.cloud.sentinel.datasource.ds1.file.file=classpath: flowrule.json
#spring.cloud.sentinel.datasource.ds1.file.data-type=custom
#spring.cloud.sentinel.datasource.ds1.file.converter-class=com.alibaba.cloud.examples.JsonFlowRuleListConverter
#spring.cloud.sentinel.datasource.ds1.file.rule-type=flow

spring.cloud.sentinel.datasource.ds2.nacos.server-addr=localhost:8848
spring.cloud.sentinel.datasource.ds2.nacos.data-id=sentinel
spring.cloud.sentinel.datasource.ds2.nacos.group-id=DEFAULT_GROUP
spring.cloud.sentinel.datasource.ds2.nacos.data-type=json
spring.cloud.sentinel.datasource.ds2.nacos.rule-type=degrade

spring.cloud.sentinel.datasource.ds3.zk.path = /Sentinel-Demo/SYSTEM-CODE-DEMO-FLOW
spring.cloud.sentinel.datasource.ds3.zk.server-addr = localhost:2181
spring.cloud.sentinel.datasource.ds3.zk.rule-type=authority

spring.cloud.sentinel.datasource.ds4.apollo.namespace-name = application
spring.cloud.sentinel.datasource.ds4.apollo.flow-rules-key = sentinel
spring.cloud.sentinel.datasource.ds4.apollo.default-flow-rule-value = test
spring.cloud.sentinel.datasource.ds4.apollo.rule-type=param-flow
这种配置方式参考了 Spring Cloud Stream Binder 的配置,内部使用了 TreeMap 进行存储,comparator 为 String.CASE_INSENSITIVE_ORDER 。
d1, ds2, ds3, ds4 是 ReadableDataSource 的名字,可随意编写。后面的 file ,zk ,nacos , apollo 就是对应具体的数据源,它们后面的配置就是这些具体数据源各自的配置。注意数据源的依赖要单独引入(比如 sentinel-datasource-nacos)。
每种数据源都有两个共同的配置项: data-type、 converter-class 以及 rule-type。
data-type 配置项表示 Converter 类型,Spring Cloud Alibaba Sentinel 默认提供两种内置的值,分别是 json 和 xml (不填默认是json)。 如果不想使用内置的 json 或 xml 这两种 Converter,可以填写 custom 表示自定义 Converter,然后再配置 converter-class 配置项,该配置项需要写类的全路径名(比如 spring.cloud.sentinel.datasource.ds1.file.converter-class=com.alibaba.cloud.examples.JsonFlowRuleListConverter)。
rule-type 配置表示该数据源中的规则属于哪种类型的规则(flow,degrade,authority,system, param-flow, gw-flow, gw-api-group)。
- 当某个数据源规则信息加载失败的情况下,不会影响应用的启动,会在日志中打印出错误信息。
- 默认情况下,xml 格式是不支持的。需要添加
jackson-dataformat-xml依赖后才会自动生效。 - 如果规则加载没有生效,有可能是 jdk 版本导致的,请关注 759 issue 的处理。
4、Push模式的演示,代码整合演示
官方文档用的zookeeper举例,我这边使用的nacos作为注册中心,就用nacos实现整合;
这个项目,是基于上一项目的基础上,新增jar包以及yaml的配置,来完成的
4.1、在pom文件中,新增nacos-discovery、Sentinel-datasource-nacos
完整文件如下
<project xmlns="http://maven.apache.org/POM/4.0.0" xmlns:xsi="http://www.w3.org/2001/XMLSchema-instance"
    xsi:schemaLocation="http://maven.apache.org/POM/4.0.0 http://maven.apache.org/xsd/maven-4.0.0.xsd">
    <modelVersion>4.0.0modelVersion>
    <parent>
        <groupId>org.springframework.bootgroupId>
        <artifactId>spring-boot-starter-parentartifactId>
        <version>2.2.4.RELEASEversion>
    parent>
    <groupId>com.badgergroupId>
    <artifactId>badger-spring-cloud-alibaba-sentinelartifactId>
    <name>badger-spring-cloud-alibaba-sentinelname>
    <description>服务熔断、限流description>
    <properties>
        <project.build.sourceEncoding>UTF-8project.build.sourceEncoding>
        <java.version>1.8java.version>
        <maven-jar-plugin.version>3.1.1maven-jar-plugin.version>
        <nacos.version>1.2.1nacos.version>
    properties>
    <dependencies>
        <dependency>
            <groupId>org.springframework.bootgroupId>
            <artifactId>spring-boot-starter-webartifactId>
        dependency>
        <dependency>
            <groupId>org.springframework.bootgroupId>
            <artifactId>spring-boot-starter-actuatorartifactId>
        dependency>
        <dependency>
            <groupId>com.alibaba.cloudgroupId>
            <artifactId>spring-cloud-starter-alibaba-nacos-discoveryartifactId>
        dependency>
        <dependency>
            <groupId>com.alibaba.cspgroupId>
            <artifactId>sentinel-datasource-nacosartifactId>
            <exclusions>
                <exclusion>
                    <groupId>com.alibaba.nacosgroupId>
                    <artifactId>nacos-clientartifactId>
                exclusion>
            exclusions>
        dependency>
        <dependency>
            <groupId>com.alibaba.cloudgroupId>
            <artifactId>spring-cloud-starter-alibaba-sentinelartifactId>
        dependency>
    dependencies>
    <dependencyManagement>
        <dependencies>
            <dependency>
                <groupId>com.alibaba.cloudgroupId>
                <artifactId>spring-cloud-alibaba-dependenciesartifactId>
                <version>2.2.1.RELEASEversion>
                <type>pomtype>
                <scope>importscope>
            dependency>
        dependencies>
    dependencyManagement>
    <build>
        <plugins>

            <plugin>
                <groupId>org.springframework.bootgroupId>
                <artifactId>spring-boot-maven-pluginartifactId>
            plugin>
        plugins>
        <finalName>badger-spring-cloud-alibaba-sentinelfinalName>
    build>
project>
4.2、yaml文件中,新增nacos注册中心配置
完整文件如下
server:
  port: 9000
spring:
  application:
    name: badger-spring-cloud-alibaba-sentinel
  cloud:
    nacos:
      discovery:
        server-addr: 127.0.0.1:8848
    sentinel:
      transport:
        dashboard: 127.0.0.1:8080
        port: 8719
      datasource:
        ds1:
          nacos:
            server-addr: 127.0.0.1:8848
            data-id: ${spring.application.name}
            rule-type: flow
management:
  endpoints:
    web:
      exposure:
        include: '*'
更详细的配置,可以参看对应的yml配置的对应的PropertiesConfiguration的class;
com.alibaba.cloud.sentinel.datasource.config.DataSourcePropertiesConfiguration.class
4.3、业务代码中,新增服务注册和发现的注解@EnableDiscoveryClient
完整文件如下
/**
 * @EnableDiscoveryClient 开启服务注册和发现
 */
@SpringBootApplication
@EnableDiscoveryClient
public class SentinelApplication {

    public static void main(String[] args) throws Exception {
        SpringApplication.run(SentinelApplication.class, args);
    }

    @RestController
    public class DemoController {

        @GetMapping(value = "/hello/{name}")
        @SentinelResource(value = "sayHello")
        public String apiHello(@PathVariable String name) {
            return "Hello, " + name;
        }

        @GetMapping("/demo")
        public String test() {
            return "demo";
        }
    }
}
5、测试
5.1、启动对应的应用
1、启动nacos
./startup.sh -m standalone
2、启动sentinel-dashboard-1.7.1
nohup java -jar sentinel-dashboard-1.7.1.jar >/dev/null 2>&1 &
3、启动应用badger-spring-cloud-alibaba-sentinel
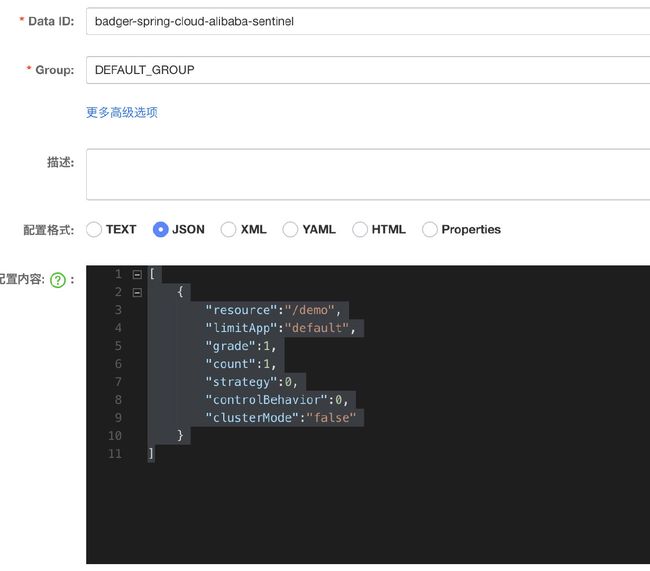
4、在nacos中,新增流控规则的配置
dataId:为yml文件中配置的
group:默认为DEFAULT_GROUP,也可以在yml文件中指定
在nacos中,需要三个坐标来确认唯一的配置文件(命名空间(默认为public)、group、dataId)
[
	{
		"resource":"/demo",
		"limitApp":"default",
		"grade":1,
		"count":1,
		"strategy":0,
		"controlBehavior":0,
		"clusterMode":"false"
	}
]
5、执行接口调用http://localhost:9000/demo
多次刷新
结果:Blocked by Sentinel (flow limiting)

在sentinel的控制台,也从nacos中,拿到了对应的流控规则;
6、配置的json说明
[
	{
		"resource":"/demo",
		"limitApp":"default",
		"grade":1,
		"count":1,
		"strategy":0,
		"controlBehavior":0,
		"clusterMode":"false"
	}
]
resource:资源名称;
limitApp:来源应用(默认)
grade:阈值类型;0:线程数;1:表示QPS
strategy:流控模式,0:直接;1:关联;2:链路
controlBehavior:流控的结果;0:快速失败;1:Warm up;2:排队等待
clusterMode:是否集群。
github官方文档;
https://github.com/alibaba/spring-cloud-alibaba/wiki/Sentinel
https://github.com/alibaba/Sentinel/wiki/%E4%BB%8B%E7%BB%8D


