Qt5.7.0 + OpenCV2.4.9 + ffmpeg在Ubuntu 14.04LTS下的配置
Qt5.7.0 + OpenCV2.4.9 + ffmpeg在Ubuntu 14.04LTS下的配置
分类:
tags: Ubuntu Qt OpenCV
©版权声明:本文为博主原创文章,未经博主允许不得转载。
前言:这是我的第一篇MarkDown文档,试手 + 记录用,希望MarkDown能给我带给我很好的记录习惯~
一、Qt 5.7.0的安装
参考链接:http://blog.csdn.net/laizhenghong2012/article/details/51758164
1、安装g++
安装Qt之前安装g++,以便在Qt的安装过程中能够检测到系统已经安装了g++。减少后期配置的困难。
sudo apt-get install g++2、安装Qt5.7.0
笔者电脑是64位的,所以应该下载对应的64位版本。安装软件是在学校的IPV6内网中下载的,平常状况下,应该在官网下载。
笔者的qt-opensource-linux-x64-5.7.0.run放在/home/grq/src文件夹下,先对文件实行权限更改:
chmod u+x ./qt-opensource-linux-x64-5.7.0.run执行安装文件:
./qt-opensource-linux-x64-5.7.0.run进入安装界面,依次登陆,选择安装位置(注意:最好选择具有读写权限的/home目录下)

直到文件最后安装完成。
3、配置Qt
安装完后,还要配置Qt,否则是不能使用的。
当你在命令行下输入qmake时,会报这样的错误
qmake:could not exec '/usr/lib/x86_64-Linux-gnu/qt4/bin/qmake':NO such file or directory(32位的ubuntu报的是这样的错 qmake:could not exec ‘/usr/lib/i386-linux-gnu/qt4/bin/qmake’:NO such file or directory)
跟随报错信息,进入下面路径中:
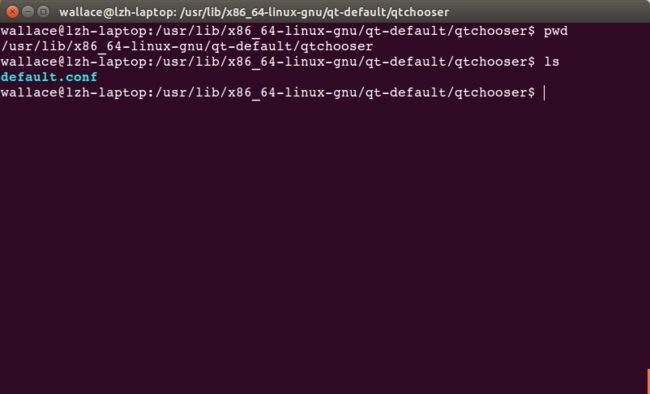
cd /usr/lib/x86_64-linux-gnu/qt-default/qtchoosersudo gedit /usr/lib/x86_64-linux-gnu/qt-default/qtchooser/default.conf将配置文件中的内容改为实际的Qt安装位置。例如笔者的default.conf文件如下所示:
 /home/grq/kit/Qt5.7.0/5.7/gcc_64/bin
 /home/grq/kit/Qt5.7.0
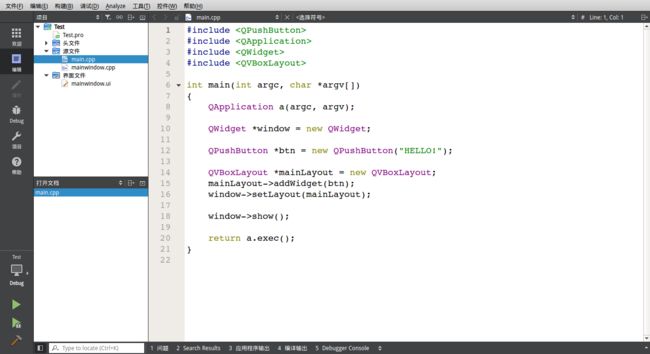
4、写Hello World(参考其他链接)
注:运行时报错can't find lGl,请参考:http://blog.csdn.net/wwkaven/article/details/37755259
二、ffmpeg的配置
参考链接:http://blog.csdn.net/micheal_w/article/details/45343873
如果安装OpenCV时没有安装ffmpeg,则在调用OpenCV视频处理函数时,将会导致读取视频失败。
1、源码下载
终端输入如下指令,获取ffmpeg源码。
svn checkout svn://svn.mplayerhq.hu/ffmpeg/trunk ffmpeg注:获取源码后建议备份。
2、文件配置
进入ffmpeg文件夹中,进行文件配置:
cd ./ffmpeg
./configure --enable-shared --enable-gpl --enable-swscale如果在configure中遇到提醒,缺少--disable-yasm时,添加该项即可:
./configure --enable-shared --enable-gpl --enable-swscale --disable-yasm3、ffmpeg安装
make
sudo make install
4、关于’cmp’的bug
当执行make操作时,出现如下bug:
libavcodec/x86/h264_qpel_mmx.c: Assembler messages:
libavcodec/x86/h264_qpel_mmx.c:1294: Error: operand type mismatch for cmp' cmp’
libavcodec/x86/h264_qpel_mmx.c:1294: Error: operand type mismatch for
libavcodec/x86/h264_qpel_mmx.c:1298: Error: operand type mismatch for cmp' cmp’
libavcodec/x86/h264_qpel_mmx.c:1298: Error: operand type mismatch for
libavcodec/x86/h264_qpel_mmx.c:964: Error: operand type mismatch for cmp' cmp’
libavcodec/x86/h264_qpel_mmx.c:964: Error: operand type mismatch for
libavcodec/x86/h264_qpel_mmx.c:964: Error: operand type mismatch for `cmp’
make[5]: * [libavcodec/x86/dsputil_mmx.o] Error 1
解决方案:
将目录下的文件:./ffmpeg/libavcodec/x86/h264_qpel_mmx.c文件中的”g”替换为”rm”。
使用gedit打开文档:
sudo gedit ./ffmpeg/libavcodec/x86/h264_qpel_mmx.c然后可以使用gedit中的替换功能。
三、OpenCV 2.4.9 的安装
参考链接:http://blog.csdn.net/guo8113/article/details/29211041
http://www.samontab.com/web/2014/06/installing-opencv-2-4-9-in-ubuntu-14-04-lts/
1、安装build-essential:
sudo apt-get install build-essential2、安装CMake:
sudo apt-get install cmake3、安装一些依赖库与组件:
sudo apt-get install libgtk2.0-dev pkg-config python-dev python-numpy libavcodec-dev libavformat-dev libswscale-dev libdc1394-22 libjpeg-dev libpng-dev libtiff-dev libjasper-dev其中,最后四个包是可选的。
4、获取OpenCV源码
可前往官网,寻找下载OpenCV 2.4.9的Linux版源码:http://opencv.org/downloads.html
下载得到OpenCV2.4.9.zip,解压到目录中。
5、安装OpenCV
此处使用release版本,所以在OpenCV文件夹下建造目录release。
cd ./opencv-2.4.9
mkdir release
cd ./release
对OpenCV进行CMake,命令如下:
cmake -D CMAKE_BUILD_TYPE=RELEASE -D CMAKE_INSTALL_PREFIX=/usr/local ..注:一定要加上后面两个点 “..”,两个点..代表上级目录的意思
cmake配置结束后,可以看到一系列编译配置情况。其中一定要注意检查ffmpeg的编译情况:

确定编译过程中会对如下模块进行编译:
core flann imgproc highgui features2d calib3d ml video legacy objdetect photo gpu ocl nonfree contrib java python stitching superres ts videostab viz.
然后编译、安装OpenCV:
make
sudo make install
安装过程比较慢,笔者较高的配置下也得编译20分钟。可以稍事休息。
6、更新系统库文件配置
sudo ldconfig这样可以直接重新加载系统中使用的库,就不用重启电脑就可用OpenCV库了。
四、OpenCV + Qt5.7.0程序测试
创建工程OpenCV_Test,在OpenCV_Test.pro文件中最后加入:
 INCLUDEPATH += /usr/local/include \
 /usr/local/include/opencv \
 /usr/local/include/opencv2
LIBS += /usr/local/lib/libopencv_highgui.so \
/usr/local/lib/libopencv_core.so \
/usr/local/lib/libopencv_imgproc.so
/usr/local/lib/libopencv_photo.so
/usr/local/lib/libopencv_calib3d.so
main.cpp如下:
#include return 1;
}
else
cout<<"Video Opened."<"Frame");
for(;;)
{
if(!video.read(frame))
{
cout<<"No Frame!"<break;
}
imshow("Frame", frame);
key = (char) cvWaitKey(1000 / fps);
if( key == 27 || key == 'q' || key == 'Q' ) // 'ESC'
break;
}
return 0;
} 运行结果如图所示:
从今天起,正式开启MarkDown记录生涯~


