Spring 整合Ehcache Server
最近响应公司的要求搞了一个Ehcache集群部署,由于之前的项目使用的Redis,现在要改成Ehcache,通过查阅资料发现ehcache是可以实现分布式的,当然现在网上查找到的资料全都是配置,而且全都是一样的,看的让人很恼火,没办法,自己整喽。
从官网上面看了一下示例代码,然后也查阅很多资料改了配置,发现spring集成ehcache还是挺简单的,直接修改配置文件,然后启动ehcache的服务,重启项目,能正常存取缓存,以为这样就搞好了,没什么复杂的嘛,然后才发现掉坑里面去了。
spring里面的ehcache是把数据放到内存里面的,当我把ehcache的服务停掉之后发现还能正常存取缓存,也就是那些配置压根就没起作用。
spring使用ehcache是自动放内存的,它里面有个EhcacheManager,我们的项目里面使用的是spring的注解方式存取缓存的,官网的介绍是用的是外部的cacheManager进行存取缓存,没有基于注解的方式,Redis是通过配置spring的cacheManager将管理器换成redis的才能通过注解的方式使用redis进行缓存的操作,当然redis也是可以用外部的cacheManager进行缓存操作的。
我懒得改代码!!!我必须得使用注解的方式,可是偷懒的办法(百度)用不了,只能自己操作了。
通过研究spring加缓存的机制发现需要继承一个类 CachingConfigurerSupport ,通过这个类对spring的 cacheManager 进行注入,让spring使用第三方缓存。
发现入口之后我们就开始操作了,我的项目使用的是gradle,首先引入jar包,通过ehcache的官网得知,需要以下两个jar
    compile 'org.ehcache:ehcache:3.7.0'
    compile 'org.ehcache:ehcache-clustered:3.7.0'
然后编写配置类,然后就遇到问题了,ehcache服务的管理器和spring的管理器不是一个东西,压根就注入不进去啊,难道只能大量的修改代码?不,总会有办法的。。。百度,半个小时之后放弃了,开始研究spring的源码
ehcache的管理器是在这里 ===》 org.ehcache.CacheManager
spring的管理器是在这里=====》 org.springframework.cache.CacheManager
两个不是一个类型的,也就是不能使用这种方式注入,办法总是会有的,继续深入
继续研究后发现spring里面在注入ehcache的时候返回 EhCacheCacheManager 这个玩意,进去看看,发现它继承了AbstractTransactionSupportingCacheManager 这个玩意
![]()
在通常使用ehcache的时候,我们配置类里面差不多都是这样写的
    @Bean
    public EhCacheCacheManager cacheManager(CacheManager cacheManager) {
        return new EhCacheCacheManager(cacheManager);
    }

    @Bean
    public EhCacheManagerFactoryBean ehcache() {
        EhCacheManagerFactoryBean ehCacheManagerFactoryBean = new EhCacheManagerFactoryBean();
        ehCacheManagerFactoryBean.setConfigLocation(new ClassPathResource("**/**/ehcache.xml"));
        return ehCacheManagerFactoryBean;

    }
最后spring会自动找到名称为 cacheManager 这个的bean,它返回的就是 EhCacheCacheManager ,继承的就是 AbstractTransactionSupportingCacheManager 这个玩意,那么我们自己是不是也可以继承这个玩意,然后不返回 EhCacheCacheManager ,返回自己定义的cacheManager ?说干就干!!!列出代码
package com.example.testehcache1.config.ehcache;
import org.ehcache.CacheManager;
import org.ehcache.Status;
import org.ehcache.config.CacheConfiguration;
import org.ehcache.config.Configuration;
import org.ehcache.xml.XmlConfiguration;
import org.springframework.cache.Cache;
import org.springframework.cache.transaction.AbstractTransactionSupportingCacheManager;
import org.springframework.lang.NonNull;
import org.springframework.lang.Nullable;
import org.springframework.util.Assert;
import java.net.URL;
import java.util.Collection;
import java.util.LinkedHashSet;
import java.util.Map;
import static org.ehcache.config.builders.CacheManagerBuilder.newCacheManager;
/**
* Created by zenghang on 2019/4/1.
*/
public class EhcacheManager extends AbstractTransactionSupportingCacheManager {
//定义两个全局变量,主要是方便自定义配置
@NonNull
private org.ehcache.core.EhcacheManager ehcacheManager;
private String xmlUrl = "/ehcache/ehcache.xml";
//这里定义三个构造函数,其实应该是只有两个,当然根据不同的需求可以定义多个,空的就是使用默认配置,一般来说只需要传入xml的url地址就行
public EhcacheManager() {
}
public EhcacheManager(org.ehcache.core.EhcacheManager ehcacheManager) {
this.ehcacheManager = ehcacheManager;
}
public EhcacheManager(org.ehcache.core.EhcacheManager ehcacheManager, String xmlUrl) {
this.ehcacheManager = ehcacheManager;
this.xmlUrl = xmlUrl;
}
//这个是重点,直接从EhCacheCacheManager复制过来的,避免自己手写,容易出现错误
@Override
protected Collection loadCaches() {
URL myUrl = EhcacheManager.class.getResource(xmlUrl);
Configuration xmlConfig = new XmlConfiguration(myUrl);
org.ehcache.CacheManager cacheManager = newCacheManager(xmlConfig);
cacheManager.init();
Assert.state(cacheManager != null, "No CacheManager set");
Status status = cacheManager.getStatus();
if (!Status.AVAILABLE.equals(status)) {
throw new IllegalStateException(
"An 'alive' EhCache CacheManager is required - current cache is " + status.toString());
}
Map> cacheConfigurations = xmlConfig.getCacheConfigurations();
Collection caches = new LinkedHashSet<>(cacheConfigurations.size());
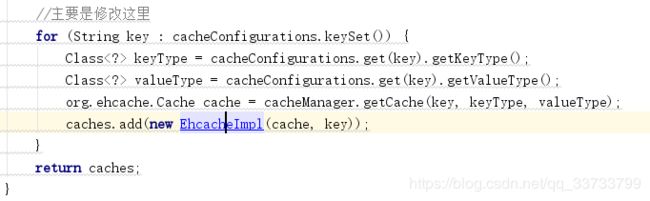
//主要是修改这里
for (String key : cacheConfigurations.keySet()) {
Class keyType = cacheConfigurations.get(key).getKeyType();
Class valueType = cacheConfigurations.get(key).getValueType();
org.ehcache.Cache cache = cacheManager.getCache(key, keyType, valueType);
caches.add(new EhcacheImpl(cache, key));
}
return caches;
}
@Nullable
public CacheManager getCacheManager() {
return this.ehcacheManager;
}
}
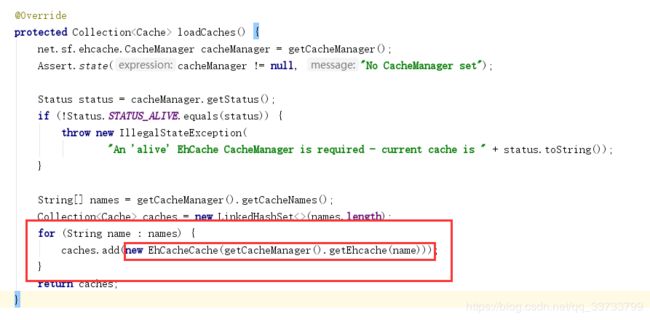
主要是修改上面图片框出来的这一块,这个方法是spring 的
类在这===》org.springframework.cache.ehcache.EhCacheCacheManager
到这里又遇到一个问题
new EhCacheCache(getCacheManager().getEhcache(name))
这一段代码里面的是什么东西?ehcache里面的是 org.ehcache.Cache
又不是一个东西,怎么办呢?还是老办法,看 EhCacheCache 这个里面实现的了 org.springframework.cache.Cache

我们也实现它
这里又是一个自己实现的类,上代码
package com.example.testehcache1.config.ehcache;

import net.sf.ehcache.Element;
import org.springframework.cache.support.SimpleValueWrapper;
import org.springframework.lang.Nullable;

import java.util.concurrent.Callable;

/**
 * Created by zenghang on 2100019/4/1.
 */
public class EhcacheImpl implements org.springframework.cache.Cache {
    private org.ehcache.Cache ehcache;
    private String name;

    public EhcacheImpl(org.ehcache.Cache ehcache, String name) {
        this.ehcache = ehcache;
        this.name = name;
    }

    @Override
    public String getName() {
        return this.name;
    }

    @Override
    public Object getNativeCache() {
        return this.ehcache;
    }

    @Override
    public ValueWrapper get(Object key) {
        Element element = lookup(key);
        return toValueWrapper(element);
    }

    @Override
    public  T get(Object key, Class type) {
        Object value = this.ehcache.get(key);
        if (value != null && type != null && !type.isInstance(value)) {
            throw new IllegalStateException(
                    "Cached value is not of required type [" + type.getName() + "]: " + value);
        }
        return (T) value;
    }

    @SuppressWarnings("unchecked")
    @Override
    @Nullable
    public  T get(Object key, Callable valueLoader) {
        Element element = lookup(key);
        if (element != null) {
            return (T) element.getObjectValue();
        } else {
            return loadValue(key, valueLoader);
        }
    }

    @Override
    public void put(Object key, Object value) {
        this.ehcache.put(key, value);
    }

    @Nullable
    private Element lookup(Object key) {
        Object value = this.ehcache.get(key);
        if (value == null) {
            return null;
        } else {
            return new Element(key, value);
        }
    }

    private  T loadValue(Object key, Callable valueLoader) {
        T value;
        try {
            value = valueLoader.call();
        } catch (Throwable ex) {
            throw new ValueRetrievalException(key, valueLoader, ex);
        }
        put(key, value);
        return value;
    }

    @Nullable
    private ValueWrapper toValueWrapper(@Nullable Element element) {
        return (element != null ? new SimpleValueWrapper(element.getObjectValue()) : null);
    }

    @Override
    public ValueWrapper putIfAbsent(Object key, Object value) {
        Object o = this.ehcache.putIfAbsent(key, value);
        return toValueWrapper(new Element(key, o));

//        Object existingValue = this.get(key);
//        if (existingValue == null) {
//            this.put(key, value);
//            return null;
//        } else {
//            return () -> existingValue;
//        }
    }

    @Override
    public void evict(Object key) {
        this.ehcache.remove(key);
    }

    @Override
    public void clear() {
        this.ehcache.clear();
    }
}
这里就没有太多的介绍了,全都是copy EhCacheCache 它的代码,毕竟是要改框架的操作,出错那就完了,就把具体的实现用ehcache的。
最后一步就是配置使用我们自定义的类和方法了,上代码
package com.example.testehcache1.config.ehcache;

import org.springframework.cache.CacheManager;
import org.springframework.cache.annotation.CachingConfigurerSupport;
import org.springframework.cache.annotation.EnableCaching;
import org.springframework.context.annotation.Bean;
import org.springframework.context.annotation.Configuration;

/**
 * Created by zenghang on 2019/3/28.
 */
@Configuration
@EnableCaching
public class EhcacheConfig extends CachingConfigurerSupport {

    @Bean
    @Override
    public CacheManager cacheManager() {
        return new EhcacheManager();
    }
}
最后就是配置文件和ehcache服务了,ehcache服务,提取码1ddx
        java.lang.Long
        java.lang.String

            100
            1
            5


        java.lang.Long
        com.example.basecache.model.CacheBean

            100
            1
            5


        java.lang.String
        com.example.basecache.model.CacheBean

            100
            1
            5
这个配置文件我是放到了resources/config/ 下面了
这个文件放的地方需要注意,必须是在resources下面
里面的value-type需要注意,必须实现序列化,我是将一个类序列化,其余的所有需要缓存的都继承这个类,然后配置信息怎么配的我这里就不详细说了,毕竟随便百度一下一大堆。。。
我是通过spring boot项目进行测试的,迁移到springmvc项目上没有问题。
然后列一下我的gradle所有jar,避免缺少依赖说我的东西有问题,以下是我的gradle文件
buildscript {
    ext {
        springBootVersion = '2.1.3.RELEASE'
    }
    repositories {
        mavenCentral()
    }
    dependencies {
        classpath("org.springframework.boot:spring-boot-gradle-plugin:${springBootVersion}")
    }
}

apply plugin: 'java'
apply plugin: 'eclipse'
apply plugin: 'org.springframework.boot'
apply plugin: 'io.spring.dependency-management'

group = 'com.example'
version = '0.0.1-SNAPSHOT'
sourceCompatibility = '1.8'

repositories {
    maven {
        url = 'https://oss.sonatype.org/content/repositories/snapshots/'
    }
    mavenCentral()
}

dependencies {
    implementation project(":base-cache")

    implementation 'org.springframework.boot:spring-boot-starter-cache'
//    implementation 'org.springframework.boot:spring-boot-starter-data-cassandra'
//    implementation 'org.springframework.boot:spring-boot-starter-integration'
    implementation 'org.springframework.boot:spring-boot-starter-thymeleaf'
    implementation 'org.springframework.boot:spring-boot-starter-web'
    implementation 'org.springframework.boot:spring-boot-starter-data-jpa'
    testImplementation 'org.springframework.boot:spring-boot-starter-test'
    testImplementation 'org.springframework.boot:spring-boot-starter-jdbc'

    compile 'com.alibaba:fastjson:1.2.56'
    compile 'mysql:mysql-connector-java:8.0.13'
    compile 'org.ehcache:ehcache:3.7.0'
    compile 'org.ehcache:ehcache-clustered:3.7.0'
    compile 'net.sf.ehcache:ehcache:2.10.6'
}
好了,这样操作完成之后就可以实现通过注解的方式进行缓存数据的操作了。
GitHub项目地址
转载请注明出处:https://blog.csdn.net/qq_33733799/article/details/88998430