轻松简单实现基于深度学习(deep learning)和OpenCV下的物体检测(含源代码)
本文将利用已配备好OpenCV3.3和cuda、cudnn环境下的电脑简单实现对于物体的识别与检测
Ubuntu下安装CUDA8.0及nvidia驱动:https://blog.csdn.net/qq_35379989/article/details/80147630
opencv3.3安装:https://blog.csdn.net/qq_35379989/article/details/80151352
首先你得安装好opencv和cudnn环境,然后呢下载以下的程序源码资源:
下载好后,执行以下指令
cd ~/object-detection-deep-learning (此处假定解压至/home下)
python deep_learning_object_detection.py \
	--prototxt MobileNetSSD_deploy.prototxt.txt \
	--model MobileNetSSD_deploy.caffemodel --image images/example_01.jpg (此处可替换为你的图片名称放置在文件夹中的images中)
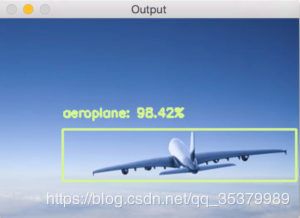
第一次运行要进行训练需要稍长时间,后面即可快速识别图片中的物体咯,这里放上我识别后的结果
以下为程序的原理性分析:
此程序使用 OpenCV中的MobileNet SSD +深度神经网络( dnn)模块来构建我们的对象检测器。
建议使用此博客上方下载(源代码+经过培训的网络+示例图像)压缩包,以便可以在计算机上测试它们。
让我们继续使用OpenCV开始构建我们的深度学习对象检测器。
打开一个新文件,将其命名为 deep_learning_object_detection .py ,然后插入以下代码:
# import the necessary packages
import numpy as np
import argparse
import cv2

# construct the argument parse and parse the arguments
ap = argparse.ArgumentParser()
ap.add_argument("-i", "--image", required=True,
	help="path to input image")
ap.add_argument("-p", "--prototxt", required=True,
	help="path to Caffe 'deploy' prototxt file")
ap.add_argument("-m", "--model", required=True,
	help="path to Caffe pre-trained model")
ap.add_argument("-c", "--confidence", type=float, default=0.2,
	help="minimum probability to filter weak detections")
args = vars(ap.parse_args())在第2-4行,我们导入了这个脚本所需的包 - dnn 模块也包含在 cv2中,这里假设你使用的是OpenCV 3.3。
然后,我们解析命令行参数(第7-16行):
- - image :输入图像的路径。
- - prototxt :Caffe原型文件的路径。
- - model :预训练模型的路径。
- - 置信度 :过滤弱检测的最小概率阈值。默认值为20%。
同样,前三个参数的示例文件包含在本博文的“下载”部分中。在这里你可以在images中放置一些你自己的图片进行测试
接下来,让我们初始化类标签和边框颜色:
# initialize the list of class labels MobileNet SSD was trained to
# detect, then generate a set of bounding box colors for each class
CLASSES = ["background", "aeroplane", "bicycle", "bird", "boat",
	"bottle", "bus", "car", "cat", "chair", "cow", "diningtable",
	"dog", "horse", "motorbike", "person", "pottedplant", "sheep",
	"sofa", "train", "tvmonitor"]
COLORS = np.random.uniform(0, 255, size=(len(CLASSES), 3))第20-23行构建一个名为CLASSES的列表, 其中包含我们的标签。接下来是一个列表 COLORS ,其中包含边界框的相应随机颜色(第24行)。
现在我们需要加载我们的模型:
# load our serialized model from disk
print("[INFO] loading model...")
net = cv2.dnn.readNetFromCaffe(args["prototxt"], args["model"])
接下来,我们将加载我们的查询图像并准备我们的 blob ,我们将通过网络前馈:
# load the input image and construct an input blob for the image
# by resizing to a fixed 300x300 pixels and then normalizing it
# (note: normalization is done via the authors of the MobileNet SSD
# implementation)
image = cv2.imread(args["image"])
(h, w) = image.shape[:2]
blob = cv2.dnn.blobFromImage(cv2.resize(image, (300, 300)), 0.007843,
	(300, 300), 127.5)
现在我们已准备好进行繁重的工作 - 我们将通过神经网络传递这个blob:
# pass the blob through the network and obtain the detections and
# predictions
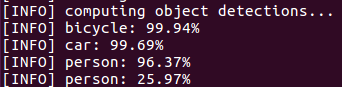
print("[INFO] computing object detections...")
net.setInput(blob)
detections = net.forward()让我们遍历我们的 detections 和确定图像中的物体是什么:
# loop over the detections
for i in np.arange(0, detections.shape[2]):
	# extract the confidence (i.e., probability) associated with the
	# prediction
	confidence = detections[0, 0, i, 2]

	# filter out weak detections by ensuring the `confidence` is
	# greater than the minimum confidence
	if confidence > args["confidence"]:
		# extract the index of the class label from the `detections`,
		# then compute the (x, y)-coordinates of the bounding box for
		# the object
		idx = int(detections[0, 0, i, 1])
		box = detections[0, 0, i, 3:7] * np.array([w, h, w, h])
		(startX, startY, endX, endY) = box.astype("int")

		# display the prediction
		label = "{}: {:.2f}%".format(CLASSES[idx], confidence * 100)
		print("[INFO] {}".format(label))
		cv2.rectangle(image, (startX, startY), (endX, endY),
			COLORS[idx], 2)
		y = startY - 15 if startY - 15 > 15 else startY + 15
		cv2.putText(image, label, (startX, y),
			cv2.FONT_HERSHEY_SIMPLEX, 0.5, COLORS[idx], 2)
我们首先循环检测我们的检测,记住可以在单个图像中检测到多个对象。我们还对每次检测相关的置信度(即概率)进行检查。如果置信度足够高(即高于阈值),那么我们将在终端中显示预测以及使用文本和彩色边界框在图像上绘制预测。
使用标签,我们将其打印到终端(第62行),然后使用我们先前提取的(x,y)坐标(第63和64行)在对象周围绘制彩色矩形。
通常,我们希望标签显示在矩形上方,但如果没有空间,我们将在矩形顶部下方显示它(第65行)。
最后,我们 使用我们刚刚计算的y值将彩色文本叠加到image上 (第66和67行)。
剩下的唯一步骤是显示结果:
# show the output image
cv2.imshow("Output", image)
cv2.waitKey(0)我们将结果输出图像显示在屏幕上,直到按下一个键(第70和71行)。
解压缩存档并执行以下命令:
$ python deep_learning_object_detection.py \
	--prototxt MobileNetSSD_deploy.prototxt.txt \
	--model MobileNetSSD_deploy.caffemodel --image images/example_02.jpg
获得结果