Ambari&CDH平台搭建使用指南
一.相关资源:
CentOS-6.5-x86_64-bin-DVD1.iso
Ambari-1.7.0
HDP-2.2.0.0
HDP-UTILS-1.1.0.20
jdk-7u71-linux-x64.tar.gz
二.环境准备
centos6.5 mini安装
hostname 符合 Fully Qualified Domain Name 规则,如:
ambari-server.hdp
不符合在ambari配置时会有警告,但也能安装
配置hosts,加入:(此处必须将计算机名指向一个Ip不然在ambari-server start 会报一个gethobstyhostname(host_name)错误
192.168.137.116 ambari-server.hdp
jdk安装
解压缩jdk-7u71-linux-x64.tar.gz,扔/opt/java里
配置/etc/profile,加入:
export JAVA_HOME=/opt/java
export PATH=$JAVA_HOME/bin:$PATH
让配置生效,执行
source /etc/profile
设置进程打开的文件句柄数量的限制(ulimit), 建议大于10000
修改/etc/security/limits.conf
* soft   nofile  32768
* hard   nofile  65536
soft为警告, hard为限制
ssh免鉴
执行: ssh-keygen
cd ~/.ssh
cat id_rsa.pub >> authorized_keys
chmod 700 ~/.ssh
chmod 600 ~/.ssh/authorized_keys
启动ntpd服务
yum install ntpd
chkconfig —list ntpd
chkconfig ntpd on关闭iptables
chkconfig iptables off
/etc/init.d/iptables stop关闭selinux
在/etc/selinux/config中设置
SELINUX=disabled关闭packagekit
在/etc/yum/pluginconf.d/refresh-packagekit.conf中设置
enabled=0设置umask
在/etc/profile中设置
umask 022
三.建立本地yum源
安装相关服务
yum -y install yum-utils createrepo yum-plugin-priorities httpd在/etc/yum/pluginconf.d/priorities.conf中设置
[main]
enabled=1
gpgcheck=0
设置httpd
chkconfig httpd on
service httpd startserver {
listen 80;
listen 192.168.88.79:80;
server_name 192.168.88.79;
root /var/www/html/;
# Load configuration files for the default server block.
include /etc/nginx/default.d/*.conf;
location / {
}
error_page 404 /404.html;
location = /40x.html {
}
error_page 500 502 503 504 /50x.html;
location = /50x.html {
}
}
下载相关资源
http://public-repo-1.hortonworks.com/ambari/centos6/ambari-1.7.0-centos6.tar.gz
http://public-repo-1.hortonworks.com/HDP/centos6/HDP-2.2.0.0-centos6-rpm.tar.gz
http://public-repo-1.hortonworks.com/HDP-UTILS-1.1.0.20/repos/centos6/HDP-UTILS-1.1.0.20-centos6.tar.gz
解包并移动到/var/www/html/目录下
配置yum.repo.d/ambari.repo如下:
此处需要将ip(192.168.137.116/)设置为自己本机ip 需要将nginx指向/var/www/html下
[CentOS65-Media]
name=CentOS6-Media
baseurl=http://192.168.88.79/HDP-UTILS-1.1.0.20/repos/centos6/
gpgcheck=1
enabled=1
gpgkey=file:///etc/pki/rpm-gpg/RPM-GPG-KEY-CentOS-6


[Ambari-1.7.0]
name=Ambari-1.7.0
baseurl=http://192.168.88.79/ambari/centos6/1.x/updates/1.7.0
gpgcheck=0
enabled=1


[HDP-2.2.0.0]
name=HDP-2.2.0.0
baseurl=http://192.168.88.79/HDP/centos6/2.x/GA/2.2.0.0
gpgcheck=0
enabled=1


[HDP-UTILS-1.1.0.20]
name=HDP-UTILS-1.1.0.20
baseurl=http://192.168.88.79/HDP-UTILS-1.1.0.20/repos/centos6
gpgcheck=0
enabled=1
访问http服务
http://192.168.137.116/ambari/centos6/1.x/updates/1.7.0/ambari.repo
如果没关selinux,会遇到403错误
安装ambari-server, 依赖postgresql
yum install ambari-server
配置ambari-server
ambari-server setup
配置JDK时,选3,自定义JDK路径,输入/opt/java
配置数据库时用默认的postgresql,自动建库,库名ambari,用户/密码 ambari/bigdata
也可以用mysql,好像要准备mysqljdbc的包(此处需要自己创建mysql数据库并将/var/lib/ambari-server/resources/Ambari-DDL-MySQL-CREATE.sql 执行)
启动ambari-server
ambari-server start
访问192.168.137.116:8080
admin/admin
先写流程,等有时候再配图
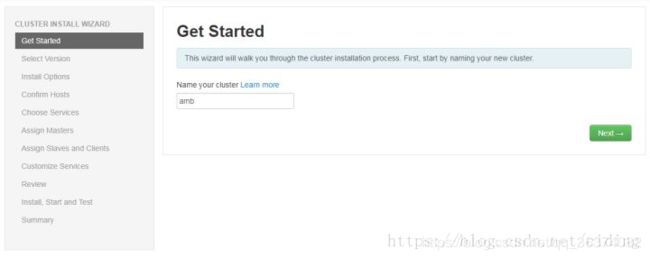
1.给cluster起名
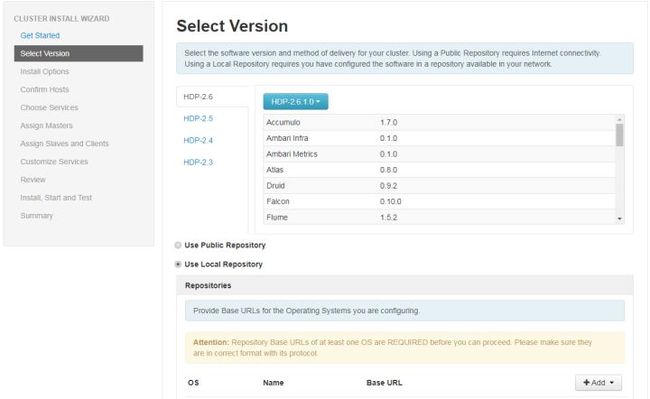
2.选择stack, 这里选hdp2.2,下面有一个Advanced Repository Options,
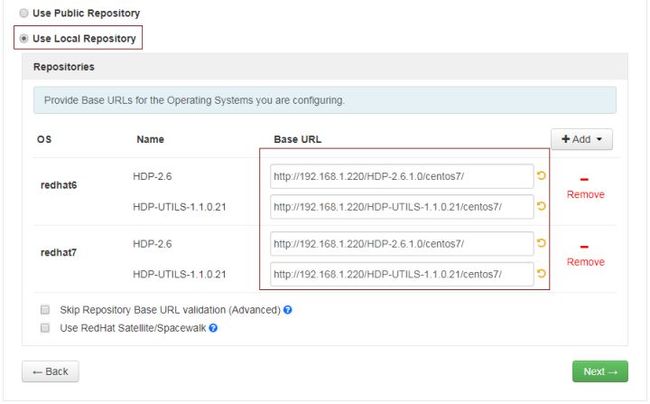
如果用的上面的repo文件,所有设置都取消,否则可以在redhat6输入本地yum源的HDP和HDP-UTILS的URL
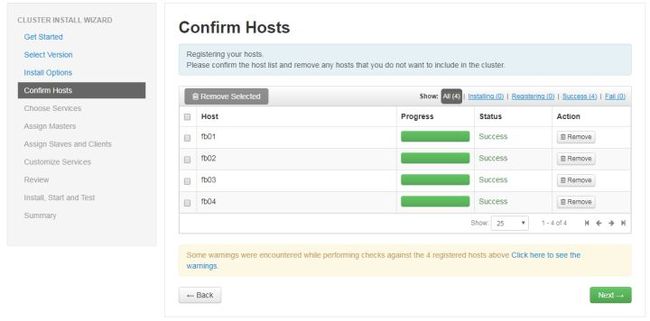
3.输入hosts,这里就一个输入ambari-server.hdp, 上传id_rsa文件
4.显示agent安装,遇到访问https://xxx:8440/ca错误的 升级openssl, agent安装成功后,下面有一个警告列表,把有问题的解决,THP的看下面的遇到问题3
5.选择要安装的服务
6.选择masters
7.选择slaves
8.自定义配置
9.review
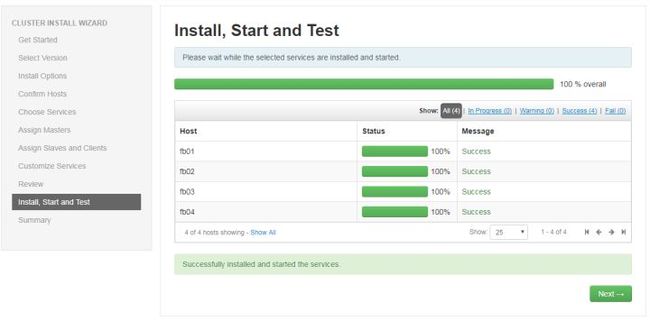
10.开始安装
11.完成
可以查看Dashboard了
遇到问题:
1.selinux开启 导致本地yum源访问403
2.centosos6.5 openssh 版本bug 导致 agent安装失败
解决 yum upgrade openssl
3.关闭 THP(Transparent HugePages )
Add the following lines in /etc/rc.local and reboot the server:
echo never > /sys/kernel/mm/redhat_transparent_hugepage/enabled
echo never > /sys/kernel/mm/redhat_transparent_hugepage/defrag
如果找不到 mapreduce.tar.gz
需要将 mapreduce.tar.gz 上传到 hdfs中的 hdp/apps/{hdp.version}/mapreduce/mapreduce.tar.gz这个目录下
hadoop dfs -mkdir /apps/2.2.0.0-20412.2.9.0-3393/

sudo -u hdfs hadoop fs -put /usr/hdp/2.2.0.0-2041/hadoop/mapreduce.tar.gz /apps/2.2.0.0-20412.2.9.0-3393/mapreduce/mapreduce.tar.gz
如果版本号出现 2.2.0.0-2041 2.2.9.0-3393这种情况 两个版本相连,这会导致 hdp/apps/{hdp.version}/这个目录无法正常找不到
/use/bin/hdp/2.2.0.0-2041 /use/bin/hdp/.2.9.0-3393
这个是因为内部代码判断2.2.*开头的都是版本
要删除掉非默认的版本,改名会报错 ,可以移动到别的目录下
如果mysql8.0连接包找不到 mysql-connector-java
建议自己下载安装
1.3.3 启动ambari-server
1.3.4 查看日志:
如果jdk版本出现错误
需要装jdk1.8
mysql的链接失败,是因为配置的driver没有设置正确.
修改如下:vi /etc/ambari-server/conf/ambari.properties
再次启动,成功.
1.3.4 打开网页:http://192.168.1.218:8080 直接到了安装界面
![]()
下一步,配置节点,制作安装源.
2.大数据组件可视化安装过程:举例zookeeper的安装
根据自定义的安装源,来修改内容如下:
主要填写:
1.每行填写一个host name,对应的是安装集群的节点
2.提交配置的ssh的私密
填写完成后
![]()
安装过程时,报错:
ERROR 2017-09-20 10:55:30,922 main.py:244 - Ambari agent machine hostname (localhost.localdomain) does not match expected ambari server hostname (fb01). Aborting registration. Please check hostname, hostname -f and /etc/hosts file to confirm your hostname is setup correctly
表示:你的hostname没有修改。
另外,记得关闭防火墙
2.4
安装ambari-agent 客户端
操作:选中要安装的版本组件。会涉及关联校验步骤。
![]()
在上一环节,只选中zookeeper提交后
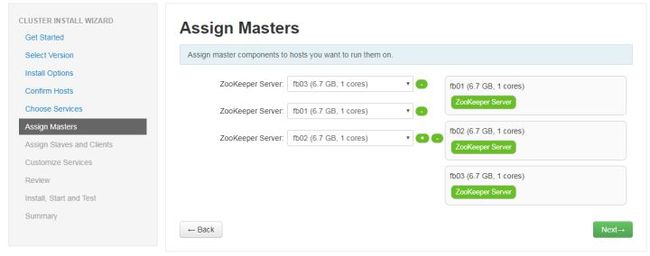
这个环节,是选择master
![]()
3.大数据组件api接口安装过程
以zookeeper为例子:
使用post方式提交数据
url: http://192.168.1.220:8080/api/v1/clusters/amb/services
提交数据:{"ServiceInfo":{"service_name":"ZOOKEEPER"}}
目的:注册服务名字,方便监控
3.2
使用put方式提交数据
url: http://192.168.1.220:8080/api/v1/clusters/amb
提交数据:(实际内容可以通过json工具查看一下,主要提交的就是配置文件)
[{"Clusters":{"desired_config":[{"type":"zoo.cfg","tag":"version1506065925604","properties":{"autopurge.purgeInterval":"24","autopurge.snapRetainCount":"30","clientPort":"2181","dataDir":"/hadoop/zookeeper","initLimit":"10","syncLimit":"5","tickTime":"3000"},"service_config_version_note":"Initial configurations for ZooKeeper"},{"type":"zookeeper-env","tag":"version1506065925604","properties":{"content":"\nexport JAVA_HOME={{java64_home}}\nexport ZOOKEEPER_HOME={{zk_home}}\nexport ZOO_LOG_DIR={{zk_log_dir}}\nexport ZOOPIDFILE={{zk_pid_file}}\nexport SERVER_JVMFLAGS={{zk_server_heapsize}}\nexport JAVA=$JAVA_HOME/bin/java\nexport CLASSPATH=$CLASSPATH:/usr/share/zookeeper/*\n\n{% if security_enabled %}\nexport SERVER_JVMFLAGS=\"$SERVER_JVMFLAGS -Djava.security.auth.login.config={{zk_server_jaas_file}}\"\nexport CLIENT_JVMFLAGS=\"$CLIENT_JVMFLAGS -Djava.security.auth.login.config={{zk_client_jaas_file}}\"\n{% endif %}","zk_log_dir":"/var/log/zookeeper","zk_pid_dir":"/var/run/zookeeper","zk_server_heapsize":"1024m","zk_user":"zookeeper"},"service_config_version_note":"Initial configurations for ZooKeeper"},{"type":"zookeeper-log4j","tag":"version1506065925604","properties":{"content":"\n#\n#\n# Licensed to the Apache Software Foundation (ASF) under one\n# or more contributor license agreements. See the NOTICE file\n# distributed with this work for additional information\n# regarding copyright ownership. The ASF licenses this file\n# to you under the Apache License, Version 2.0 (the\n# \"License\"); you may not use this file except in compliance\n# with the License. You may obtain a copy of the License at\n#\n# http://www.apache.org/licenses/LICENSE-2.0\n#\n# Unless required by applicable law or agreed to in writing,\n# software distributed under the License is distributed on an\n# \"AS IS\" BASIS, WITHOUT WARRANTIES OR CONDITIONS OF ANY\n# KIND, either express or implied. See the License for the\n# specific language governing permissions and limitations\n# under the License.\n#\n#\n#\n\n#\n# ZooKeeper Logging Configuration\n#\n\n# DEFAULT: console appender only\nlog4j.rootLogger=INFO, CONSOLE, ROLLINGFILE\n\n# Example with rolling log file\n#log4j.rootLogger=DEBUG, CONSOLE, ROLLINGFILE\n\n# Example with rolling log file and tracing\n#log4j.rootLogger=TRACE, CONSOLE, ROLLINGFILE, TRACEFILE\n\n#\n# Log INFO level and above messages to the console\n#\nlog4j.appender.CONSOLE=org.apache.log4j.ConsoleAppender\nlog4j.appender.CONSOLE.Threshold=INFO\nlog4j.appender.CONSOLE.layout=org.apache.log4j.PatternLayout\nlog4j.appender.CONSOLE.layout.ConversionPattern=%d{ISO8601} - %-5p [%t:%C{1}@%L] - %m%n\n\n#\n# Add ROLLINGFILE to rootLogger to get log file output\n# Log DEBUG level and above messages to a log file\nlog4j.appender.ROLLINGFILE=org.apache.log4j.RollingFileAppender\nlog4j.appender.ROLLINGFILE.Threshold=DEBUG\nlog4j.appender.ROLLINGFILE.File={{zk_log_dir}}/zookeeper.log\n\n# Max log file size of 10MB\nlog4j.appender.ROLLINGFILE.MaxFileSize={{zookeeper_log_max_backup_size}}MB\n# uncomment the next line to limit number of backup files\n#log4j.appender.ROLLINGFILE.MaxBackupIndex={{zookeeper_log_number_of_backup_files}}\n\nlog4j.appender.ROLLINGFILE.layout=org.apache.log4j.PatternLayout\nlog4j.appender.ROLLINGFILE.layout.ConversionPattern=%d{ISO8601} - %-5p [%t:%C{1}@%L] - %m%n\n\n\n#\n# Add TRACEFILE to rootLogger to get log file output\n# Log DEBUG level and above messages to a log file\nlog4j.appender.TRACEFILE=org.apache.log4j.FileAppender\nlog4j.appender.TRACEFILE.Threshold=TRACE\nlog4j.appender.TRACEFILE.File=zookeeper_trace.log\n\nlog4j.appender.TRACEFILE.layout=org.apache.log4j.PatternLayout\n### Notice we are including log4j's NDC here (%x)\nlog4j.appender.TRACEFILE.layout.ConversionPattern=%d{ISO8601} - %-5p [%t:%C{1}@%L][%x] - %m%n","zookeeper_log_max_backup_size":"10","zookeeper_log_number_of_backup_files":"10"},"service_config_version_note":"Initial configurations for ZooKeeper"},{"type":"zookeeper-logsearch-conf","tag":"version1506065925604","properties":{"component_mappings":"ZOOKEEPER_SERVER:zookeeper","content":"\n{\n \"input\":[\n {\n \"type\":\"zookeeper\",\n \"rowtype\":\"service\",\n \"path\":\"{{default('/configurations/zookeeper-env/zk_log_dir', '/var/log/zookeeper')}}/zookeeper*.log\"\n }\n ],\n \"filter\":[\n {\n \"filter\":\"grok\",\n \"conditions\":{\n \"fields\":{\"type\":[\"zookeeper\"]}\n },\n \"log4j_format\":\"%d{ISO8601} - %-5p [%t:%C{1}@%L] - %m%n\",\n \"multiline_pattern\":\"^(%{TIMESTAMP_ISO8601:logtime})\",\n \"message_pattern\":\"(?m)^%{TIMESTAMP_ISO8601:logtime}%{SPACE}-%{SPACE}%{LOGLEVEL:level}%{SPACE}\\\\[%{DATA:thread_name}\\\\@%{INT:line_number}\\\\]%{SPACE}-%{SPACE}%{GREEDYDATA:log_message}\",\n \"post_map_values\": {\n \"logtime\": {\n \"map_date\":{\n \"target_date_pattern\":\"yyyy-MM-dd HH:mm:ss,SSS\"\n }\n }\n }\n }\n ]\n}","service_name":"Zookeeper"},"service_config_version_note":"Initial configurations for ZooKeeper"}]}}]
目的:将页面配置的参数内容做为了字段提交保存到数据库,形成配置版本,其中version1506065925604为版本号。
3.3
使用post方式提交数据
url: http://192.168.1.220:8080/api/v1/clusters/amb/services?ServiceInfo/service_name=ZOOKEEPER
提交数据:{"components":[{"ServiceComponentInfo":{"component_name":"ZOOKEEPER_CLIENT"}},{"ServiceComponentInfo":{"component_name":"ZOOKEEPER_SERVER"}}]}
目的:向组件注册名字,方便监控时名字对应
3.4
使用post方式提交数据
url: http://192.168.1.220:8080/api/v1/clusters/amb/hosts
提交数据:
2次数据提交如下:
第1次:
{"RequestInfo":{"query":"Hosts/host_name=fb02|Hosts/host_name=fb04|Hosts/host_name=fb03"},"Body":{"host_components":[{"HostRoles":{"component_name":"ZOOKEEPER_SERVER"}}]}}
第2次:
{"RequestInfo":{"query":"Hosts/host_name=fb04"},"Body":{"host_components":[{"HostRoles":{"component_name":"ZOOKEEPER_CLIENT"}}]}}
目的:指定需要安装的节点
3.5
使用put方式提交数据
url: http://192.168.1.220:8080/api/v1/clusters/amb/services?ServiceInfo/service_name.in(ZOOKEEPER)
提交数据:
{"RequestInfo":{"context":"Install Services","operation_level":{"level":"CLUSTER","cluster_name":"amb"}},"Body":{"ServiceInfo":{"state":"INSTALLED"}}}
目的:发起安装
如要其它组件的安装api文档,请联作者。
4.ambari的api使用说明
安装api:
http://192.168.1.220:8080/api/v1/clusters/amb/services
监控api:
http://192.168.1.220:8080/api/v1/clusters/amb/hosts/fb02?fields=metrics/cpu
1.内存
http://192.168.1.220:8080/api/v1/clusters/amb/hosts/fb02?fields=metrics/memory
2.cpu
http://192.168.1.220:8080/api/v1/clusters/amb/hosts/fb02?fields=metrics/cpu
3.磁盘
http://192.168.1.220:8080/api/v1/clusters/amb/hosts/fb02?fields=metrics/disk
This is a premium name
没有,只有cpu等待io 叫 wio,在cpu的api里有数据
5.网络
http://192.168.1.220:8080/api/v1/clusters/amb/hosts/fb02?fields=metrics/network
6.日志查看
7.应用状态
http://192.168.1.220:8080/api/v1/clusters/amb/requests?fields=Requests/request_status,Requests/request_context
其中?后面为过滤条件,/后面是取的字段,多个字段用,分隔来取
http://192.168.1.220:8080/api/v1/clusters/amb/requests取的每个hosts中的
8.所有组件安装情况 与 当前情况
http://192.168.1.220:8080/api/v1/clusters/amb/components/?fields=ServiceComponentInfo/service_name,ServiceComponentInfo/category,ServiceComponentInfo/installed_count,ServiceComponentInfo/started_count,ServiceComponentInfo/init_count,ServiceComponentInfo/install_failed_count,ServiceComponentInfo/unknown_count,ServiceComponentInfo/total_count,ServiceComponentInfo/display_name,host_components/HostRoles/host_name&minimal_response=true&_=1506411896857
9.已经安装的组件安装配置情况
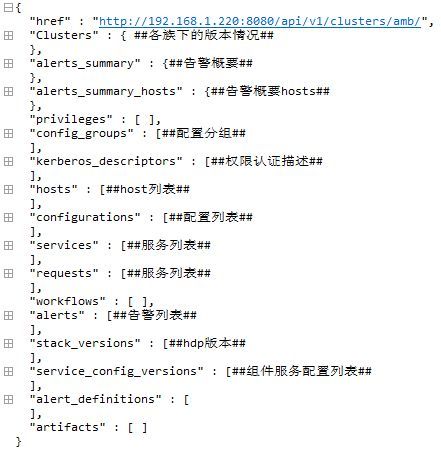
http://192.168.1.220:8080/api/v1/clusters/amb/
1类:Clusters
对应:http://192.168.1.220:8080/api/v1/clusters/amb?fields=Clusters
1.1 health_report
1.2 desired_configs
1.3 desired_service_config_versions
2类: alerts_summary
对应:http://192.168.1.220:8080/api/v1/clusters/amb?fields=alerts_summary
3类: alerts_summary_hosts
对应:http://192.168.1.220:8080/api/v1/clusters/amb?fields=alerts_summary_hosts
4类: config_groups
对应:http://192.168.1.220:8080/api/v1/clusters/amb?fields=config_groups
5类:kerberos_descriptors
对应:http://192.168.1.220:8080/api/v1/clusters/amb?fields=kerberos_descriptors
6类:hosts
对应:http://192.168.1.220:8080/api/v1/clusters/amb?fields=hosts
7类:configurations
对应:http://192.168.1.220:8080/api/v1/clusters/amb?fields=configurations
8类:services
对应:http://192.168.1.220:8080/api/v1/clusters/amb?fields=services
9类:requests
对应:http://192.168.1.220:8080/api/v1/clusters/amb?fields=requests
10类:alerts
对应:http://192.168.1.220:8080/api/v1/clusters/amb?fields=alerts
11类:stack_versions
对应:http://192.168.1.220:8080/api/v1/clusters/amb?fields=stack_versions
12类:service_config_versions
对应:http://192.168.1.220:8080/api/v1/clusters/amb?fields=service_config_versions
13类:alert_definitions
对应:http://192.168.1.220:8080/api/v1/clusters/amb?fields=alert_definitions
5.ambari的框架解析
待续!!!
6.ambari引入的开源包
待续!!!!!!
