CMAQ5.3安装
安装CMAQ-5.3软件
详细步骤
(一)、gcc-7.1.0
支持版本号:6.1.0 及以上
源码包位置:
/home/export/parastor/users/yinhh/gcc-install
已经安装好的版本链接位置:
/home/export/parastor/users/yinhh/local/gcc/gcc-7.1.0
安装步骤:
涉及到的源码安装包:
gmp-6.1.0.tar.gz;
mpfr-3.1.4.tar.gz;
mpc-1.1.0.tar.gz;
gcc-7.1.0.tar.gz
- 编译安装gmp-6.1.0
# 解压缩
tar -zxvf gmp-6.1.0.tar.gz
# 进入解压缩后的文件夹
cd gmp-6.1.0
# 安装路径设置
./configure --prefix=/home/export/parastor/users/yinhh/local/gcc/gmp-6.1.0
# 编译
Make
# 安装
Make install
2、添加gmp-6.1.0环境变量
# 添加环境变量
vim ~/.bashrc
# gmp gcc的依赖
export GMP_HOME=/home/export/parastor/users/yinhh/local/gcc/gmp-6.1.0
export PATH=$GMP_HOME/bin:$PATH
export LD_LIBRARY_PATH=$GMP_HOME/lib:$LD_LIBRARY_PATH
export INCLUDE=$GMP_HOME/include:$INCLUDE
3、环境变量生效
# 环境变量生效
source ~/.bashrc
4、编译安装mpfr
# 解压缩
tar -zxvf mpfr-3.1.4.tar.gz
# 进入解压缩后的文件
cd mpfr-3.1.4
# 设置安装路径及依赖路径
./configure --prefix=/home/export/parastor/users/yinhh/local/gcc/mpfr-3.1.4 --with-gmp=$GMP_HOME
# 编译
make
# 编译安装
make install
5、环境变量配置
# 配置环境变量
vim ~/.bashrc

# mpfr gcc的依赖
export MPFR_HOME=/home/export/parastor/users/yinhh/local/gcc/mpfr-3.1.4
export PATH=$MPFR_HOME/bin:$PATH
export LD_LIBRARY_PATH=$MPFR_HOME/lib:$LD_LIBRARY_PATH
export INCLUDE=$MPFR_HOME/include:$INCLUDE
6、环境变量生效
# 使环境变量生效
source ~/.bashrc
7、编译安装mpc
# 解压缩
tar -zxvf mpc-1.1.0.tar.gz
# 进入文件夹
cd mpc-1.1.0
# 设置安装路径、依赖路径
./configure --prefix=/home/export/parastor/users/yinhh/local/gcc/mpc-1.1.0 --with-gmp=$GMP_HOME --with-mpfr=$MPFR_HOME
# 编译
make
# 安装
make install
8、配置环境变量
# 添加环境依赖
vim ~/.bashrc

# mpc gcc的依赖
export MPC_HOME=/home/export/parastor/users/yinhh/local/gcc/mpc-1.1.0
export PATH=$MPC_HOME/bin:$PATH
export LD_LIBRARY_PATH=$MPC_HOME/lib:$LD_LIBRARY_PATH
export INCLUDE=$MPC_HOME/include:$INCLUDE
9、环境变量生效
source ~/.bashrc
10、安装gcc-7.1.0
# 解压缩
tar -zxvf gcc-7.1.0.tar.gz
# 进入文件夹
cd gcc-7.1.0
# 设置安装路径,及依赖
./configure --prefix=/home/export/parastor/users/yinhh/local/gcc/gcc-7.1.0 --with-gmp=$GMP_HOME --with-mpfr=$MPFR_HOME --with-mpc=$MPC_HOME
# 编译
make
# 安装
make install
11、配置环境变量
# 配置环境变量
Vim ~/.bashrc

# gcc-7.1.0 版本
export GCC_HOME=/home/export/parastor/users/yinhh/local/gcc/gcc-7.1.0
export PATH=$GCC_HOME/bin:$PATH
export LD_LIBRARY_PATH=$GCC_HOME/lib:$GCC_HOME/lib64:$LD_LIBRARY_PATH
export INCLUDE=$GCC_HOME/include:$INCLUDE
12、环境变量生效
source ~/.bashrc
(二)mpich-3.3.1
支持版本号:3.3.1
源码包位置:
/home/export/parastor/users/yinhh/instrument/mpich-3.3.1.tar.gz
已经安装好的版本链接位置:
/home/export/parastor/users/yinhh/local/mpich-3.3.1
安装步骤:
# 解压
tar -zxvf mpich-3.3.1.tar.gz
# 进入解压后的文件目录
cd mpich-3.3.1
# 设置安装参数
./configure --prefix=/home/export/parastor/users/yinhh/local/mpich-3.3.1
# 编译
make
# 安装
make install
添加环境变量
vim ~/.bashrc
# mpich-3.3.1
export MPI_HOME=/home/export/parastor/users/yinhh/local/mpich-3.3.1
export PATH=$MPI_HOME/bin:$PATH
export LD_LIBRARY_PATH=$MPI_HOME/lib:$LD_LIBRARY_PATH
export INCLUDE=$MPI_HOME/include:$INCLUDE
更新系统环境变量
source ~/.bashrc
成功判断条件:
[yinhh@sn21 ~]$ which mpicc
~/local/mpich-3.3.1/bin/mpicc
(三)hdf5-1.10.5
支持版本号:1.10.5
源码包位置:
/home/export/parastor/users/yinhh/instrument/hdf5-1.10.5.tar.gz
已经安装好的版本链接位置:
/home/export/parastor/users/yinhh/local/netcdf
安装步骤:
# 解压
tar -zxvf hdf5-1.10.5.tar.gz
# 进入解压后的文件目录
cd hdf5-1.10.5
# 设置安装参数
./configure --prefix=/home/export/parastor/users/yinhh/local/netcdf --enable-fortran --enable-parallel CC=mpicc FC=mpif90 CXX=mpicxx
# 编译
make
# 安装
make install
添加环境变量
vim ~/.bashrc

# hdf5环境变量
export HDF5_HOME=/home/export/parastor/users/yinhh/local/netcdf
export PATH=$HDF5_HOME/bin:$PATH
export LD_LIBRARY_PATH=$HDF5_HOME/lib:$LD_LIBRARY_PATH
export INCLUDE=$HDF5_HOME/include:$INCLUDE
更新系统环境变量
source ~/.bashrc
(四)netcdf-c-4.7.1
支持版本号:4.7.1
源码包位置:
/home/export/parastor/users/yinhh/instrument/netcdf-c-4.7.1.tar.gz
已经安装好的版本链接位置:
/home/export/parastor/users/yinhh/local/netcdf
安装步骤:
# 解压缩
tar -zxvf netcdf-c-4.7.1.tar.gz
# 进入压缩后的文件夹
cd netcdf-c-4.7.1
# 设置路径
./configure --prefix=/home/export/parastor/users/yinhh/local/netcdf LDFLAGS="-L$HDF5_HOME/lib" CPPFLAGS="-I$HDF5_HOME/include" CC=mpicc --disable-dap
# 编译
make
# 安装
make install
添加环境变量
vim ~/.bashrc
# netcdf
export NETCDF_HOME=/home/export/parastor/users/yinhh/local/netcdf
export PATH=$NETCDF_HOME/bin:$PATH
export LD_LIBRARY_PATH=$NETCDF_HOME/lib:$LD_LIBRARY_PATH
export CPPFLAGS='-I/home/export/parastor/users/yinhh/local/netcdf/include'
export LDFLAGS='-L/home/export/parastor/users/yinhh/local/netcdf/lib'
更新系统环境变量
source ~/.bashrc
(五)netcdf-fortran-4.5.2
支持版本号:4.5.2
源码包位置:
/home/export/parastor/users/yinhh/instrument/netcdf-fortran-4.5.2.tar.gz
已经安装好的版本链接位置:
/home/export/parastor/users/yinhh/local/netcdf
安装步骤:
# 解压缩
tar -zxvf netcdf-fortran-4.5.2.tar.gz
# 进入解压后的文件夹
cd netcdf-fortran-4.5.2
# 设置安装路径和参数
./configure --prefix=/home/export/parastor/users/yinhh/local/netcdf CPPFLAGS="-I$HDF5_HOME/include -I$NETCDF_HOME/include" LDFLAGS="-L$HDF5_HOME/lib -L$NETCDF_HOME/lib" CC=mpicc FC=mpif90 F77=mpif90
# 编译
make
# 安装
make install
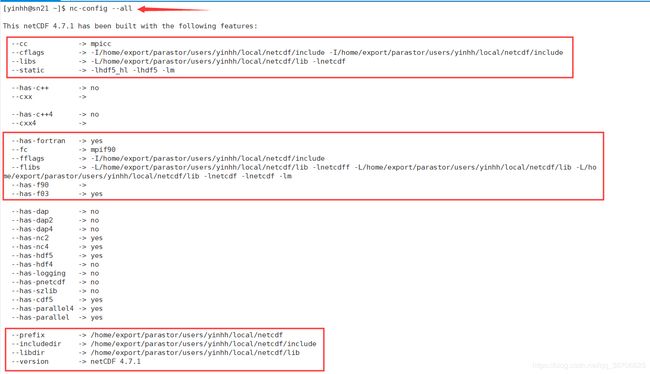
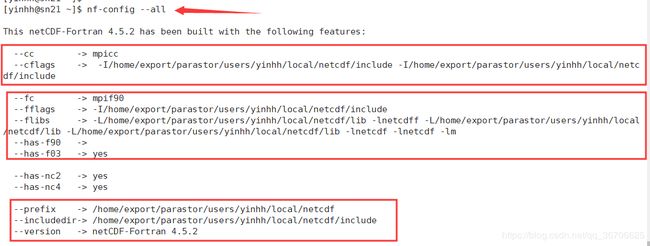
检查是否成功
- nc-config --all
- nf-config --all
(六)ioapi-3.2
支持版本号:3.2
源码包位置:
/home/export/parastor/users/yinhh/local/ioapi-3.2.tar.gz
已经安装好的版本链接位置:
/home/export/parastor/users/yinhh/local/ioapi-3.2
安装步骤:
# 新建文件夹
mkdir ioapi-3.2
# 解压缩
tar -zxvf ioapi-3.2.tar.gz -C ioapi-3.2
# 进入解压缩后的文件
cd ioapi-3.2

# 复制配置文件
cp ioapi/Makefile.nocpl ioapi/Makefile
cp m3tools/Makefile.nocpl m3tools/Makefile
cp Makefile.template Makefile

# 修改配置文件属性
vim Makefile
# 修改BIN、INSTALL、NCFLIBS
BIN = Linux2_x86_64gfort
INSTALL = /home/export/parastor/users/yinhh/local/ioapi-3.2
NCFLIBS   = -L$NETCDF_HOME/lib -lnetcdff -lnetcdf -L$NETCDF_HOME/lib -lhdf5_hl -lhdf5 -lz
# 去除IOAPIDEFS的注释,并确认其值,如:
IOAPIDEFS = "-DIOAPI_NCF4"
# 保存并退出vim

vim ioapi/Makeinclude.Linux2_x86_64gfort
# 注释
OMPFLAGS  = #-fopenmp
OMPLIBS   = #-fopenmp
# 保存并退出

# 更新安装配置
make configure
# 编译
Make BIN=Linux2_x86_64gfort
# 文件拷贝
cp ioapi/fixed_src/* Linux2_x86_64gfort/
成功判断条件:
在Linux2_x86_64gfort下输入
[yinhh@sn21 ioapi-3.2]$ cd Linux2_x86_64gfort/
[yinhh@sn21 Linux2_x86_64gfort]$ ls
确定有没有相关文件,有的话恭喜基本过这关了
(七)CMAQ-5.3
支持版本号:5.3
源码包位置:
/home/export/parastor/users/yinhh/local/CMAQ-master.zip
已经安装好的版本链接位置:
/home/export/parastor/users/yinhh/program/CMAQ_Project
安装步骤:
# 解压缩
unzip CMAQ-master.zip
# 文件夹重命名
mv CMAQ-master CMAQ_REPO
# 配置文件初始化路径
vim bldit_project.csh
# 变更CMAQ_HOME的值,明确工作目录
set CMAQ_HOME = /home/export/parastor/users/yinhh/program/CMAQ_Project
# 保存,并退出vim

# 初始化
./bldit_project.csh

# 进入工作目录
cd /home/export/parastor/users/yinhh/program/CMAQ_Project
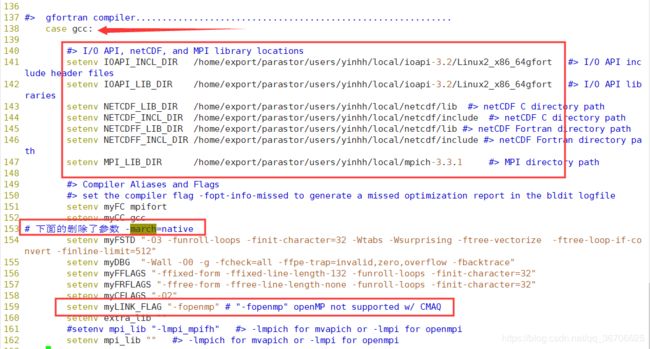
# 编辑配置文件
vim config_cmaq.csh
# 链接各种依赖库(编译器,编译器版本)
./config_cmaq.csg gcc 7.1.0
# 进入编译目录
cd CCTM/scripts
# 编译主程序
./bldit_cctm.csh gcc 7.1.0
完成检测
编译完成后,会生成BLD_CCTM_v53_gcc7.1.0目录,里面有CMAQ可执行文件,
跑测试数据
(一)、修改文件路径、属性
打开/home/export/parastor/users/yinhh/program/CMAQ_Project/CCTM/scripts目录
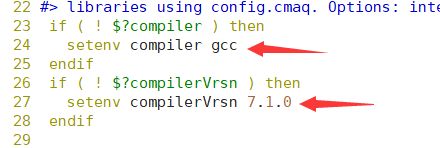
修改run_cctm_Bench_2016_12SE1.csh ,编译器为gcc,版本为当前机器的版本7.1.0,如图1-2
vim run_cctm_Bench_2016_12SE1.csh
修改数据目录(数据需要从官网下载)
修改MPI配置如
对于单处理器计算,需要修改PROC为串行
(二)、执行
提交命令
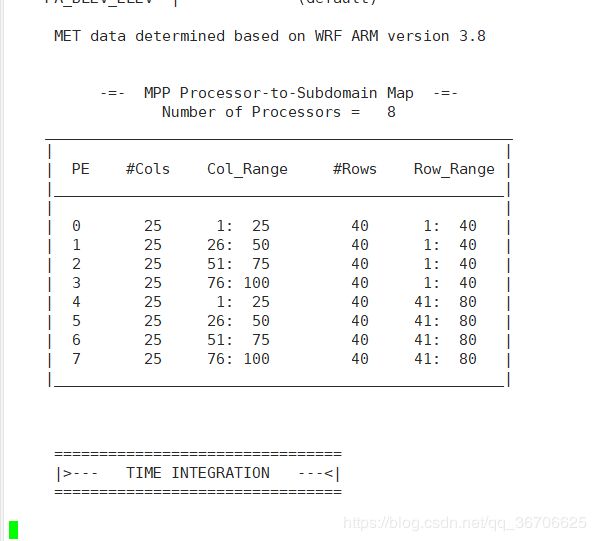
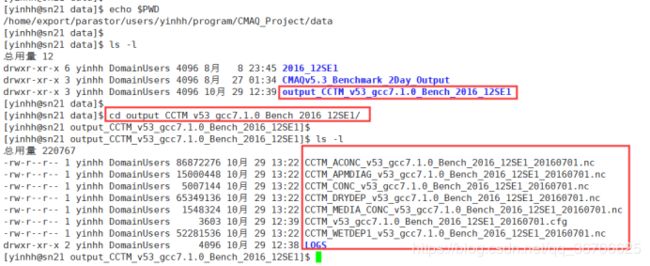
./run_cctm_Bench_2016_12SE1.csh |& tee cctm.log 运行中如图2-1,所生成的文件
