计算机网络原理 实验1《NS3路由模拟实验》

实验1《NS3路由模拟实验》

一、实验目的
  1. 了解NS3网络模拟器的基本操作;
  2. 学习采用距离矢量算法(Distance Vector Algorithm)的动态路由。
二、实验内容

  本实验的主要实验过程分别是:搭建NS3平台的坏境和学习采用距离矢量算法(Distance Vector Algorithm)的动态路由。此外,在实验过程中需要同学们自学linux操作系统的安装和使用(可在虚拟机中安装linux,本实验指导书使用的VMware虚拟机中的ubuntu操作系统),熟悉linux下的软件开发过程(如vi编辑器,gcc编译器),熟悉C++、Python编程语言。

三、实验方法

  利用Vmware 14 + CentOS 7.6 开发工具进行NS3路由模拟实验。

四、实验步骤
  1. 安装NS3(参考官方教程:https://www.nsnam.org/wiki/Installation)
    (1)开发环境配置:
    在CentOS系统中按照如下命令进行操作:
yum install gcc-c++ python   //运行环境要求

计算机网络原理 实验1《NS3路由模拟实验》_第1张图片

yum -y install python-devel  //Python开发头是启用Python绑定所必需的(用于从Python编写ns-3程序)

计算机网络原理 实验1《NS3路由模拟实验》_第2张图片

yum install qt5-devel  //netanim动画器需要Qt5开发包
yum -y install mercurial  //Mercurial需要与ns-3开发存储库一起工作

计算机网络原理 实验1《NS3路由模拟实验》_第3张图片

yum install doxygen graphviz ImageMagick  //Doxygen和相关的内联文档

计算机网络原理 实验1《NS3路由模拟实验》_第4张图片

yum install python-sphinx dia texlive texlive-latex  //ns-3手册和教程是用reStructuredText为Sphinx编写的(doc/tutorial、doc/manual、doc/models),通常用dia编写图形

计算机网络原理 实验1《NS3路由模拟实验》_第5张图片

yum install openmpi openmpi-devel  //基于mpi的并行分布式仿真支持需要openmpi

计算机网络原理 实验1《NS3路由模拟实验》_第6张图片

 yum install tcpdump wireshark   //读取ns-3生成的pcap数据包跟踪

计算机网络原理 实验1《NS3路由模拟实验》_第7张图片

yum install sqlite sqlite-devel  //对统计数据的数据库支持

计算机网络原理 实验1《NS3路由模拟实验》_第8张图片

yum install libxml2 libxml2-devel  //配置存储的基于xml的版本(需要libxml2 >= 2.7版本)

计算机网络原理 实验1《NS3路由模拟实验》_第9张图片

yum install uncrustify  //支持utils/check-style.py风格的检查程序

在这里插入图片描述

yum install boost-devel  //对openflowswitch的支持需要一些Boost库

计算机网络原理 实验1《NS3路由模拟实验》_第10张图片

// 支持ns-3-pyviz可视化器
yum install graphviz graphviz-devel python-setuptools-devel ipython
sudo easy_install pygraphviz
yum install goocanvas pygtk2-devel

计算机网络原理 实验1《NS3路由模拟实验》_第11张图片
计算机网络原理 实验1《NS3路由模拟实验》_第12张图片
在这里插入图片描述

yum install git  //需要Git来获取click模块路由和pygccxml

在这里插入图片描述

 yum install gsl gsl-devel  //一个可选但推荐的包(用于提高一些无线模型的保真度)是GNU科学库

计算机网络原理 实验1《NS3路由模拟实验》_第13张图片

yum install gtk2 gtk2-devel  //一个基于gtk的配置系统

计算机网络原理 实验1《NS3路由模拟实验》_第14张图片

yum install gdb valgrind  //调试

计算机网络原理 实验1《NS3路由模拟实验》_第15张图片

  (2)使用Mercurial下载ns-3
 cd 自定义安装目录
 mkdir repos
 cd repos
 hg clone http://code.nsnam.org/ns-3-allinone

在这里插入图片描述

 cd ns-3-allinone-3.29/
./download.py

  (3)编译NS3以及图形化界面程序NetAnim

cd ns-3-allinone-3.29/
./build.py
cd ns-3-allinone-3.29/ns-3-dev
./waf -c auto
cd ..
cd netanim-3.108
make clean
qmake NetAnim.pro
make

  (5)运行仿真界面

cd netanim-3.108/     //进入图形界面目录
./NetAnim     //运行图形界面,即可看到如下界面

计算机网络原理 实验1《NS3路由模拟实验》_第16张图片
2.编写动态路由算法实现路由模拟程序
根据距离矢量算法实现模拟程序编码工作,具体源码如下所示:

//ns3routing.cc
 #include 
 #include 
 #include 
 #include 
 #include "ns3/core-module.h"
 #include "ns3/network-module.h"
 #include "ns3/csma-module.h"
 #include "ns3/internet-module.h"
 #include "ns3/point-to-point-module.h"
 #include "ns3/applications-module.h"
 #include "ns3/ipv4-global-routing-helper.h"
 #include "ns3/netanim-module.h"
 using namespace ns3;
 
 NS_LOG_COMPONENT_DEFINE ("DynamicGlobalRoutingExample");
 
 int 
 main (int argc, char *argv[])
 {
   // 配置全局路由算法的参数。The below value configures the default behavior of global routing.
   // 默认情况下是禁用的,相应借口事件时候,设为true
   Config::SetDefault ("ns3::Ipv4GlobalRouting::RespondToInterfaceEvents", BooleanValue (true));
 

   CommandLine cmd;
   cmd.Parse (argc, argv);
   //创建节点
   NS_LOG_INFO ("Create nodes.");
   NodeContainer c;
   c.Create (7);
   NodeContainer n0n2 = NodeContainer (c.Get (0), c.Get (2));
   NodeContainer n1n2 = NodeContainer (c.Get (1), c.Get (2));
   NodeContainer n5n6 = NodeContainer (c.Get (5), c.Get (6));
   NodeContainer n1n6 = NodeContainer (c.Get (1), c.Get (6));
   NodeContainer n2345 = NodeContainer (c.Get (2), c.Get (3), c.Get (4), c.Get (5));
 
   InternetStackHelper internet;
   internet.Install (c);
 
   // 创建第一次没有任何ip寻址信息的信道
   NS_LOG_INFO ("Create channels.");
   PointToPointHelper p2p;
   p2p.SetDeviceAttribute ("DataRate", StringValue ("5Mbps"));
   p2p.SetChannelAttribute ("Delay", StringValue ("2ms"));
   NetDeviceContainer d0d2 = p2p.Install (n0n2);
   NetDeviceContainer d1d6 = p2p.Install (n1n6);
 
   NetDeviceContainer d1d2 = p2p.Install (n1n2);
 
   p2p.SetDeviceAttribute ("DataRate", StringValue ("1500kbps"));
   p2p.SetChannelAttribute ("Delay", StringValue ("10ms"));
   NetDeviceContainer d5d6 = p2p.Install (n5n6);
 
   // 创建第一次没有任何ip寻址信息的信道
   CsmaHelper csma;
   csma.SetChannelAttribute ("DataRate", StringValue ("5Mbps"));
   csma.SetChannelAttribute ("Delay", StringValue ("2ms"));
   NetDeviceContainer d2345 = csma.Install (n2345);
 
   // 添加ip地址
   NS_LOG_INFO ("Assign IP Addresses.");
   Ipv4AddressHelper ipv4;
   ipv4.SetBase ("10.1.1.0", "255.255.255.0");
   ipv4.Assign (d0d2);
 
   ipv4.SetBase ("10.1.2.0", "255.255.255.0");
   ipv4.Assign (d1d2);
 
   ipv4.SetBase ("10.1.3.0", "255.255.255.0");
   Ipv4InterfaceContainer i5i6 = ipv4.Assign (d5d6);
 
   ipv4.SetBase ("10.250.1.0", "255.255.255.0");
   ipv4.Assign (d2345);
 
   ipv4.SetBase ("172.16.1.0", "255.255.255.0");
   Ipv4InterfaceContainer i1i6 = ipv4.Assign (d1d6);
 
   // 创建路由器节点,初始化路由选择数据库,设置路由表节点。
   Ipv4GlobalRoutingHelper::PopulateRoutingTables ();
 
   // 创建时断时续的发送数据报应用。
   NS_LOG_INFO ("Create Applications.");
   uint16_t port = 9;   // Discard port (RFC 863)
   OnOffHelper onoff ("ns3::UdpSocketFactory",
                      InetSocketAddress (i5i6.GetAddress (1), port));
   onoff.SetConstantRate (DataRate ("2kbps"));
   onoff.SetAttribute ("PacketSize", UintegerValue (50));
 
   ApplicationContainer apps = onoff.Install (c.Get (1));
   apps.Start (Seconds (1.0));
   apps.Stop (Seconds (10.0));
 
   OnOffHelper onoff2 ("ns3::UdpSocketFactory",
                       InetSocketAddress (i1i6.GetAddress (1), port));
   onoff2.SetAttribute ("OnTime", StringValue ("ns3::ConstantRandomVariable[Constant=1]"));
   onoff2.SetAttribute ("OffTime", StringValue ("ns3::ConstantRandomVariable[Constant=0]"));
   onoff2.SetAttribute ("DataRate", StringValue ("2kbps"));
   onoff2.SetAttribute ("PacketSize", UintegerValue (50));
 
   ApplicationContainer apps2 = onoff2.Install (c.Get (1));
   apps2.Start (Seconds (11.0));
   apps2.Stop (Seconds (16.0));
 
   // 接收数据包
   PacketSinkHelper sink ("ns3::UdpSocketFactory",
                          Address (InetSocketAddress (Ipv4Address::GetAny (), port)));
   apps = sink.Install (c.Get (6));
   apps.Start (Seconds (1.0));
   apps.Stop (Seconds (10.0));
 
   PacketSinkHelper sink2 ("ns3::UdpSocketFactory",
                           Address (InetSocketAddress (Ipv4Address::GetAny (), port)));
   apps2 = sink2.Install (c.Get (6));
   apps2.Start (Seconds (11.0));
   apps2.Stop (Seconds (16.0));
 
 
   AsciiTraceHelper ascii;
   Ptr<OutputStreamWrapper> stream = ascii.CreateFileStream ("dynamic-global-routing.tr");
   p2p.EnableAsciiAll (stream);
   csma.EnableAsciiAll (stream);
   internet.EnableAsciiIpv4All (stream);
 
   p2p.EnablePcapAll ("dynamic-global-routing");
   csma.EnablePcapAll ("dynamic-global-routing", false);
  
   Ptr<Node> n1 = c.Get (1);
   Ptr<Ipv4> ipv41 = n1->GetObject<Ipv4> ();
   
   uint32_t ipv4ifIndex1 = 2;
 
   Simulator::Schedule (Seconds (2),&Ipv4::SetDown,ipv41, ipv4ifIndex1);
   Simulator::Schedule (Seconds (4),&Ipv4::SetUp,ipv41, ipv4ifIndex1);
 
   Ptr<Node> n6 = c.Get (6);
   Ptr<Ipv4> ipv46 = n6->GetObject<Ipv4> ();
   
   uint32_t ipv4ifIndex6 = 2;
   Simulator::Schedule (Seconds (6),&Ipv4::SetDown,ipv46, ipv4ifIndex6);
   Simulator::Schedule (Seconds (8),&Ipv4::SetUp,ipv46, ipv4ifIndex6);
 
   Simulator::Schedule (Seconds (12),&Ipv4::SetDown,ipv41, ipv4ifIndex1);
   Simulator::Schedule (Seconds (14),&Ipv4::SetUp,ipv41, ipv4ifIndex1);
 
   // 查探路由表
   Ipv4GlobalRoutingHelper g;
   Ptr<OutputStreamWrapper> routingStream = Create<OutputStreamWrapper> ("dynamic-global-routing.routes", std::ios::out);
   g.PrintRoutingTableAllAt (Seconds (12), routingStream);
   //设置生成xml文件,并确定各个节点的位置
   AnimationInterface animsd("ns3routing.xml");
   animsd.SetConstantPosition(c.Get(0),0,0);
   animsd.SetConstantPosition(c.Get(1),0,40);
   animsd.SetConstantPosition(c.Get(2),20,20);
   animsd.SetConstantPosition(c.Get(3),80,20);
   animsd.SetConstantPosition(c.Get(4),40,20);
   animsd.SetConstantPosition(c.Get(5),60,20);
   animsd.SetConstantPosition(c.Get(6),60,40);

//开始仿真
   NS_LOG_INFO ("Run Simulation.");
   Simulator::Run ();
   Simulator::Destroy ();
   NS_LOG_INFO ("Done.");
 }
  1. 测试验证NS3静态路由
    实验结果见第五点。
五、实验结果

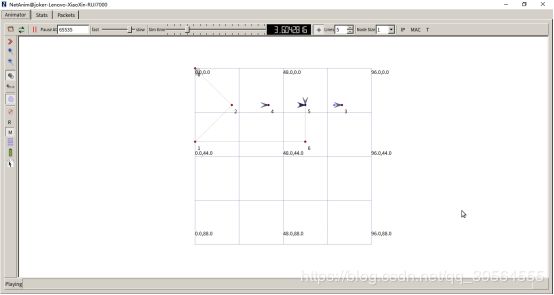
  在CentOS 中按照以下命令操作,即可运行图形界面并进行程序操作。

cd netanim-3.108/    //进入到netanim目录下
./NetAnim

计算机网络原理 实验1《NS3路由模拟实验》_第17张图片
计算机网络原理 实验1《NS3路由模拟实验》_第18张图片
计算机网络原理 实验1《NS3路由模拟实验》_第19张图片
计算机网络原理 实验1《NS3路由模拟实验》_第20张图片
计算机网络原理 实验1《NS3路由模拟实验》_第21张图片

六、实验小结

  本次实验主要是了解NS3网络模拟器的搭建与使用,在CentOS平台搭建过程中还是遇到了很多问题,主要是由于官方教程版本很久未更新了,导致部分软件版本对不上甚至不存在,另一个问题实验程序的编写与使用,主要是参考过往资料进行解读与重新编写使用。

参考文章:【1】基于Centos7的NS-3安装总结(超详细!超完整!)
     【2】NS3入门与安装
     【3】Installation - Nsnam
     【4】NS3 安装可视化动画工具netanim
     【5】Centos7系统安装Qt5.9
     【6】CentOS 7做流程图软件

你可能感兴趣的:(计算机网络原理)