Python超详细实时人脸活物识别基于TensorFlow_CNN(卷积神经网络)
活物识别在生活中有广泛应用,设想如果一个人拿着你的照片去刷脸支付,是不是你钱包就要空了。在生活中,有多种方法进行活物(活体)识别,比如动作指令活体检测(让你眨眼睛等)。这里我们是用CNN(卷积神经网络)来对图片进行分析来识别是否为真人。
最终效果:
首先,我们将我们的项目大致分成三步:
1. 产生训练集
2. 训练模型
3. 验证数据
1. 产生训练集
我们知道,视频是由每一帧组成的,换句话说就是由很多张图片组成的。因此我们如果想要产生训练集,首先要将人脸逐帧截图,分别产生真实(Real)和非真实(Fake)的数据集,具体方法如下:
我们先看一下两段视频

一段是手机自拍(Real),另一段是拿另一个手机录屏(Fake),然后我们导入这两个视频然后逐帧截取人脸。此时,我们需要 face_recognition的功能来识别人脸的具体位置。由于本文章是专注于活物识别的,面部识别就直接使用别人的封包了,具体代码如下:
import cv2
import os
import numpy as np
import face_recognition
from PIL import Image


inputpath_real='video/real.mp4'
inputpath_fake='video/fake.mp4'
outputpath_real='train/real/'
outputpath_fake='train/fake/'

'''
inputpathtest_real='video/real_test.mp4'
inputpathtest_fake='video/fake_test.mp4'
outputpathtest_real='train/real_test/'
outputpathtest_fake='train/fake_test/'
'''

def cut_img (inputpath,outputpath,type,width,height):
    vs = cv2.VideoCapture(inputpath)
    read = 0
    while True:
        (grabbed, frame) = vs.read()
        if not grabbed:
            print('This frame is not grabbed')
            break
        read +=1

        rgb_frame = frame[:, :, ::-1]
        face_locations = face_recognition.face_locations(rgb_frame)

        for face_location in face_locations:
            top, right, bottom, left = face_location
            cropped= frame [top:bottom, left:right]
            img_name=outputpath+'%s_%d.png' %(type,read)
            cv2.imwrite(img_name, cropped,[int(cv2.IMWRITE_PNG_COMPRESSION), 9] )
            img = Image.open(img_name)
            new_image = img.resize((width, height), Image.BILINEAR) #Resize to 50*50
            new_image.save(os.path.join(outputpath, os.path.basename(img_name)))

if __name__ == '__main__':
    cut_img(inputpath_real,outputpath_real,'real',50,50)
    cut_img(inputpath_fake,outputpath_fake,'fake',50,50)
    '''
    cut_img(inputpathtest_real, outputpathtest_real, 'real_test', 50, 50)
    cut_img(inputpathtest_fake, outputpathtest_fake, 'fake_test', 50, 50)
    '''
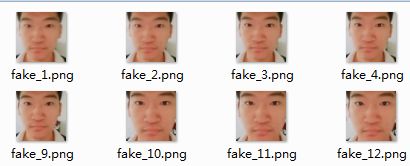
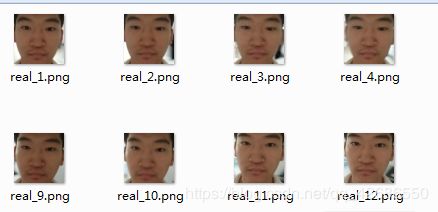
被注释起来的部分是用来产生测试数据的,有兴趣的可以再录两段测试视频(共四段)。代码很简单,我就不解释了,最后会产生如下效果:


这里,所有的图片(约400张)都被resize到50*50,方便导入CNN。这样我们的训练集就产生了。
2. 训练模型
下面就是我们的重头戏,训练模型了。 我们使用TensorFlow的CNN来构件我们的神经网络:
我们先看一下我们的文件路径等设置:
import os
from PIL import Image
import numpy as np
import tensorflow as tf
import face_recognition
import cv2

#文件路径设置(address)
data_dir_real='train/real/'
data_dir_fake='train/fake/'
test='video/test.mp4'
output_test='train/test_output/'
model_path='train/' # CNN model save address
train= Ture # Ture: Training mode ,False: Validation mode
当train=True是为训练模式,False为验证模式。 data_dir_real和data_dir_fake为之前产生图片的地址,test是用来验证模型的视频路径,output_test则是验证视频产生的人脸图片的路径。
首先第一步读取数据:
def read_data(data_dir_real,data_dir_fake):
    datas = []
    labels = []
    fpaths = []
    # Read data of real
    for fname in os.listdir(data_dir_real):
        fpath = os.path.join(data_dir_real, fname) # Record image name and address
        fpaths.append(fpath)
        image = Image.open(fpath) # Open image
        data = np.array(image) / 255.0 # 归一化(Normalization)
        datas.append(data)
        labels.append(0) # Take real as 0
    # Read data of fake
    for fname in os.listdir(data_dir_fake):
        fpath = os.path.join(data_dir_fake, fname)
        fpaths.append(fpath)
        image = Image.open(fpath)
        data = np.array(image) / 255.0 # 归一化(Normalization)
        datas.append(data)
        labels.append(1) # Take fake as 1

    datas = np.array(datas)
    labels = np.array(labels)

    return fpaths, datas,labels
fpaths, datas,labels = read_data(data_dir_real,data_dir_fake) # Load training set
构建CNN模型:
定义容器:
# Placeholder
datas_placeholder = tf.placeholder(tf.float32,[None, 50,50, 3])
labels_placeholder = tf.placeholder(tf.int32, [None])
dropout_placeholdr = tf.placeholder(tf.float32)
众所周知,图片是由像素组成的,每个像素有3个RGB颜色,图片大小为50*50,因此读取数据的size为[None, 50,50, 3](None表示图片数目为不确定)
定义卷积层与池化:
# First layer and pooling, 20 kernel, size of kernel is 5
conv0 = tf.layers.conv2d(datas_placeholder, 20, 5, activation=tf.nn.relu)
# pooling filter is 2x2,stride is 2x2
pool0 = tf.layers.max_pooling2d(conv0, [2, 2], [2, 2])

# Second layer
conv1 = tf.layers.conv2d(pool0, 40, 4, activation=tf.nn.relu)
pool1 = tf.layers.max_pooling2d(conv1, [2, 2], [2, 2])
我们使用了2层,并有数个卷积核,卷积核大小为5*5
全连接层:
# Fully Connected Layer
flatten = tf.layers.flatten(pool1)
fc = tf.layers.dense(flatten, 400, activation=tf.nn.relu)
全连接层可以将我们的CNN展开,就好比CNN是眼睛,后面的NN为大脑
加上dropuout防止过拟合,并产生输出层:
# DropOut to prevent overfitting
dropout_fc = tf.layers.dropout(fc, dropout_placeholdr)
logits = tf.layers.dense(dropout_fc, 2,activation=None)
predicted_labels = tf.arg_max(logits, 1)
定义损失函数和优化器并定义模型保存器:
# Mean loss
losses = tf.nn.softmax_cross_entropy_with_logits(
    labels=tf.one_hot(labels_placeholder, 2),
    logits=logits)
mean_loss = tf.reduce_mean(losses)

# Optimizer
optimizer = tf.train.AdamOptimizer(learning_rate=1e-2).minimize(losses)

saver = tf.train.Saver()
这个时候我们的CNN模型就已经构建好了,我们就可以进入训练模式了:
with tf.Session() as sess:
    if train:
        print('Training')
        sess.run(tf.global_variables_initializer()) # initialization
        train_feed = {
            datas_placeholder: datas,
            labels_placeholder: labels,
            dropout_placeholdr: 0.5
        } # feed data
        for step in range(150): # iterate 150
            _, mean_loss_val = sess.run([optimizer, mean_loss],feed_dict=train_feed)
            if step % 10 == 0:
                print("step = {}\tmean loss = {}".format(step,mean_loss_val)) # print mean loss every 10 step
        saver.save(sess, model_path) # save model
        print('Training finished,save')
这里有一点要注意的地方,我这里选择的迭代150次,每10次计算一次平均损失。你也可以自己改变我之前的模型结构,然后手动选择迭代次数,但需要注意的是,当你训练完毕的时候,要注意他的平均损失足够的低,0.01以下,不然会非常不准。
好了这个时候,我们的模型已经训练完毕了,我们就要开始验证我们的模型了。
3. 验证数据
    else:
        print('Validation')
        vs = cv2.VideoCapture(test) # Load video
        saver.restore(sess, model_path) # load model
        read = 0
        while True:
            (grabbed, frame) = vs.read()
            if not grabbed:
                print('This frame is not grabbed')
                break
            read += 1

            rgb_frame = frame[:, :, ::-1]
            face_locations = face_recognition.face_locations(rgb_frame) # Find faces

            for face_location in face_locations:
                datas = []

                top, right, bottom, left = face_location # Obtain face location
                cropped = frame[top:bottom, left:right]
                img_name = output_test + 'test_%d.png' % (read)
                cv2.imwrite(img_name, cropped, [int(cv2.IMWRITE_PNG_COMPRESSION), 9]) # Cut face images
                img = Image.open(img_name) # Open Img
                new_image = img.resize((50, 50), Image.BILINEAR) # Resize to 50*50
                new_image.save(os.path.join(output_test, os.path.basename(img_name))) # save resize img
                data = np.array(new_image) / 255.0
                datas.append(data)
                datas = np.array(datas)

                label_name_dict = {
                    0: "Real",
                    1: "Fake"
                } # Create dir
                test_feed_dict = {
                    datas_placeholder: datas,
                    dropout_placeholdr: 0
                }
                predicted_labels_val = sess.run(predicted_labels, feed_dict=test_feed_dict) # Feed data

                predicted_label_name = label_name_dict[int(predicted_labels_val)] # Label transformation

                cv2.rectangle(frame, (left, top), (right, bottom), (0, 0, 255), 3) # Create rectangle to label face
                font = cv2.FONT_HERSHEY_DUPLEX
                cv2.putText(frame, predicted_label_name, (left + 10, bottom), font, 2, (255, 255, 255)) # put text of face result

            cv2.imshow('Video', frame)
            if cv2.waitKey(1) & 0xFF == ord('q'): # Type q to quit
                break
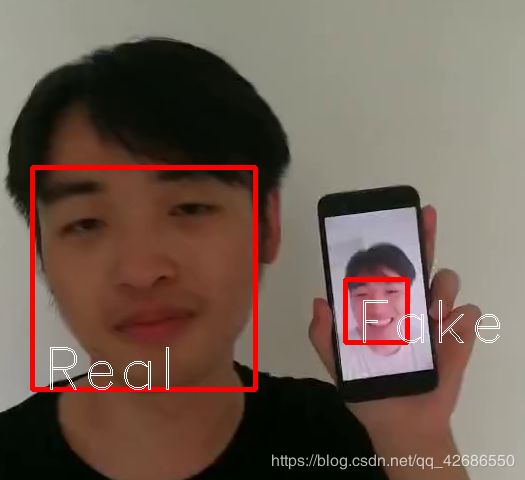
按Q键退出,大致效果如下:

这里呢,训练集为我本人,测试集为我室友,来充分验证模型的泛化性。但经本人亲测,由于训练集可能不足,导致整个预测的准确率跟光线强弱十分相关,因此建议大家在学习时候,尽量在相同的光照环境下进行测试,并手机在录制时候也尽量保持设置一致,否则可能误差会较大。这里,由于我室友隐私问题,我不放出视频文件,仅提供我个人照片文件供大家学习。建议大家自己录制视频进行学习,有问题也请积极留言。
最终代码如下:
产生训练数据:
import cv2
import os
import numpy as np
import face_recognition
from PIL import Image


inputpath_real='video/real.mp4'
inputpath_fake='video/fake.mp4'
outputpath_real='train/real/'
outputpath_fake='train/fake/'

'''
inputpathtest_real='video/real_test.mp4'
inputpathtest_fake='video/fake_test.mp4'
outputpathtest_real='train/real_test/'
outputpathtest_fake='train/fake_test/'
'''


def cut_img (inputpath,outputpath,type,width,height):
    vs = cv2.VideoCapture(inputpath)
    read = 0
    while True:
        (grabbed, frame) = vs.read()
        if not grabbed:
            print('This frame is not grabbed')
            break
        read +=1

        rgb_frame = frame[:, :, ::-1]
        face_locations = face_recognition.face_locations(rgb_frame)

        for face_location in face_locations:
            top, right, bottom, left = face_location
            cropped= frame [top:bottom, left:right]
            img_name=outputpath+'%s_%d.png' %(type,read)
            cv2.imwrite(img_name, cropped,[int(cv2.IMWRITE_PNG_COMPRESSION), 9] )
            img = Image.open(img_name)
            new_image = img.resize((width, height), Image.BILINEAR)
            new_image.save(os.path.join(outputpath, os.path.basename(img_name)))


if __name__ == '__main__':
    cut_img(inputpath_real,outputpath_real,'real',50,50)
    cut_img(inputpath_fake,outputpath_fake,'fake',50,50)
    '''
    cut_img(inputpathtest_real, outputpathtest_real, 'real_test', 50, 50)
    cut_img(inputpathtest_fake, outputpathtest_fake, 'fake_test', 50, 50)
    '''
训练及验证代码:
import os
from PIL import Image
import numpy as np
import tensorflow as tf
import face_recognition
import cv2

#文件路径设置(address)
data_dir_real='train/real/'
data_dir_fake='train/fake/'
test='video/test.mp4'
output_test='train/test_output/'
model_path='train/'
train= False # Ture: Training mode ,False: Validation mode


# 读取训练集(Load training set)
def read_data(data_dir_real,data_dir_fake):
    datas = []
    labels = []
    fpaths = []
    # Read data of real
    for fname in os.listdir(data_dir_real):
        fpath = os.path.join(data_dir_real, fname) # Record image name and address
        fpaths.append(fpath)
        image = Image.open(fpath) # Open image
        data = np.array(image) / 255.0 # 归一化(Normalization)
        datas.append(data)
        labels.append(0) # Take real as 0
    # Read data of fake
    for fname in os.listdir(data_dir_fake):
        fpath = os.path.join(data_dir_fake, fname)
        fpaths.append(fpath)
        image = Image.open(fpath)
        data = np.array(image) / 255.0 # 归一化(Normalization)
        datas.append(data)
        labels.append(1) # Take fake as 1

    datas = np.array(datas)
    labels = np.array(labels)

    return fpaths, datas,labels

fpaths, datas,labels = read_data(data_dir_real,data_dir_fake) # Load training set


# Placeholder
datas_placeholder = tf.placeholder(tf.float32,[None, 50,50, 3])
labels_placeholder = tf.placeholder(tf.int32, [None])
dropout_placeholdr = tf.placeholder(tf.float32)

# First layer and pooling, 20 kernel, size of kernel is 5
conv0 = tf.layers.conv2d(datas_placeholder, 20, 5, activation=tf.nn.relu)
# pooling filter is 2x2,stride is 2x2
pool0 = tf.layers.max_pooling2d(conv0, [2, 2], [2, 2])

# Second layer
conv1 = tf.layers.conv2d(pool0, 40, 4, activation=tf.nn.relu)
pool1 = tf.layers.max_pooling2d(conv1, [2, 2], [2, 2])


# Fully Connected Layer
flatten = tf.layers.flatten(pool1)
fc = tf.layers.dense(flatten, 400, activation=tf.nn.relu)

# DropOut to prevent overfitting
dropout_fc = tf.layers.dropout(fc, dropout_placeholdr)
logits = tf.layers.dense(dropout_fc, 2,activation=None)
predicted_labels = tf.arg_max(logits, 1)

# Mean loss
losses = tf.nn.softmax_cross_entropy_with_logits(
    labels=tf.one_hot(labels_placeholder, 2),
    logits=logits)
mean_loss = tf.reduce_mean(losses)

# Optimizer
optimizer = tf.train.AdamOptimizer(learning_rate=1e-2).minimize(losses)

saver = tf.train.Saver()

with tf.Session() as sess:
    if train:
        print('Training')
        sess.run(tf.global_variables_initializer()) # initialization
        train_feed = {
            datas_placeholder: datas,
            labels_placeholder: labels,
            dropout_placeholdr: 0.5
        } # feed data
        for step in range(150): # iterate 150
            _, mean_loss_val = sess.run([optimizer, mean_loss],feed_dict=train_feed)
            if step % 10 == 0:
                print("step = {}\tmean loss = {}".format(step,mean_loss_val)) # print mean loss every 10 step
        saver.save(sess, model_path) # save model
        print('Training finished,save')

    else:
        print('Validation')
        vs = cv2.VideoCapture(test) # Load video
        saver.restore(sess, model_path) # load model
        read = 0
        while True:
            (grabbed, frame) = vs.read()
            if not grabbed:
                print('This frame is not grabbed')
                break
            read += 1

            rgb_frame = frame[:, :, ::-1]
            face_locations = face_recognition.face_locations(rgb_frame) # Find faces

            for face_location in face_locations:
                datas = []

                top, right, bottom, left = face_location # Obtain face location
                cropped = frame[top:bottom, left:right]
                img_name = output_test + 'test_%d.png' % (read)
                cv2.imwrite(img_name, cropped, [int(cv2.IMWRITE_PNG_COMPRESSION), 9]) # Cut face images
                img = Image.open(img_name) # Open Img
                new_image = img.resize((50, 50), Image.BILINEAR) # Resize to 50*50
                new_image.save(os.path.join(output_test, os.path.basename(img_name))) # save resize img
                data = np.array(new_image) / 255.0
                datas.append(data)
                datas = np.array(datas)

                label_name_dict = {
                    0: "Real",
                    1: "Fake"
                } # Create dir
                test_feed_dict = {
                    datas_placeholder: datas,
                    dropout_placeholdr: 0
                }
                predicted_labels_val = sess.run(predicted_labels, feed_dict=test_feed_dict) # Feed data

                predicted_label_name = label_name_dict[int(predicted_labels_val)] # Label transformation

                cv2.rectangle(frame, (left, top), (right, bottom), (0, 0, 255), 3) # Create rectangle to label face
                font = cv2.FONT_HERSHEY_DUPLEX
                cv2.putText(frame, predicted_label_name, (left + 10, bottom), font, 2, (255, 255, 255)) # put text of face result

            cv2.imshow('Video', frame)
            if cv2.waitKey(1) & 0xFF == ord('q'): # Type q to quit
                break
完整代码和文件可以查看我的Github代码链接
https://github.com/Connor666/Tutorial
