《PyTorch模型训练实用教程》—学习笔记
文章目录
- 前言
- 数据
- Dataset类
- DataLoader类
- transform
- 裁剪-Crop
- 翻转和旋转-Flip and Rotation
- 图像变换
- 对transforms操作,使数据增强更灵活
- 模型
- 模型定义
- 权值初始化
- 权值初始化流程
- 常用初始化方法
- 模型Finetune
- 用预训练的模型参数对新模型的权值进行初始化
- 不同层设置不同的学习率
- 损失函数和优化器
- 损失函数
- L1范数损失 L1Loss
- 均方误差损失 MSELoss
- 交叉熵损失CrossEntropyLoss
- KL 散度损失 KLDivLoss
- 二进制交叉熵损失BCELoss
- BCEWithLogitsLoss
- MarginRankingLoss
- HingeEmbeddingLoss
- 多标签分类损失MultiLabelMarginLoss
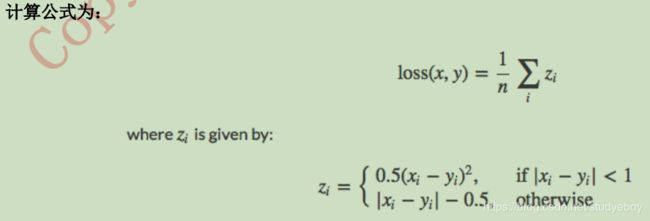
- 平滑版L1损失SmoothL1Loss
- 2分类的logistic损失SoftMarginLoss
- 多标签 one-versus-all 损失 MultiLabelSoftMarginLoss
- cosine 损失 CosineEmbeddingLoss
- 多类别分类的hinge损失 MultiMarginLoss
- 三元组损失 TripletMarginLoss
- 连接时序分类损失 CTCLoss
- 负对数似然损失 NLLLoss
- NLLLoss2d
- PoissonNLLLoss
- 优化器
- 优化器基类Optimizer
- 常见优化器
- 学习率
- 学习率调整方法分类
- 常见学习率调整方法
前言
在机器学习模型开发中,注意涉及三大部分:数据、模型、损失函数及优化器。主要内容为在PyTorch中训练一个模型所可能涉及到的方法及函数,并且对PyTorch提供的数据增强方法(22个)、权值初始化方法(10个)、损失函数(17个)、优化器(6个)及tensorboardX的方法(13个)进行了详细介绍。
数据
Dataset类
PyTorch读取图片,主要是通过Dataset类。
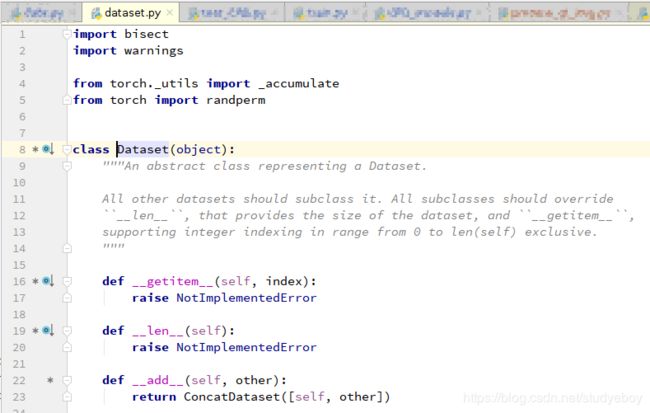
getitem函数接收一个index,然后返回图片数据和标签,这个index通常指的是一个list的index,这个list的每个元素就包含了图片数据的路径和标签信息。
PyTorch读取数据的步骤:
DataLoader类
通过Dataset构建的子类主要定义如何通过索引读取图片及其标签。但是触发读取操作是在数据加载器DataLoader中。
图像从硬盘到模型输入的流程:
1. main.py: train_data = MyDataset(...)
2. main.py: train_loader = DataLoader(data=train_data, ...)
3. main.py: for i, data in enumerate(train_loader, 0)
4. dataloader.py: class DataLoader(): def __iter__(self):return _DataLoaderIter(self)
5. dataloader.py: class _DataLoaderIter(): def __next__(self): batch = self.collate_fn([self.dataset[i] for i in indices])
6. tool.py: class MyDataset(): def __getitem__(): img = Image.open(fn).convert('RGB')
7. tool.py: class MyDataset(): img = self.transform(img)
8. main.py: inputs, labels = data   -->   inputs, labels = Variable(inputs), Variable(labels)   -->  outputs = nets(inputs)
流程描述:
- 从构建的Dataset子类中,初始化图像的路径和标签。
- 初始化DataLoader类,将train_data传入,从而使DataLoader拥有图像的路径。
- 在一个iteration进行时,读取一个batch图像数据enumerate函数会返回可迭代数据的一个元素(在这里data是一个batch的图像数据和标签,data是一个list)。
- class DataLoader中再调用class _DataLoaderIter()。
- 在_DataLoaderIter()类中会跳到__next__(self)函数,通过indices = next(self.sample_iter)获取一个batch的indices,再通过batch=self.collate_fn([self.dataset[i] for i in indices]) 中会调用self.collate_fn函数。
- self.collate_fn中会调用Dataset的子类中的__getitem__()函数,在__getitem__()中读取图像。
- 对读取的图像进行增强处理。返回处理后的图像再通过self.collate_fn来拼接成一个batch。一个batch是一个list。
- 将图像数据转换成Variable类型,即模型真正的输入。
transform
在训练时,依次对图像进行以下操作:
- 随机裁剪
- ToTensor
- 数据标准化(减均值,除以标准差)
裁剪-Crop
- 中心裁剪:transforms.CenterCrop
class torchvison.transforms.CenterCrop(size)
# 功能:依据给定的size从中心裁剪
# 参数:
size - (sequence or int),若为sequence,则为(h,w),若为int,则(size,size)
- 随机裁剪:transforms.RrandomCrop
class torchvision.transforms.RandomCrop(size, padding=None, pad_if_needed=False, fill=0, padding_mode='constant')
# 功能:根据依据给定的size随机裁剪
# 参数:
size -(sequence or int),若为sequence,则为(好,w),若为int,则(size,size)
padding -(sequence or int , optional),此参数是设置填充多少个pixel。当为int时,图像上下左右均填充int个,例如padding=4,则上下左右均填充4个pixel,若为32*32,则会变成40*40.当为sequence时,若有2个数,则第一个数表示左右扩充多少,第二个数表示上下的。当有4个数时,则为左、上、右、下。
pad_if_needed - 如果小于所需大小,它将填充图像,以避免引发异常。由于裁剪是在填充之后完成的,因此填充似乎是在随机偏移下完成的。
fill - (int or tuple)填充的值是什么(仅当填充模式为constant时有用)。int时,各通道均填充该值,当长度为3的tuple时,表示RGB通道需要填充的值。
padding_mode - 填充的模式,这里提供了4中填充模式,1.constant,以常量值填充,该值通过fill指定。2.edge 在图像边缘填充最后一个值。3.reflect ,填充图像上的反射值(不重复边缘上的最后一个值),例如:[1, 2, 3, 4] --> [3, 2, 1, 2, 3, 4, 3, 2]。4.symmetric, 填充图像上的反射值(重复边缘上的最后一个值),例如:[1, 2, 3, 4] --> [2, 1, 1, 2, 3, 4, 4, 3]。
- 随机长宽比裁剪:transforms.RandomResizedCrop
class torchvison.transforms.RandomResizedCrop(size, scale=(0.08,1.0), ratio=(0.75,1.33333), interpolation=2)
# 功能:随机大小,随机长宽比裁剪原始图像,最后将图像热死则到设定好的size
# 参数:
size - 输出的分辨率
scale - 随机crop的大小区间,如scale=(0.08,1.0),表示随机crop出来的图像会在0.08到1倍之间。
ratio - 随机长宽比设置
interpolation - 插值的方法,默认为双线性插值(PIL.Image.BILINEAR)
- 上下左右中心裁剪:transforms.FiveCrop
class torchvision.transforms.FiveCrop(size)
# 功能:对图片进行上下左右以及中心裁剪,获得 5 张图片,返回一个 4D-tensor
# 参数:
size - (sequence or int),若为 sequence,则为(h,w),若为 int,则(size,size)
- 上下左右中心裁剪后翻转:transforms.TenCrop
class torchvision.transforms.TenCrop(size, vertical_flip=False)
# 功能:对图片进行上下左右以及中心裁剪,然后全部翻转(水平或者垂直),获得 10 张图
片,返回一个 4D-tensor。
# 参数:
size - (sequence or int),若为 sequence,则为(h,w),若为 int,则(size,size)
vertical_flip (bool)  - 是否垂直翻转,默认为 flase,即默认为水平翻转
翻转和旋转-Flip and Rotation
- 依概率p水平翻转:transforms.RandomHorizontalFlip(p=0.5)
class torchvision.transforms.RandomHorizontalFlip(p=0.5)
# 功能:依据概率 p 对 PIL 图片进行水平翻转
# 参数:
p - 概率,默认值为 0.5
- 依概率p垂直翻转:transforms.RandomVerticalFlip(p=0.5)
class torchvision.transforms.RandomVerticalFlip(p=0.5)
# 功能:依据概率 p 对 PIL 图片进行垂直翻转
# 参数:
p - 概率,默认值为 0.5
- 随机旋转:transforms.RrandomRotation
class torchvision.transforms.RandomRotation(degrees, resample=False, expand=False, cente
r=None)
# 功能:依 degrees 随机旋转一定角度
# 参数:
degress - (sequence or float or int) ,若为单个数,如 30,则表示在(-30,+30)之间随机旋
转, 若为 sequence,如(30,60),则表示在 30-60 度之间随机旋转.
resample - 重采样方法选择,可选PIL.Image.NEAREST, PIL.Image.BILINEAR, PIL.Image.BICUBIC,默认为最近邻
expand - ?
center - 可选为中心旋转还是左上角旋转
图像变换
- resize:transforms.Resize
class torchvision.transforms.Resize(size, interpolation=2)
# 功能:重置图像分辨率
# 参数:
size - If size is an int, if height > width, then image will be rescaled to (size * height / width,
size),所以建议 size 设定为 h*w
interpolation - 插值方法选择,默认为 PIL.Image.BILINEAR
- 标准化:transforms.Normalize
class torchvision.transforms.Normalize(mean, std)
# 功能:对数据按通道进行标准化,即先减均值,再除以标准差,注意是 h*w*c
- 转为tensor,并归一化至[0-1]:transforms.ToTensor
class torchvision.transforms.ToTensor
# 功能:将 PIL Image 或者 ndarray 转换为 tensor,并且归一化至[0-1]
# 注意事项:归一化至[0-1]是直接除以 255,若自己的 ndarray 数据尺度有变化,则需要自行
修改。
- 填充:transforms.Pad
class torchvision.transforms.Pad(padding, fill=0, padding_mode='constant')
# 功能:对图像进行填充
# 参数:同RandomCrop
- 修改亮度、对比度和饱和度:transforms.ColorJitter
class torchvision.transforms.ColorJitter(brightness=0, contrast=0, saturation=0, hue=0)
# 功能:修改修改亮度、对比度和饱和度
- 转灰度图:transforms.Grayscale
class torchvision.transforms.Grayscale(num_output_channels=1)
# 功能:将图片转换为灰度图
# 参数:
num_output_channels- (int) ,当为 1 时,正常的灰度图,当为 3 时, 3 channel with r ==
g == b
- 线性变换:transforms.LinearTransformation
class torchvision.transforms.LinearTransformation(transformation_matrix)
# 功能:对矩阵做线性变化,可用于白化处理! whitening: zero-center the data, compute
the data covariance matrix
# 参数:
transformation_matrix (Tensor) – tensor [D x D], D = C x H x W
- 仿射变换:transforms.RandomAffine
class torchvision.transforms.RandomAffine(degrees, translate=None, scale=None, shear=Non
e, resample=False, fillcolor=0)
# 功能:仿射变换
- 依概率p转为灰度图像:transforms.RandomGrayscale
class torchvision.transforms.RandomGrayscale(p=0.1)
# 功能:依概率 p 将图片转换为灰度图,若通道数为 3,则 3 channel with r == g == b
- 将数据转换为PILImage:transforms.ToPILImage
class torchvision.transforms.ToPILImage(mode=None)
# 功能:将 tensor 或者 ndarray 的数据转换为 PIL Image 类型数据
# 参数:
mode- 为 None 时,为 1 通道, mode=3 通道默认转换为 RGB,4 通道默认转换为 RGBA
- Apply a user-defined lambda as transform:transforms.Lambda
对transforms操作,使数据增强更灵活
PyTorch 不仅可设置对图片的操作,还可以对这些操作进行随机选择、组合。
- transforms.RandomChoice(transforms),从给定的一系列transforms中选一个进行操作。
- transformsRandomApply(transforms, p=0.5), 给一个transform加上概率,依概率进行操作。
- transforms.RandomOrder,将transforms中的操作随机打乱。
模型
模型定义
- 必须继承nn.Module类,让Pytorch知道这个类是一个Module。
- 在__init__(self)中设置好需要的"组件"(conv、pooling,linear,batchnorm等)。
- forward(self, x)中用定义好的“组件”进行组装,搭建网络结构。
模型的定义就是先继承,再构建组件,最后组装。其中基本组件可以从torch.nn中获取,或者从torch.nn.functional中获取,同时为了方便重复使用组件,可以使用Sequence容器将一系列组件包起来,最后在forward函数中将这些组件组装成模型。
class Net(nn.Module):
    def __init__(self):
        super(Net, self).__init__()
        self.conv1 = nn.Conv2d(3, 6, 5)
        self.pool1 = nn.MaxPool2d(2, 2)
        self.conv2 = nn.Conv2d(6, 16, 5)
        self.pool2 = nn.MaxPool2d(2, 2)
        self.fc1 = nn.Linear(16 * 5 * 5, 120)
        self.fc2 = nn.Linear(120, 84)
        self.fc3 = nn.Linear(84, 10)

    def forward(self, x):
        x = self.pool1(F.relu(self.conv1(x)))
        x = self.pool2(F.relu(self.conv2(x)))
        x = x.view(-1, 16 * 5 * 5)
        x = F.relu(self.fc1(x))
        x = F.relu(self.fc2(x))
        x = self.fc3(x)
        return x
权值初始化
模型定义完成后,需要对权值进行初始化,才能开始训练。
权值初始化流程
- 先设定什么层用什么初始化方法,初始化方法在torch.nn.init中给出。
- 实例化一个模型后,执行该函数,即可完成初始化。
class Net(nn.Module):
    def __init__(self):
    ...
    def forward(self, x):
    ...
    # 定义权值初始化
    def initialize_weights(self):
        for m in self.modules():
            if isinstance(m, nn.Conv2d):
                torch.nn.init.xavier_normal_(m.weight.data)
                if m.bias is not None:
                    m.bias.data.zero_()
            elif isinstance(m, nn.BatchNorm2d):
                m.weight.data.fill_(1)
                m.bias.data.zero_()
            elif isinstance(m, nn.Linear):
                torch.nn.init.normal_(m.weight.data, 0, 0.01)
                m.bias.data.zero_()
常用初始化方法
PyTorch 在 torch.nn.init 中ᨀ供了常用的初始化方法函数, Xavier,kaiming 系列和 其他方法分布。
Xavier 初始化方法,论文在《Understanding the difficulty of training deep feedforward neural networks》公式推导是从“方差一致性”出发,初始化的分布有均匀分布和正态分布两种。
kaiming 初始化方法,论文在《 Delving deep into rectifiers: Surpassing human-level
performance on ImageNet classification》,公式推导同样从“方差一致性”出法,kaiming是针对 xavier 初始化方法在 relu 这一类激活函数表现不佳而提出的改进,详细可以参看论文。
- Xavier均匀分布
torch.nn.init.xavier_uniform_(tensor, gain=1)
# xavier 初始化方法中服从均匀分布 U(−a,a) ,分布的参数 a = gain * sqrt(6/fan_in+fan_out),
# 这里有一个 gain,增益的大小是依据激活函数类型来设定
# eg:nn.init.xavier_uniform_(w, gain=nn.init.calculate_gain('relu'))
# PS:上述初始化方法,也称为 Glorot initialization
- Xavier 正态分布
torch.nn.init.xavier_normal_(tensor, gain=1)
# xavier 初始化方法中服从正态分布,
# mean=0,std = gain * sqrt(2/fan_in + fan_out)
- kaiming 均匀分布
torch.nn.init.kaiming_uniform_(tensor, a=0, mode='fan_in', nonlinearity='leaky_relu')
# 此为均匀分布,U~(-bound, bound), bound = sqrt(6/(1+a^2)*fan_in)
# 其中,a 为激活函数的负半轴的斜率,relu 是 0
# mode - 可选为 fan_in 或 fan_out, fan_in 使正向传播时,方差一致; fan_out 使反向传播时,
# 方差一致
# nonlinearity - 可选 relu 和 leaky_relu ,默认值为 。 leaky_relu
# nn.init.kaiming_uniform_(w, mode='fan_in', nonlinearity='relu')
- kaiming 正态分布
torch.nn.init.kaiming_normal_(tensor, a=0, mode='fan_in', nonlinearity='leaky_relu')
# 此为 0 均值的正态分布,N~ (0,std),其中 std = sqrt(2/(1+a^2)*fan_in)
# 其中,a 为激活函数的负半轴的斜率,relu 是 0
# mode - 可选为 fan_in 或 fan_out, fan_in 使正向传播时,方差一致;fan_out 使反向传播时,
# 方差一致
# nonlinearity - 可选 relu 和 leaky_relu ,默认值为 。 leaky_relu
# nn.init.kaiming_normal_(w, mode='fan_out', nonlinearity='relu')
- 均匀分布初始化
torch.nn.init.uniform_(tensor, a=0, b=1)
# 使值服从均匀分布 U(a,b)
- 正态分布初始化
torch.nn.init.normal_(tensor, mean=0, std=1)
使值服从正态分布 N(mean, std),默认值为 0,1
- 常数初始化
torch.nn.init.constant_(tensor, val)
# 使值为常数 val nn.init.constant_(w, 0.3)
- 单位矩阵初始化
torch.nn.init.eye_(tensor)
# 将二维 tensor 初始化为单位矩阵(the identity matrix)
- 正交初始化
torch.nn.init.orthogonal_(tensor, gain=1)
# 使得 tensor 是正交的,论文:Exact solutions to the nonlinear dynamics of learning in
# deep linear neural networks” - Saxe, A. et al. (2013)
- 稀疏初始化
torch.nn.init.sparse_(tensor, sparsity, std=0.01)
# 从正态分布 N~(0. std)中进行稀疏化,使每一个 column 有一部分为 0
# sparsity- 每一个 column 稀疏的比例,即为 0 的比例
# nn.init.sparse_(w, sparsity=0.1)
- 计算增益
torch.nn.init.calculate_gain(nonlinearity, param=None)
模型Finetune
一个良好的权值初始化,可以使收敛速度加快,甚至可以获得更好的精度。而在实际
应用中,我们通常采用一个已经训练模型的模型的权值参数作为我们模型的初始化参数,也称之为 Finetune,更宽泛的称之为迁移学习。迁移学习中的 Finetune 技术,本质上就是让我们新构建的模型,拥有一个较好的权值初始值。
用预训练的模型参数对新模型的权值进行初始化
finetune 权值初始化三步曲,finetune 就相当于给模型进行初始化,其流程共用三步:
- 第一步:保存模型,拥有一个预训练模型;
# 假设创建了一个 net = Net(),并且经过训练,通过以下方式保存:
torch.save(net.state_dict(), 'net_params.pkl')
- 第二步:加载模型,把预训练模型中的权值取出来;
pretrained_dict = torch.load('net_params.pkl')
- 第三步:初始化,将权值对应的“放”到新模型中。
# 1.首先我们创建新模型,并且获取新模型的参数字典 net_state_dict:
net = Net() # 创建 net
net_state_dict = net.state_dict() # 获取已创建 net 的 state_dict
# 2.接着将 pretrained_dict 里不属于 net_state_dict 的键剔除掉:
pretrained_dict_1 = {k: v for k, v in pretrained_dict.items() if k in net_state_dict}
# 3.然后,用预训练模型的参数字典 对 新模型的参数字典 net_state_dict 进行更新:
net_state_dict.update(pretrained_dict_1)
# 4.最后,将更新了参数的字典 “放”回到网络中:
net.load_state_dict(net_state_dict)
不同层设置不同的学习率
在利用 pre-trained model 的参数做初始化之后,我们可能想让 fc 层更新相对快一些,
而希望前面的权值更新小一些,这就可以通过为不同的层设置不同的学习率来达到此目的。
为不同层设置不同的学习率,主要通过优化器对多个参数组进行设置不同的参数。所
以,只需要将原始的参数组,划分成两个,甚至更多的参数组,然后分别进行设置学习率。
损失函数和优化器
损失函数
L1范数损失 L1Loss
torch.nn.MSELoss(reduction='mean')
- 功能:
计算 output 和 target 之差的绝对值,可选返回同维度的 tensor 或者是一个标量。这里是引用
reduction-三个值,none: 不使用约简;mean:返回loss和的平均值; sum:返回loss的和。默认:mean。这里是引用
均方误差损失 MSELoss
class torch.nn.MSELoss(size_average=None, reduce=None, reduction='elementwise_mean')
- 功能:
计算 output 和 target 之差的平方,可选返回同维度的 tensor 或者是一个标量。
reduction-三个值,none: 不使用约简;mean:返回loss和的平均值; sum:返回loss的和。默认:mean。
交叉熵损失CrossEntropyLoss
class torch.nn.CrossEntropyLoss(weight=None, size_average=None, ignore_index=-
100, reduce=None, reduction='elementwise_mean')
- 功能:
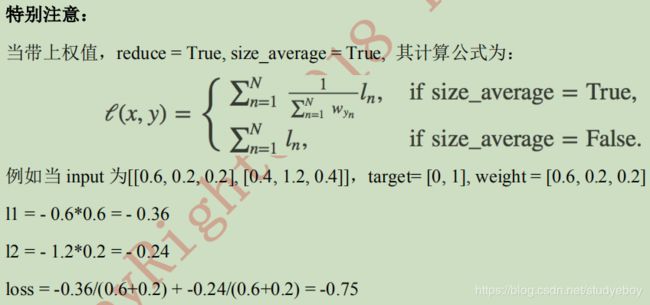
当训练有 C 个类别的分类问题时很有效. 可选参数 weight 必须是一个1维 Tensor, 权重将被分配给各个类别. 对于不平衡的训练集非常有效。
在多分类任务中,经常采用 softmax 激活函数+交叉熵损失函数,因为交叉熵描述了两个概率分布的差异,然而神经网络输出的是向量,并不是概率分布的形式。所以需要 softmax激活函数将一个向量进行“归一化”成概率分布的形式,再采用交叉熵损失函数计算 loss。
将输入经过 softmax 激活函数之后,再计算其与 target 的交叉熵损失。即该方法将
nn.LogSoftmax()和 nn.NLLLoss()进行了结合。严格意义上的交叉熵损失函数应该是
nn.NLLLoss()。
- 补充:
交叉熵损失(cross-enropy Loss)又称对数似然损失(Log-likelihood Loss)、对数损失;二分类时还可以称为逻辑回归损失(Logistics Loss)。在多分类任务中,经常采用softmax激活函数+交叉熵损失函数,因为交叉熵描述了两个概率分布的差异,然而神经网络输出的是向量,并不是概率分布的形式。所以需要softmax激活函数将一个向量进行归一化成概率分布的形式,再采用交叉熵损失函数计算loss。
weight (Tensor, optional) – 自定义的每个类别的权重. 必须是一个长度为 C 的 Tensor
ignore_index (int, optional) – 设置一个目标值, 该目标值会被忽略, 从而不会影响到 输入的梯度。
reduction-三个值,none: 不使用约简;mean:返回loss和的平均值; sum:返回loss的和。默认:mean。
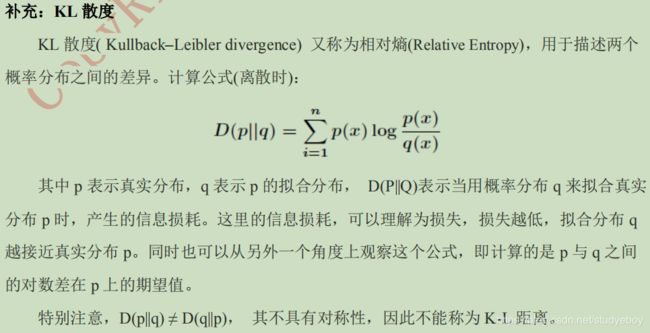
KL 散度损失 KLDivLoss
class torch.nn.KLDivLoss(size_average=None, reduce=None, reduction='elementwise_mean')
- 功能
计算 input 和 target 之间的 KL 散度。KL 散度可用于衡量不同的连续分布之间的距离, 在连续的输出分布的空间上(离散采样)上进行直接回归时 很有效.
二进制交叉熵损失BCELoss
class torch.nn.BCELoss(weight=None, size_average=None, reduce=None, reduction='element
wise_mean')
- 功能
- 参数
weight (Tensor, optional) – 自定义的每个 batch 元素的 loss 的权重. 必须是一个长度为 “nbatch” 的 的 Tensor
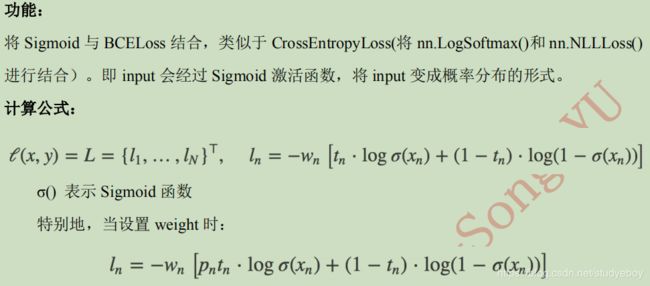
BCEWithLogitsLoss
class torch.nn.BCEWithLogitsLoss(weight=None, size_average=None, reduce=None, reductio
n='elementwise_mean', pos_weight=None)
- 功能
BCEWithLogitsLoss损失函数把 Sigmoid 层集成到了 BCELoss 类中. 该版比用一个简单的 Sigmoid 层和 BCELoss 在数值上更稳定, 因为把这两个操作合并为一个层之后, 可以利用 log-sum-exp 的 技巧来实现数值稳定.
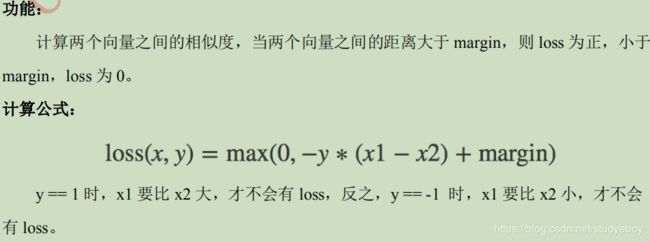
MarginRankingLoss
class torch.nn.MarginRankingLoss(margin=0, size_average=None, reduce=None, reduction='
elementwise_mean')
HingeEmbeddingLoss
class torch.nn.HingeEmbeddingLoss(margin=1.0, size_average=None, reduce=None, reductio
n='elementwise_mean')
多标签分类损失MultiLabelMarginLoss
class torch.nn.MultiLabelMarginLoss(size_average=None, reduce=None, reduction='element
wise_mean')
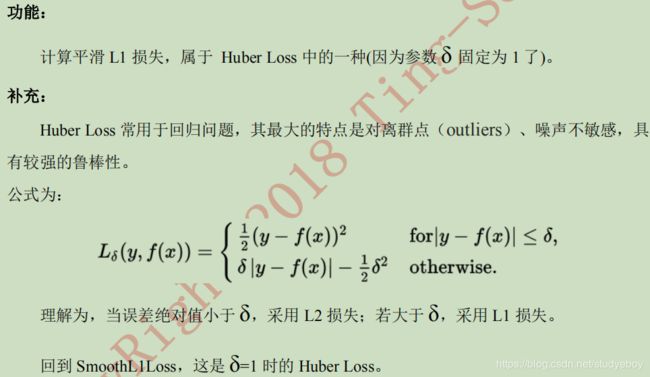
平滑版L1损失SmoothL1Loss
class torch.nn.SmoothL1Loss(size_average=None, reduce=None, reduction='elementwise_mea
n')
2分类的logistic损失SoftMarginLoss
class torch.nn.SoftMarginLoss(size_average=None, reduce=None, reduction='elementwise_me
an')
多标签 one-versus-all 损失 MultiLabelSoftMarginLoss
torch.nn.MultiLabelSoftMarginLoss(weight=None, reduction='mean')
cosine 损失 CosineEmbeddingLoss
torch.nn.CosineEmbeddingLoss(margin=0.0, reduction='mean')
多类别分类的hinge损失 MultiMarginLoss
torch.nn.MultiMarginLoss(p=1, margin=1.0, weight=None, reduction='mean')
p=1或者2 默认值:1
margin:默认值1
三元组损失 TripletMarginLoss
torch.nn.TripletMarginLoss(margin=1.0, p=2.0, eps=1e-06, swap=False, reduction='mean')
连接时序分类损失 CTCLoss
torch.nn.CTCLoss(blank=0, reduction='mean')
- 功能
CTC连接时序分类损失,可以对没有对齐的数据进行自动对齐,主要用在没有事先对齐的序列化数据训练上。比如语音识别、ocr识别等等
负对数似然损失 NLLLoss
class torch.nn.NLLLoss(weight=None, size_average=None, ignore_index=-
100, reduce=None, reduction='elementwise_mean')
- 功能:
负对数似然损失. 用于训练 C 个类别的分类问题.
NLLLoss2d
torch.nn.NLLLoss2d(weight=None, ignore_index=-100, reduction='mean')
- 功能
对于图片输入的负对数似然损失. 它计算每个像素的负对数似然损失.
- 参数
weight (Tensor, optional) – 自定义的每个类别的权重. 必须是一个长度为 C 的 Tensor
reduction-三个值,none: 不使用约简;mean:返回loss和的平均值; sum:返回loss的和。默认:mean。
PoissonNLLLoss
class torch.nn.PoissonNLLLoss(log_input=True, full=False, size_average=None, eps=1e-
08, reduce=None, reduction='elementwise_mean')
- 参数
log_input (bool, optional) – 如果设置为 True , loss 将会按照公 式 exp(input) - target * input 来计算, 如果设置为 False , loss 将会按照 input - target * log(input+eps) 计算.
full (bool, optional) – 是否计算全部的 loss, i. e. 加上 Stirling 近似项 target * log(target) - target + 0.5 * log(2 * pi * target).
eps (float, optional) – 默认值: 1e-8
优化器
当数据、模型和损失函数确定,任务的数学模型就已经确定,接着就要选择一个合适的优化器对模型进行优化。
优化器基类Optimizer
- 参数组(param_groups)
Optimizer对参数的管理是基于组的概念,可以为每一组参数配置特定的lr, momentum,weight_decay等等。参数组在Optimizer中表现为一个list(self.param_groups),其中每个元素是dict,表示参数及其相应配置,在dict中包含‘params’、‘weight_decay’、‘lr’、‘momentum’等字段。 - zero_grad()
将梯度清零,pytorch不会自动清零梯度,每次更新前都需要进行此操作。 - state_dict()
获取模型的当前参数,以一个有序字典形式返回。在有序字典中,key是各层参数名,value是参数。 - load_state_dict(state_dict)
将state_dict中的参数加载到当前网络,常用于finetune。 - add_param_group()
给Optimizer管理的参数组中增加一组参数,可以为该组定制lr,momentum,weight_decay等,在finetune中常用。 - step(closure)
执行一步权值更新,其中可传入参数closure(一个闭包)。
常见优化器
- torch.optim.SGD
可实现 SGD 优化算法,带动量 SGD 优化算法,带 NAG(Nesterov accelerated
gradient)动量 SGD 优化算法,并且均可拥有 weight_decay 项。
class torch.optim.SGD(params, lr=注意:
- torch.optim.ASGD
ASGD 也成为 SAG,均表示随机平均梯度下降(Averaged Stochastic Gradient
Descent),简单地说 ASGD 就是用空间换时间的一种 SGD。
class torch.optim.ASGD(params, lr=0.01, lambd=0.0001, alpha=0.75, t0=1000000.
0, weight_decay=0)
- torch.optim.Rprop
实现 Rprop 优化方法(弹性反向传播),该优化方法适用于 full-batch,不适用于 mini-batch。
class torch.optim.Rprop(params, lr=0.01, etas=(0.5, 1.2), step_sizes=(1e-06, 50))
- torch.optim.Adagrad
实现 Adagrad 优化方法(Adaptive Gradient),Adagrad 是一种自适应优化方法,是自适应的为各个参数分配不同的学习率。这个学习率的变化,会受到梯度的大小和迭代次数的影响。梯度越大,学习率越小;梯度越小,学习率越大。缺点是训练后期,学习率过小,因为 Adagrad 累加之前所有的梯度平方作为分母。
class torch.optim.Adagrad(params, lr=0.01, lr_decay=0, weight_decay=0, initial
_accumulator_value=0)
- torch.optim.Adadelta
实现 Adadelta 优化方法。Adadelta 是 Adagrad 的改进。Adadelta 分母中采用距离
当前时间点比较近的累计项,这可以避免在训练后期,学习率过小。
class torch.optim.Adadelta(params, lr=1.0, rho=0.9, eps=1e-
06, weight_decay=0)
- torch.optim.RMSprop
实现 RMSprop 优化方法(Hinton ᨀ出),RMS 是均方根(root meam square)的意
思。RMSprop 和 Adadelta 一样,也是对 Adagrad 的一种改进。RMSprop 采用均方根作为分母,可缓解 Adagrad 学习率下降较快的问题,并且引入均方根,可以减少摆动。
class torch.optim.RMSprop(params, lr=0.01, alpha=0.99, eps=1e-
08, weight_decay=0, momentum=0, centered=False)
- torch.optim.Adam(AMSGrad)
实现 Adam(Adaptive Moment Estimation))优化方法。Adam 是一种自适应学习率的优
化方法,Adam 利用梯度的一阶矩估计和二阶矩估计动态的调整学习率。Adam 是结合了 Momentum 和 RMSprop,并进行了偏差修正。
class torch.optim.Adam(params, lr=0.001, betas=(0.9, 0.999), eps=1e-
08, weight_decay=0, amsgrad=False)
- torch.optim.Adamax
Adamax 是对 Adam 增加了一个学习率上限的概念,所以也称之为 Adamax。
class torch.optim.Adamax(params, lr=0.002, betas=(0.9, 0.999), eps=1e-
08, weight_decay=0)
- torch.optim.SparseAdam
针对稀疏张量的一种“阉割版”Adam 优化方法。
class torch.optim.SparseAdam(params, lr=0.001, betas=(0.9, 0.999), eps=1e-08)
- torch.optim.LBFGS
实现 L-BFGS(Limited-memory Broyden–Fletcher–Goldfarb–Shanno)优化方法。
L-BFGS 属于拟牛顿算法。L-BFGS 是对 BFGS 的改进,特点就是节省内存。
class torch.optim.LBFGS(params, lr=1, max_iter=20, max_eval=None, tolerance_
grad=1e-05, tolerance_change=1e-09, history_size=100, line_search_fn=None)
学习率
合理的学习率可以使优化器快速收敛。一般在训练初期给予较大的学习率,随着训练的进行,学习率逐渐减小。
在pytorch中,学习率的更新是通过scheduler.step进行的。
学习率调整方法分类
- 有序调整:依一定规律有序进行调整,这一类是最常用的,分别是等间隔下降(Step),按需设定下降间隔(MultiStep),指数下降(Exponential)和CosineAnnealing。这四种方法的调整时机都是人为可控的,也是训练时常用到的。
- 自适应调整:依训练状况伺机调整,ReduceLROnPlateau方法通过监测某一指标的变化情况,当该指标不再怎么变化时,就是调整学习率的时机,因而属于自适应的调整。
- 自定义调整:Lambda方法提供的调整策略十分灵活,可以为不同的层设定不同的学习率调整方法,在finetune中十分有用,可为不同的层设定不同的学习率,还可以为其设定不同的学习率调整策略。
常见学习率调整方法
- lr_scheduler.StepLR
等间隔调整学习率,调整倍数为 gamma 倍,调整间隔为 step_size。间隔单位是
step。需要注意的是,step 通常是指 epoch,不要弄成 iteration 了。
class torch.optim.lr_scheduler.StepLR(optimizer, step_size, gamma=0.1, las
t_epoch=-1)
- ls_scheduler.MultiStepLR
按设定的间隔调整学习率。这个方法适合后期调试使用,观察 loss 曲线,为每个实验
定制学习率调整时机。
class torch.optim.lr_scheduler.MultiStepLR(optimizer, milestones, gamma
=0.1, last_epoch=-1)
- lr_scheduler.ExponentialLR
按指数衰减调整学习率,调整公式: lr = lr * gamma**epoch。
class torch.optim.lr_scheduler.ExponentialLR(optimizer, gamma, last_epo
ch=-1)
- lr_scheduler.CosineAnnealingLR
以余弦函数为周期,并在每个周期最大值时重新设置学习率。
class torch.optim.lr_scheduler.CosineAnnealingLR(optimizer, T_max, eta_
min=0, last_epoch=-1)
学习率调整公式:
以初始学习率为最大学习率,以2*Tmax为周期,在IG周期内先下降,后上升。
- lr_scheduler.ReduceLROnPlateau
当某指标不再变化(下降或升高),调整学习率,这是非常实用的学习率调整策略。
例如,当验证集的 loss 不再下降时,进行学习率调整;或者监测验证集的 accuracy,当accuracy 不再上升时,则调整学习率。
class torch.optim.lr_scheduler.ReduceLROnPlateau(optimizer, mode='min',
factor=0.1, patience=10, verbose=False, threshold=0.0001, threshold_mode='rel', c
ooldown=0, min_lr=0, eps=1e-08)
- lr_schedulerLambdaLR
为不同参数组设定不同学习率调整策略。调整规则为,lr = base_lr *
lmbda(self.last_epoch) 。
class torch.optim.lr_scheduler.LambdaLR(optimizer, lr_lambda, last_epoch=- 1)
参考资料
- 快速上手笔记,PyTorch模型训练实用教程(附代码)
- 《Pytorch模型训练实用教程》中配套代码
- WRITING CUSTOM DATASETS, DATALOADERS AND TRANSFORMS
- PyTorch入门学习(七):数据加载与处理
- PYTORCH DOCUMENTATION
- Pytorch学习之十九种损失函数


