应用 AddressSanitizer 发现程序内存错误
作为C/ C++工程师,在开发过程中会遇到各类问题,最常见便是内存使用问题,比如,越界,泄漏。
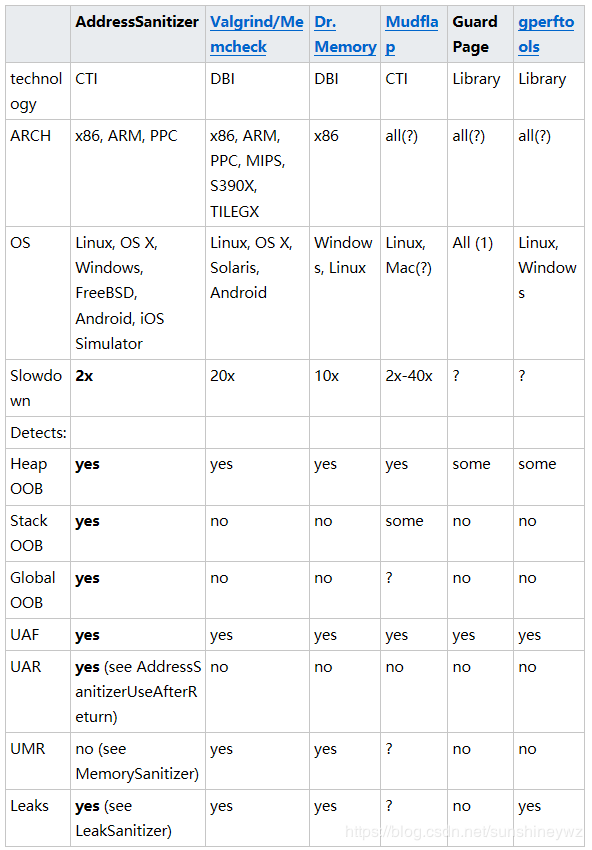
过去常用的工具是 Valgrind,但使用 Valgrind 最大问题是它会极大地降低程序运行的速度,初步估计会降低 10 倍运行速度。而 Google 开发的 AddressSanitizer 这个工具很好地解决了 Valgrind 带来性能损失问题,它非常快,只拖慢程序 2 倍速度。
AddressSanitizer 概述
AddressSanitizer 是一个基于编译器的测试工具,可在运行时检测 C/C++代码中的多种内存错误。
严格上来说,AddressSanitizer 是一个编译器插件,它分为两个模块,一个是编译器的 instrumentation 模块,一个是用来替换 malloc/free 的动态库。
Instrumentation 主要是针对在 llvm 编译器级别对访问内存的操作(store,load,alloc等),将它们进行处理。
动态库主要提供一些运行时的复杂的功能(比如 poison/unpoison shadow memory)以及将 malloc/free 等系统调用函数 hook 住。
AddressSanitizer 基本使用
根据 AddressSanitizer Wiki可以检测下面这些内存错误
- Use after free:访问堆上已经被释放的内存
- Heap buffer overflow:堆上缓冲区访问溢出
- Stack buffer overflow:栈上缓冲区访问溢出
- Global buffer overflow:全局缓冲区访问溢出
- Use after return:访问栈上已被释放的内存
- Use after scope:栈对象使用超过定义范围
- Initialization order bugs:初始化命令错误
- Memory leaks:内存泄漏
这里我只简单地介绍下基本的使用,详细的使用文档可以看官方的编译器使用文档,比如 Clang 的文档:https://clang.llvm.org/docs/AddressSanitizer.html
Use after free 实践例子
下面这段代码是一个很简单的 Use after free 的例子:
//use_after_free.cpp
#include
int main(int argc, char **argv) {
  int *array = new int[100];
  delete [] array;
  std::cout << array[0] << std::endl;
  return 1;
}
编译代码,并且运行,这里可以看到只需要在编译的时候带上-fsanitize=address 选项就可以了。
clang++  -O -g -fsanitize=address ./use_after_free.cpp
./a.out
最终我们会看到如下的输出:
==10960==ERROR: AddressSanitizer: heap-use-after-free on address 0x614000000040 at pc 0x00010d471df0 bp 0x7ffee278e6b0 sp 0x7ffee278e6a8
READ of size 4 at 0x614000000040 thread T0
    #0 0x10d471def in main use_after_free.cpp:6
    #1 0x7fff732c17fc in start (libdyld.dylib:x86_64+0x1a7fc)

0x614000000040 is located 0 bytes inside of 400-byte region [0x614000000040,0x6140000001d0)
freed by thread T0 here:
    #0 0x10d4ccced in wrap__ZdaPv (libclang_rt.asan_osx_dynamic.dylib:x86_64h+0x51ced)
    #1 0x10d471ca1 in main use_after_free.cpp:5
    #2 0x7fff732c17fc in start (libdyld.dylib:x86_64+0x1a7fc)

previously allocated by thread T0 here:
    #0 0x10d4cc8dd in wrap__Znam (libclang_rt.asan_osx_dynamic.dylib:x86_64h+0x518dd)
    #1 0x10d471c96 in main use_after_free.cpp:4
    #2 0x7fff732c17fc in start (libdyld.dylib:x86_64+0x1a7fc)

SUMMARY: AddressSanitizer: heap-use-after-free use_after_free.cpp:6 in main
可以看到一目了然,非常清楚的告诉了我们在哪一行内存被释放,而又在哪一行内存再次被使用。
还有一个是内存泄漏,比如下面的代码,显然 p 所指的内存没有被释放。
void *p;

int main() {
        p = malloc(7);
        p = 0; // The memory is leaked here.
        return 0;
}
编译然后运行
clang -fsanitize=address -g  ./leak.c
./a.out
可以看到如下的结果
=================================================================
==17756==ERROR: LeakSanitizer: detected memory leaks

Direct leak of 7 byte(s) in 1 object(s) allocated from:
    #0 0x4ffc80 in malloc (/home/simon.liu/workspace/a.out+0x4ffc80)
    #1 0x534ab8 in main /home/simon.liu/workspace/./leak.c:4:8
    #2 0x7f127c42af42 in __libc_start_main (/usr/lib64/libc.so.6+0x23f42)

SUMMARY: AddressSanitizer: 7 byte(s) leaked in 1 allocation(s).
不过这里要注意内存泄漏的检测只会在程序最后退出之前进行检测,也就是说如果你在运行时如果不断地分配内存,然后在退出的时候对内存进行释放,AddressSanitizer 将不会检测到内存泄漏,这种时候可能你就需要另外的工具了 JeMalloc / TCMalloc。
AddressSanitizer 基本原理
这里简单介绍一下 AddressSanitizer 的实现,更详细的算法实现可以看《AddressSanitizer: a fast address sanity checker》:https://www.usenix.org/system/files/conference/atc12/atc12-final39.pdf
AddressSanitizer 会替换你的所有 malloc 以及 free,然后已经被分配(malloc)的内存区域的前后会被标记为 poisoned (主要是为了处理 overflow 这种情况),而释放(free)的内存会被标记为 poisoned(主要是为了处理 Use after free)。
你的代码中的每一次的内存存取都会被编译器做类似下面的翻译.
before:
*address = ...; // or: ... = *address;
after:
shadow_address = MemToShadow(address);
if (ShadowIsPoisoned(shadow_address)) {
  ReportError(address, kAccessSize, kIsWrite);
}
*address = ...;  // or: ... = *address;
这里可以看到首先会对内存地址有一个翻译(MemToShadow)的过程,然后再来判断当所访问的内存区域是否为poisoned,如果是则直接报错并退出。
这里之所以会有这个翻译是因为 AddressSanitizer 将虚拟内存分为了两部分:
Main application memory(Mem)也就是被当前程序自身使用的内存Shadow memory简单来说就是保存了主存元信息的一块内存,比如主存的那些区域被posioned都是在Shadow memory中保存的
AddressSanitizer 和其他内存检测工具对比
下图是 AddressSanitizer 与其他的一些内存检测工具的对比:

参数说明:
- DBI: dynamic binary instrumentation(动态二进制插桩)
- CTI: compile-time instrumentation (编译时插桩)
- UMR: uninitialized memory reads (读取未初始化的内存)
- UAF: use-after-free (aka dangling pointer) (使用释放后的内存)
- UAR: use-after-return (使用返回后的值)
- OOB: out-of-bounds (溢出)
- x86: includes 32- and 64-bit.
可以看到相比于 Valgrind,AddressSanitizer 只会拖慢程序 2 倍运行速度。当前 AddressSanitizer 支持 GCC 以及 Clang,其中 GCC 是从4.8 开始支持,而 Clang 的话是从 3.1 开始支持。
AddressSanitizer 的使用注意事项
AddressSanitizer 在发现内存访问违规时,应用程序并不会自动崩溃。这是由于在使用模糊测试工具时,它们通常都是通过检查返回码来检测这种错误。当然,我们也可以在模糊测试进行之前通过将环境变量 ASAN_OPTIONS 修改成如下形式来迫使软件崩溃:
export ASAN_OPTIONS='abort_on_error=1'/
AddressSanitizer 需要相当大的虚拟内存(大约 20 TB),不用担心,这个只是虚拟内存,你仍可以使用你的应用程序。
但像 american fuzzy lop 这样的模糊测试工具就会对模糊化的软件使用内存进行限制,不过你仍可以通过禁用内存限制来解决该问题。
唯一需要注意的就是,这会带来一些风险:测试样本可能会导致应用程序分配大量的内存进而导致系统不稳定或者其他应用程序崩溃。
因此在进行一些重要的模糊测试时,不要去尝试在同一个系统上禁用内存限制。