VirtualBox 搭建 CentOS 7 虚拟机集群运行 MPI
课题需要研究分布式计算,为此我学习在 Linux 集群上运行 MPI 程序。为了先熟悉一下过程,我在 VirtualBox 搭建的 4 台 CentOS 7 虚拟机上构建了一个集群。
这里涉及的知识有:
- 虚拟机静态 ip 分配和网络互联的设置
- SSH 免密登陆
- NFS 文件共享系统
- MPICH 的安装,和在集群上运行
文章目录
- 1 虚拟机分区
- 2 虚拟机网络设置
- 设置静态 ip
- ① 宿主机
- ② 虚拟机
- NAT
- 3 SSH 免密连接
- 4 创建 NFS(Network FileSystem)
- ① 服务端
- ② 客户端
- 5 在虚拟机上安装 MPICH
1 虚拟机分区
master 采用 40 GB 的空间,按如下分配:
- BIOS Boot:2MB
- /boot:1GB
- /:10 GB
- /var:5 GB
- /tmp:3 GB
- Swap:2 GB ( 因为我每部 Linux 虚拟机上面都有 1GB 的内存 )
- /mpi_cloud:19 GB(仅仅 master 虚拟机有这个分区)
2 虚拟机网络设置
首先要设置宿主机和虚拟机的静态 ip,并且要实现 3 个方向能够 ping 成功:
1 宿主机 ping 虚拟机
2 虚拟机1 ping 虚拟机 2
3 虚拟机 ping 因特网
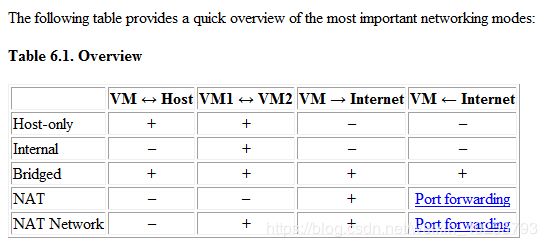
VirtualBox 的网络设置的特点(来自 VirtualBox 的帮助文档):
根据我们要实现的目标我们可以使用 Bridged 方式设置一张网卡,或者使用 Host-only 和 NAT 方式设置两张网卡。
这里我采用第二种。
设置静态 ip
主机名和静态 ip:
- 宿主机:192.168.0.1
- master.cluster:192.168.0.2
- node1.cluster:192.168.0.3
- node2.cluster:192.168.0.4
- node3.cluster:192.168.0.5
① 宿主机
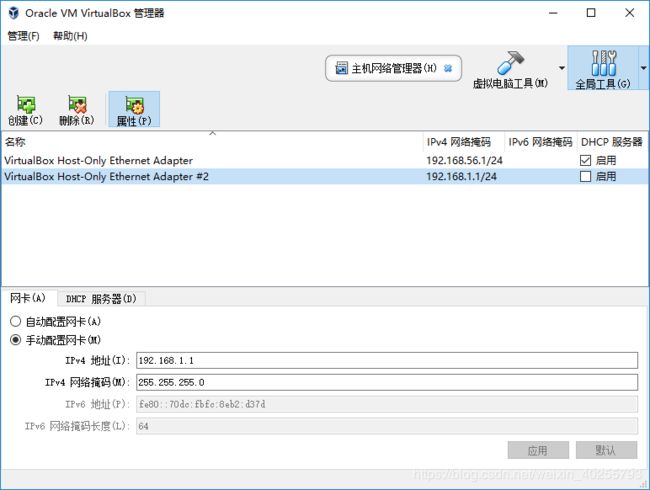
为了设置静态 ip,操作 VirtualBox 管理器:管理 -> 主机网络管理器

默认的 Adapter 不知道为什么无法修改成自动配置网卡,因此我就创建了一个新的 Adapter #2,不启用 DHCP 服务器,设置手动配置网卡,IPv4 地址和掩码使用了默认值。设置完成之后,在 Window 中打开 cmd:
C:\WINDOWS\system32>ipconfig
...
以太网适配器 VirtualBox Host-Only Network #2:

   连接特定的 DNS 后缀 . . . . . . . :
   本地链接 IPv6 地址. . . . . . . . : fe80::70dc:fbfc:8eb2:d37d%62
   IPv4 地址 . . . . . . . . . . . . : 192.168.1.1
   子网掩码  . . . . . . . . . . . . : 255.255.255.0
   默认网关. . . . . . . . . . . . . :
设置成功,宿主机的静态 ip 为 192.168.1.1。
② 虚拟机
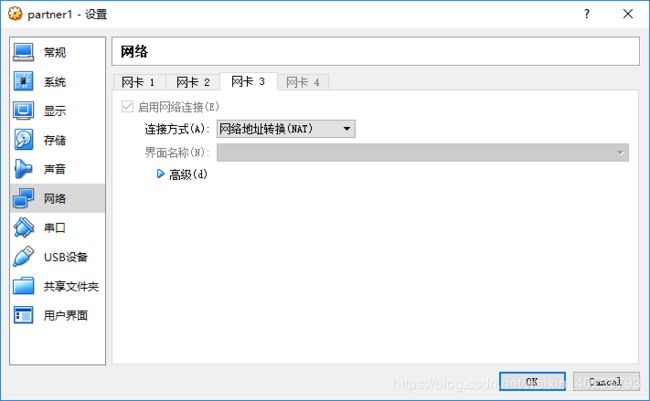
点击虚拟机:设置 -> 网络

添加网卡 1 为 Host-Only,采用刚刚添加的 Adapter #2。
打开虚拟机后,设置虚拟机的网络属性:
[root@p1 mindle]# nmcli connection show
NAME        UUID                                  TYPE      DEVICE
enp0s3      86605a09-7b00-44a0-9107-573c20084c7b  ethernet  enp0s3
[root@p1 mindle]# nmcli connection modify enp0s3 ipv4.method manual ipv4.addresses 192.168.1.2/24
[root@p1 mindle]# nmcli connection up enp0s3
通过 nmcli 命令发现网卡的名称为 enp03,进一步修改了网卡的静态地址为 192.168.1.2。
到这里,宿主机就可以用 ping 上虚拟机,虚拟机之间也可以 ping 通。下一步解决虚拟机连上互联网。
NAT
这一步很简单,再增加一张 NAT 的网卡就可以了,虚拟机也不需要设置。

这下虚拟机就可以访问互联网了。
3 SSH 免密连接
关于 SSH 的设置建议参考鸟哥的官网,写得非常详细,图文并茂,不习惯繁体字的朋友可以使用谷歌翻译插件将页面翻译成中文简体。
为方便登陆时知道在哪一个主机上,我修改了主机的 hostname
[mindle@localhost ~]$ hostname node1.cluster
[mindle@localhost ~]$ sudo /etc/hostname
node1.cluster
这样登陆成功后显示的就是:
[mindle@node1 ~]$
另外为了方便,我修改了虚拟机的 hosts 文件,给静态 ip 地址取了别名,一台 VM 为 master,另一台 VM 为 p1:
[mindle@p1 ~]$ sudo vim /etc/hosts
192.168.1.2 master
192.168.1.3 node1
192.168.1.4 node2
192.168.1.5 node3
我们需要实现,master 免密登陆 node1、node2、node3,且 node1、node2、node3 免密登陆 master。这样来来回回得设置 6 趟呢,咱们以 node1 免密 ssh 登陆 master 为例子:
1.node1 生成 RSA 密钥系统,并将公钥通过 scp 发送给 master。
# 生成 RSA 密钥系统
[mindle@node1 ~]$ ssh-keygen
Generating public/private rsa key pair.
Enter file in which to save the key (/home/mindle/.ssh/id_rsa): # Enter 键,使用默认值
Created directory '/home/mindle/.ssh'.
Enter passphrase (empty for no passphrase): # Enter 键,使用空密码
Enter same passphrase again: # Enter 键,使用空密码
Your identification has been saved in /home/mindle/.ssh/id_rsa.
Your public key has been saved in /home/mindle/.ssh/id_rsa.pub.

# 将公钥通过 scp 发送给 master
[mindle@node1 ~]$ scp .ssh/id_rsa.pub master:/home/mindle/
id_rsa.pub                                                           100%  402   536.3KB/s   00:00
2.master 将 node1 的公钥添加进去自己的 ~/.ssh/authorized_keys 文件中
[mindle@master ~]$ cat id_rsa.pub >> .ssh/authorized_keys
[mindle@master ~]$ rm id_rsa.pub
# 一定保证 authorized_keys 的权限为 644
[mindle@master ~]$ chmod 644 .ssh/authorized_keys
[mindle@master ~]$ ll .ssh/authorized_keys
-rw-r--r--. 1 mindle mindle 1206 Nov 26 19:02 .ssh/authorized_keys
3.从 node1 上面再次用 ssh 连接 master,已经不需要密码了
4 创建 NFS(Network FileSystem)
创建 NFS 系统也建议参考鸟哥的官网。
NFS 服务器和客户端需要有两个软件,分别是 RPC 主程序 rpcbind 和 NFS 主程序 nfs-utils,如果没有的话需要先安装好哦。
① 服务端
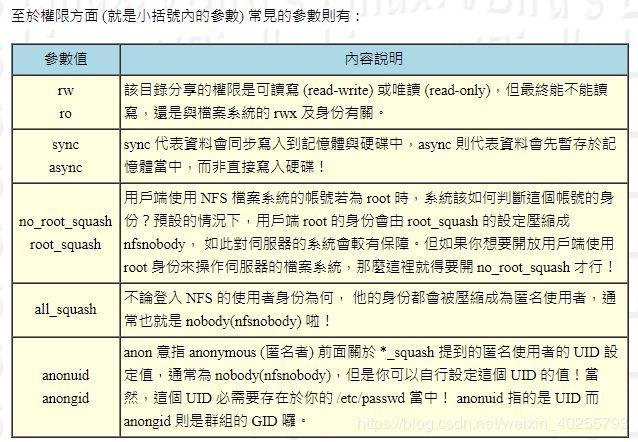
master 将自己的 /mpi_cloud 文件夹共享出来。NFS 服务器的假设实在很简单,只要编辑好主要设置文件 /etc/exports 之后,先启动 rpcbind,再启动 nfs ,你的 NFS 就成功了。
# 1.编辑主要设置文件
[mindle@master ~]$ sudo vim /etc/exports
/mpi_cloud 192.168.1.0/24(rw,async,no_root_squash)
#语法为:[分享目錄]   [第一部主機(權限)]     [可用主機名]    [可用萬用字元]
# 2.启动 rpcbind 和 nfs 并设为开机自启动
[mindle@master ~]$ sudo systemctl start rpcbind
[mindle@master ~]$ sudo systemctl start nfs
[mindle@master ~]$ sudo systemctl enable rpcbind
[mindle@master ~]$ sudo systemctl enable nfs
# 如果你想要增加 NFS 服务器资料的一致性功能时,可以增加一个服务,
# 那就是 nfslock 咯!
[mindle@master ~]$ sudo systemctl start nfslock
[mindle@master ~]$ sudo systemctl enable nfslock
② 客户端
node 虚拟机挂载 master 共享的文件夹。
# 1.启动必需的两个服务。
[mindle@master ~]$ sudo systemctl start rpcbind
[mindle@master ~]$ sudo systemctl start nfslock

# 2.挂载前查询 master 共享的文件夹有哪些:
[mindle@node1 ~]$ showmount -e master
/mpi_cloud192.168.1.0/24

# 3.建立挂载点,正式挂载
[mindle@node1 mindle]$ mkdir /mpi_cloud
[mindle@node1 mindle]$ mount -t nfs master:/mpi_cloud /mpi_cloud
# 挂载的语法,『-t nfs』 指定文件系统类型
# IP:/dir 则是指定某一部主机的某个提供的目录!另外,如果出現如下錯誤:
mount: master:/mpi_cloud failed, reason given by server: No such file
or directory
# 這代表你在 mster上面並沒有建立 /disk1 啦!自己在 mster 端建立他吧!

# 4.看看挂在后的情况,可以使用 df 或 mount 啦!
[mindle@node1 mindle]$ df -h /mpi_cloud/
文件系统        容量  已用  可用 已用% 挂载点
master:/mpi_cloud 19G  4.9G   14G   26% /mpi_cloud
那么如何将挂在的 NFS 目录卸载呢?就是用 umount 啊!
[mindle@node1 mindle]$ sudo unmount /mpi_cloud
5 在虚拟机上安装 MPICH
采用 yum 来安装 MPICH 确实好简单:
1.列出支持的 MPICH 版本
[mindle@node1 ~]$ yum list mpich*
可安装的软件包
mpich-3.0.i686                                          3.0.4-10.el7                               base
mpich-3.0.x86_64                                        3.0.4-10.el7                               base
mpich-3.0-autoload.x86_64                               3.0.4-10.el7                               base
mpich-3.0-devel.i686                                    3.0.4-10.el7                               base
mpich-3.0-devel.x86_64                                  3.0.4-10.el7                               base
mpich-3.0-doc.noarch                                    3.0.4-10.el7                               base
mpich-3.2.i686                                          3.2-2.el7                                  base
mpich-3.2.x86_64                                        3.2-2.el7                                  base
mpich-3.2-autoload.x86_64                               3.2-2.el7                                  base
mpich-3.2-devel.i686                                    3.2-2.el7                                  base
mpich-3.2-devel.x86_64                                  3.2-2.el7                                  base
mpich-3.2-doc.noarch                                    3.2-2.el7                                  base
2.安装最新版
[mindle@node1 ~]$ sudo yum install mpich-3.2*
3.安装完成后,重载系统的环境变量,使得 mpicc mpirun mpiexec 命令马上生效
[mindle@node1 ~]$ sudo source /etc/profile
4.测试安装成功
[mindle@node1 ~]$ mpicc
Error: Command line argument is needed!
我们在 master 的共享文件夹 /mpi_cloud 中新建测试程序 /mpi_cloud/hello.c:
#include 编译程序,并单机测试:
# 编译程序
[mindle@master mpi_cloud ]$ mpicc hello.c
[mindle@master mpi_cloud ]$ ll
-rwxrwxr-x. 1 mindle mindle 12688 Nov 26 16:49 a.out
-rw-r--r--. 1 mindle mindle   624 Nov 26 16:40 hello.c
# 单机测试
[mindle@master  mpi_cloud ]$ mpirun -n 2 ./a.out
Hello World! Process 0 of 2 on master.cluster
Hello World! Process 1 of 2 on master.cluster
在集群中测试:
前提:
- 所有虚拟机都已经安装 MPICH
- 所有 node 和 master 可以 ssh 无密连接
# 方式一:使用 --host 指定 IP
[mindle@master mpi_cloud]$ mpirun -n 2 --hosts master,node1 ./a.out
Hello World! Process 0 of 2 on master.cluster
Hello World! Process 1 of 2 on node1.cluster

# 方式二:使用 -f 指定保存集群 IP 的文件
[mindle@master mpi_cloud]$ vim mpi_file
master
node1
node2
node3
[mindle@master mpi_cloud]$ mpirun -n 4 -f mpi_file /mpi_cloud/a.out
Hello World! Process 0 of 4 on master.cluster
Hello World! Process 1 of 4 on node1.cluster
Hello World! Process 2 of 4 on node2.cluster
Hello World! Process 3 of 4 on node3.cluster

