kmeans目标框聚类方法整理与实现(附散点密度图可视化)
kmeans目标框聚类方法及其散点密度图可视化
- 1.kmeans目标框聚类方法实现
- 1.1新建kmeans.py文件
- 1.2同目录下新建example.py
- 2.散点密度图可视化聚类结果(附matplotlib无法输出中文的解决方法)。
- 3.解决matplotlib无法输出中文的问题。
- 3.1下载一款自己喜欢的中文字体包(ttf格式)
- 3.2修改配置文件matplotlibrc
- 3.3将下载的字体放到matplotlib存放字体的文件夹下。
- 3.4删除matplotlib缓存文件
- reference
1.kmeans目标框聚类方法实现
参考 蝴蝶飞啊飞啊π博主的博客,实现聚类。
1.1新建kmeans.py文件
kmeans.py代码如下:
# -*- coding: utf-8 -*-
import numpy as np


def iou(box, clusters):
    """
    Calculates the Intersection over Union (IoU) between a box and k clusters.
    :param box: tuple or array, shifted to the origin (i. e. width and height)
    :param clusters: numpy array of shape (k, 2) where k is the number of clusters
    :return: numpy array of shape (k, 0) where k is the number of clusters
    """
    x = np.minimum(clusters[:, 0], box[0])
    y = np.minimum(clusters[:, 1], box[1])
    if np.count_nonzero(x == 0) > 0 or np.count_nonzero(y == 0) > 0:
        raise ValueError("Box has no area")

    intersection = x * y
    box_area = box[0] * box[1]
    cluster_area = clusters[:, 0] * clusters[:, 1]

    iou_ = intersection / (box_area + cluster_area - intersection)

    return iou_


def avg_iou(boxes, clusters):
    """
    Calculates the average Intersection over Union (IoU) between a numpy array of boxes and k clusters.
    :param boxes: numpy array of shape (r, 2), where r is the number of rows
    :param clusters: numpy array of shape (k, 2) where k is the number of clusters
    :return: average IoU as a single float
    """
    return np.mean([np.max(iou(boxes[i], clusters)) for i in range(boxes.shape[0])])

def translate_boxes(boxes):
    """
    Translates all the boxes to the origin.
    :param boxes: numpy array of shape (r, 4)
    :return: numpy array of shape (r, 2)
    """
    new_boxes = boxes.copy()
    for row in range(new_boxes.shape[0]):
        new_boxes[row][2] = np.abs(new_boxes[row][2] - new_boxes[row][0])
        new_boxes[row][3] = np.abs(new_boxes[row][3] - new_boxes[row][1])
    return np.delete(new_boxes, [0, 1], axis=1)


def kmeans(boxes, k, dist=np.median):
    """
    Calculates k-means clustering with the Intersection over Union (IoU) metric.
    :param boxes: numpy array of shape (r, 2), where r is the number of rows
    :param k: number of clusters
    :param dist: distance function
    :return: numpy array of shape (k, 2)
    """
    rows = boxes.shape[0]

    distances = np.empty((rows, k))
    last_clusters = np.zeros((rows,))

    np.random.seed()
    clusters = boxes[np.random.choice(rows, k, replace=False)]
    while True:
        for row in range(rows):
            distances[row] = 1 - iou(boxes[row], clusters)
        nearest_clusters = np.argmin(distances, axis=1)
        if (last_clusters == nearest_clusters).all():
            break
        for cluster in range(k):
            clusters[cluster] = dist(boxes[nearest_clusters == cluster], axis=0)
        last_clusters = nearest_clusters

    return clusters
1.2同目录下新建example.py
# -*- coding: utf-8 -*-
import glob
import xml.etree.ElementTree as ET
import matplotlib.pyplot as plt
import numpy as np

from kmeans import kmeans, avg_iou

ANNOTATIONS_PATH = "/home/***/data/VOCdevkit/mydataset/Annotations/xml"#xml标签文件路径
CLUSTERS = 9 #要聚类的目标框数

def load_dataset(path):
  dataset = []
  x_l = []
  y_l = []
  for xml_file in glob.glob("{}/*xml".format(path)):
    tree = ET.parse(xml_file)

    height = int(tree.findtext("./size/height"))
    width = int(tree.findtext("./size/width"))

    for obj in tree.iter("object"):
      name = obj.findtext("name")
      if name == "plane":  #此处是只进行‘plane’的目标框聚类,如需聚类所有目标框可以不进行此处判断
      #xmin = float(obj.findtext("bndbox/xmin")) / width #因为我用的是遥感图像,图像尺寸太大,进行图像归一化后目标框太小,故未进行图像归一化。此处可按自己需求自行设置
      #ymin = float(obj.findtext("bndbox/ymin")) / height
      #xmax = float(obj.findtext("bndbox/xmax")) / width
      #ymax = float(obj.findtext("bndbox/ymax")) / height
         xmin = float(obj.findtext("bndbox/xmin"))
         ymin = float(obj.findtext("bndbox/ymin"))
         xmax = float(obj.findtext("bndbox/xmax"))
         ymax = float(obj.findtext("bndbox/ymax"))
         if xmax == xmin or ymax == ymin:
            print(xml_file)
         dataset.append([xmax - xmin, ymax - ymin])
  return np.array(dataset)

if __name__ == '__main__':
  #print(__file__)
  data = load_dataset(ANNOTATIONS_PATH)
  out = kmeans(data, k=CLUSTERS)
  #clusters = [[10,13],[16,30],[33,23],[30,61],[62,45],[59,119],[116,90],[156,198],[373,326]]
  #out= np.array(clusters)/416.0
  print(out)
  print("Accuracy: {:.2f}%".format(avg_iou(data, out) * 100))
  print("Boxes:\n {}-{}".format(out[:, 0], out[:, 1]))

  ratios = np.around(out[:, 0] / out[:, 1], decimals=2).tolist()
  print("Ratios:\n {}".format(sorted(ratios)))
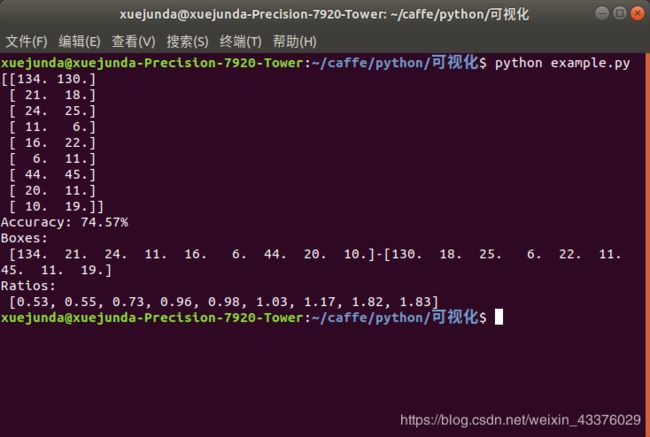
此算法在07数据集上的聚类结果可以达到论文中67.2%的水平,在此就不作展示了。在自己的数据集上聚类看一下结果:

我的数据集是挑选了DOTAv1.5数据集中的飞机、小汽车(sv)、大汽车(lv)三类组成的数据集,可能是类别比较少,聚类结果可以达到74.57%。
2.散点密度图可视化聚类结果(附matplotlib无法输出中文的解决方法)。
散点密度图可视化代码如下:
# -*- coding: utf-8 -*-
import glob
from matplotlib.colors import LogNorm
import xml.etree.ElementTree as ET
import matplotlib.pyplot as plt
import numpy as np
import sys
reload(sys)
sys.setdefaultencoding('utf-8')

plt.rcParams['font.sans-serif'] = ['YaHei Consolas Hybrid']#解决matplotlib无法输出中文,后面有教程
plt.rcParams['axes.unicode_minus']=False

ANNOTATIONS_PATH = "/home/***/data/VOCdevkit/mydataset/Annotations/xml"#xml样本标签数据路径

def load_dataset(path):
  data = []
  plane = []
  sv = []
  ls = []
  kuang = []
  x = [134,21,24,11,16,6,44,20,10]
  y = [130,18,25,6,22,11,45,11,19]#kmeans聚类结果
  for xml_file in glob.glob("{}/*xml".format(path)):
    tree = ET.parse(xml_file)
    filename = tree.findtext("filename")
    height = int(tree.findtext("./size/height"))
    width = int(tree.findtext("./size/width"))

    for obj in tree.iter("object"):
      name = obj.findtext("name")
      xmin = float(obj.findtext("bndbox/xmin"))
      ymin = float(obj.findtext("bndbox/ymin"))
      xmax = float(obj.findtext("bndbox/xmax"))
      ymax = float(obj.findtext("bndbox/ymax"))
      kuang.append([xmax - xmin, ymax - ymin])
      if xmax == xmin or ymax == ymin:
         print(xml_file)#上述为所有目标框一起可视化出来,下面是按类别可视化
      if name == "plane":
         xmin = float(obj.findtext("bndbox/xmin"))
         ymin = float(obj.findtext("bndbox/ymin"))
         xmax = float(obj.findtext("bndbox/xmax"))
         ymax = float(obj.findtext("bndbox/ymax"))
         plane.append([xmax - xmin, ymax - ymin])
         if xmax == xmin or ymax == ymin:
            print(xml_file)
      if name == "small-vehicle":
         xmin = float(obj.findtext("bndbox/xmin"))
         ymin = float(obj.findtext("bndbox/ymin"))
         xmax = float(obj.findtext("bndbox/xmax"))
         ymax = float(obj.findtext("bndbox/ymax"))
         sv.append([xmax - xmin, ymax - ymin])
         if xmax == xmin or ymax == ymin:
            print(xml_file)
      if name == "large-vehicle":
         xmin = float(obj.findtext("bndbox/xmin"))
         ymin = float(obj.findtext("bndbox/ymin"))
         xmax = float(obj.findtext("bndbox/xmax"))
         ymax = float(obj.findtext("bndbox/ymax"))
         ls.append([xmax - xmin, ymax - ymin])
         if xmax == xmin or ymax == ymin:
            print(xml_file)

  pl = np.array(plane)
  sv1 = np.array(sv)
  ls1 = np.array(ls)
  kuang1 = np.array(kuang)

  plt.figure(1)
  plt.xlabel(u'X(像素)')
  plt.ylabel(u'Y(像素)')
  plt.title(u'plane')
  plt.hist2d(pl[:,0],pl[:,1], bins=400, norm=LogNorm())#画散点密度图
  plt.colorbar()
  #plt.scatter(pl[:,0],pl[:,1],s=2, c='k',marker = ".",alpha=0.4)
  plt.scatter(x,y,s=2,marker = '.',c = 'r',alpha=0.4)
  plt.savefig(r'pl.png', dpi=300)
  plt.close(1)

  plt.figure(2)
  plt.xlabel(u'X(像素)')
  plt.ylabel(u'Y(像素)')
  plt.title(u'small-vehicle')
  plt.hist2d(sv1[:,0],sv1[:,1], bins=40, norm=LogNorm())
  plt.colorbar()
  #plt.scatter(sv1[:,0],sv1[:,1],s=2 ,c='k',marker = ".",alpha=0.8)
  plt.scatter(x,y,s=20,marker = '.',c = 'r',alpha=0.4)
  plt.savefig(r'sv.png', dpi=300)
  plt.close(2)

  plt.figure(3)
  plt.xlabel(u'X(像素)')
  plt.ylabel(u'Y(像素)')
  plt.title(u'large-vehicle')
  plt.hist2d(ls1[:,0],ls1[:,1], bins=40, norm=LogNorm())
  plt.colorbar()
  #plt.scatter(ls1[:,0],ls1[:,1], s=2,c='k',marker = ".",alpha=0.4)
  plt.scatter(x,y,s=20,marker = '.',c = 'r',alpha=0.4)
  plt.savefig(r'lv.png', dpi=300)
  plt.close(3)

  plt.figure(4)
  plt.xlabel(u'X(像素)')
  plt.ylabel(u'Y(像素)')
  plt.title(u'所有目标框')
  plt.hist2d(kuang1[:,0],kuang1[:,1], bins=400, norm=LogNorm())
  plt.colorbar()
  #plt.scatter(ls1[:,0],ls1[:,1], s=2,c='k',marker = ".",alpha=0.4)
  plt.scatter(x,y,s=2,marker = '.',c = 'r',alpha=0.4)
  plt.savefig(r'all.png', dpi=300)
  plt.close(4)

if __name__ == '__main__':
  data = load_dataset(ANNOTATIONS_PATH)
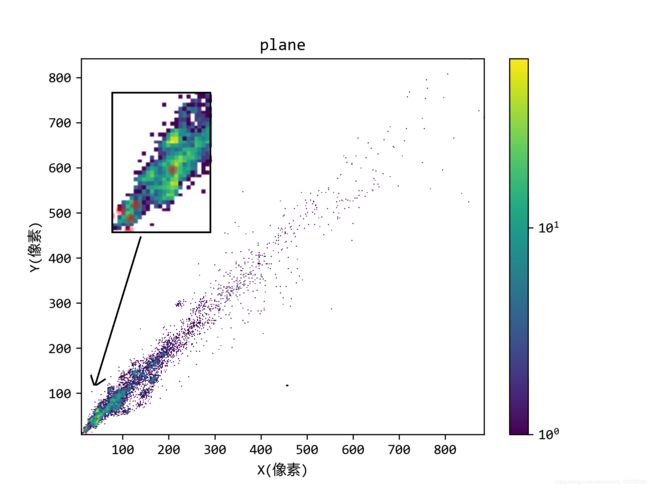
我画的结果图如下


 由于小汽车(sv)样本数量太多,所以9个聚类中心有7个是围绕小汽车的。
3.解决matplotlib无法输出中文的问题。
3.1下载一款自己喜欢的中文字体包(ttf格式)
我找了许久黑体和宋体,无果。但找到一款雅黑,将就吧。
YaHeiConsolas 密码: kd6d
3.2修改配置文件matplotlibrc
在终端查找matplotlibrc文件的地址
python
import matplotlib
print(matplotlib.matplotlib_fname())
我的文件路径为:/home/xuejunda/.local/lib/python2.7/site-packages/matplotlib/mpl-data/matplotlibrc
这是一个包含隐藏文件的路径,可以通过Ctrl+H快捷键来显示隐藏文件,找到matplotlibrc后打开。定位到193行左右,修改为:
#font.family         : sans-serif
#font.sans-serif     : YaHei Consolas Hybrid
#axes.unicode_minus  : False
第二行为下载的ttf格式字体包中字体的名称(不是ttf文件名!!!),可以打开ttf文件之后在右上角信息中查看。

3.3将下载的字体放到matplotlib存放字体的文件夹下。
路径寻找以此为例:
上一步配置文件的路径为:/home/xuejunda/.local/lib/python2.7/site-packages/matplotlib/mpl-data/matplotlibrc
matplotlib存放字体的文件夹路径:/home/xuejunda/.local/lib/python2.7/site-packages/matplotlib/mpl-data/fonts/ttf
此路径下应该有众多ttf文件,将下载的中文字体包复制到此文件夹下。
3.4删除matplotlib缓存文件
在主目录下搜索.cache文件夹,删掉里面的matplotlib文件夹
至此,matplotlib配置中文字体就算是大功告成了,在代码中加入以下两行即可:
plt.rcParams['font.sans-serif'] = ['YaHei Consolas Hybrid']
plt.rcParams['axes.unicode_minus']=False
reference
[1]https://blog.csdn.net/zuliang001/article/details/90551798
[2]https://blog.csdn.net/cgt19910923/article/details/82154401
[3]https://cloud.tencent.com/developer/article/1466183