bochs运行bootloader的流程
创建虚拟软盘镜像文件
安装好bochs软件后, 自带也安装了bximage工具,通过bximage工具,可以创建虚拟软盘或者硬盘镜像文件。
bximage创建虚拟软件镜像文件的步骤如下
输入 bximage 命令
该命令输出如下信息
========================================================================
                                bximage
  Disk Image Creation / Conversion / Resize and Commit Tool for Bochs
         $Id: bximage.cc 13481 2018-03-30 21:04:04Z vruppert $
========================================================================

1. Create new floppy or hard disk image
2. Convert hard disk image to other format (mode)
3. Resize hard disk image
4. Commit 'undoable' redolog to base image
5. Disk image info

0. Quit

Please choose one [0] 1
输入数字 1,此时输出如下信息
Create image

Do you want to create a floppy disk image or a hard disk image?
Please type hd or fd. [hd] fd
输入 fd, 表示创建软盘镜像文件。若创建硬盘镜像文件,则输入 hd
此时输出如下信息
Choose the size of floppy disk image to create.
Please type 160k, 180k, 320k, 360k, 720k, 1.2M, 1.44M, 1.68M, 1.72M, or 2.88M.
 [1.44M] 1.44M
输入 1.44M, 由于此时默认就是1.44M,可以不用输入1.44M。1.44MB表示创建的软盘镜像文件的容量大小。
此时输出如下信息
What should be the name of the image?
[a.img] kernel.img
输入要创建的软盘镜像文件名, 自取一个即可。此处输入 kernel.img,
此时输出如下信息
What should be the name of the image?
[a.img] kernel.img

Creating floppy image 'kernel.img' with 2880 sectors

The following line should appear in your bochsrc:
  floppya: image="kernel.img", status=inserted
这样就创建好了软盘镜像文件,上面的输出显示出创建的虚拟软盘的总扇区数(2880)等信息.
另外,最后一行
floppya: image=“kernel.img”, status=inserted
用于告诉用户在bochs虚拟平台环境配置信息中如何把虚拟软盘文件加入配置文件中。
bochs虚拟平台运行环境
bochs软件安装好后,需要创建虚拟的硬件运行环境。 在bochs中是通过配置文件来对运行的硬件环境进行描述和配置。在bochs安装源代码目录下已提供了一个默认的系统环境配置文件 .bochsrc。具体文件如下:
wxer@wxer:~/os_dev/bochs/bochs-2.6.11$ ls -al
......
-rw-r--r--  1 wxer wxer    60680 12月 29 15:20 .bochsrc
......
-rw-r--r--  1 wxer wxer    26428 2月   8  2009 COPYING
drwxr-xr-x  6 wxer wxer     4096 5月  18 22:43 cpu
-rw-r--r--  1 wxer wxer     2154 9月  25  2019 cpudb.h
-rw-r--r--  1 wxer wxer     2302 4月   3  2011 crc.cpp
......
根据该配置文件,创建一个运行kernel的硬件运行环境配置文件,如下:
# configuration file generated by Bochs
plugin_ctrl: unmapped=1, biosdev=1, speaker=1, extfpuirq=1, parallel=1, serial=1, iodebug=1
config_interface: textconfig
display_library: x
#memory: host=2048, guest=2048
romimage: file="/home/wxer/opt/bochs/share/bochs/BIOS-bochs-latest"
vgaromimage: file="/home/wxer/opt/bochs/share/bochs/VGABIOS-lgpl-latest"
boot: floppy
floppy_bootsig_check: disabled=0
floppya: type=1_44, 1_44="kernel.img", status=inserted, write_protected=0
# no floppyb
ata0: enabled=1, ioaddr1=0x1f0, ioaddr2=0x3f0, irq=14
ata0-master: type=none
ata0-slave: type=none
ata1: enabled=1, ioaddr1=0x170, ioaddr2=0x370, irq=15
ata1-master: type=none
ata1-slave: type=none
ata2: enabled=0
ata3: enabled=0
pci: enabled=1, chipset=i440fx
vga: extension=vbe, update_freq=5

cpu: count=1:1:1, ips=4000000, quantum=16, model=corei7_haswell_4770, reset_on_triple_fault=1, cpuid_limit_winnt=0, ignore_bad_msrs=1, mwait_is_nop=0, msrs="msrs.def"

cpuid: x86_64=1,level=6, mmx=1, sep=1, simd=avx512, aes=1, movbe=1, xsave=1,apic=x2apic,sha=1,movbe=1,adx=1,xsaveopt=1,avx_f16c=1,avx_fma=1,bmi=bmi2,1g_pages=1,pcid=1,fsgsbase=1,smep=1,smap=1,mwait=1,vmx=1
cpuid: family=6, model=0x1a, stepping=5, vendor_string="GenuineIntel", brand_string="Intel(R) Core(TM) i7-4770 CPU (Haswell)"

print_timestamps: enabled=0
debugger_log: -
magic_break: enabled=0
port_e9_hack: enabled=0
private_colormap: enabled=0
clock: sync=none, time0=local, rtc_sync=0
# no cmosimage
# no loader
log: -
logprefix: %t%e%d
debug: action=ignore
info: action=report
error: action=report
panic: action=ask
keyboard: type=mf, serial_delay=250, paste_delay=100000, user_shortcut=none
mouse: type=ps2, enabled=0, toggle=ctrl+mbutton
speaker: enabled=1, mode=system
parport1: enabled=1, file=none
保存为 bochsrc
bochs启动bootloader
编译简单的bootloader程序,只显示一个字符串,代码如下
org 0x7c00
BaseOfStack equ 0x7c00
Label_Start:
mov ax, cs
mov ds, ax
mov es, ax
mov ss, ax
mov sp, BaseOfStack
;======= clear screen
mov ax, 0600h
mov bx, 0700h
mov cx, 0
mov dx, 0184fh
int 10h
;======= set focus
mov ax, 0200h
mov bx, 0000h
mov dx, 0000h
int 10h
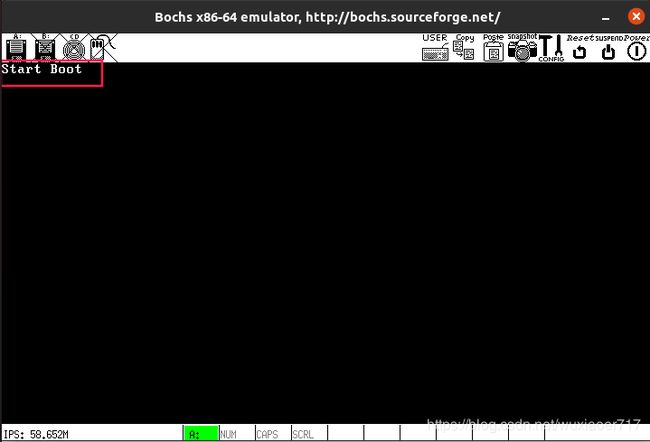
;======= display on screen : Start Booting......
mov ax, 1301h
mov bx, 000fh
mov dx, 0000h
mov cx, 10
push ax
mov ax, ds
mov es, ax
pop ax
mov bp, StartBootMessage
int 10h
;======= reset floppy
xor ah, ah
xor dl, dl
int 13h
jmp $
StartBootMessage: db "Start Boot"
;======= fill zero until whole sector
times 510 - ($ - $$) db 0
dw 0xaa55
编译
nasm boot.asm -o boot.bin
写入虚拟软盘
dd if=boot.bin of=kernel.img bs=512 count=1 conv=notrunc
运行
bochs -f bochsrc
结果如下图